Manual Pengguna
![]()
VLVWIP2000-ENC
VLVWIP2000-DEC
Pengekod dan Penyahkod AVoIP JPEG2000

Hak Cipta Terpelihara
Version: VLVWIP2000-ENC_2025V1.0
Version: VLVWIP2000-DEC_2025V1.0
![]()
Pengekod dan Penyahkod AVoIP JPEG2000
Mukadimah
Baca manual pengguna ini dengan teliti sebelum menggunakan produk. Gambar yang ditunjukkan dalam manual ini adalah untuk rujukan sahaja. Model dan spesifikasi yang berbeza tertakluk kepada produk sebenar.
Manual ini hanya untuk arahan operasi, sila hubungi pengedar tempatan untuk bantuan penyelenggaraan. Dalam usaha berterusan untuk menambah baik produk, kami berhak untuk membuat perubahan fungsi atau parameter tanpa notis atau kewajipan. Sila rujuk kepada pengedar untuk butiran terkini.
Penyata FCC
Peralatan ini menjana, menggunakan dan boleh memancarkan tenaga frekuensi radio dan, jika tidak dipasang dan digunakan mengikut arahan, boleh menyebabkan gangguan berbahaya kepada komunikasi radio. Ia telah diuji dan didapati mematuhi had untuk peranti digital Kelas B, menurut bahagian 15 Peraturan FCC. Had ini direka bentuk untuk memberikan perlindungan yang munasabah terhadap gangguan berbahaya dalam pemasangan komersial.
Pengendalian peralatan ini di kawasan perumahan berkemungkinan menyebabkan gangguan, dalam hal ini pengguna atas perbelanjaan mereka sendiri akan dikehendaki mengambil apa-apa langkah yang mungkin perlu untuk membetulkan gangguan tersebut.
Sebarang perubahan atau pengubahsuaian yang tidak diluluskan secara nyata oleh pengilang akan membatalkan kuasa pengguna untuk mengendalikan peralatan.
![]()

![]()
![]()
LANGKAH BERJAGA-JAGA KESELAMATAN
Untuk memastikan prestasi terbaik daripada produk, sila baca semua arahan dengan teliti sebelum menggunakan peranti. Simpan manual ini untuk rujukan selanjutnya.
- Buka bungkusan peralatan dengan berhati-hati dan simpan kotak asal dan bahan pembungkusan untuk kemungkinan penghantaran akan datang.
- Ikuti langkah berjaga-jaga keselamatan asas untuk mengurangkan risiko kebakaran, kejutan elektrik dan kecederaan kepada orang.
- Jangan bongkar perumah atau ubah suai modul. Ia boleh mengakibatkan kejutan elektrik atau terbakar.
- Menggunakan bekalan atau bahagian yang tidak memenuhi spesifikasi produk boleh menyebabkan kerosakan, kemerosotan atau pincang fungsi.
- Rujuk semua servis kepada kakitangan perkhidmatan yang berkelayakan.
- Untuk mengelakkan bahaya kebakaran atau kejutan, jangan dedahkan unit kepada hujan, lembapan atau pasang produk ini berhampiran air.
- Jangan letakkan sebarang barang berat pada kabel sambungan sekiranya berlaku penyemperitan.
- Jangan tanggalkan perumah peranti kerana membuka atau menanggalkan perumah boleh mendedahkan anda kepada voltage atau bahaya lain.
- Pasang peranti di tempat yang mempunyai pengudaraan yang baik untuk mengelakkan kerosakan yang disebabkan oleh terlalu panas.
- Jauhkan modul daripada cecair.
- Tumpahan ke dalam perumahan boleh mengakibatkan kebakaran, kejutan elektrik atau kerosakan peralatan. Jika objek atau cecair jatuh atau tertumpah ke perumah, cabut palam modul dengan segera.
- Jangan putar atau tarik hujung kabel optik secara paksa. Ia boleh menyebabkan kerosakan.
- Jangan gunakan cecair atau pembersih aerosol untuk membersihkan unit ini. Sentiasa cabut plag kuasa pada peranti sebelum membersihkan.
- Cabut palam kord kuasa apabila dibiarkan tidak digunakan untuk jangka masa yang lama.
- Maklumat tentang pelupusan untuk peranti yang dilupuskan: jangan bakar atau campurkan dengan sisa rumah umum, sila anggap ia sebagai sisa elektrik biasa.
Terima kasih kerana membeli produk ini
Untuk prestasi dan keselamatan optimum, sila baca arahan ini dengan teliti sebelum menyambung, mengendalikan atau melaraskan produk ini. Sila simpan manual ini untuk rujukan masa hadapan.
Peranti perlindungan lonjakan disyorkan
Produk ini mengandungi komponen elektrik sensitif yang mungkin rosak akibat pancang elektrik, lonjakan, renjatan elektrik, serangan lampu, dsb. Penggunaan sistem perlindungan lonjakan amat disyorkan untuk melindungi dan memanjangkan hayat peralatan anda.
1. Pengenalan
This product is based on JPEG2000 technology. It integrates Copper port and Fiber port within a single box. Encoder input supports up to 4K60 4:4:4, audio embedding or extracting. Decoder output supports up to 4K60 4:4:4, audio extracting. The product supports ARC/eARC/S/PDIF/Analog audio return function, also supports USB2.0/KVM/Camera, 1G Ethernet, bidirectional RS-232, two-way IR and POE function. Guest mode controls of RS-232, IR, CEC are supported. Built-in two channel RELAY ports and two channel I/O ports for contact control. Dante AV-A mode is supported if the product is license activated.
Substream MJPEG terbina dalam yang menyokong banyak arahan API untuk mencapai konfigurasi fleksibel berguna untuk aplikasi kawalan pihak ke-3 sebelumview kandungan video.
Sistem ini berasaskan Linux untuk pembangunan perisian, menyediakan kaedah kawalan yang fleksibel, yang berdasarkan rangkaian pintar Suis Ethernet 1G.
2. Ciri-ciri
☆ mematuhi HDCP 2.2
☆ Menyokong lebar jalur video 18Gbps
☆ Input and output video resolution is up to 4K60 4:4:4, as specified in HDMI 2.0b
☆ Jarak penghantaran isyarat boleh dilanjutkan sehingga 328 kaki / 100m melalui kabel CAT5E/6/6A/7
☆ Transmit video, analog/digital audio, IR , RS-232, CEC and USB over Ethernet
☆ Integrasikan port Copper dan port Fiber dalam satu kotak
☆ ARC/eARC/S/PDIF/Analog audio return function
☆ Dante AV-A mode is supported if license activated
☆ Konfigurasi saluran melalui butang panel hadapan dan skrin LED
☆ Built-in two channel RELAY ports and two channel I/O ports for contact control
☆ Menyokong fungsi unicast dan multicast
☆ Menyokong fungsi titik-ke-titik, matriks video dan dinding video (dinding video menyokong sehingga 9×9)
☆ Pengurusan kelas dinding video pintar
☆ Sokong MJPEG Substream pra masa nyataview
☆ Suis Ethernet 1G
☆ Menyokong fungsi POE
☆ Terbina dalam web konfigurasi dan kawalan halaman, Telnet dan SSH juga
☆ Format audio HDMI: LPCM 2.0/5.1/7.1CH, Dolby Digital/Plus/EX, Dolby True HD, DTS, DTS-96/24, DTS-EX DSD, DTS High Res, DTS-HD Master
☆ Reka bentuk rangkaian pintar untuk pemasangan yang mudah dan fleksibel
3. Kandungan Pakej
| Kuantiti | item |
| 1 | 4K60 melalui Pengekod IP 1GbE |
| 1 | Kabel Penerima IR (1.5 meter) |
| 1 | Kabel IR Blaster (1.5 meter) |
| 3 | Penyambung Phoenix 3-pin 3.81mm |
| 2 | Penyambung Phoenix 4-pin 3.81mm |
| 1 | Penyesuai Kuasa Mengunci 12V/2.5A |
| 2 | Melekap telinga |
| 4 | Skru mesin (KM3*4) |
| 1 | Manual Pengguna |
or
| Kuantiti | item |
| 1 | 4K60 melalui Penyahkod IP 1GbE |
| 1 | Kabel Penerima IR (1.5 meter) |
| 1 | Kabel IR Blaster (1.5 meter) |
| 3 | Penyambung Phoenix 3-pin 3.81mm |
| 2 | Penyambung Phoenix 4-pin 3.81mm |
| 1 | Penyesuai Kuasa Mengunci 12V/2.5A |
| 2 | Melekap telinga |
| 4 | Skru mesin (KM3*4) |
| 1 | Manual Pengguna |
4. Spesifikasi
Teknikal
| Mematuhi HDMI | HDMI 2.0b |
| Mematuhi HDCP | HDCP 2.2 |
| Bandwidth Video | 18Gbps |
| Standard Pemampatan Video | JPEG2000 |
| Jalur Lebar Rangkaian Video | 1G |
| Resolusi Video | Sehingga 4K@60Hz 4:4:4 |
| Kedalaman Warna | Input: 8/10/12-bit Output: 8-bit |
| Ruang Warna | RGB 4:4:4, YCbCr 4:4:4 / 4:2:2 / 4:2:0 |
| Format Audio HDMI | LPCM 2.0/5.1/7.1CH, Dolby Digital/Plus/EX, Dolby True HD, DTS, DTS-96/24, DTS-EX DSD, DTS High Res, DTS-HD Master |
| Jarak Penghantaran | 100M CAT5E/6/6A/7 |
| Tahap IR | 12V lalai, 5V pilihan |
| Kekerapan IR | Wideband 20K – 60KHz |
| Perlindungan ESD | IEC 61000-4-2: ±8kV (pelepasan celah udara) & ±4kV (Nyahcas sesentuh) |
Sambungan
| Pengekod | Input: 1 x HDMI IN [Type A, 19-pin female] 1 x L/R AUDIO IN [3-pin 3.81mm Phoenix connector] Output: 1 x HDMI OUT [Type A, 19-pin female] 1 x L/R AUDIO OUT [3-pin 3.81mm Phoenix connector] 1 x SPDIF OUT [Optical audio connector] Control: 1 x RS-232 [3-pin 3.81mm Phoenix connector] 1 x LAN (POE) [RJ45 jack] 1 x FIBER [Optical fiber slot] 1 x USB 2.0 HOST [Type B, 4-pin female] 2 x USB 2.0 DEVICE [Type-A, 4pin female] 2 x RELAYS [3.81mm Phoenix connector] 2 x DIGITAL IO [3.81mm Phoenix connector] 1 x IR IN [3.5mm Audio Jack] 1 x IR OUT [3.5mm Audio Jack] |
| Penyahkod | Input: 1 x SPDIF IN [Optical audio connector] 1 x L/R AUDIO IN [3-pin 3.81mm Phoenix connector] Output: 1 x HDMI OUT [Type A, 19-pin female] 1 x L/R AUDIO OUT [3-pin 3.81mm Phoenix connector] Control: 1 x RS-232 [3.81mm Phoenix connector] 1 x LAN (POE) [RJ45 jack] 1 x FIBER [Optical fiber slot] 2 x USB 1.1 DEVICE [Type-A, 4-pin female] 2 x USB 2.0 DEVICE [Type-A, 4-pin female] 2 x RELAYS [3.81mm Phoenix connector] 2 x DIGITAL IO [3.81mm Phoenix connector] 1 x IR IN [3.5mm Audio Jack] 1 x IR OUT [3.5mm Audio Jack] |
mekanikal
| Perumahan | Kepungan logam |
| warna | Hitam |
| Dimensi | Pengekod/Penyahkod: 204mm [W] x 136mm [D] x 25.5mm [H] |
| Berat badan | Pengekod: 631g, Penyahkod: 626g |
| Bekalan Kuasa | Input: AC100 – 240V 50/60Hz, Output: DC 12V/2.5A (standard AS/EU, diperakui CE/FCC/UL) |
| Penggunaan Kuasa | Pengekod: 8.52W, Penyahkod: 7.08W (Maks.) |
| Suhu Operasi | 32 - 104 ° F / 0 - 40 ° C |
| Suhu Penyimpanan | -4 - 140 ° F / -20 - 60 ° C |
| Kelembapan Relatif | 20 – 90% RH (tiada pemeluwapan) |
| Resolusi / Panjang Kabel | 4K60 - Kaki / Meter | 4K30 - Kaki / Meter | 1080P60 – Kaki / Meter |
| HDMI DALAM / KELUAR | 16 kaki / 5 Juta | 32 kaki / 10 Juta | 50 kaki / 15 Juta |
| Penggunaan kabel "Premium High Speed HDMI" sangat disyorkan. | |||
5. Kawalan dan Fungsi Operasi
5.1 Panel Pengekod


| Tidak. | Nama | Penerangan Fungsi |
| 1 | TETAP SEMULA | Selepas menghidupkan peranti, tekan dan tahan butang RESET sehingga POWER LED dan LINK LED berkelip pada masa yang sama, lepaskan butang untuk menetapkan semula peranti kepada tetapan kilang. |
| 2 | LED KUASA (Merah) |
|
| 3 | LED LINK (Hijau) | LED status sambungan.
|
| 4 | Skrin LED | Menunjukkan ID Pengekod sebagai lalai. Memaparkan pilihan fungsi konfigurasi yang sepadan semasa menetapkan konfigurasi Pengekod. |
| 5 | CH PILIH | Digunakan untuk menetapkan ID Pengekod dan tetapan lain. |
| 6 | PERANTI USB 2.0 | Sambung ke peranti USB 2.0. |
| 7 | HOST USB | Penyambung USB-B untuk menyambungkan PC. |
| 8 | IR KELUAR | Port keluaran isyarat IR. Aras IR boleh ditetapkan kepada 5V atau 12V (lalai) melalui butang panel. |
| 9 | IR DALAM | Port input isyarat IR. Aras IR boleh ditetapkan kepada 5V atau 12V (lalai) melalui butang panel. |
| 10 | Relays I DIGITAL IO | VCC: Power output (12V or 5V configurable), maximum to 12V @50mA, 5V@ 100mA loading. The default output is 12V. Relay: 2 saluran vol rendahtage port geganti, setiap kumpulan adalah bebas dan terpencil, maksimum kepada 1A 30VDC pemuatan. Kenalan diputuskan secara lalai. DIGITAL IO: Port GPIO 2 saluran, untuk kawalan keluaran isyarat tahap digital atau pengesanan input (sehingga pengesanan tahap 12V). Mod kawalan output (mod lalai, tahap rendah sebagai output lalai) atau mod pengesanan input boleh dikonfigurasikan. Tarik naik dalaman DIGITAL IO voltage mengikuti VCC. Mod kawalan output: a. Arus sinki tahan maksimum ialah 50mA apabila mengeluarkan tahap rendah. b. Apabila VCC ialah 5V dan tahap tinggi dikeluarkan, kapasiti pemanduan arus maksimum ialah 2mA. c. Apabila VCC ialah 12V dan paras tinggi dikeluarkan, kapasiti pemanduan arus maksimum ialah 5mA. Mod pengesanan input: a. Apabila VCC ialah 5V, DIGITAL IO ditarik sehingga 5V secara dalaman melalui perintang 2.2K ohm. b. Apabila VCC ialah 12V, DIGITAL IO ditarik sehingga 12V secara dalaman melalui perintang 2.2K ohm. |
| 11 | RS-232 | Port bersiri RS-232, menyokong laluan masuk arahan RS-232 dan kawalan port bersiri tempatan. |
| 12 | AUDIO MASUK/KELUAR | AUDIO IN: Analog audio input port, the audio can be embedded into the HDMI signal for pass-through over to HDMI output and audio out on Decoder, or be loop out by the AUDIO OUT port on Encoder. |
| AUDIO OUT: Analog audio output port. It can output the audio extracted from the HDMI IN port (in case of LPCM) . Also it can output the audio transmitted from the AUDIO IN port of the Decoder in unicast mode (point-to-point direct connection). | ||
| 13 | SPDIF KELUAR | S/PDIF signal output port. It can output the ARC or S/PDIF audio returned from the Decoder when both the Encoder and Decoder are correspondingly set to the ARC or S/PDIF audio return mode (Set through the Controller Box or API commands in Multicast mode; Set through the front panel buttons in unicast mode). |
| 14 | HDMI KELUAR | Port output gelung tempatan HDMI, disambungkan ke peranti paparan HDMI seperti TV atau monitor. |
| 15 | HDMI DALAM | Port input isyarat HDMI, disambungkan ke peranti sumber HDMI seperti Pemain Blu-ray atau Set-top box dengan kabel HDMI. |
| 16 | SERAT | Sambungkan dengan modul gentian optik, dan hantar isyarat kepada Penyahkod dengan kabel gentian optik secara terus atau melalui Suis. |
| 17 | LAN (POE) | Port LAN 1G, sambungkan rangkaian Suis untuk membentuk sistem teragih. Nota: Apabila suis rangkaian menghantar bekalan kuasa POE, penyesuai DC 12V tidak perlu digunakan pada unit. |
| 18 | Penunjuk Isyarat Data lamp (Kuning) | Light flashing: There is data transmission. ▪ Light off: There is no data transmission. |
| 19 | Penunjuk Isyarat Pautan lamp (Hijau) | Light on: The network cable is connected normally. ▪ Light off: The network cable is not connected well. |
| 20 | DC 12V | Peranti boleh dikuasakan melalui dua kaedah:
When the Switch supports POE function, DC power supply is not needed. |
Penerangan operasi skrin LED dan butang CH SELECT (Untuk Pengekod).
1, ID ENC: Selepas sistem dihidupkan, skrin LED Pengekod akan menunjukkan ID ENC (000 secara lalai jika tidak ditetapkan).
2, alamat IP: Tekan dan tahan butang UP selama 5 saat, skrin LED Pengekod akan ditunjukkan dalam urutan "IPx", "xxx", "xxx", "xxx", "xxx", yang merupakan mod IP dan alamat IP Pengekod.
3, Mod konfigurasi: Tekan dan tahan butang ATAS + BAWAH pada masa yang sama selama 5 saat, kemudian lepaskan untuk memasuki mod konfigurasi dengan "CFN" dipaparkan pada skrin LED.
4, Tetapan ID peranti: After entering the configuration mode, press the UP/DOWN button to enter the first page with the current ID number (e.g. 001) displaying on the LED screen (000 by default). Press and hold UP + DOWN buttons for 5 seconds, then release to enter the ID settings mode, in which the ID number (e.g. 001) on the LED screen will flash at 1Hz, then press the UP/DOWN button to select the device ID you desired (ID range: 000~762), then press and hold UP + DOWN buttons for 5 seconds to confirm the setting and stop flashing. After setting, the unit will reboot automatically.
Nota: ID peranti tidak boleh diubah suai dalam mod Kotak Pengawal.
5, Tetapan EDID: After entering the configuration mode, press the UP/DOWN button to enter the second page with “E00” (in which “E” refers to EDID, “00” to EDID ID) or “COP” (which indicates copy EDID) displaying on the LED screen (E15 by default).
Press and hold UP + DOWN buttons for 5 seconds, then release to enter the EDID settings mode, in which the EDID ID number (e.g. E01) on the LED screen will flash at 1Hz, then press the UP/DOWN button to select the EDID ID you desired, then press and hold UP + DOWN buttons for 5 seconds to confirm the setting and stop flashing.
ID EDID yang sepadan adalah seperti berikut:
| ID EDID | Penerangan EDID |
| E00 | 1080P_Stereo_Audio_2.0_SDR |
| E01 | 1080P_DolbyDTS_5.1_SDR |
| E02 | 1080P_HD_Audio_7.1_SDR |
| E03 | 1080I_Stereo_Audio_2.0_SDR |
| E04 | 1080I_DolbyDTS_5.1_SDR |
| E05 | 1080I_HD_Audio_7.1_SDR |
| E06 | 3D_Stereo_Audio_2.0_SDR |
| E07 | 3D_DolbyDTS_5.1_SDR |
| E08 | 3D_HD_Audio_7.1_SDR |
| E09 | 4K2K30_444_Stereo_Audio_2.0_SDR |
| E10 | 4K2K30_444_DolbyDTS_5.1_SDR |
| E11 | 4K2K30_444_HD_Audio_7.1_SDR |
| E12 | 4K2K60_420_Stereo_Audio_2.0_SDR |
| E13 | 4K2K60_420_DolbyDTS_5.1_SDR |
| E14 | 4K2K60_420_HD_Audio_7.1_SDR |
| E15 | 4K2K60_444_Stereo_Audio_2.0_SDR |
| E16 | 4K2K60_444_DolbyDTS_5.1_SDR |
| E17 | 4K2K60_444_HD_Audio_7.1_SDR |
| E18 | 4K2K60_444_Stereo_Audio_2.0_HDR_10-bit |
| E19 | 4K2K60_444_DolbyDTS_5.1_HDR_10-bit |
| E20 | 4K2K60_444_HD_Audio_7.1_HDR_10-bit |
| E21 | DVI_1280x1024 |
| E22 | DVI_1920x1080 |
| E23 | DVI_1920x1200 |
Nota: In point to point connection mode, before using the EDID copy function, all codecs need to be set to CA1 unicast mode, and after setting, the HDMI cable of the Decoder needs to be re-plugged to report the EDID of TV to the Encoder.
6, Tetapan mod IR: After entering the configuration mode, press the UP/DOWN button to enter the third page with “IR2” (in which “IR” refers to IR and “2” to 12V) displaying on the LED screen (IR2 by default). Press and hold UP + DOWN buttons for 5 seconds, then release to enter the settings mode, in which the IR mode (IR1 or IR2) on the LED screen will flash at 1Hz, then press the UP/DOWN button to select the IR mode, then press and hold UP + DOWN buttons for 5 seconds to confirm the setting and stop flashing.
The corresponding IR mode options are as follows:
IR1: Wayar IR 5V
IR2: Wayar IR 12V
7, Audio embedding mode settings: After entering the configuration mode, press the UP/DOWN button to enter the fourth page with “HDI/ANA” displaying on the LED screen (HDI by default). Press and hold UP + DOWN buttons for 5 seconds, then release to enter the settings mode, in which the audio return mode (HDI/ANA) on the LED screen will flash at 1Hz, then press the UP/DOWN button to select the mode, then press and hold UP + DOWN buttons for 5 seconds to confirm the setting and stop flashing.
The corresponding audio embedding mode options are as follows:
HDI: HDMI audio embedding
ANA: Analog audio embedding
8, Tetapan mod IP: After entering the configuration mode, press the UP/DOWN button to enter the fifth page with “IP1/IP2/IP3” displaying on the LED screen (IP3 by default).
Press and hold UP + DOWN buttons for 5 seconds, then release to enter the settings mode, in which the IP mode (IP1/IP2/IP3) on the LED screen will flash at 1Hz, then press the UP/DOWN button to select the mode, then press and hold UP + DOWN buttons for 5 seconds to confirm the setting and stop flashing. After setting, the unit will reboot automatically.
The corresponding IP mode options are as follows:
IP1: Static IP mode (Default IP address: 169.254.100.254)
IP2: Mod IP DHCP
IP3: Auto IP mode (Default assigned network segment: 169.254.xxx.xxx)
Note: The IP mode can not be modified in Controller Box mode.
9, Fiber/Copper mode settings: After entering the configuration mode, press the UP/DOWN button to enter the sixth page with “CPP/FIB” displaying on the LED screen (CPP by default). Press and hold UP + DOWN buttons for 5 seconds, then release to enter the settings mode, in which the Fiber/Copper mode (CPP/FIB) on the LED screen will flash at 1Hz, then press the UP/DOWN button to select the mode, then press and hold UP + DOWN buttons for 5 seconds to confirm the setting and stop flashing. After setting, the unit will reboot automatically.
The corresponding Fiber/Copper mode options are as follows:
CPP: Copper mode
FIB: Fiber mode
10, Multicast mode settings: After entering the configuration mode, press the UP/DOWN button to enter the seventh page with “CA1/CA2” displaying on the LED screen (CA1 by default). Press and hold UP + DOWN buttons for 5 seconds, then release to enter the settings mode, in which the multicast mode (CA1/CA2) on the LED screen will flash at 1Hz, then press the UP/DOWN button to select the mode, then press and hold UP + DOWN buttons for 5 seconds to confirm the setting and stop flashing. After setting, the unit will reboot automatically.
The corresponding multicast mode options are as follows:
CA1: Unicast mode
CA2: Multicast mode
11, Tetapan mod pemulangan audio: After entering the configuration mode, press the UP/DOWN button to enter the eighth page with “C2C/A2A” displaying on the LED screen (C2C by default). Press and hold UP + DOWN buttons for 5 seconds, then release to enter the settings mode, in which the audio return mode (C2C/A2A) on the LED screen will flash at 1Hz, then press the UP/DOWN button to select the mode, then press and hold UP + DOWN buttons for 5 seconds to confirm the setting and stop flashing. After setting, the unit will reboot automatically.
The corresponding audio return mode options are as follows:
C2C: The eARC/ARC or S/PDIF audio from the Decoder is transmitted back to the HDMI IN or SPDIF OUT port of the Encoder.
A2A: The analog audio embedded in the Decoder is transmitted back to the AUDIO OUT analog audio port of the Encoder.
Nota:
(1) Mod pemulangan audio tidak boleh diubah suai melalui butang panel hadapan dalam mod Peti Pengawal atau Multicast.
(2) Only when both the Encoder and Decoder are correspondingly set to C2C/A2A audio return mode in unicast mode, the audio return can be realized.
(3) The A2A audio return mode is available only in unicast mode.
(4) Bila hendak menggunakan ARC, audio ARC amplifier pada port HDMI IN Pengekod dan TV ARC pada port HDMI OUT Dekoder harus digunakan.
Bila hendak menggunakan eARC, audio eARC amplifier pada port HDMI IN Pengekod dan TV eARC pada port HDMI OUT Dekoder harus digunakan.
(5) Selepas memasuki pelbagai mod tetapan, anda boleh menahan butang BAWAH untuk keluar dari antara muka semasa dengan cepat, atau jika anda tidak melakukan sebarang operasi dalam masa 5 saat, ia akan kembali ke antara muka sebelumnya secara automatik.
5.2 Panel Penyahkod


| Tidak. | Nama | Penerangan Fungsi |
| 1 | TETAP SEMULA | Selepas menghidupkan peranti, tekan dan tahan butang RESET sehingga POWER LED dan LINK LED berkelip pada masa yang sama, lepaskan butang untuk menetapkan semula peranti kepada tetapan kilang. |
| 2 | LED KUASA (Merah) |
|
| 3 | LED LINK (Hijau) | LED status sambungan.
|
| 4 | Skrin LED | Menunjukkan ID Pengekod yang dipilih sebagai lalai. Memaparkan pilihan fungsi konfigurasi yang sepadan semasa menetapkan konfigurasi Penyahkod. |
| 5 | CH PILIH | Digunakan untuk menetapkan ID Penyahkod dan tetapan lain. |
| 6 | PERANTI USB 1.1 | Sambung ke peranti USB 1.1, seperti Papan Kekunci atau Tetikus. |
| 7 | PERANTI USB 2.0 | Sambung ke peranti USB 2.0, seperti cakera kilat USB atau Kamera USB. |
| 8 | IR KELUAR | Port keluaran isyarat IR. Aras IR boleh ditetapkan kepada 5V atau 12V (lalai) melalui butang panel. |
| 9 | IR DALAM | Port input isyarat IR. Aras IR boleh ditetapkan kepada 5V atau 12V (lalai) melalui butang panel. |
| 10 | Relays I DIGITAL IO | VCC: Output kuasa (boleh dikonfigurasikan 12V atau 5V), maksimum kepada 12V@50mA, pemuatan 5V@100mA. Output lalai ialah 12V. Relay: 2 saluran vol rendahtage port geganti, setiap kumpulan adalah bebas dan terpencil, maksimum kepada 1A 30VDC pemuatan. Kenalan diputuskan secara lalai. DIGITAL IO: 2 channel GPIO ports, for digital level signal output control or input detection (up to 12V level detection). The output control mode (default mode, low level as default output) or input detection mode is configurable. The DIGITAL IO internal pull-up voltage mengikuti VCC. Mod kawalan output: a. Arus sinki tahan maksimum ialah 50mA apabila mengeluarkan tahap rendah. b. Apabila VCC ialah 5V dan tahap tinggi dikeluarkan, kapasiti pemanduan arus maksimum ialah 2mA. c. Apabila VCC ialah 12V dan paras tinggi dikeluarkan, kapasiti pemanduan arus maksimum ialah 5mA. Mod pengesanan input: a. Apabila VCC ialah 5V, DIGITAL IO ditarik sehingga 5V secara dalaman melalui perintang 2.2K ohm. b. Apabila VCC ialah 12V, DIGITAL IO ditarik sehingga 12V secara dalaman melalui perintang 2.2K ohm. |
| 11 | RS-232 | Port bersiri RS-232, menyokong laluan masuk arahan RS-232 dan kawalan port bersiri tempatan. |
| 12 | AUDIO MASUK/KELUAR | AUDIO IN: Port input audio analog, audio boleh dihantar ke Pengekod AUDIO OUT dalam mod unicast (sambungan langsung titik ke titik). |
| AUDIO OUT: Port output audio analog. Ia mengeluarkan audio yang sama pada HDMI OUT sekiranya format audio ialah LPCM. | ||
| 13 | SPDIF DI | Port input isyarat S/PDIF. |
| 14 | HDMI KELUAR | Port output isyarat HDMI, disambungkan ke peranti paparan HDMI seperti TV atau monitor. |
| 15 | SERAT | Sambungkan dengan modul gentian optik, dan terima isyarat daripada Pengekod dengan kabel gentian optik secara terus atau melalui Suis. |
| 16 | LAN (POE) | Port LAN 1G, sambungkan rangkaian Suis untuk membentuk sistem teragih. Nota: Apabila suis rangkaian menghantar bekalan kuasa POE, penyesuai DC 12V tidak perlu digunakan pada unit. |
| 17 | Penunjuk Isyarat Data lamp (Kuning) |
|
| 18 | Penunjuk Isyarat Pautan lamp (Hijau) |
|
| 19 | DC 12V | Peranti boleh dikuasakan melalui dua kaedah:
When the Switch supports POE function, DC power supply is not needed. |
Penerangan operasi skrin LED dan butang CH SELECT (Untuk Penyahkod).
1, Sambungan ENC: Selepas sistem dihidupkan, skrin LED Penyahkod akan menunjukkan 000 secara lalai jika tidak ditetapkan. Tekan terus butang ATAS/BAWAH untuk memilih ID saluran Pengekod yang disambungkan (julat ID: 000~762) untuk melengkapkan sambungan.
2, alamat IP: Tekan dan tahan butang UP selama 5 saat, skrin LED Penyahkod akan ditunjukkan dalam urutan "IPx", "xxx", "xxx", "xxx", "xxx", yang merupakan mod IP dan alamat IP Penyahkod.
3, Mod konfigurasi: Tekan dan tahan butang ATAS + BAWAH pada masa yang sama selama 5 saat, kemudian lepaskan untuk memasuki mod konfigurasi dengan "CFN" dipaparkan pada skrin LED.
4, Tetapan ID peranti: After entering the configuration mode, press the UP/DOWN button to enter the first page with the current ID number (e.g. 001) displaying on the LED screen (000 by default). Press and hold UP + DOWN buttons for 5 seconds, then release to enter the ID settings mode, in which the ID number (e.g. 001) on the LED screen will flash at 1Hz, then press the UP/DOWN button to select the device ID you desired (ID range: 000~762), then press and hold UP + DOWN buttons for 5 seconds to confirm the setting and stop flashing. After setting, the unit will reboot automatically.
Nota: ID peranti tidak boleh diubah suai dalam mod Kotak Pengawal.
5, Output scaling settings: After entering the configuration mode, press the UP/DOWN button to enter the second page with “S00” (in which “S” refers to Scaling, and “00” to resolution ID) displaying on the LED screen (S00 by default). Press and hold UP + DOWN buttons for 5 seconds, then release to enter the settings mode, in which the Sxx on the LED screen will flash at 1Hz, then press the UP/DOWN button to select the ID you desired, then press and hold UP + DOWN buttons for 5 seconds to confirm the setting and stop flashing.
The scaling settings are listed below:
| Scaling Sxx | Penerangan Resolusi |
| S00 | pintasan |
| S01 | 1080P50 |
| S02 | 1080P60 |
| S03 | 720P50 |
| S04 | 720P60 |
| S05 | 2160P24 |
| S06 | 2160P30 |
| S07 | 2160P50 |
| S08 | 2160P60 |
| S09 | 1280×1024 |
| S10 | 1360×768 |
| S11 | 1440×900 |
| S12 | 1680×1050 |
| S13 | 1920×1200 |
6, Tetapan mod IR: After entering the configuration mode, press the UP/DOWN button to enter the third page with “IR2” (in which “IR” refers to IR and “2” to 12V) displaying on the LED screen (IR2 by default). Press and hold UP + DOWN buttons for 5 seconds, then release to enter the settings mode, in which the IR mode (IR1 or IR2) on the LED screen will flash at 1Hz, then press the UP/DOWN button to select the IR mode, then press and hold UP + DOWN buttons for 5 seconds to confirm the setting and stop flashing.
The corresponding IR mode options are as follows:
IR1: Wayar IR 5V
IR2: Wayar IR 12V
7, eARC/ARC or S/PDIF audio return settings: After entering the configuration mode, press the UP/DOWN button to enter the fourth page with “ARC/SPD” displaying on the LED screen (ARC by default). Press and hold UP + DOWN buttons for 5 seconds, then release to enter the audio return settings mode, in which the audio return mode (ARC/SPD) on the LED screen will flash at 1Hz, then press the UP/DOWN button to select the mode, then press and hold UP + DOWN buttons for 5 seconds to confirm the setting and stop flashing. The corresponding audio return mode options are as follows:
ARC: eARC/ARC audio return (The audio from the HDMI OUT port of Decoder is transmitted back to the HDMI IN port of the Encoder.)
SPD: S/PDIF audio return (The audio from the S/PDIF IN port of Decoder is transmitted back to the S/PDIF OUT port of the Encoder.)
Nota:
(1) Mod pemulangan audio tidak boleh diubah suai melalui butang panel hadapan dalam mod Peti Pengawal atau Multicast.
(2) Only when both the Encoder and Decoder are set to C2C audio return mode, the eARC/ARC or S/PDIF audio return can be realized.
(3) Bila hendak menggunakan ARC, audio ARC amplifier pada port HDMI IN Pengekod dan TV ARC pada port HDMI OUT Dekoder harus digunakan.
Bila hendak menggunakan eARC, audio eARC amplifier pada port HDMI IN Pengekod dan TV eARC pada port HDMI OUT Dekoder harus digunakan.
8, Tetapan mod IP: After entering the configuration mode, press the UP/DOWN button to enter the fifth page with “IP1/IP2/IP3” displaying on the LED screen (IP3 by default).
Press and hold UP + DOWN buttons for 5 seconds, then release to enter the settings mode, in which the IP mode (IP1/IP2/IP3) on the LED screen will flash at 1Hz, then press the UP/DOWN button to select the mode, then press and hold UP + DOWN buttons for 5 seconds to confirm the setting and stop flashing. After setting, the unit will reboot automatically.
The corresponding IP mode options are as follows:
IP1: Static IP mode (Default IP address: 169.254.100.253)
IP2: Mod IP DHCP
IP3: Auto IP mode (Default assigned network segment: 169.254.xxx.xxx)
Nota: Mod IP tidak boleh diubah suai dalam mod Kotak Pengawal.
9, Fiber/Copper mode settings: After entering the configuration mode, press the UP/DOWN button to enter the sixth page with “CPP/FIB” displaying on the LED screen (CPP by default). Press and hold UP + DOWN buttons for 5 seconds, then release to enter the settings mode, in which the Copper/Fiber mode (CPP/FIB) on the LED screen will flash at 1Hz, then press the UP/DOWN button to select the mode, then press and hold UP + DOWN buttons for 5 seconds to confirm the setting and stop flashing. After setting, the unit will reboot automatically.
The corresponding Fiber/Copper mode options are as follows:
CPP: Copper mode
FIB: Fiber mode
10, Multicast mode settings: After entering the configuration mode, press the UP/DOWN button to enter the seventh page with “CA1/CA2” displaying on the LED screen (CA1 by default). Press and hold UP + DOWN buttons for 5 seconds, then release to enter the settings mode, in which the Multicast mode (CA1/CA2) on the LED screen will flash at 1Hz, then press the UP/DOWN button to select the mode, then press and hold UP + DOWN buttons for 5 seconds to confirm the setting and stop flashing. After setting, the unit will reboot automatically.
The corresponding multicast mode options are as follows:
CA1: Unicast mode
CA2: Multicast mode
11, Tetapan mod pemulangan audio: After entering the configuration mode, press the UP/DOWN button to enter the eighth page with “C2C/A2A” displaying on the LED screen (C2C by default). Press and hold UP + DOWN buttons for 5 seconds, then release to enter the settings mode, in which the audio return mode (C2C/A2A) on the LED screen will flash at 1Hz, then press the UP/DOWN button to select the mode, then press and hold UP + DOWN buttons for 5 seconds to confirm the setting and stop flashing. After setting, the unit will reboot automatically.
The corresponding audio return mode options are as follows:
C2C: The eARC/ARC or S/PDIF audio from the Decoder is transmitted back to the HDMI IN or S/PDIF OUT port of the Encoder.
A2A: The analog audio embedded in the Decoder is transmitted back to the AUDIO OUT analog audio port of the Encoder.
Nota:
(1) Mod pemulangan audio tidak boleh diubah suai melalui butang panel hadapan dalam mod Peti Pengawal atau Multicast.
(2) Only when both the Encoder and Decoder are correspondingly set to C2C/A2A audio return mode in unicast mode, the audio return can be realized.
(3) The A2A audio return mode is available only in unicast mode.
(4) Bila hendak menggunakan ARC, audio ARC amplifier pada port HDMI IN Pengekod dan TV ARC pada port HDMI OUT Dekoder harus digunakan.
Bila hendak menggunakan eARC, audio eARC amplifier pada port HDMI IN Pengekod dan TV eARC pada port HDMI OUT Dekoder harus digunakan.
(5) Selepas memasuki pelbagai mod tetapan, anda boleh menahan butang BAWAH untuk keluar dari antara muka semasa dengan cepat, atau jika anda tidak melakukan sebarang operasi dalam masa 5 saat, ia akan kembali ke antara muka sebelumnya secara automatik.
5.3 Definisi Pin IR


IR BLASTER IR RECEIVER
IR BLASTER
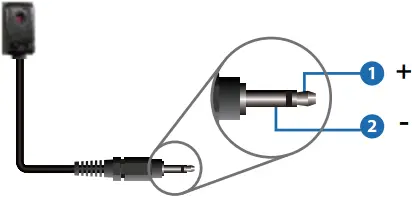
PENERIMA IR

(1) Isyarat IR
(2) Pembumian
(3) Kuasa 12V
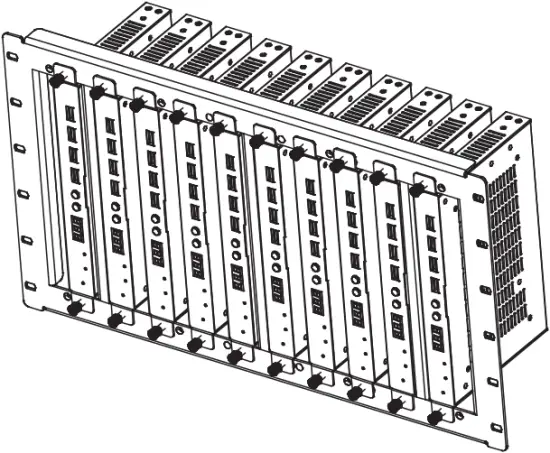
6. Arahan Pemasangan Rak
6.1 Pemasangan Rak 6U V2
Produk ini boleh dipasang dalam rak 6U V2 standard (Sila hubungi pembekal anda untuk jualan rak 6U V2). Langkah-langkah pemasangan adalah seperti berikut:
Langkah 1: Gunakan skru yang disertakan untuk memasang dua telinga yang melekap pada produk, seperti yang ditunjukkan dalam rajah di bawah:
Langkah 2: Masukkan produk dengan telinga pelekap ke dalam rak 6U V2 (6/8/10 unit boleh dipasang secara menegak), seperti ditunjukkan dalam rajah di bawah:
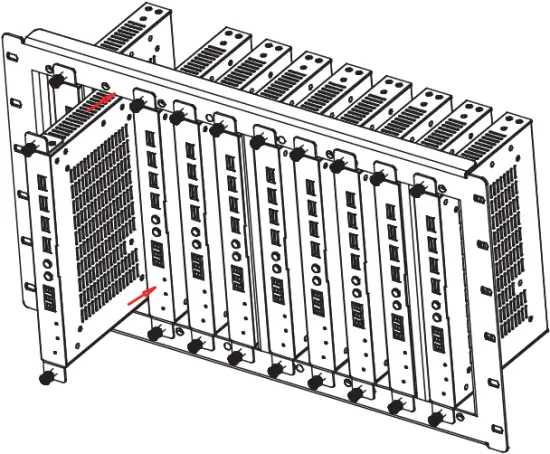
Langkah 3: Gunakan skru untuk memasang telinga pelekap pada rak untuk melengkapkan pemasangan, seperti yang ditunjukkan dalam rajah di bawah:
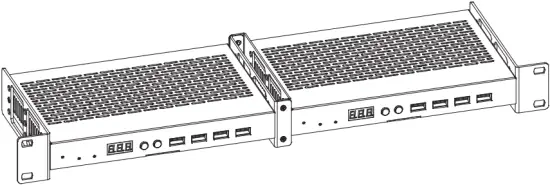
6.2 Pemasangan Rak 1U V2
Produk ini juga boleh dipasang dalam rak 1U V2 standard (2 unit boleh dipasang secara mendatar). Langkah-langkah pemasangan adalah seperti berikut:
Langkah 1: Gunakan skru yang disertakan untuk memasang dua kurungan rak 1U V2 pada dua produk masing-masing, seperti ditunjukkan dalam rajah di bawah:
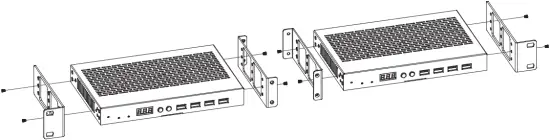
Langkah 2: Gunakan skru untuk memasang dua kurungan rak 1U V2 bersama-sama, seperti yang ditunjukkan dalam rajah di bawah:

Langkah 3: Kencangkan skru di antara dua kurungan rak 1U V2, supaya dua produk dipasang dalam rak 1U V2, seperti ditunjukkan dalam rajah di bawah:
7. Pengenalan Operasi Substream MJPEG
7.1 MJPEG Substream Praview/Tatarajah melalui Web Halaman
The product supports playing MJPEG Substream on computer through the corresponding software such as Pemain media VLC, serentak anda boleh mengakses Web halaman untuk mengkonfigurasi Substream MJPEG.
Ikuti langkah di bawah untuk praview dan konfigurasikan Substream MJPEG.
Langkah 1: Sambungkan Pengekod, Penyahkod dan PC kepada Penukar yang sama, kemudian sambungkan peranti sumber HDMI dan bekalan kuasa. Gambar rajah sambungan ditunjukkan seperti di bawah.
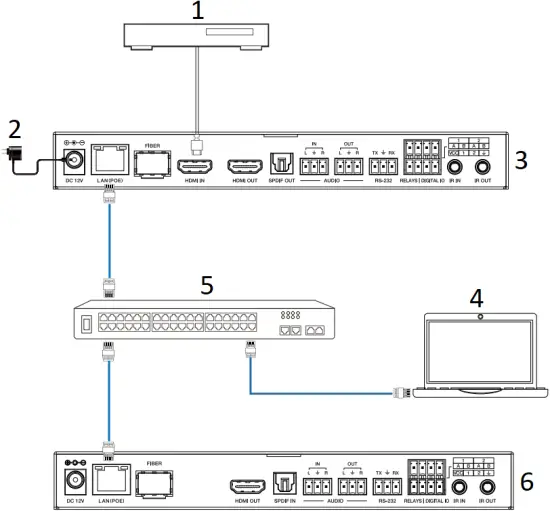
- Pemain Blu-ray
- Penyesuai Kuasa
- Pengekod
- PC
- Suis Ethernet 1G
- Penyahkod
Langkah 2: Install a bonjour protocol checking tool (such as zeroconfService Browser) on PC to find the IP address of the Encoder/Decoder.
Ambil zeroconfServiceBrowser sebagai bekasample. Selepas membuka perisian, anda boleh memilih "Pengurus Kumpulan Kerja" dalam Perkhidmatan Penyemak Imbas, pilih nama Hos dalam Perkhidmatan-Instance, dan cari alamat IP dalam item Alamat dalam Instance-Info.
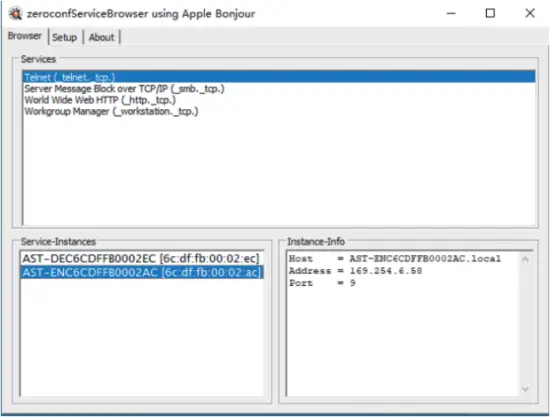
Nota:
(1) Tetingkap di sudut kiri bawah memaparkan nama Hos semua peranti dalam rangkaian semasa.
(2) The window in the lower right corner displays the Host name, IP address and Port number of the device.
(3) The Host name of Encoder starts with AST-ENC; the Host name of Decoder starts with AST-DEC.
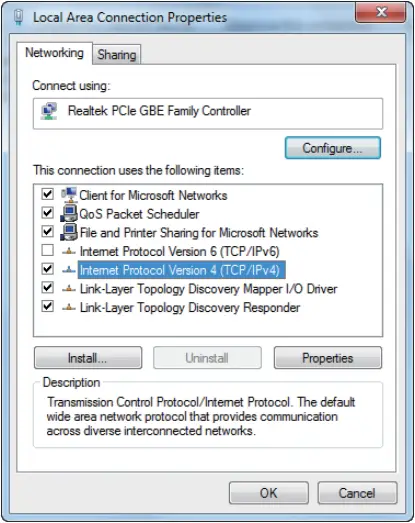
Langkah 3: Tetapkan alamat IP PC kepada segmen rangkaian yang sama dengan alamat IP Pengekod/Penyahkod yang terdapat dalam langkah 2.

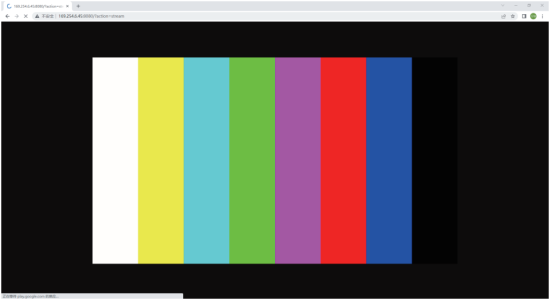
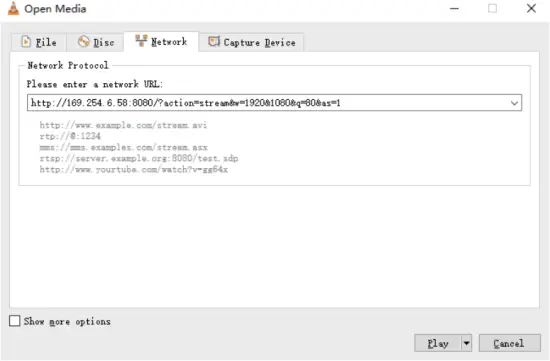
Langkah 4: Menurut alamat IP Pengekod/Penyahkod yang ditemui melalui alat semakan protokol bonjour, masukkan “http://IP:PORT/?action=stream” ke dalam web pelayar pada PC. Substrim MJPEG akan dipaparkan dengan resolusi lalai, seperti ditunjukkan dalam rajah di bawah.
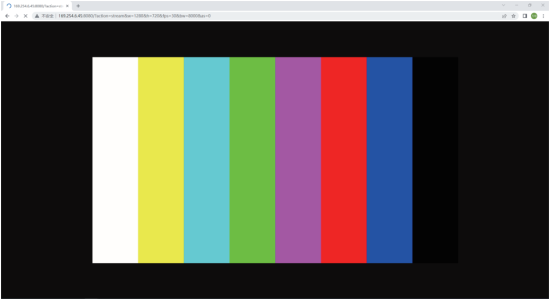
Langkah 5: Tukar resolusi alamat IP Pengekod/Penyahkod yang diperoleh dalam format berikut.
http://IP:PORT/?action=stream&w=x&h=x&fps=x&bw=x&as=x&mq=x
- WIDTH: [Pilihan] lebar imej. Dalam piksel. 'x' bermaksud tiada perubahan.
Lalai adalah 640. - HEIGHT: ketinggian imej [Pilihan]. Dalam piksel. 'x' bermaksud tiada perubahan.
Lalai adalah 360. - FRAMERAT: [Pilihan] kadar bingkai sub-strim.
Unit: fps (bingkai sesaat). 'x' bermaksud tiada perubahan. Lalai ialah 30. - BW: [Pilihan] lebar jalur maksimum trafik sub-strim.
Unit: Kbps (Kbit sesaat). 'x' bermaksud tiada perubahan. Lalai ialah 8000 (8Mbps). - AS: [Pilihan] konfigurasi nisbah aspek. 'x' bermaksud tiada perubahan. Lalai ialah 0.
- 0: lanjutkan kepada "WIDTH" dan "HEIGHT" yang dikonfigurasikan
- 1: [A1 only] keep original aspect ratio and place in the center of output (letterboxing or pillarboxing)
- MINQ: [Pilihan] nombor kualiti imej minimum. Julat: 10, 20, …, 90, 100, tetapan yang lebih tinggi bermakna kualiti imej yang lebih baik. 'x' bermaksud tiada perubahan. Nilai lalai ialah 10. Hadkan bilangan kualiti minimum kawalan lebar jalur automatik pemandu. Jika kualiti lebih rendah daripada nilai MINQ, pemandu akan menjatuhkan bingkai dengan mengembalikan saiz 0 file.
Selepas menukar, masukkan alamat IP Pengekod/Penyahkod baharu ke dalam web pelayar pada PC, Substream MJPEG akan dipaparkan dengan resolusi yang dikehendaki, seperti yang ditunjukkan dalam rajah di bawah.
7.2 Arahan Pemain Media VLC
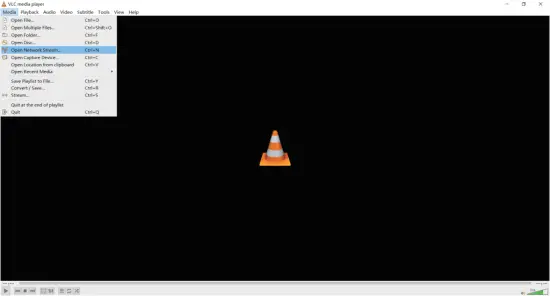
Mula-mula, lakukan langkah 1~3 seperti yang diterangkan dalam Bab 7.1, kemudian buka pemain media VLC pada PC. Sila lihat ikon berikut.

Klik "Media > Buka Strim Rangkaian"
Selepas mengklik pilihan "Buka Strim Rangkaian", halaman berikut akan muncul.
Masukkan rangkaian MJPEG Substream URL, kemudian klik “Mainbutang ”.
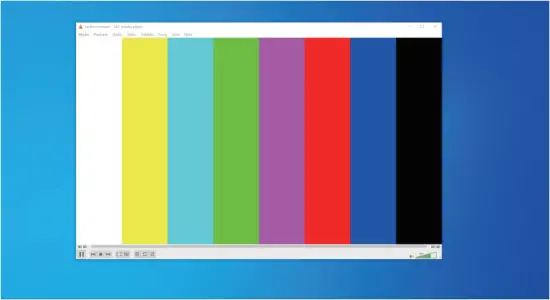
pilih “Alat>Maklumat codec“, a pop-up window will display and show you Stream information, as shown in the figure below.

pilih “Alat>Maklumat codec>Statistik” to check current Bitrate. Please see the following picture.

Nota: Kadar Bit terapung ke atas dan ke bawah apabila anda menyemaknya. Ini adalah fenomena biasa.
8. Model Suis
Suis rangkaian yang digunakan untuk menyediakan sistem harus menyokong ciri di bawah:
- Jenis lapisan 3/Suis rangkaian terurus.
- Jalur lebar gigabit.
- Keupayaan bingkai jumbo 8KB.
- IGMP mengintip.
Model Suis berikut amat disyorkan.
| Pengeluar | Nombor Model |
| CISCO | CISCO SG500 |
| CISCO | siri CATALYST |
| HUAWEI | S5720S-28X-PWR-LI-AC |
| ZyXEL | GS2210 |
| MEWAH | AMS-4424P |
9. Kawalan Sistem 4K atas IP
Produk ini boleh dikawal oleh Kotak Pengawal atau pengawal pihak ketiga. Untuk butiran kawalan sistem 4K melalui IP, sila rujuk manual pengguna "Video melalui Pengawal IP".
10. Permohonan Cthample
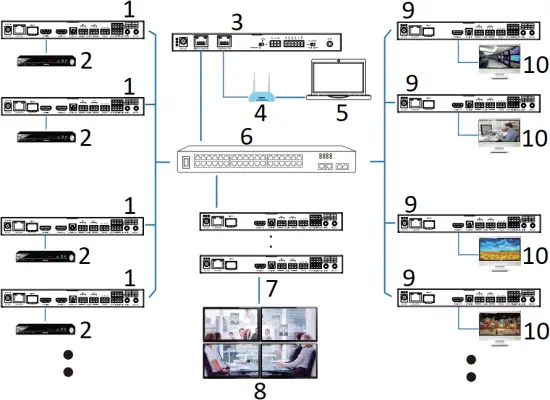
- HIDUP
- DVD
- Kotak Pengawal
- Penghala (pilihan)
- PC
- Suis Ethernet 1G
- 4 × DIS
- Dinding Video
- DIS
- TV
Nota:
(1) For the default IP mode of Control LAN port of the Controller Box is DHCP, the PC also needs to be set to “Obtain an IP address automatically” mode, and a DHCP server (e.g. network router) is required in the system.
(2) If there is no DHCP server in the system, 192.168.0.225 will be used as the IP address of Control LAN port. You need to set the IP address of the PC to be in the same network segment. For exampKemudian, tetapkan alamat IP PC sebagai 192.168.0.88.
(3) Anda boleh mengakses Web GUI dengan memasukkan alamat IP port LAN Kawalan (192.168.0.225) atau URL “http://controller.local” pada penyemak imbas komputer anda.
(4) Tidak perlu mengambil berat tentang tetapan port LAN Video Kotak Pengawal, ia diuruskan oleh Pengawal secara automatik (Lalai).
(5) Apabila Suis Rangkaian tidak menyokong PoE, Pengekod, Penyahkod dan Kotak Pengawal hendaklah dikuasakan oleh penyesuai kuasa DC.
![]()
Istilah HDMI dan antara muka Multimedia Definisi Tinggi HDMI dan Logo HDMI ialah tanda dagangan atau tanda dagangan berdaftar HDMI Licensing LLC di Amerika Syarikat dan negara lain.
Perkhidmatan Pelanggan
Pengembalian produk kepada Perkhidmatan Pelanggan kami membayangkan persetujuan penuh terma dan syarat selepas ini. Terdapat terma dan syarat boleh diubah tanpa notis terlebih dahulu.
1) Waranti
Tempoh jaminan terhad produk ditetapkan tiga tahun.
2) Skop
Terma dan syarat Perkhidmatan Pelanggan ini terpakai kepada perkhidmatan pelanggan yang disediakan untuk produk atau mana-mana item lain yang dijual oleh pengedar sah sahaja.
3) Pengecualian Waranti:
- Waranti tamat tempoh.
- Factory applied serial number has been altered or removed from the Product.
- Kerosakan, kemerosotan atau kerosakan yang disebabkan oleh:
✓ Haus dan lusuh biasa.
✓ Penggunaan bekalan atau alat ganti yang tidak memenuhi spesifikasi kami.
✓ Tidak ada sijil atau invois sebagai bukti jaminan.
✓ Model produk yang ditunjukkan pada kad jaminan tidak sesuai dengan model produk untuk diperbaiki atau telah diubah.
✓ Kerosakan disebabkan oleh force majeure.
✓ Servis tidak dibenarkan oleh pengedar.
✓ Apa-apa sebab lain yang tidak berkaitan dengan kecacatan produk. - Bayaran penghantaran, pemasangan atau buruh untuk pemasangan atau penyediaan produk.
4) Dokumentasi:
Perkhidmatan Pelanggan akan menerima produk yang rosak dalam skop perlindungan waranti dengan syarat tunggal bahawa kekalahan telah ditakrifkan dengan jelas, dan selepas menerima dokumen atau salinan invois, menunjukkan tarikh pembelian, jenis produk, nombor siri, dan nama pengedar.
Catatan: Sila hubungi pengedar tempatan anda untuk bantuan atau penyelesaian lanjut.
Dokumen / Sumber
 |
VIVO LINK JPEG2000 AVoIP Encoder and Decoder [pdf] Manual Pengguna VLVWIP2000-ENC, VLVWIP2000-DEC, JPEG2000 AVoIP Encoder and Decoder, JPEG2000, AVoIP Encoder and Decoder, Encoder and Decoder, and Decoder |