1. Pengenalan
Thank you for choosing the VILTROX DC-A1 2800 Nit Camera Monitor. This 7-inch HD 1920x1080 IPS touch screen field monitor is designed to enhance your video production workflow with its high brightness, versatile monitoring tools, and robust connectivity. It features 4K HDMI 2.0 input/output, 3D LUT support, and various professional functions like Focus Peaking, HDR, and Full Waveform. This manual provides essential information for the proper setup, operation, and maintenance of your monitor.
2. Maklumat Keselamatan
Please read and understand all safety precautions before using the monitor to prevent damage to the device or injury to yourself. Keep this manual for future reference.
- Do not expose the monitor to water or excessive humidity.
- Avoid extreme temperatures. Operate the monitor within 0°C to 40°C (32°F to 104°F).
- Do not disassemble or modify the monitor. Refer all servicing to qualified personnel.
- Use only VILTROX-approved accessories and power adapters.
- Protect the screen from sharp objects and excessive pressure.
- Ensure proper ventilation to prevent overheating. The built-in cooling fan system requires unobstructed airflow.
3. Kandungan Pakej
Sahkan bahawa semua item terdapat dalam pakej anda:
- VILTROX DC-A1 2800 Nit 7 inch Camera field video monitor
- Special sunhood
- Black carry case
- VILTROX NP-F550 battery
- Kabel HDMI x2
- Kabel Jenis-C
- VL-550 cold shoe adapter
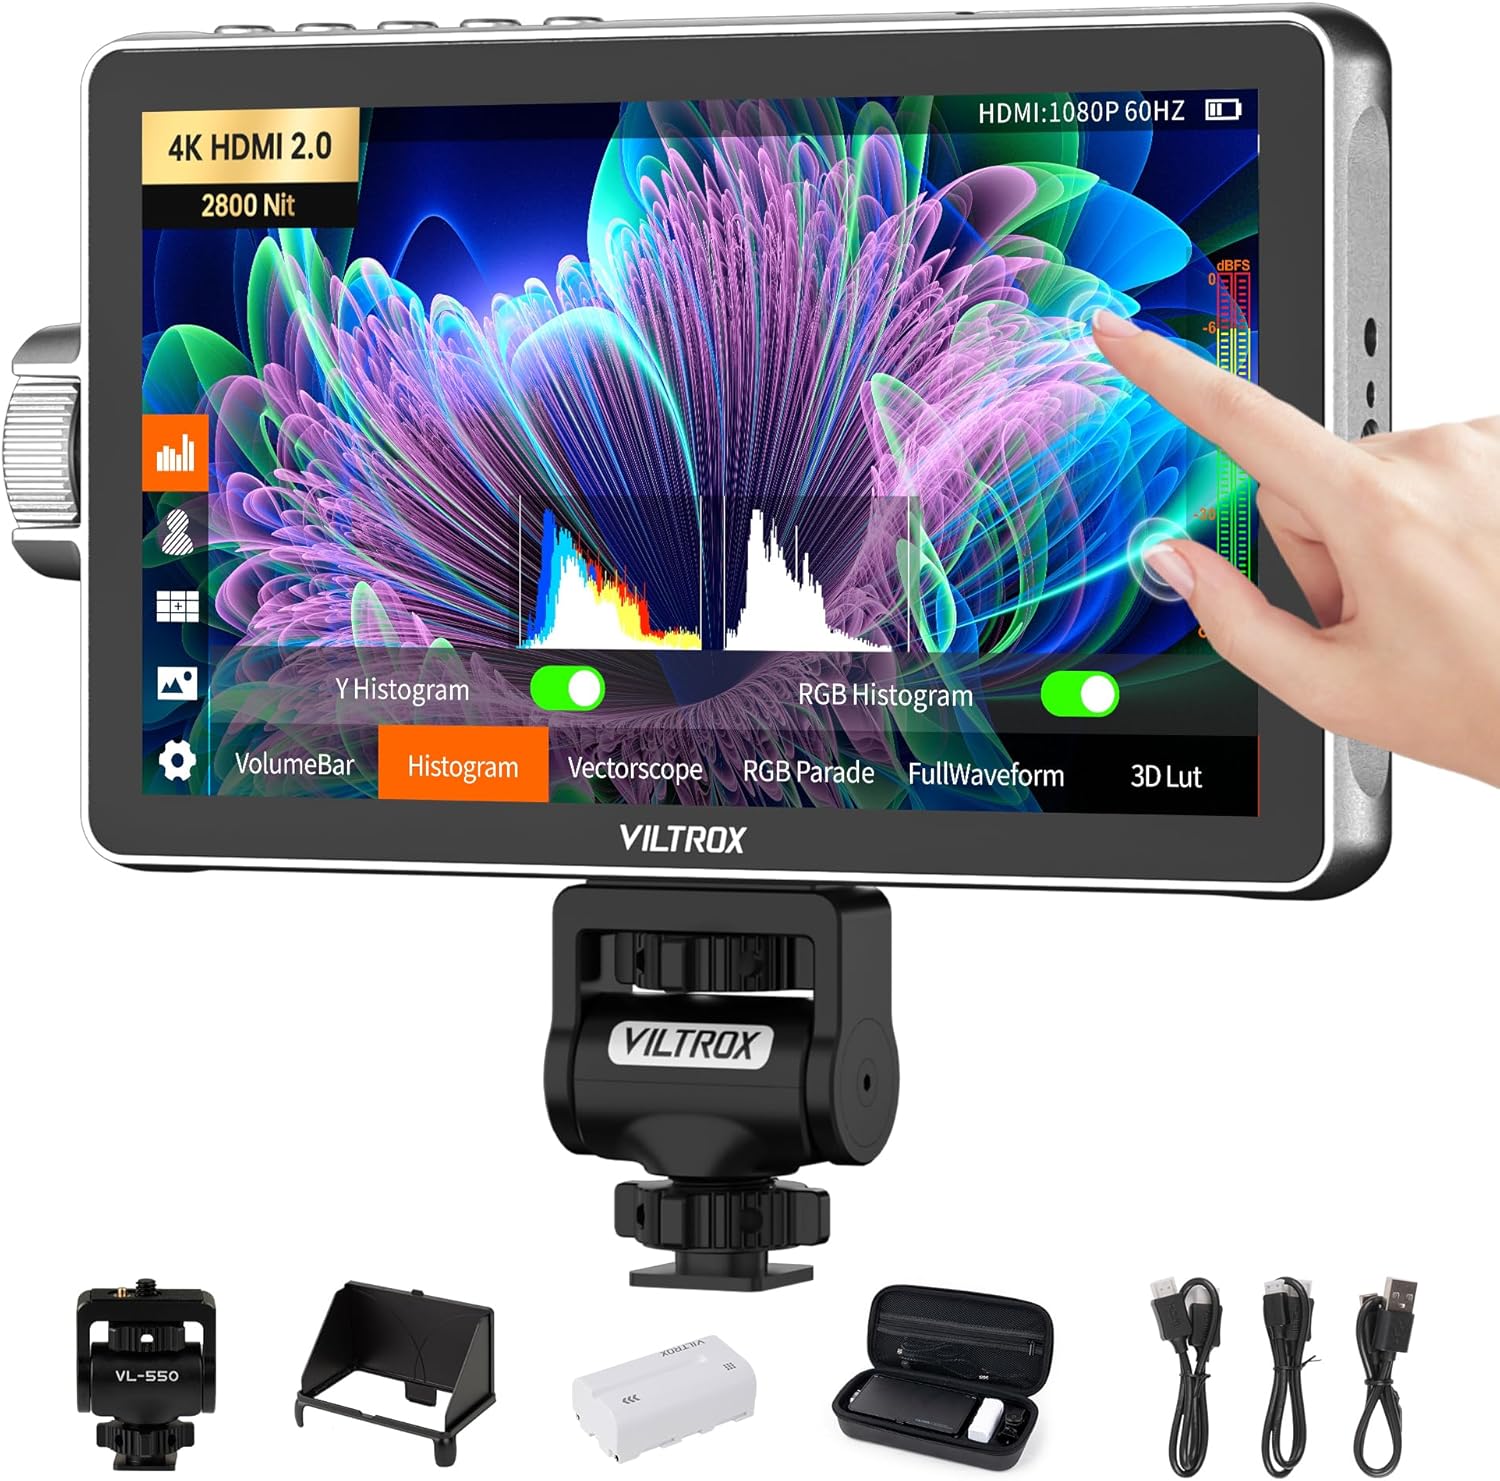
This image displays the VILTROX DC-A1 monitor along with all the items you should find in the box, including the sunhood, carrying case, NP-F550 battery, two HDMI cables, a Type-C cable, and the VL-550 cold shoe adapter.
4. Produk Lebihview
Familiarize yourself with the various parts and interfaces of your VILTROX DC-A1 monitor:

This diagram illustrates the key components of the monitor:
- Butang Belakang/Menu: Used to navigate back or access the main menu.
- Shortcut Key (F1, F2, F3, F4): Customizable buttons for quick access to frequently used functions.
- Skrin Paparan: The 7-inch HD IPS touch screen.
- Fan Exhaust Vent: Memastikan pelesapan haba yang betul.
- Antaramuka USB: For firmware upgrades and custom 3D LUT file memuat naik.
- Butang Kuasa: Untuk menghidupkan atau mematikan monitor.
- Penunjuk Isyarat: Indicates signal status.
- Tombol Kunci: For one-handed control and precise adjustments.
- 1/4 Lubang Skru: Mounting points for accessories.
- Input HDMI: Connects to your camera or video source.
- Output HDMI: For passing the video signal to another monitor.
- 1/4 Lubang Skru: Additional mounting point.
- Jack fon kepala: 3.5mm port for audio monitoring.
- Pelabuhan Jenis-C: Untuk bekalan kuasa.
- Port DC: For external DC power supply (10-18V/2A).
- Butang Pelepas Bateri: Releases the NP-F series battery.
- Slot Bateri: Accommodates NP-F series batteries.
- Cooling Air Intake: Air intake for the cooling system.
5. Persediaan
Follow these steps to set up your VILTROX DC-A1 monitor:
- Install Battery or Connect Power:
Insert a fully charged NP-F series battery (e.g., NP-F550 included) into the battery slot until it clicks into place. Alternatively, connect the monitor using the DC IN port (10-18V/2A) or the USB Type-C port (9V/3A) for continuous power. Ensure the power source is stable.

Figure 5.1: Multiple Power Supply Options. This image demonstrates the three ways to power the monitor: using an NP-F series battery, connecting a DC power adapter, or using a USB Type-C power source.
- Pasang Monitor:
Attach the VL-550 cold shoe adapter to the 1/4 screw hole on the monitor. Then, mount the monitor onto your camera's hot shoe or a compatible rig. The cold shoe adapter allows for 180° rotation for flexible viewsudut-sudut.
- Sambungkan Kabel HDMI:
Connect one end of an HDMI cable to your camera's HDMI output and the other end to the HDMI IN port on the monitor. If you need to send the signal to another display, connect a second HDMI cable from the monitor's HDMI OUT port to your secondary display.

Figure 5.2: HDMI Signal Input/Output. This image shows the HDMI input and output ports on the monitor, highlighting its ability to handle 4K HDMI 2.0 signals for clear and smooth transmission.
- Attach Sunhood (Optional):
For outdoor shooting or bright environments, attach the included special sunhood to reduce glare and improve screen visibility.
6. Arahan Operasi
Operating the VILTROX DC-A1 monitor is intuitive with its touch screen and physical controls.
- Hidupkan/Mati Kuasa:
Press and hold the Power Button (6) on the side of the monitor to turn it on or off.
- Kawalan Skrin Sentuh:
The monitor features a full touch screen for easy navigation and setting adjustments. Tap icons to select functions, swipe to navigate menus, and pinch to zoom.

Figure 6.1: Full Touch Screen Control and Physical Buttons. This image illustrates the responsive touch screen interface, the precise control offered by the knob button, and the convenience of the customizable shortcut keys for quick access to monitoring functions.
- Knob Key and Shortcut Keys:
Use the Knob Key (8) for precise adjustments and menu navigation. The four Shortcut Keys (F1, F2, F3, F4) on top can be customized to quickly access your most used monitoring functions, such as False Color, Peaking, or Histogram.
- Monitoring Functions:
The DC-A1 offers a wide range of professional monitoring tools:
- Warna Palsu: Helps with exposure adjustment.
- Zebras: Indicates overexposed areas.
- Histogram: Displays the tonal distribution of the image.
- Oscillogram / Full Waveform: Provides detailed luminance and chrominance information.
- Vectorscope: Shows color saturation and hue.
- HDR: High Dynamic Range support for wider contrast.
- Anti-squeeze: Adjusts aspect ratio for anamorphic lenses.
- Peak Focus: Highlights in-focus areas.
- Audio Bar: Displays audio levels.
- Custom 3D LUT:
The monitor supports 20 preloaded 3D LUTs and allows you to upload your own custom 3D LUT files via the USB A port. This feature enables instant preview of color effects for seamless post-production integration.
- Peningkatan Firmware:
Firmware can be upgraded via the USB A port using a USB flash drive. Refer to the VILTROX official weblaman web untuk perisian tegar dan arahan terkini.
7. Penyelenggaraan
Proper care and maintenance will extend the lifespan of your VILTROX DC-A1 monitor.
- Pembersihan: Use a soft, dry cloth to clean the monitor's body. For the screen, use a microfiber cloth specifically designed for electronics. Do not use liquid cleaners directly on the screen.
- Storan: When not in use, store the monitor in its black carry case to protect it from dust, scratches, and impacts. Store in a cool, dry place away from direct sunlight.
- Sistem Penyejukan: Ensure the fan exhaust vents and cooling air intakes are not obstructed during operation to maintain optimal performance and prevent overheating. The built-in intelligent cooling fan system is designed for stable long-term operation.
- Penjagaan Bateri: If using batteries, remove them if the monitor will not be used for an extended period. Store batteries in a cool, dry place.
8. Penyelesaian masalah
If you encounter issues with your VILTROX DC-A1 monitor, refer to the following common problems and solutions:
| Masalah | Kemungkinan Punca | Penyelesaian |
|---|---|---|
| Monitor tidak dihidupkan. | Battery is depleted or not installed correctly; power cable is loose or faulty. | Ensure battery is charged and properly inserted. Check power cable connections or try a different power source. |
| No video signal displayed. | HDMI cable is loose or faulty; incorrect input selected; camera output settings. | Check HDMI cable connections. Ensure the correct HDMI input is selected on the monitor. Verify camera's HDMI output settings (resolution, frame rate). |
| Screen flickering or distorted image. | Faulty HDMI cable; signal interference; incompatible resolution. | Try a different HDMI cable. Ensure no strong electromagnetic interference. Adjust camera output resolution to a supported format. |
| Skrin sentuh tidak bertindak balas. | Gangguan perisian sementara; skrin kotor. | Restart the monitor. Clean the screen with a soft, dry cloth. If problem persists, consider a firmware update. |
| Monitor overheats. | Obstructed ventilation; prolonged use in high ambient temperatures. | Ensure cooling vents are clear. Operate in a well-ventilated area. Allow monitor to cool down if used for extended periods. |
9. Spesifikasi
Detailed technical specifications for the VILTROX DC-A1 2800 Nit Camera Monitor:
| Ciri | Spesifikasi |
|---|---|
| Model Produk | DC-A1 |
| Skrin Paparan | Skrin Sentuh IPS 7-inci |
| Resolusi | 1920x1080 |
| Nisbah Kontras | 1000:1 |
| Kecerahan Skrin | 2800cd/m² (Nit) |
| Ketumpatan Piksel | 316PPI |
| Kedalaman Warna | 8bit |
| Nisbah Aspek | 16:9 |
| Kadar Segar Semula | 60Hz |
| Viewsudut | 170° |
| Warna Gamut | sRGB |
| Antara muka input | HDMI 2.0 DALAM |
| Antaramuka Output | HDMI 2.0 KELUAR |
| Kipas Penyejuk | ya |
| Berat badan | ≈348g (Monitor) / 12.27oz |
| Dimensi | 187.8 x 110.5 x 28.5mm / 7.39 x 4.35 x 1.12 inci |
| Antaramuka USB | Support of USB Upgrade and 3D Lut File Input |
| Output Audio | Headphone Jack φ3.5mm |
| Suhu Bekerja | 0°C ~ 40°C |
| Suhu Penyimpanan | -20°C ~ 60°C |
| Antara Muka Kuasa | DC10V-18V/2A; Type-C=9V/3A (9V/12V/15V/20V=3A) |
| Bateri Berkenaan | Lithium Battery NP-F550/F750/F970 |

This image provides a visual summary of the monitor's key technical specifications, including its display type, resolution, brightness, and power requirements.
10. Waranti dan Sokongan
VILTROX products are designed for reliability and performance. For warranty information, technical support, or service inquiries, please refer to the warranty card included with your product or visit the official VILTROX webtapak. Simpan resit pembelian anda sebagai bukti pembelian untuk tuntutan waranti.
For additional assistance, you may contact VILTROX customer support through their official channels. Information regarding product updates and additional resources can often be found on the manufacturer's webtapak.


