1. Pengenalan
This manual provides essential instructions for setting up, operating, and maintaining your CONSUMER CELLULAR Iris Connect smartphone. The Iris Connect is designed for reliable performance, featuring a 6.5-inch display, 32GB of storage, and running on Android 13. Please read this manual thoroughly to ensure proper use and to maximize your device's capabilities.
2. Apa yang ada di dalam Kotak
Upon unboxing your CONSUMER CELLULAR Iris Connect, verify that all the following items are included:
- CONSUMER CELLULAR Iris Connect Smartphone
- Kabel USB
- Panduan Mula Pantas
3. Peranti Lebihview
Familiarize yourself with the physical components of your Iris Connect smartphone.

Rajah 3.1: Depan dan belakang view of the Iris Connect smartphone, highlighting its sleek design and camera placement.

Rajah 3.2: Depan view of the Iris Connect, showcasing the 6.5-inch display and front-facing camera.
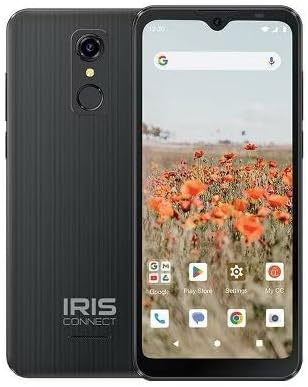
Rajah 3.3: belakang view of the Iris Connect, showing the main camera, flash, and fingerprint sensor.
Komponen Utama:
- Paparan 6.5-inci: High Definition+ screen for clear visuals.
- Kamera Hadapan (8MP): Located at the top of the display for selfies and video calls.
- Main Camera (13MP): Located on the rear, for high-resolution photos and videos.
- Pengimbas cap jari: Integrated on the rear for secure unlocking.
- Butang Kuasa: Typically on the right side, used to turn the device on/off or wake/sleep the screen.
- Butang Kelantangan: Bersebelahan dengan butang kuasa, untuk melaraskan tahap audio.
- Port USB-C: Di bahagian bawah, untuk pengecasan dan pemindahan data.
- Bicu Audio 3.5mm: Untuk menyambungkan fon kepala.
4. Persediaan
4.1. Memasukkan Kad SIM dan Kad MicroSD
- Cari dulang SIM di sisi peranti anda.
- Insert the SIM ejector tool (not included, use a thin paperclip) into the small hole next to the tray and press gently until the tray pops out.
- Letakkan kad Nano-SIM anda ke dalam slot yang ditetapkan dengan sesentuh emas menghadap ke bawah.
- If desired, insert a microSD card (up to 256GB) into its dedicated slot for expanded storage.
- Masukkan semula dulang dengan berhati-hati ke dalam peranti sehingga ia berbunyi pada tempatnya.
4.2. Kuasa Awal Hidup dan Wizard Persediaan
- Tekan dan tahan butang Butang Kuasa sehingga skrin menyala.
- Ikut arahan pada skrin untuk memilih bahasa anda, sambung ke rangkaian Wi-Fi dan sediakan akaun Google anda.
- You may be prompted to transfer data from an old device or set up security features like the fingerprint scanner.
4.3. Mengecas Peranti
Before first use, it is recommended to fully charge your device. The Iris Connect features a 3500 mAh battery with an approximate charging time of 2.5 hours.
- Connect the USB cable to the USB-C port at the bottom of your phone.
- Connect the other end of the USB cable to a compatible power adapter (not included) and plug it into a wall outlet.
- Penunjuk pengecasan akan muncul pada skrin.
5. Arahan Operasi
5.1. Navigasi Asas
- Sentuh: Ketik ikon untuk membuka apl atau memilih item.
- Leret: Seret jari anda merentasi skrin untuk menatal atau menavigasi antara skrin.
- Cubit: Gunakan dua jari untuk zum masuk atau keluar pada foto dan web muka surat.
- Skrin Utama: Hab pusat untuk aplikasi dan widget anda.
- Laci Apl: Leret ke atas dari skrin utama untuk mengakses semua aplikasi yang dipasang.
5.2. Membuat Panggilan
- Ketik pada telefon ikon pada skrin utama atau laci aplikasi anda.
- Masukkan nombor telefon menggunakan pad dail atau pilih kenalan daripada buku alamat anda.
- Ketik pada Panggil butang untuk memulakan panggilan.
5.3. Menghantar Mesej
- Buka Mesej apl.
- Ketik pada Mulakan sembang or Mesej baharu ikon.
- Masukkan nombor penerima atau pilih daripada kenalan, kemudian taip mesej anda.
- Ketik pada Hantar butang.
5.4. Menyambung ke Wi-Fi
- Pergi ke tetapan > Rangkaian & internet > Internet.
- Togol Wi-Fi On.
- Pilih rangkaian Wi-Fi yang anda inginkan daripada senarai dan masukkan kata laluan jika digesa.
5.5. Berpasangan Bluetooth
- Pergi ke tetapan > Peranti yang disambungkan > Keutamaan sambungan > Bluetooth.
- Togol Bluetooth On.
- Pilih Pasangkan peranti baru and choose your desired device from the list. Follow any on-screen prompts to complete pairing.
5.6. Penggunaan Kamera
The Iris Connect features a 13MP main camera and an 8MP front-facing camera.
- Buka Kamera apl.
- Ketik pada Pengatup butang untuk mengambil gambar.
- Switch between photo and video modes, or front and rear cameras, using the on-screen icons.
5.7. Pengimbas Cap Jari
To set up the fingerprint scanner for secure unlocking:
- Pergi ke tetapan > Keselamatan & privasi > Buka kunci peranti > Cap jari.
- Ikut arahan pada skrin untuk mendaftarkan cap jari anda.
6. Penyelenggaraan
6.1. Membersihkan Peranti
To keep your device clean and functional:
- Gunakan kain lembut dan tidak berbulu untuk mengelap skrin dan badan.
- Elakkan menggunakan bahan kimia yang keras, pembersih yang melelas, atau semburan aerosol.
- Pastikan port bebas daripada habuk dan serpihan.
6.2. Penjagaan Bateri
To optimize your battery life (up to 26 hours of use):
- Elakkan suhu yang melampau.
- Do not leave the device charging for extended periods after it's full.
- Adjust screen brightness and close unused apps to conserve power.
6.3. Kemas Kini Perisian
Regularly check for software updates to ensure your device has the latest features and security patches:
- Pergi ke tetapan > Sistem > Kemas kini sistem.
- Ikut arahan pada skrin untuk memuat turun dan memasang sebarang kemas kini yang tersedia.
7. Penyelesaian masalah
This section addresses common issues you might encounter with your Iris Connect smartphone.
- Peranti tidak dihidupkan: Pastikan bateri dicas. Sambungkan pengecas dan tunggu beberapa minit sebelum cuba menghidupkan semula.
- Tiada isyarat rangkaian: Check if your SIM card is correctly inserted. Verify that Airplane Mode is off (swipe down from the top of the screen to check quick settings). Contact your service provider if the issue persists.
- Apl ranap atau beku: Try restarting the app. If the issue continues, restart the phone. You may also clear the app's cache or data via tetapan > Apl > [Nama Apl] > Storan & cache.
- Prestasi perlahan: Close unused apps, clear cache, or consider uninstalling rarely used applications to free up storage.
- Unable to connect to Wi-Fi/Bluetooth: Ensure Wi-Fi/Bluetooth is enabled in settings. Try forgetting the network/device and reconnecting. Restart your phone and the router/Bluetooth device.
- Forgot screen lock password/pattern: Jika anda mempunyai akaun Google yang dipautkan, anda mungkin boleh menetapkan semula akaun tersebut. Jika tidak, tetapan semula kilang mungkin diperlukan (ini akan memadamkan semua data).
For more complex issues, please refer to the official CONSUMER CELLULAR support resources or contact their customer service.
8. Spesifikasi
Detailed technical specifications for the CONSUMER CELLULAR Iris Connect smartphone (Model: SH4650).
| Ciri | Spesifikasi |
|---|---|
| Nama Model | Sambung Iris |
| Nombor Model | SH4650 |
| Sistem Operasi | Android 13.0 |
| Saiz Paparan | 6.5 Inci |
| Resolusi Paparan | 1440 x 810 |
| Model CPU | Snapdragon 710 |
| Kelajuan CPU | 2 GHz |
| Saiz Terpasang Memori RAM | 3 GB |
| Storan Dalaman | 32 GB |
| Storan Boleh Dikembangkan | Sehingga 256GB melalui microSD |
| Kamera Utama | 13 MP |
| Kamera Depan | 8 MP |
| Kapasiti Bateri | 3500 Miliamp jam |
| Penilaian Kuasa Bateri | 3600 (likely Wh or similar unit, as mAh is 3500) |
| Masa Mengecas | 2.5 Jam |
| Ketersambungan | 4G LTE, Bluetooth, Wi-Fi |
| Ciri Khas | Dual Camera, Expandable Storage, Fingerprint Scanner, Long Battery Life |
| Bicu Audio | 3.5 milimeter |
| Dimensi | 8 x 6 x 3 inci |
| Berat Barang | 6.5 auns |
9. Waranti dan Sokongan
For information regarding your product's warranty, please refer to the warranty card included with your purchase or visit the official CONSUMER CELLULAR website. For technical assistance, troubleshooting beyond this manual, or customer service inquiries, please contact CONSUMER CELLULAR support directly.
CONSUMER CELLULAR Official Webtapak: www.consumercellular.com


