1. Pengenalan
Thank you for choosing the VALBERG CYCLOCLEAN bagless vacuum cleaner. This manual provides essential information for the safe and efficient operation, maintenance, and troubleshooting of your appliance. Please read this manual thoroughly before first use and keep it for future reference.
1.1 Produk Selesaiview
The VALBERG CYCLOCLEAN is a powerful and efficient bagless vacuum cleaner designed for effective cleaning of hard floors and various surfaces. It utilizes cyclonic technology to separate dust and dirt, ensuring consistent suction performance. Key features include an 800W motor, a 1.8-liter dust reservoir, and a HEPA 10 filter for improved air quality.
1.2 Arahan Keselamatan
Sentiasa patuhi langkah berjaga-jaga keselamatan asas semasa menggunakan peralatan elektrik untuk mengurangkan risiko kebakaran, kejutan elektrik atau kecederaan:
- Pastikan voltage yang ditunjukkan pada perkakas sepadan dengan voltan sesalur kuasa tempatantage sebelum menyambung.
- Jangan gunakan pembersih vakum untuk menapis air atau cecair lain, abu panas, objek tajam atau bahan mudah terbakar/letupan.
- Do not operate the appliance with a damaged cord or plug. If the cord is damaged, it must be replaced by the manufacturer, its service agent, or similarly qualified persons to avoid a hazard.
- Jauhkan rambut, pakaian longgar, jari dan semua bahagian badan daripada bukaan dan bahagian yang bergerak.
- Unplug the appliance from the power outlet when not in use and before cleaning or maintenance.
- Perkakas ini adalah untuk kegunaan domestik sahaja.
- Jangan biarkan pembersih vakum tanpa pengawasan apabila dipasang.
2. Komponen Produk
Familiarize yourself with the parts of your VALBERG CYCLOCLEAN vacuum cleaner:
- Main Unit (Motor housing, dust reservoir)
- Hos Fleksibel
- Tiub Logam Teleskopik
- Muncung Lantai Gabungan
- Pemegang Aksesori
- Crevice Tool / Brush (integrated or separate)
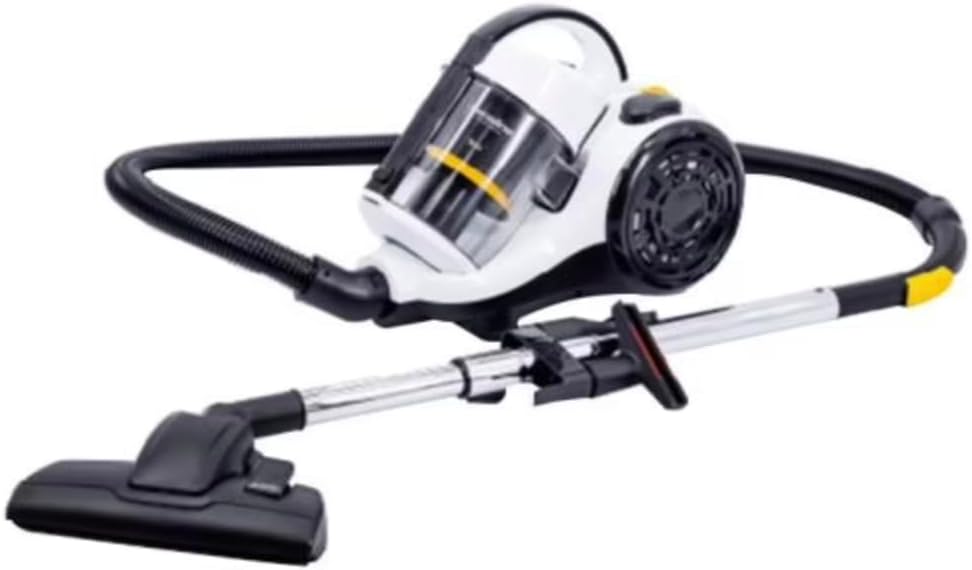
Figure 2.1: Assembled VALBERG CYCLOCLEAN vacuum cleaner, showing the main unit, flexible hose, telescopic tube, and combination floor nozzle.
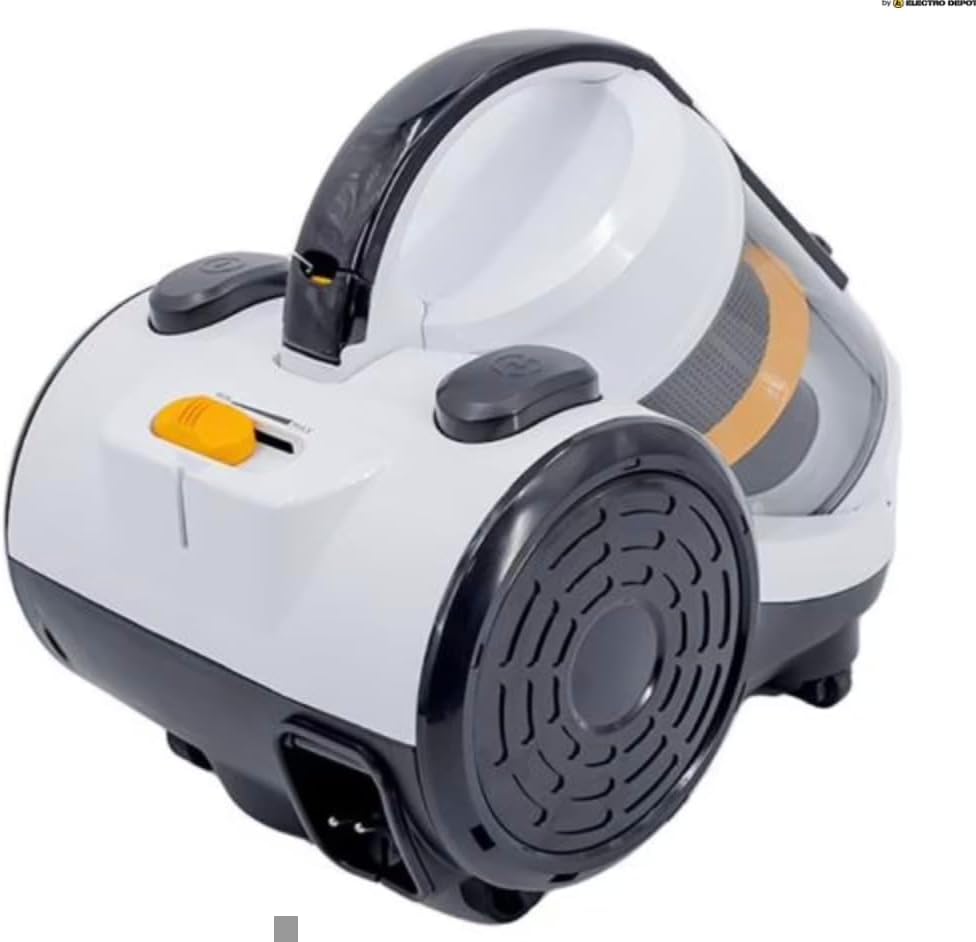
Figure 2.2: Main unit of the VALBERG CYCLOCLEAN, highlighting the transparent dust reservoir and control buttons.
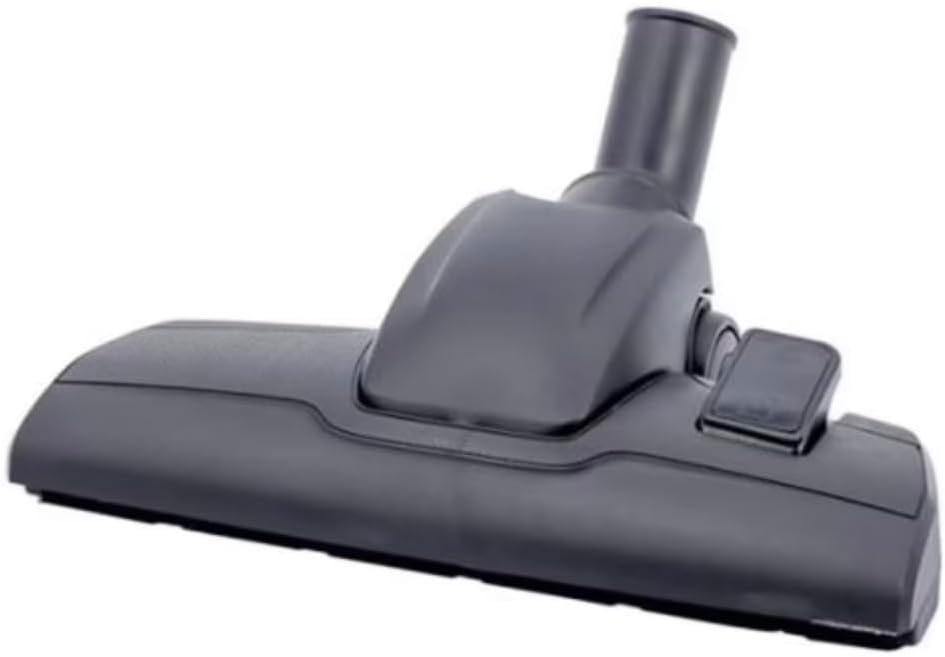
Figure 2.3: The combination floor nozzle, suitable for both hard floors and carpets.

Figure 2.4: An accessory tool, likely a crevice tool or small brush, for specialized cleaning tasks.
3. Persediaan dan Pemasangan
Ikuti langkah-langkah ini untuk memasang pembersih vakum anda sebelum penggunaan pertama:
- Pasangkan Hos Fleksibel: Masukkan hujung hos ke dalam salur masuk sedutan pada unit utama sehingga ia klik dengan selamat ke tempatnya.
- Sambungkan Tiub Teleskopik: Push the wider end of the telescopic metal tube onto the handle end of the flexible hose.
- Pasang muncung Lantai: Connect the combination floor nozzle to the other end of the telescopic tube. Ensure it is firmly attached.
- Storan Aksesori: The accessory holder can be attached to the telescopic tube for convenient storage of the crevice tool/brush during use.
Your VALBERG CYCLOCLEAN is now ready for operation.
4. Arahan Operasi
4.1 Menghidupkan/Mematikan
- Kord Kuasa: Pull out the power cord to the desired length (up to 6 meters). Do not pull beyond the yellow mark. Insert the plug into a suitable power outlet.
- Hidupkan: Press the On/Off button located on the main unit to start the vacuum cleaner.
- Tutup: Press the On/Off button again to turn off the appliance.
- Putar Balik Kord: After use, unplug the cord from the outlet. Press the cord rewind button to automatically retract the power cord. Guide the cord with your hand to prevent whipping.
4.2 Suction Power Control
The VALBERG CYCLOCLEAN features mechanical suction power regulation. This is typically controlled by an air flow regulator on the hose handle or a slider on the main unit. Adjust the slider or opening to increase or decrease suction power as needed for different surfaces (e.g., lower suction for delicate fabrics, higher for hard floors).
4.3 Menggunakan Aksesori
- Combination Floor Nozzle: Use the foot switch on the nozzle to switch between hard floor mode (brushes extended) and carpet mode (brushes retracted).
- Crevice Tool / Brush: Detach the floor nozzle and telescopic tube from the hose handle. Attach the crevice tool for narrow spaces or the brush for dusting delicate surfaces.
5. Penyelenggaraan
Penyelenggaraan tetap memastikan prestasi optimum dan memanjangkan jangka hayat pembersih vakum anda. Sentiasa cabut plag perkakas sebelum melakukan sebarang penyelenggaraan.
5.1 Emptying the Dust Reservoir
The dust reservoir has a capacity of 1.8 liters. Empty it regularly, ideally after each use or when the MAX fill line is reached, to maintain strong suction.
- Locate the dust reservoir release button/latch on the main unit.
- Press the button and carefully remove the dust reservoir from the main unit.
- Position the reservoir over a waste bin. Open the bottom lid of the reservoir to release the collected dust and debris.
- Close the lid securely and reattach the dust reservoir to the main unit until it clicks into place.
5.2 Filter Maintenance (HEPA 10 Filter)
The HEPA 10 filter helps to trap fine dust particles and allergens. It requires regular cleaning to prevent clogging and maintain suction efficiency.
- Penapis Pra-Motor: This filter is usually located between the dust reservoir and the motor. Remove it and tap off loose dust. It can often be rinsed under cold running water. Ensure it is completely dry before reinserting.
- HEPA 10 Exhaust Filter: This filter is typically located at the rear or side of the vacuum cleaner. Remove it and gently tap off any accumulated dust. Do not wash the HEPA filter unless explicitly stated in the product's specific instructions (which are not provided here, so assume dry cleaning only). Replace the HEPA filter periodically as recommended by the manufacturer (general recommendation is every 6-12 months, depending on usage).
Note: Refer to the specific diagrams in your product's physical manual for exact filter locations and removal procedures.
5.3 Pembersihan Am
- Lap bahagian luar pembersih vakum dengan lembut, damp kain. Jangan gunakan pembersih atau pelarut yang melelas.
- Check the floor nozzle for tangled hair or debris and remove them.
6. Penyelesaian masalah
Sebelum menghubungi sokongan pelanggan, cuba langkah penyelesaian masalah biasa ini:
| Masalah | Kemungkinan Punca | Penyelesaian |
|---|---|---|
| Pembersih vakum tidak boleh dihidupkan. | No power supply; plug not inserted correctly; power outlet faulty. | Check if the plug is fully inserted. Try another power outlet. Check household fuse/circuit breaker. |
| Kuasa sedutan rendah. | Dust reservoir full; filters clogged; hose/tube/nozzle blocked. | Empty the dust reservoir. Clean or replace filters. Check hose, tube, and nozzle for blockages and remove them. |
| Bunyi luar biasa semasa operasi. | Blockage in hose/tube/nozzle; motor filter incorrectly fitted; foreign object in fan. | Check for and remove blockages. Ensure all filters are correctly seated. If noise persists, contact customer support. |
| Habuk-habuk keluar dari pembersih vakum. | Dust reservoir not properly closed; filters missing or incorrectly fitted; damaged filter. | Ensure dust reservoir is securely closed. Check that all filters are present and correctly installed. Replace damaged filters. |
7. Spesifikasi
| Ciri | Perincian |
|---|---|
| Model | CYCLOCLEAN |
| Jenama | VALBERG (by Electro Depot) |
| taip | Pembersih Vakum Silinder Tanpa Beg |
| kuasa | 800W |
| Dust Reservoir Capacity | 1.8 Liter |
| Jejari Operasi | 8 meters (6-meter power cord) |
| Sistem Penapisan | Penapis HEPA 10 |
| Tahap Kebisingan | 79 dB |
| Dimensi (H x W x D) | 33.5 cm x 32 cm x 46 cm |
| Berat badan | 6.2 kg |
| warna | Hitam / Putih |
8. Waranti dan Sokongan Pelanggan
For warranty information, please refer to the warranty card included with your product or contact the retailer where you purchased the VALBERG CYCLOCLEAN vacuum cleaner. Keep your proof of purchase for warranty claims.
If you encounter issues not covered in the troubleshooting section or require further assistance, please contact Electro Depot customer support or your local authorized service center. Contact details can typically be found on the manufacturer's webtapak atau pada resit pembelian anda.
Untuk maklumat lanjut, lawati pegawai Depot Elektro webtapak.


