1. Pengenalan
The darkFlash D-VISION is a 3.5-inch IPS LCD display screen designed to enhance your CPU liquid cooler by providing real-time system performance monitoring and customizable visual effects. This manual provides detailed instructions for installation, operation, and maintenance of your D-VISION display.

Image 1.1: The darkFlash D-VISION display screen showcasing system statistics and a customizable background.
Ciri-ciri Utama:
- Paparan Serbaguna: Customizable LCD dashboard for unique graphics and real-time PC performance tracking.
- Stunning IPS LCD Screen: Vibrant 3.5-inch IPS LCD with 480x320 resolution, supporting animated GIFs.
- Aesthetic Customization: High-definition eye-care screen, dynamic video backgrounds, user-friendly software, and intuitive visual theme editor.
- Vivid 24-Bit Color Depth: Over 16.7 million colors for vibrant visuals.
- Operasi yang mudah: One-button operation with auto-start feature.
2. Kandungan Pakej
Sahkan bahawa semua item terdapat dalam pakej sebelum meneruskan pemasangan.

Image 2.1: Package contents showing the D-VISION display and connection cable.
- 1 x darkFlash D-VISION 3.5-inch USB Monitor (Black)
- 1 x Type-C to 9-Pin Connection Cable
3. Spesifikasi
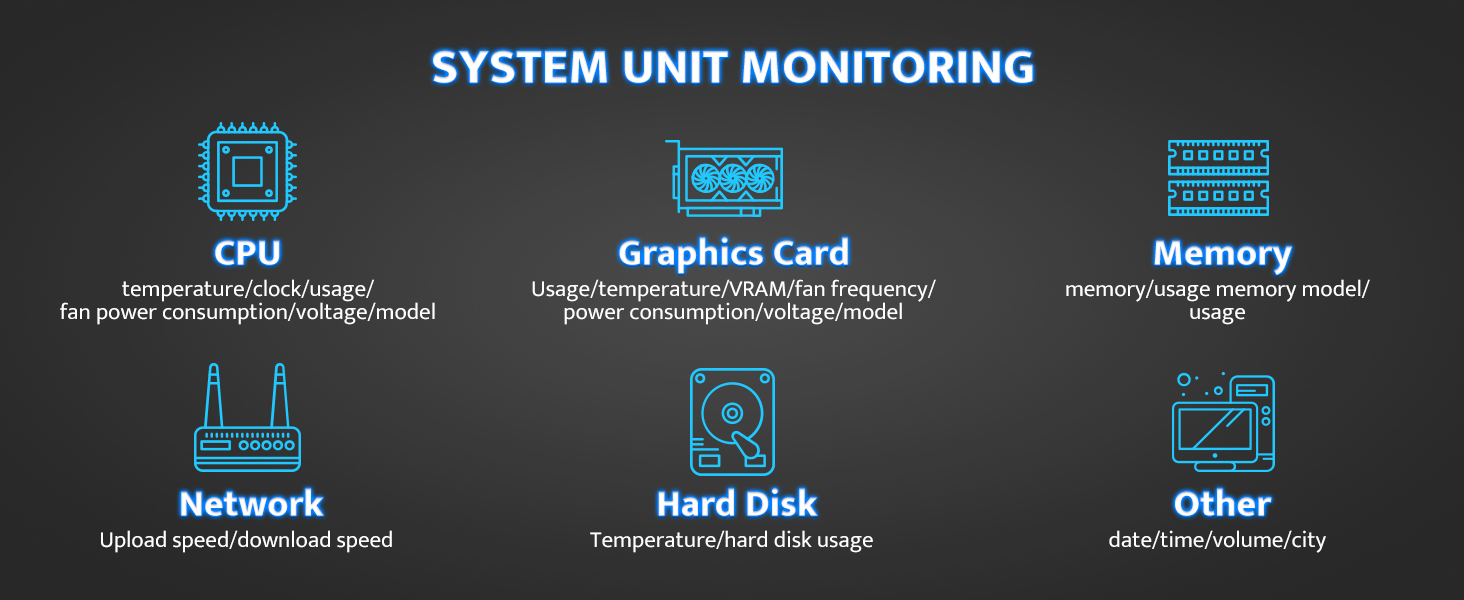
Image 3.1: Physical dimensions of the D-VISION display.
| Ciri | Perincian |
|---|---|
| Dimensi Produk | 4.06 x 1.59 x 2.91 inci |
| Berat Barang | 0.008 auns |
| Nombor Model | D-VISION |
| Saiz Skrin | 3.5 Inci |
| Resolusi | 480x320 Piksel |
| Nisbah Aspek | 1.50:1 |
| Permukaan Skrin | Matte |
| Pengeluar | darkFlash |
4. Arahan Persediaan
Follow these steps to install your darkFlash D-VISION display screen.
4.1 Pemasangan Fizikal
- Kenal pasti Lokasi Pemasangan: The D-VISION display is designed to clip onto the pump housing of compatible CPU liquid coolers. Ensure your cooler has a suitable mounting point.
- Attach Display: Gently align the display module with the designated area on your CPU cooler's pump. Press firmly until the snap clip engages, securing the display in place.

Image 4.1: Easy installation of the D-VISION display using its snap clip.
4.2 Sambungan Kabel
- Sambungkan Kabel Jenis-C: Plug the Type-C end of the provided connection cable into the port on the D-VISION display.
- Connect 9-Pin Header: Connect the 9-pin header end of the cable to an available USB 2.0 header on your motherboard. Refer to your motherboard manual for the correct header location.
- Hidupkan kuasa: Once connected, power on your computer. The display should automatically start.
5. Arahan Operasi
The darkFlash D-VISION display operates through dedicated software, allowing for customization and real-time monitoring.
5.1 Pemasangan dan Penggunaan Perisian
- Muat turun Perisian: Obtain the latest D-VISION control software from the official darkFlash webtapak.
- Pasang Perisian: Follow the on-screen instructions to install the software on your Windows PC (Windows 7-11 supported).
- Pelancaran Perisian: Open the darkFlash D-VISION application. It should automatically detect the connected display.

Image 5.1: D-VISION software interface for system monitoring and theme editing.
5.2 Real-time System Monitoring
The display can show various system parameters:
- CPU: Temperature, clock speed, usage, fan power consumption, voltage, model.
- Kad Grafik: Usage, temperature, VRAM, fan frequency, power consumption, voltage, model.
- Ingatan: Usage, memory model.
- Rangkaian: Upload and download speed.
- Cakera Keras: Temperature, usage.
- Lain-lain: Date, time, volume, city.
Imej 5.2: Selesaiview of system parameters monitored by D-VISION.
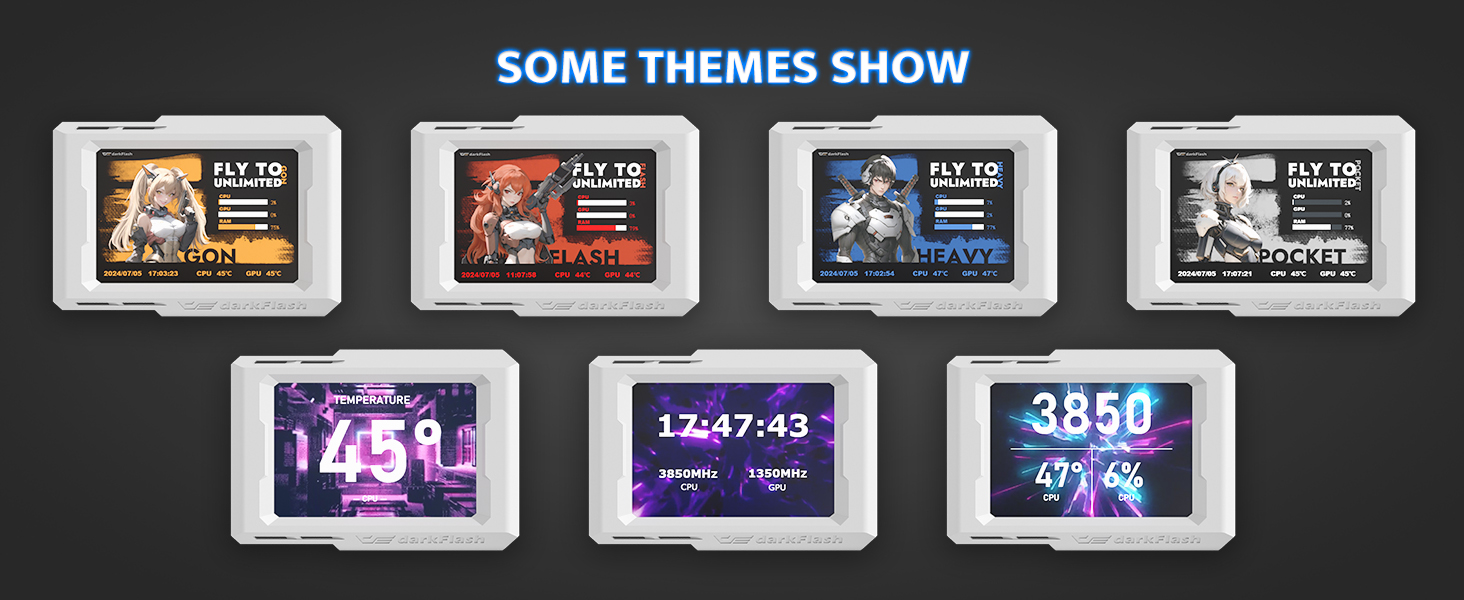
5.3 Customization and Themes
The software allows for extensive customization of the display's appearance.
- Theme Editor: Use the visual theme editor to create or modify display layouts.
- Dynamic Backgrounds: Upload your favorite images or animated GIFs to personalize the background.
- Putaran 180 Darjah: Adjust the display orientation as needed within the software.

Imej 5.3: Cthamples of customizable themes for the D-VISION display.
6. Penyelenggaraan
To ensure the longevity and optimal performance of your darkFlash D-VISION display, follow these simple maintenance guidelines:
- Pembersihan: Use a soft, dry, anti-static cloth to gently wipe the screen and body. Avoid abrasive cleaners, solvents, or aerosol sprays.
- Pengendalian: Handle the display with care. Avoid dropping it or subjecting it to strong impacts.
- Persekitaran: Operate the display in a clean, dry environment, away from extreme temperatures and direct sunlight.
7. Penyelesaian masalah
If you encounter issues with your darkFlash D-VISION display, refer to the following common problems and solutions:
| Masalah | Kemungkinan Punca | Penyelesaian |
|---|---|---|
| Paparan tidak dihidupkan. | No power or improper connection. | Ensure the Type-C cable is securely connected to both the display and the motherboard's USB 2.0 header. Check motherboard power. |
| Software does not detect the display. | Driver issue, incorrect USB header, or software malfunction. | Reinstall the D-VISION software. Try a different USB 2.0 header on the motherboard. Restart your computer. |
| Display shows incorrect data or freezes. | Software glitch or outdated software. | Restart the D-VISION software. Ensure you have the latest version of the software installed. |
| Cannot customize themes or backgrounds. | Software not fully functional or user error. | Refer to the software's help section for detailed customization instructions. Ensure the software is running with administrative privileges if necessary. |
| No Linux support. | The D-VISION software is designed for Windows operating systems only. | The product is not officially supported on Linux. Functionality may be limited or unavailable. |
8. Waranti dan Sokongan
darkFlash products are manufactured to high-quality standards. For warranty information, technical support, or any product-related inquiries, please visit the official darkFlash webtapak atau hubungi perkhidmatan pelanggan mereka secara langsung.
darkFlash rasmi Webtapak: www.darkflash.com


