1. Pengenalan
This manual provides essential information for the safe operation, installation, maintenance, and troubleshooting of your Shinco 120 Pints Energy Star Dehumidifier. Please read this manual thoroughly before using the appliance and retain it for future reference. Proper use ensures optimal performance and extends the lifespan of your dehumidifier.
Maklumat Keselamatan
- Always operate the unit on a level surface to prevent water spillage.
- Pastikan alur keluar kuasa sepadan dengan voltage keperluan unit.
- Jangan sekat saluran masuk atau alur keluar udara. Kekalkan kelegaan sekurang-kurangnya 8 inci (20 cm) di sekeliling unit.
- Cabut plag penyahlembap sebelum membersihkan atau melakukan sebarang penyelenggaraan.
- Jauhkan kanak-kanak dan haiwan peliharaan dari unit semasa operasi.
2. Produk Lebihview
The Shinco 120 Pints Energy Star Dehumidifier is designed to efficiently remove excess moisture from large spaces up to 6,000 Sq.Ft, helping to create a healthier and more comfortable environment. It features Wi-Fi connectivity for remote control, auto defrost, and continuous drainage options.

Figure 2.1: Shinco Dehumidifier with Wi-Fi connectivity and smartphone app interface.
Ciri-ciri Utama
- Kapasiti Tinggi: Removes up to 120 pints of moisture per day (under 95°F, 90%RH conditions).
- Kawasan Liputan Besar: Suitable for spaces up to 6,000 Sq.Ft.
- Wi-Fi Smart Control: Remote operation via smartphone app.
- Adjustable Humidity: Settings from 30% to 80% in 5% increments.
- Pelbagai Pilihan Saliran: Manual water tank (5L/1.32Gal) or continuous drainage with included hose.
- Pemasa 24 Jam: Programmable operation for energy efficiency.
- Auto Nyahbeku: Mencegah pembekuan gegelung pada suhu rendah.
- Kunci Kanak-kanak: Disables control panel buttons to prevent accidental changes.
- Penapis yang boleh dibasuh: Mudah dibersihkan dan diselenggara.
3. Persediaan
Membongkar dan Meletakkan
- Keluarkan dehumidifier dengan berhati-hati daripada pembungkusnya.
- Letakkan unit tegak pada permukaan yang kukuh dan rata.
- Ensure there is at least 8 inches (20 cm) of space around the unit for proper airflow. Do not place it against a wall or furniture that could obstruct the air intake or exhaust.
- Elakkan meletakkan unit berhampiran sumber haba atau di bawah cahaya matahari langsung.
Sambungan Kuasa
Plug the power cord into a grounded electrical outlet. The unit will beep once, and the display will illuminate briefly.
Pilihan Saliran
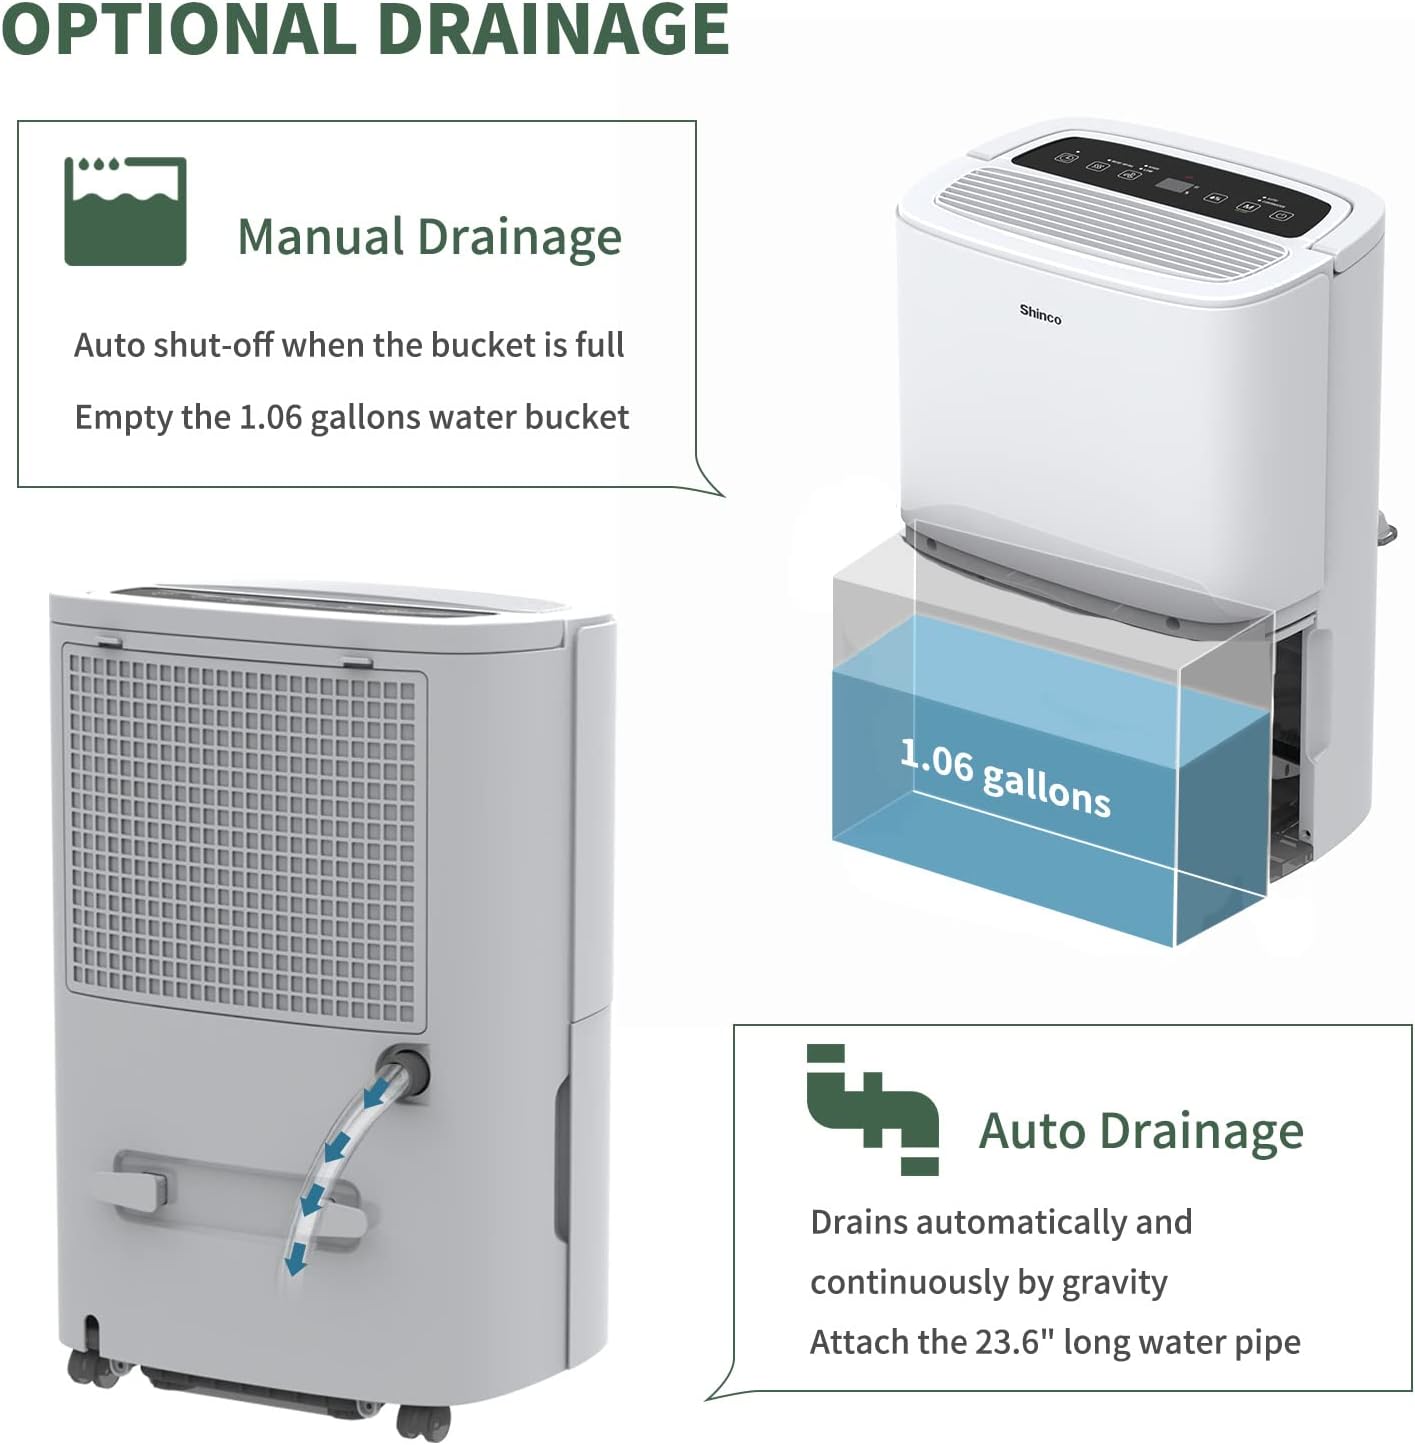
Figure 3.1: Manual and continuous drainage methods.
Dehumidifier anda menawarkan dua kaedah untuk penyingkiran air:
- Saliran Manual (Tangki Air): The unit collects water in its internal 5-liter (1.32-gallon) water tank. When the tank is full, the unit will automatically shut off, display "FL" (Full) on the screen, and an alarm will sound. The tank must be manually emptied.
- Saliran Berterusan (Hos Saliran): For extended operation without manual emptying, attach the included 23.6-inch drain hose to the continuous drain port on the back of the unit. Ensure the hose is sloped downwards to a suitable floor drain or larger container to allow gravity drainage. Do not elevate the hose above the drain port.
4. Arahan Operasi
Panel Kawalan Terlaluview

Figure 4.1: Digital control panel layout.
- Butang Kuasa: HIDUPKAN atau MATI unit.
- Butang Mod: Cycles through operating modes (Auto, Continuous). Press and hold for 3 seconds to activate/deactivate Child Lock.
- Humidity Setting Buttons (%): Melaraskan tahap kelembapan yang diingini (30% hingga 80%).
- Butang Kelajuan Kipas: Selects fan speed (High, Low).
- Butang Pemasa: Menetapkan pemasa hidup automatik atau mati automatik (1-24 jam).
- Inside Drying Button: Activates the internal drying function, useful before storage.
Menetapkan Kelembapan yang Diingini
- Tekan butang Kuasa untuk menghidupkan unit.
- Use the Humidity Setting buttons (%) to select your desired humidity level. The display will show the target humidity. The unit will operate until the room humidity reaches this level, then cycle on and off to maintain it.
Penyesuaian Kelajuan Kipas
Press the Fan Speed button to toggle between High and Low fan speeds. Higher fan speed results in faster dehumidification.
Fungsi Pemasa

Figure 4.2: 24-hour programmable timer function.
The timer allows you to set a specific duration (1-24 hours) for the unit to either turn on or turn off automatically.
- Pemasa Mati Otomatis: While the unit is running, press the Timer button and use the Humidity Setting buttons to set the desired number of hours until the unit turns off.
- Pemasa Auto-On: While the unit is off, press the Timer button and use the Humidity Setting buttons to set the desired number of hours until the unit turns on.
Mod Pengendalian

Figure 4.3: Available operating modes and child lock feature.
- Auto Dehumidify Mode: The unit automatically senses the room's humidity and adjusts its operation to maintain the preset humidity level. If the humidity drops more than 5% below the target, the compressor and fan will stop. If it rises more than 5% above, they will resume.
- Continuous Dry Mode: The unit runs continuously regardless of the humidity level, providing maximum dehumidification. This mode is suitable for drying clothes or in very damp syarat.
Kunci Kanak-kanak
To prevent accidental changes to settings, press and hold the Mode button for 3 seconds to activate or deactivate the Child Lock function. When active, all other buttons on the control panel will be unresponsive.
Kawalan Pintar Wi-Fi

Figure 4.4: Wi-Fi connectivity for remote control.
The dehumidifier can be controlled remotely using a smartphone app. Refer to the separate Wi-Fi setup guide for detailed instructions on connecting your device to your home Wi-Fi network and using the app to adjust settings, monitor humidity, and schedule operations.
5. Penyelenggaraan
Regular maintenance ensures the efficient and long-lasting operation of your dehumidifier.
Membersihkan Penapis Udara

Figure 5.1: Washable air filter location and other design elements.
Penapis udara hendaklah dibersihkan setiap dua minggu atau lebih kerap bergantung pada penggunaan dan kualiti udara.
- Cabut plag penyahlembap daripada salur keluar kuasa.
- Keluarkan penapis dari bahagian belakang unit.
- Basuh penapis dengan air suam dan sabun. Bilas sebersih-bersihnya.
- Biarkan penapis kering sepenuhnya sebelum memasangnya semula. Jangan gunakan pengering atau haba langsung.
Mengosongkan Tangki Air
When the water tank is full, the unit will stop operating and display "FL".
- Tarik keluar tangki air perlahan-lahan dari hadapan unit.
- Kosongkan air yang terkumpul dengan berhati-hati.
- Slide the empty water tank back into the unit until it clicks into place. The unit will resume operation if not in continuous drainage mode.
Membersihkan Bahagian Luar Unit
Lap bahagian luar dehumidifier dengan lembut, damp kain. Jangan gunakan bahan kimia, bahan kasar atau pelarut yang keras, kerana ini boleh merosakkan permukaan.
Penyimpanan
Jika unit tidak akan digunakan untuk tempoh lanjutan:
- Kosongkan tangki air dan pastikan ia bersih dan kering.
- Press the "Inside Drying" button to run the internal drying function, which helps prevent mold and mildew growth inside the unit.
- Bersihkan penapis udara dan pasang semula.
- Cabut palam kord kuasa dan gulungkannya dengan kemas.
- Cover the unit with a plastic bag or its original packaging to protect it from dust.
- Simpan penyahlembap dalam kedudukan tegak di tempat yang sejuk dan kering.
6. Penyelesaian masalah
Sebelum menghubungi sokongan pelanggan, sila rujuk panduan penyelesaian masalah berikut untuk isu biasa.
| Masalah | Kemungkinan Punca | Penyelesaian |
|---|---|---|
| Dehumidifier tidak dihidupkan. | No power; Power cord not plugged in; Child Lock active. | Ensure unit is plugged into a working outlet; Check circuit breaker; Deactivate Child Lock by pressing and holding Mode button for 3 seconds. |
| Tiada air yang dikumpulkan atau penyahlembapan yang tidak mencukupi. | Humidity level already low; Air filter clogged; Room temperature too low; Air inlets/outlets blocked; Unit too small for space. | Adjust desired humidity lower; Clean air filter; Ensure room temperature is above 41°F (5°C); Clear obstructions; Consider a larger capacity unit if space exceeds 6,000 Sq.Ft. |
| "FL" code displayed and unit stops. | Water tank is full or improperly installed. | Empty the water tank; Reinstall the water tank correctly until it clicks into place. |
| Unit freezing up (ice on coils). | Low room temperature; Air filter clogged. | The unit has an Auto Defrost function. If freezing persists, ensure room temperature is not too low (below 41°F/5°C) and clean the air filter. You can also manually activate the "Inside Drying" function to help defrost. |
| Unit bising. | Unit tidak berada di atas permukaan yang rata; Penapis udara tersumbat; Bahagian longgar. | Ensure unit is on a stable, level surface; Clean air filter; Check for any loose components. |
| Isu sambungan Wi-Fi. | Kata laluan Wi-Fi salah; Penghala terlalu jauh; Apl tidak dikemas kini. | Verify Wi-Fi password; Move unit closer to router; Update smartphone app; Refer to Wi-Fi setup guide. |
7. Spesifikasi
Technical specifications for the Shinco 120 Pints Energy Star Dehumidifier (Model B0DZX4B1MK).
| Ciri | Perincian |
|---|---|
| Jenama | Shinco |
| Nama Model | B0DZX4B1MK |
| Kapasiti Dehumidifikasi | 120 Pints/Day (under 95°F, 90%RH) / 50 Pints per Day (DOE Standard) |
| Liputan Keluasan Lantai | Sehingga 6,000 Kaki Persegi |
| Isipadu Tangki | 5 Liter (1.32 Gelen) |
| Dimensi Produk | 9.45"D x 13.5"W x 20.1"H |
| Berat Barang | 30.8 paun |
| warna | putih |
| bahan | plastik |
| Bilangan Kelajuan | 2 (Tinggi, Rendah) |
| Mod Operasi | Berterusan, Auto |
| Ciri Khas | Adjustable Humidity Control, Anti-Spill, Automatic Defrost, Automatic Moisture Removal, Automatic Restart, Automatic Shutoff, Bucket Storage, Child Lock, Continuous Draining, Detachable, Digital Display, Ergonomic Handle, Portable, Quiet Operation, Removable Tank, Timer, Washable Filter, Wi-Fi |
| Komponen yang Disertakan | Dehumidifier, Drain hose |
8. Waranti dan Sokongan
For warranty information and customer support, please refer to the documentation included with your product or contact Shinco customer service directly. Keep your purchase receipt as proof of purchase for warranty claims.


