1. Pengenalan
This manual provides essential information for the safe and effective operation of your ION Audio Retro Glow Boombox. This device combines classic audio playback with modern connectivity, featuring an AM/FM radio, cassette player/recorder, Bluetooth 5.3, USB, and SD card playback capabilities. Please read this manual thoroughly before use and retain it for future reference.
2. Maklumat Keselamatan
- Jangan dedahkan unit kepada air atau lembapan.
- Elakkan meletakkan unit berhampiran sumber haba atau di bawah cahaya matahari langsung.
- Pastikan pengudaraan yang betul; jangan sekat sebarang bukaan pengudaraan.
- Gunakan hanya lampiran/aksesori yang ditentukan oleh pengilang.
- Cabut palam unit semasa ribut petir atau apabila tidak digunakan untuk tempoh yang lama.
- Rujuk semua servis kepada kakitangan perkhidmatan yang berkelayakan.
3. Apa yang Termasuk
Upon unpacking, ensure all items listed below are present and in good condition:
- ION Audio Retro Glow Boombox
- Kabel Kuasa
- Panduan Mula Pantas
4. Produk Lebihview
The Retro Glow Boombox features a translucent housing with multi-colored LED lights that synchronize with music. It includes dual full-range speakers for robust audio output.
Panel Depan

Rajah 1: Depan view of the Retro Glow Boombox, showcasing the cassette deck, radio tuner, and illuminated dual speakers.
Kawalan Teratas

Rajah 2: Terperinci view of the top panel, including volume, bass, treble controls, cassette function buttons (Pause, Stop/Eject, F.FWD, REW, Play, REC), and mode selectors (Tape, Aux, Radio, Bluetooth/USB/SD).
Side Panel and Rear
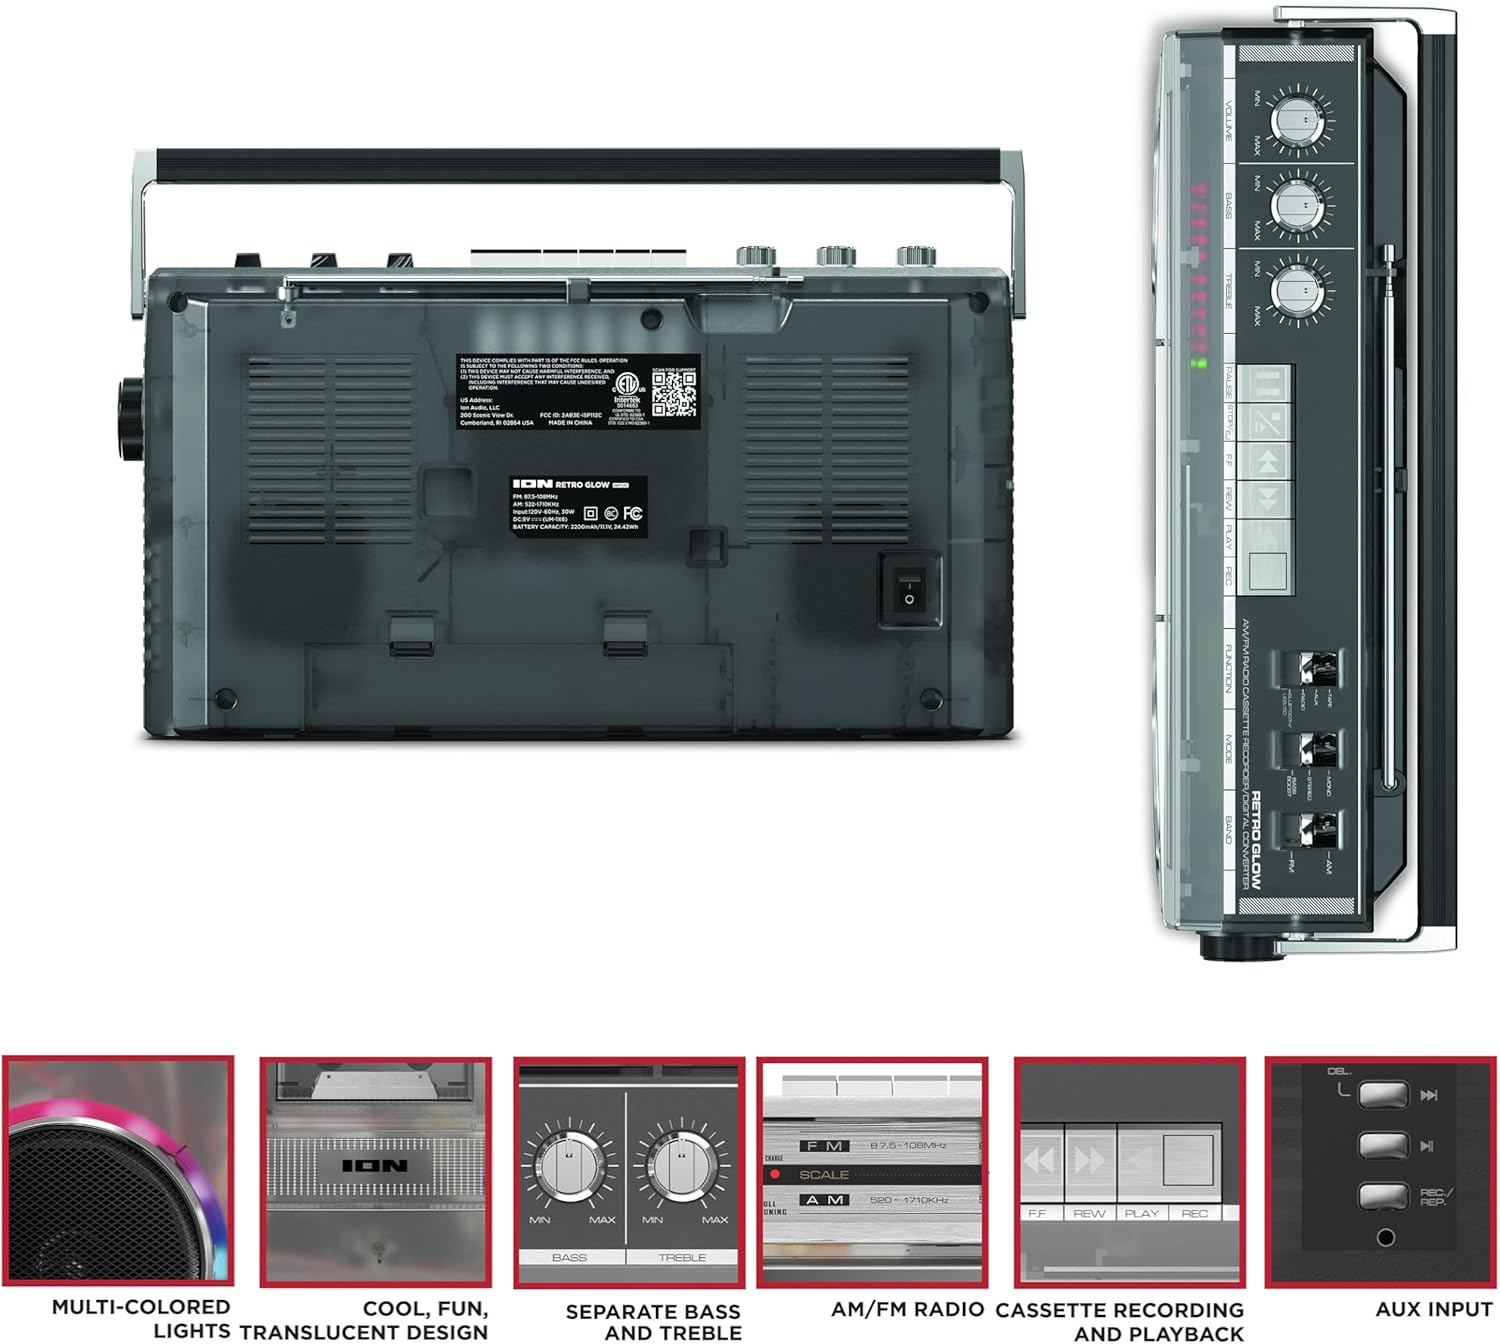
Figure 3: Side panel illustrating the USB port, SD card slot, and playback control buttons. The rear panel includes the power input and battery compartment.
5. Persediaan
Powering the Boombox
The Retro Glow Boombox can be powered via the included AC power cable or by batteries for portable use.
- Kuasa AC: Connect the power cable to the AC input on the rear of the unit and then to a wall outlet.
- Kuasa Bateri: Open the battery compartment on the rear and insert the required batteries (type and quantity specified in specifications).

Rajah 4: Belakang view of the boombox, highlighting the power input and the battery compartment for portable operation.
6. Arahan Operasi
Operasi Am
- Hidupkan/Mati Kuasa: Use the power switch to turn the unit on or off.
- Kawalan Kelantangan: Adjust the 'VOLUME' knob on the top panel to increase or decrease the sound level.
- Kawalan Nada: Use the 'BASS' and 'TREBLE' knobs to customize the audio output to your preference.
- Lampu LED: The multi-colored LED lights around the speakers dance in sync with the music. Refer to the Quickstart Guide for specific controls to change light modes or turn them off.
Fungsi Radio
- Switch the 'FUNCTION' selector to 'RADIO'.
- Select 'AM' or 'FM' using the 'BAND' switch.
- Panjangkan antena teleskopik untuk penerimaan FM yang optimum. Untuk AM, putar unit untuk penerimaan terbaik.
- Use the 'TUNING' knob to scan for stations.
Cassette Player/Recorder
- Main balik: Press the 'STOP/EJ' button to open the cassette door. Insert a cassette tape and close the door. Press 'PLAY' to begin playback.
- Rakaman: To record from the radio, built-in microphone, or an external source (via Aux input), ensure a blank cassette is inserted. Select the desired source using the 'FUNCTION' switch. Press the 'REC' button (often simultaneously with 'PLAY') to start recording.
- Maju Pantas/Putar Balik: Use the 'F.FWD' and 'REW' buttons for tape navigation.
Kesambungan Bluetooth
- Switch the 'FUNCTION' selector to 'BLUETOOTH/USB/SD'. The unit will enter pairing mode.
- On your Bluetooth-enabled device, search for 'Retro Glow Boombox' and select it to pair.
- Once paired, you can stream audio wirelessly to the boombox.
USB and SD Card Playback
- Insert a USB drive or SD card into the respective slot on the side panel.
- Switch the 'FUNCTION' selector to 'BLUETOOTH/USB/SD'. The unit should automatically detect and begin playing audio files daripada media yang dimasukkan.
- Use the playback control buttons (play/pause, skip forward/backward) on the side panel to manage your audio.
Input Bantu
- Connect an external audio device (e.g., smartphone, MP3 player) to the 'AUX' input using a 3.5mm audio cable (not included).
- Switch the 'FUNCTION' selector to 'AUX'. Audio from your external device will play through the boombox speakers.
7. Penyelenggaraan
- Pembersihan: Gunakan kain lembut dan kering untuk membersihkan bahagian luar unit. Jangan gunakan pembersih atau pelarut yang melelas.
- Penjagaan Dek Kaset: Regularly clean the tape heads and pinch rollers with a cotton swab lightly dampdilengkapi dengan isopropil alkohol untuk memastikan kualiti bunyi yang optimum dan mengelakkan kerosakan pita.
- Storan: When not in use, store the boombox in a cool, dry place away from direct sunlight and extreme temperatures.
8. Penyelesaian masalah
Tiada Kuasa
- Ensure the power cable is securely connected to both the unit and a working power outlet.
- If using batteries, check if they are inserted correctly and are not depleted.
Tiada Bunyi
- Check the volume level on the boombox and the connected audio source (if applicable).
- Ensure the correct function mode (Radio, Tape, Bluetooth, USB/SD, Aux) is selected.
- For cassette playback, verify the tape is inserted correctly and the heads are clean.
Isu Berpasangan Bluetooth
- Make sure the boombox is in Bluetooth pairing mode.
- Ensure your Bluetooth device is within range (typically 30 feet or 10 meters).
- Cuba nyahgandingkan dan pasangkan semula peranti.
9. Spesifikasi
| Dimensi Produk | 9.25 x 16.25 x 5.25 inci |
| Berat Barang | 8.93 paun |
| Teknologi Ketersambungan | Bluetooth 5.3, USB, SD Card, Aux Input |
| Jenis Pembesar Suara | Stereo, Full-Range |
| Sumber Kuasa | AC Power Cable, Rechargeable Battery (approx. 10-hour life) |
| Ciri Khas | AM/FM Radio, Cassette Player/Recorder, Multi-colored LED Lights, Retro VU Meters, Separate Bass and Treble Controls |
10. Waranti dan Sokongan
For warranty information or technical support, please refer to the Quickstart Guide included with your product or visit the official ION Audio website. Keep your purchase receipt as proof of purchase may be required for warranty claims.


