1. Pengenalan
This manual provides essential information for the assembly, operation, and maintenance of your Home Centre Addison Shoe Cabinet with Drawers. Please read these instructions carefully before beginning assembly or use to ensure proper function and longevity of the product. Retain this manual for future reference.
2. Produk Lebihview
The Home Centre Addison Shoe Cabinet is designed for organized shoe storage and entryway functionality. It features a 3-door design, including a central mirrored door, and two integrated drawers for additional storage. The cabinet is constructed from prelaminated engineered wood with a walnut finish.
- Kapasiti Storan: Accommodates approximately 22 pairs of shoes across 12 fixed shelves.
- Storan Tambahan: Two top drawers provide space for smaller items.
- Cermin Bersepadu: A full-length mirror is integrated into the central door.
- Pengudaraan: Mesh ventilation caps are included to promote air circulation within the shoe compartments.
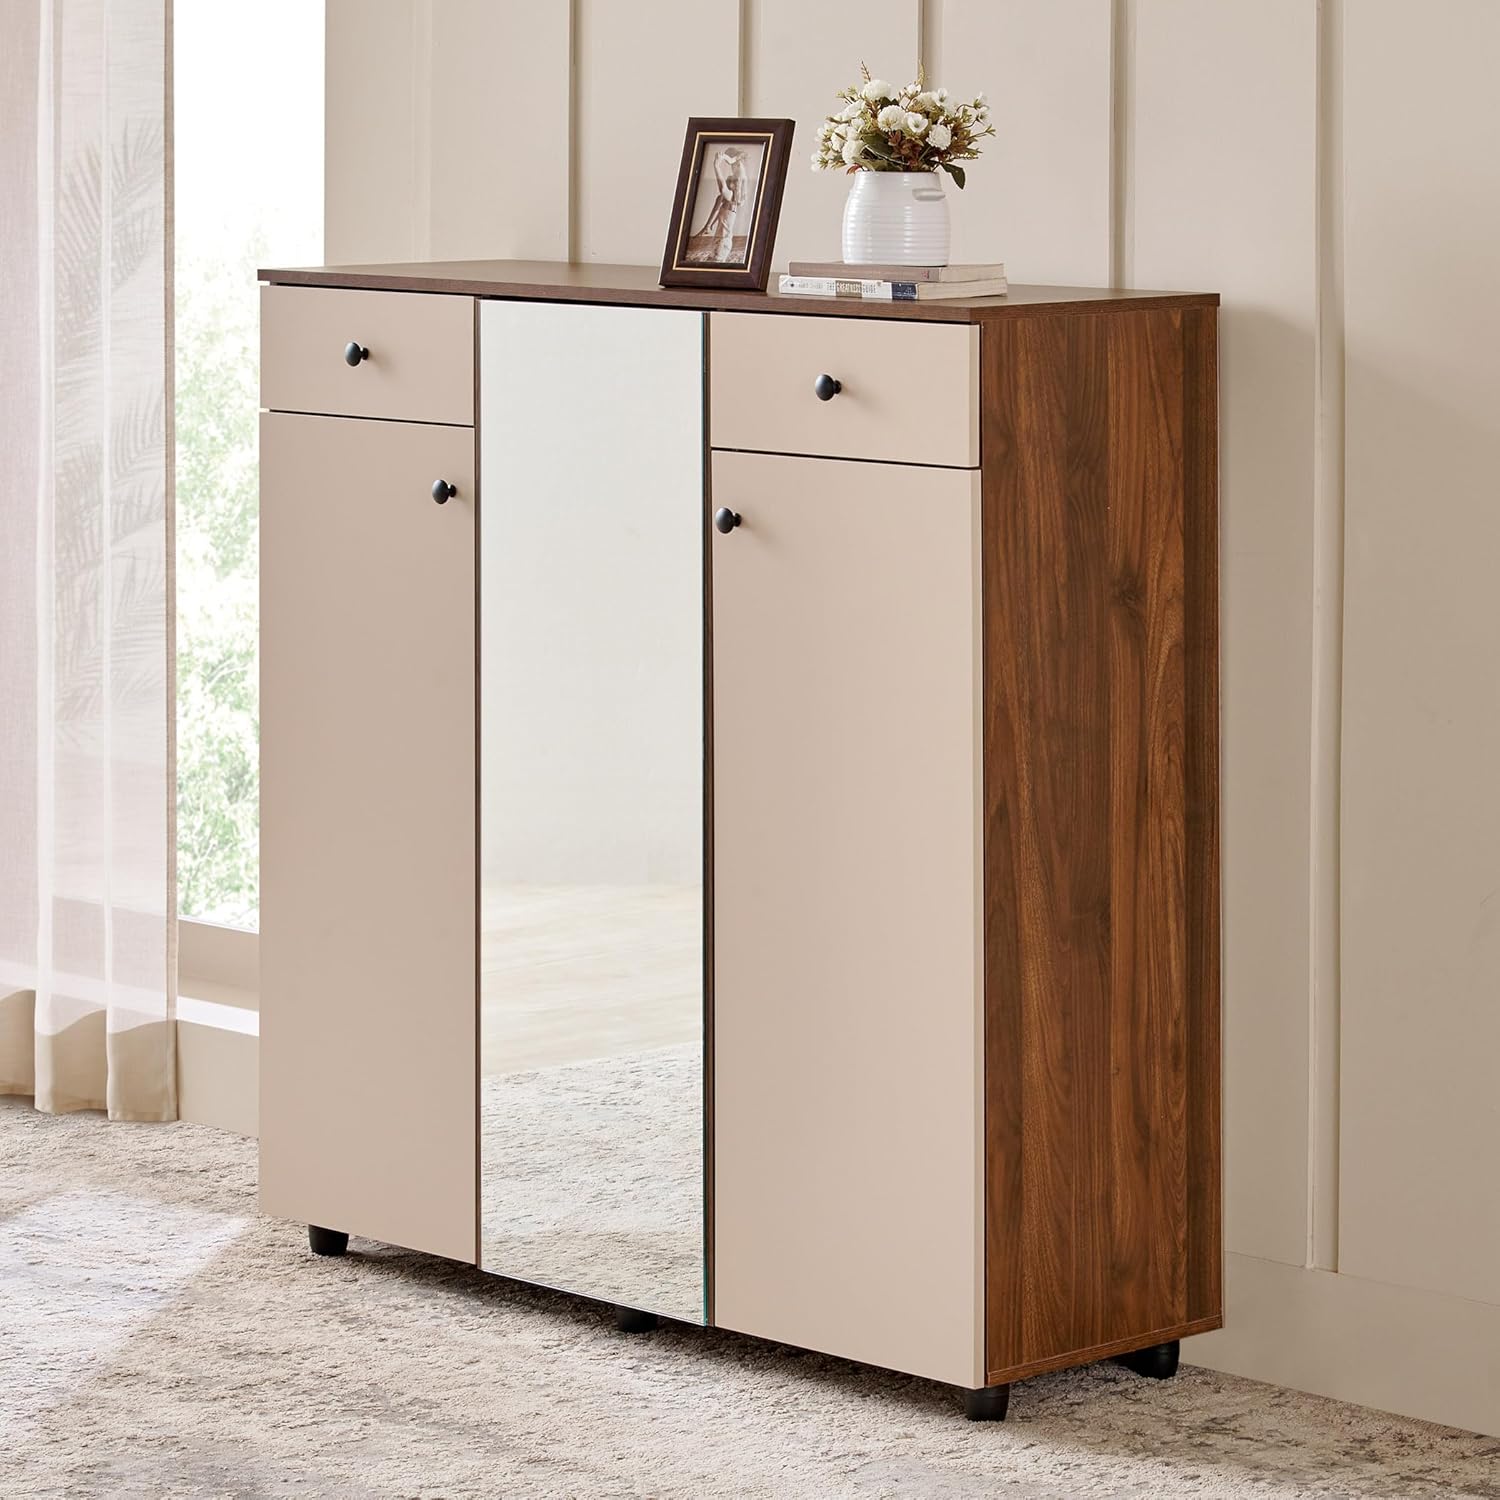
Rajah 1: Depan view of the Home Centre Addison Shoe Cabinet. This image displays the overall design, including the two side doors, the central mirrored door, and the two top drawers.

Rajah 2: A clean front view of the Home Centre Addison Shoe Cabinet in its closed state, highlighting the walnut finish and the central mirror.
3. Maklumat Keselamatan
Adhere to the following safety guidelines during assembly and use:
- Perhimpunan: Pastikan semua komponen dipasang dengan kukuh mengikut arahan pemasangan. Bahagian yang longgar boleh menyebabkan ketidakstabilan.
- Kestabilan: For tall furniture, it is recommended to secure the cabinet to a wall using appropriate anti-tip hardware (not included unless specified in package contents) to prevent accidental tipping, especially in households with children or pets.
- Pengagihan Berat: Distribute weight evenly across shelves and drawers. Avoid placing excessively heavy items on the top surface or in a single compartment.
- Kanak-kanak dan Haiwan Kesayangan: Keep children and pets away from the assembly area. Small parts can be a choking hazard. Do not allow children to climb on or play with the cabinet.
- Penjagaan Cermin: Handle the mirrored door with care to avoid breakage. Clean the mirror with a soft, lint-free cloth and a non-abrasive glass cleaner.
4. Kandungan Pakej
Before beginning assembly, verify that all components listed below are present and undamaged. If any parts are missing or damaged, contact Home Centre customer support.
- Panel Kabinet (Atas, Bawah, Tepi, Belakang)
- Door Panels (2 solid, 1 mirrored)
- Drawer Panels and Runners
- Fixed Shelves (12 for shoe compartments)
- Hardware Pack (Screws, dowels, hinges, drawer pulls, ventilation caps, etc.)
- Assembly Instructions (Separate document, if applicable)
5. Persediaan dan Pemasangan
The Home Centre Addison Shoe Cabinet requires assembly. Due to its size and complexity, carpenter assembly is recommended. If you choose to assemble it yourself, ensure you have the necessary tools and assistance.
5.1 Recommended Tools (Not Included)
- Pemutar skru (kepala Phillips)
- tukul
- Pita Pengukur
- Tahap
5.2 Langkah Perhimpunan (Garis Panduan Am)
- Buka bungkusan dan Susun: Carefully unpack all components and lay them out on a clean, soft surface to prevent scratches. Identify each part using the provided diagrams (if available).
- Pasang Rangka Asas: Connect the bottom panel to the side panels using the designated hardware.
- Pasang Rak: Insert the fixed shelves into their respective slots within the cabinet frame.
- Pasang Laci: Construct the two drawers and attach the drawer runners. Install the drawers into the cabinet frame.
- Pasang Pintu: Secure the hinges to the door panels and then attach the doors to the cabinet frame. Adjust hinges as needed for proper alignment.
- Pasang Panel Belakang: Fasten the back panel to the cabinet frame.
- Sentuhan Akhir: Attach door and drawer pulls. Insert ventilation caps into the designated holes.
Note: Detailed, step-by-step assembly diagrams are typically included with the product hardware. Follow those specific instructions for precise assembly.

Rajah 3: Detail of a door hinge. Proper installation and adjustment of hinges are crucial for door alignment and smooth operation.
6. Arahan Operasi
6.1 Menyimpan Kasut
Open the side doors to access the shoe compartments. Place shoes on the fixed shelves, ensuring they fit within the allocated space. The cabinet is designed to hold approximately 22 pairs of shoes. Utilize the mesh ventilation caps to maintain air circulation and freshness.

Rajah 4: The shoe cabinet with its doors open, revealing multiple pairs of shoes neatly stored on the internal shelves. This illustrates the internal layout and capacity.
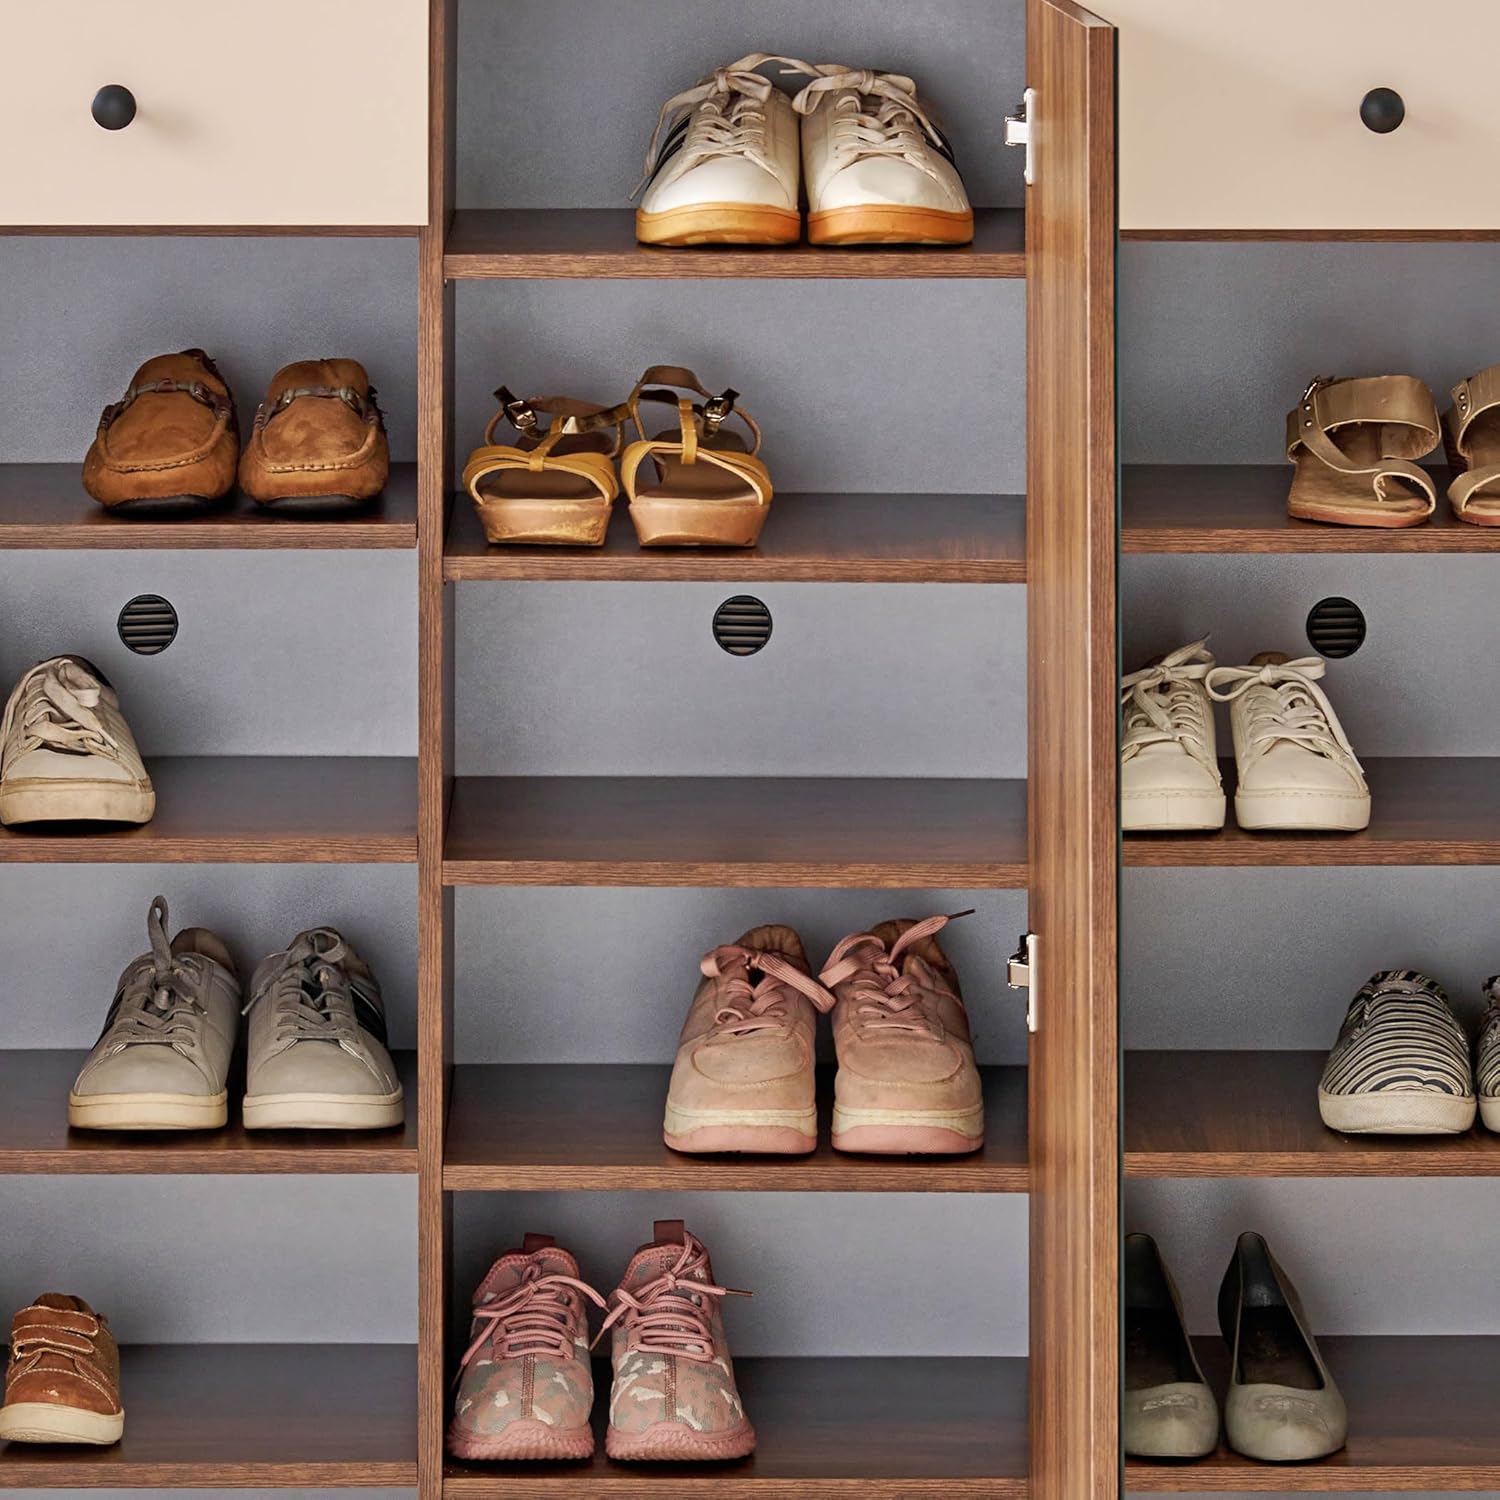
Rajah 5: Seorang yang lebih dekat view of the shoe shelves, showing various types of footwear organized within the compartments. Note the ventilation holes at the back of each compartment.
6.2 Using Drawers
The two top drawers can be used to store smaller items such as shoe care products, keys, or other entryway essentials. Pull the drawer handles gently to open and push to close.
6.3 Using the Mirror
The central door features an integrated mirror. Use it for quick checks before leaving your home. Ensure the mirror is clean for optimal reflection.
7. Penyelenggaraan dan Penjagaan
- Pembersihan: Lap permukaan kabinet dengan kain lembut,amp cloth. Avoid using abrasive cleaners, harsh chemicals, or excessive moisture, as these can damage the engineered wood finish.
- Berhabuk: Lap kabinet dengan kain kering dan lembut secara berkala untuk mengelakkan pengumpulan habuk.
- Pembersihan Cermin: Bersihkan cermin dengan pembersih kaca dan kain bebas bulu. Jangan semburkan pembersih terus ke atas cermin; sapukan pada kain terlebih dahulu.
- Pemeriksaan perkakasan: Periksa semua skru dan pengikat secara berkala untuk memastikan ia kekal ketat. Ketatkan semula jika perlu untuk mengekalkan kestabilan.
- Elakkan Cahaya Matahari Terus: Pendedahan yang berpanjangan kepada cahaya matahari langsung boleh menyebabkan pudar atau perubahan warna pada kemasan kayu.
- Kawalan Kelembapan: Kekalkan suhu dan kelembapan bilik yang stabil untuk mengelakkan kayu melengkung atau retak.
8. Penyelesaian masalah
| Masalah | Kemungkinan Punca | Penyelesaian |
|---|---|---|
| Kabinet goyah atau tidak stabil. | Pengikat longgar; lantai tidak rata. | Check and tighten all assembly screws. Ensure the cabinet is on a level surface; use shims if necessary. Consider securing to a wall. |
| Pintu tidak ditutup dengan betul atau tidak sejajar. | Engsel longgar atau tidak dilaraskan dengan betul. | Adjust the screws on the hinges to align the doors. Refer to hinge adjustment guides if unfamiliar. Tighten hinge screws. |
| Laci melekat atau tidak meluncur dengan lancar. | Drawer runners are misaligned or dirty; overloaded drawer. | Check that drawer runners are correctly installed and free of debris. Lightly lubricate runners with silicone spray if needed. Reduce drawer contents. |
| Scratches or minor damage to surface. | Hentaman atau lelasan yang tidak disengajakan. | For minor scratches, use a furniture repair marker or wax stick that matches the walnut finish. |
9. Spesifikasi
| Ciri | Perincian |
|---|---|
| Nama Model | Addison |
| Jenama | Pusat Rumah |
| Dimensi Produk (D x W x H) | 40D x 120W x 120H Sentimeter |
| bahan | Kayu Kejuruteraan |
| warna | kenari |
| Bilangan Pintu | 3 (1 mirrored, 2 solid) |
| Bilangan Laci | 2 |
| Bilangan Rak | 15 (including internal compartments) |
| Kapasiti Kasut | Approximately 22 pairs |
| Berat Barang | 15 kg |
| Perhimpunan Diperlukan | Yes (Carpenter Assembly Recommended) |
| Negara Asal | India |

Rajah 6: Berdimensi view of the shoe cabinet, showing its height (120 cm), width (120 cm), and depth (40 cm) in relation to an average adult figure.
10. Waranti dan Sokongan
For warranty information, product support, or to report missing/damaged parts, please contact Home Centre customer service. Keep your purchase receipt and model information (Addison) handy when contacting support.
Visit the official Home Centre store for more information: Home Centre Store


