1. Pengenalan
This manual provides comprehensive instructions for the safe and effective operation, setup, maintenance, and troubleshooting of your HITBOX MIG200III 6-in-1 Multi-Process Welder. Please read this manual thoroughly before using the equipment and retain it for future reference.
The HITBOX MIG200III is a versatile welding machine designed for various applications, offering six welding processes: Gas MIG, Gasless Flux Core MIG, Stick (MMA), Lift TIG, Spot Welding, and Spool Gun compatibility. It features synergic control, digital welding technology, and a large LED display for ease of use.

Image 1.1: HITBOX MIG200III Welder and included accessories.
2. Maklumat Keselamatan
AMARAN: Kimpalan boleh berbahaya. Sentiasa patuhi langkah berjaga-jaga keselamatan untuk mencegah kecederaan atau kematian.
- Renjatan Elektrik Boleh Membunuh: Do not touch live electrical parts. Wear dry welding gloves and protective clothing. Ensure the workpiece is properly grounded.
- Asap dan Gas Boleh Berbahaya: Keep your head out of the fumes. Use enough ventilation, exhaust at the arc, or both, to keep fumes and gases away from your breathing zone.
- Sinar Arka Boleh Membakar Mata dan Kulit: Wear a welding helmet with a proper shade of filter to protect your face and eyes. Wear appropriate protective clothing to protect your skin.
- Bahaya Kebakaran dan Letupan: Remove all flammables within 35 feet (10 meters) of the welding area. Have a fire extinguisher nearby.
- Bahagian Panas Boleh Menyebabkan Melecur Teruk: Allow welding equipment to cool before touching.
- Medan Magnet: Pemakai perentak jantung harus berunding dengan doktor mereka sebelum beroperasi.
- Always ensure the machine is connected to a properly rated power supply (110V or 220V) and that the power cord is in good condition.
3. Produk Lebihview
3.1 Ciri-ciri Utama
- 6-in-1 Multi-Process Welding: Supports Gas MIG, Gasless Flux Core MIG, Stick (MMA), Lift TIG, Spot Welding, and Spool Gun (TIG torch and spool gun sold separately).
- Kawalan Sinergik: Automatically adjusts recommended current and wire feed speed based on selected wire diameter and gas type, simplifying setup.
- Digital Welding Technology: Equipped with MCU control and IGBT inverter for improved stability and performance. Includes burn-back adjustment, pre-flow/post-flow, and 2T/4T settings.
- Paparan Digital LED Besar: Provides clear and accurate data visibility for easy operation.
- Dwi Voltage Keupayaan: Beroperasi pada kedua-dua bekalan kuasa 110V dan 220V.
- Keselamatan yang Dipertingkatkan: Features VRD (Voltage Peranti Pengurangan), lebihan arus, lebihan voltage, overload, and overheat protection.

Image 3.1: Multi-Process Capabilities of the HITBOX MIG200III.
3.2 Components (Typical)
The HITBOX MIG200III typically includes:
- MIG200III Welding Machine
- MIG Torch (with graphene tube enhancement)
- Tanah Clamp
- Electrode Holder (for Stick welding)
- Flux Core Wire Spool
- Contact Tips and Nozzles
- Power Cord (110V/220V compatible)
Note: Additional accessories such as a TIG torch, spool gun, and gas regulator are sold separately.

Image 3.2: Internal components and safety features.
4. Persediaan
4.1 Sambungan Kuasa
- Ensure the welder is turned off.
- Connect the power cord to a suitable 110V or 220V AC power outlet. The machine automatically detects the voltage.
- Verify the power source meets the welder's requirements.
4.2 Pemasangan Wayar (MIG/Teras Fluks)
- Open the wire feeder compartment.
- Place the wire spool onto the spool holder, ensuring it rotates freely.
- Feed the welding wire through the guide tube and into the drive roller mechanism.
- Tutup lengan ketegangan roller pemacu dan laraskan ketegangan dengan sewajarnya untuk diameter wayar.
- Sambungkan obor MIG ke panel hadapan.
- Press and hold the wire feed button (often integrated with the gas save function) to feed the wire through the torch liner until it exits the contact tip.
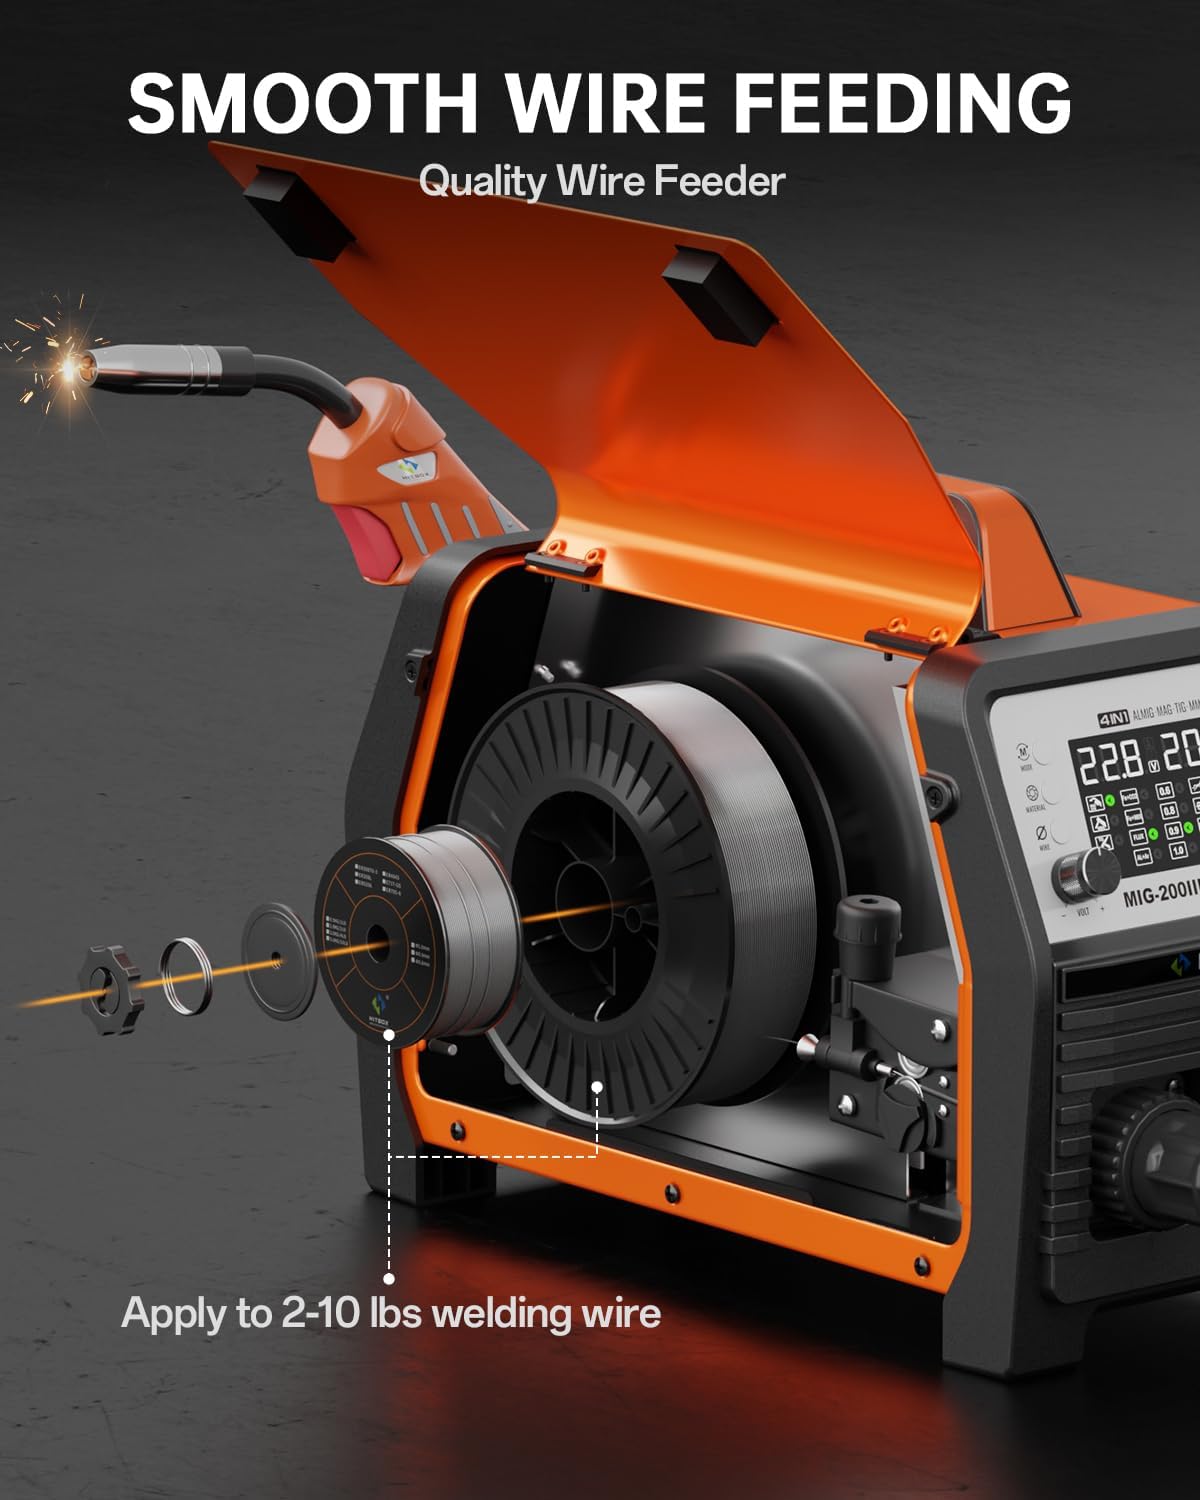
Image 4.1: Wire Spool Installation.
4.3 Sambungan Gas (untuk Gas MIG)
- Attach the gas hose from your shielding gas cylinder regulator to the gas inlet connector on the rear of the welder.
- Pastikan semua sambungan ketat untuk mengelakkan kebocoran gas.
- Open the gas cylinder valve and adjust the flow rate on the regulator as required for your welding process.
4.4 Obor dan Tanah Clamp Sambungan
- Sambungkan obor MIG kepada penyambung yang sesuai pada panel hadapan.
- Sambungkan tanah clamp cable to the designated terminal on the front panel. For Flux Core MIG, the ground clamp is typically connected to the positive (+) terminal, and for Gas MIG, it's typically connected to the negative (-) terminal. Refer to the machine's specific polarity markings.
- Pasangkan tanah cl dengan selamatamp ke bahan kerja atau meja kimpalan, memastikan sentuhan elektrik yang baik.
Video 4.1: Demonstrates connecting the MIG torch, feeding welding wire, and adjusting settings on the digital display.
5. Arahan Operasi
5.1 Kuasa Hidup dan Pemilihan Mod
- Turn on the welder using the main power switch.
- Use the control panel to select the desired welding process (MIG, MMA, TIG, etc.).
5.2 Synergic Control (MIG)
The synergic control simplifies MIG welding setup:
- Pilih SYN mod pada paparan.
- Pilih yang Jenis Bahan (e.g., Fe+CO2 for carbon steel with CO2, Fe+MIX for carbon steel with mixed gas, FLUX for flux core, AL+Ar for aluminum with Argon).
- Pilih Diameter Wayar (e.g., 0.8mm, 0.9mm, 1.0mm).
- The machine will automatically suggest optimal voltage and wire feed speed. Fine-tune these settings using the voltage dan amperage/wire feed speed knobs if necessary.

Image 5.1: Synergic Control Interface.
5.3 Specific Welding Modes
Gas MIG / Flux Core MIG:
- Select the appropriate MIG mode (Gas or Flux).
- Adjust parameters using synergic control or manually.
- guna 2T/4T function: 2T (Two-Touch) for short welds, 4T (Four-Touch) for longer welds without holding the trigger.
- Pre-Gas/Post-Gas: Adjust the duration of gas flow before and after welding to protect the weld puddle.
Kimpalan Kayu (MMA):
- Pilih mod MMA.
- Connect the electrode holder to the appropriate terminal and the ground clamp kepada yang lain.
- Laraskan amperage based on electrode type and material thickness.
- Features include Hot Start, Arc Force, and Anti-stick for improved arc stability and performance.
Angkat Kimpalan TIG:
- Pilih mod TIG. (Requires separate TIG torch, not included).
- Sambungkan obor TIG dan tanah clamp.
- Initiate arc by gently touching the tungsten electrode to the workpiece and lifting slightly.
Kimpalan Titik:
- Select Spot Welding mode.
- Adjust spot welding time as needed.
Spool Gun Welding:
- Connect a compatible spool gun. (Spool gun sold separately).
- Ideal for welding aluminum and other soft wires.

Image 5.2: Stick & Lift TIG Welding Parameters.
5.4 Gas Management Functions
- Gas Save: Press and hold the knob to feed wire without gas, useful for initial wire feeding or testing.
- Pemeriksaan Gas: Use this function to check the proper supply and flow of shielding gas before welding.

Image 5.3: Gas Save and Gas Check Functions.
6. Penyelenggaraan
Regular maintenance ensures optimal performance and longevity of your welding machine.
- Pembersihan: Regularly clean the exterior of the machine with a dry, soft cloth. Ensure ventilation openings are free from dust and debris. Use compressed air to clear internal dust periodically, ensuring the machine is unplugged.
- Pengumpan Kawat: Inspect the drive rollers and wire liner for wear or blockages. Clean any metal dust or debris from the wire path. Ensure proper tension on the drive rollers.
- Obor dan Kabel: Check the MIG torch nozzle, contact tip, and diffuser for spatter buildup and wear. Replace worn parts as needed. Inspect all cables (MIG torch, ground clamp, electrode holder, power cord) for cuts, cracks, or loose connections.
- Storan: Simpan mesin kimpal di persekitaran yang bersih dan kering, jauh daripada habuk, kelembapan dan bahan menghakis yang berlebihan.
7. Penyelesaian masalah
Bahagian ini menangani isu biasa yang mungkin anda hadapi. Untuk masalah yang tidak disenaraikan di sini, hubungi sokongan pelanggan.
- Tiada Kuasa:
Kemungkinan Punca: Power cord not connected, circuit breaker tripped, machine switch off.
Penyelesaian: Check connections, reset breaker, ensure power switch is ON. - Tiada Arka / Arka Lemah:
Kemungkinan Punca: Poor ground connection, incorrect settings, worn contact tip, wrong polarity, wire feed issue.
Penyelesaian: Pastikan tanah clamp has good contact. Verify welding parameters (voltage, amperage, wire speed). Replace contact tip. Check polarity for the selected welding process. Inspect wire feeder for blockages or incorrect tension. - Wire Feeding Problems (Wire bunched up, inconsistent feed):
Kemungkinan Punca: Incorrect drive roller tension, clogged liner, wrong drive roller size, spatter in nozzle/tip.
Penyelesaian: Adjust drive roller tension. Clean or replace the torch liner. Ensure drive rollers match wire diameter. Clean nozzle and replace contact tip if necessary. - Perlindungan Terlalu Panas Diaktifkan:
Kemungkinan Punca: Melebihi kitaran tugas, pengudaraan yang lemah.
Penyelesaian: Allow the machine to cool down. Ensure adequate airflow around the welder. Reduce welding time or current. - tidak tepat Amperage Display:
Kemungkinan Punca: Calibration variance.
Penyelesaian: While the display provides a guide, experienced users may need to adjust settings based on visual weld quality. This is a known characteristic for some units and does not necessarily indicate a malfunction if welding performance is satisfactory.
8. Spesifikasi
| Spesifikasi | Nilai |
|---|---|
| Jenama | HITBOX |
| Nombor Model | MIG200III |
| Berat Barang | 31.8 paun |
| Dimensi Pakej | 20.2 x 15.2 x 12.8 inci |
| Sumber Kuasa | AC (110V/220V Dwi Voltage) |
| Komponen yang Disertakan | MIG Welder (MIG200III) |
| Bateri Diperlukan? | Tidak |
9. Waranti dan Sokongan
For warranty information, technical support, or service inquiries, please contact HITBOX customer service directly. Refer to the product packaging or the official HITBOX webtapak untuk butiran hubungan terkini.
Please have your model number (MIG200III) and purchase date available when contacting support.