1. Pengenalan
This manual provides essential information for the safe and efficient operation of your Bietrun 2000W Pure Sine Wave Inverter. Please read it thoroughly before installation and use, and retain it for future reference.
Kandungan Pakej
Sahkan bahawa semua item terdapat dalam pakej:
- 1 x Bietrun 2000W Pure Sine Wave Inverter
- 2 x 10AWG 3-foot Battery Cables (Red and Black)
- 1 x Ground Cable
- 1 x Alat Kawalan Jauh
- 4 x Fius
- 1 x Small Wrench
- Skru Pemasangan

Image 1.1: The Bietrun 2000W Pure Sine Wave Inverter with its remote control, battery cables, ground cable, fuses, and wrench.
2. Arahan Keselamatan
Observe the following safety precautions to prevent injury and damage to the inverter or connected devices:
- Jangan buka penyongsang casing. Tiada bahagian yang boleh diservis pengguna di dalamnya.
- Pastikan pengudaraan yang betul di sekitar inverter. Jangan halang lubang penyejukan.
- Jauhkan inverter daripada air, kelembapan, bahan mudah terbakar dan cahaya matahari langsung.
- Sambungkan penyongsang hanya kepada sumber kuasa 12V DC. Menyambung ke voltages boleh menyebabkan kerosakan.
- Ensure correct polarity when connecting battery cables (Red to Positive, Black to Negative). Reverse polarity will cause damage.
- Always connect the ground cable to a proper earth ground.
- Do not exceed the inverter's rated continuous power output (2000W) or peak surge power (4000W).
- Putuskan sambungan inverter daripada bateri sebelum melakukan sebarang penyelenggaraan atau pembersihan.
Ciri Perlindungan Bersepadu
The inverter includes multiple protection mechanisms:
- Perlindungan Lebihan
- Vol. Rendahtage Perlindungan
- Perlindungan GFCI
- Overvoltage Perlindungan
- Perlindungan Suhu Terlebih
- Perlindungan Litar pintas
- Perlindungan Sambungan Terbalik
- Lebih Perlindungan Semasa

Image 2.1: Visual representation of the inverter's comprehensive safety protection system.
3. Ciri-ciri Produk
The Bietrun 2000W Pure Sine Wave Inverter is designed for reliable power conversion with advanced features:
- Output Gelombang Sinus Tulen: Provides high-quality AC power (THD < 3%) suitable for sensitive electronics, ensuring stable operation and minimizing damage risk.
- Kecekapan Tinggi: Conversion efficiency exceeding 90% reduces energy loss.
- Kuasa Berterusan: Delivers 2000W continuous power with a 4000W peak surge capacity.
- Output Serbaguna: Features 4 AC outlets, 1 AC wiring terminal, 2 USB ports (5V/2.1A), and 1 Type-C port (5V/2.1A).
- HD LED Display: Provides real-time status updates including input/output voltage, charging status, battery status, current power, and fault codes.
- Kawalan Jauh: Allows for convenient power management from a distance.
- Operasi senyap: High-efficiency cooling system with a low-noise fan maintains optimal operating temperature.
- Reka bentuk padat dan tahan lama: Encased in rugged Aluminum Alloy, with dimensions of 19 x 10 x 7 inches and a weight of 12.5 lbs.

Image 3.1: Key features of the Bietrun 2000W Pure Sine Wave Inverter.
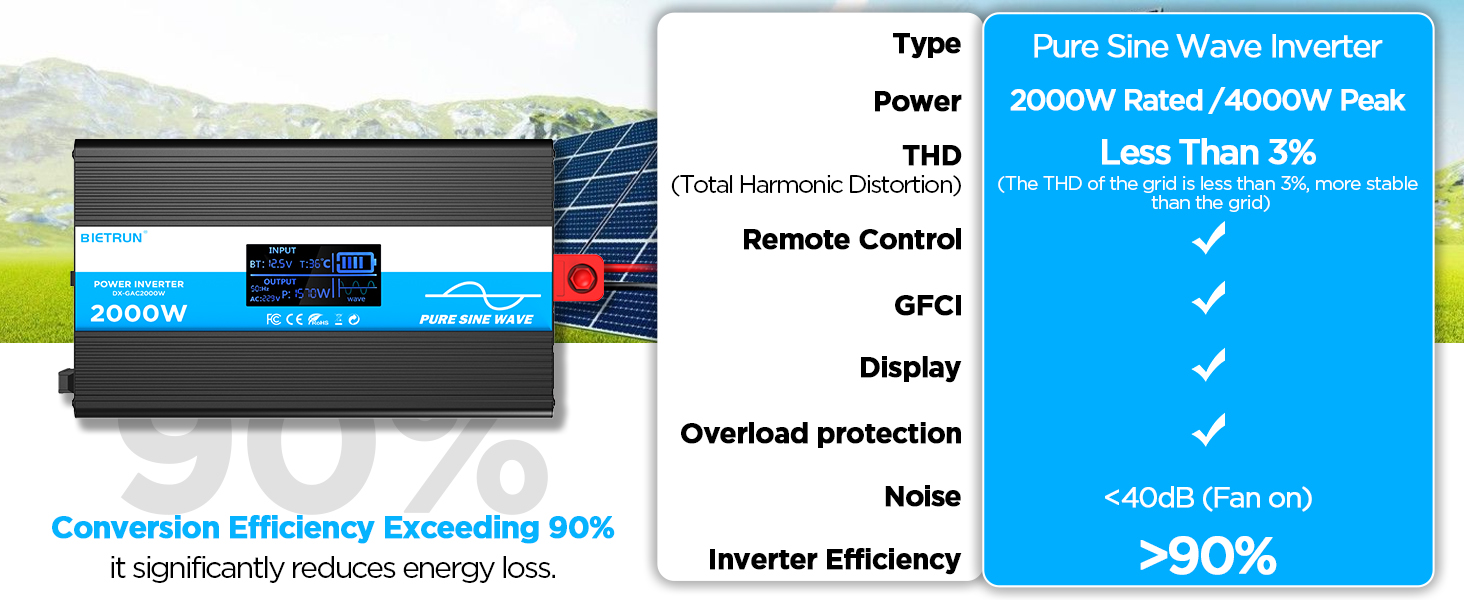
Image 3.2: Illustrates the stable, grid-like output of a pure sine wave inverter compared to unstable power from other types.
4. Persediaan dan Pemasangan
Lokasi dan Pemasangan
Choose a dry, well-ventilated location away from direct sunlight, heat sources, and flammable materials. The inverter can be wall-mounted using the provided screws.
Keserasian Bateri
The inverter is compatible with various 12V battery types, including LiFePO4, LI, SLD, GEL, FLD, and AGM batteries.

Image 4.1: The inverter supports multiple 12V battery chemistries.
Langkah Sambungan
- Sediakan Kabel: Use the provided 10AWG 3-foot cables. Ensure all connections are secure.
- Connect Ground Cable: Attach the green/yellow ground cable to the inverter's ground terminal and to a reliable earth ground point.
- Sambungkan Kabel Bateri:
- Sambungkan merah battery cable to the inverter's positif (+) terminal.
- Sambungkan hitam battery cable to the inverter's negatif (-) terminal.
- Sambungkan hujung yang satu lagi merah cable to the battery's positif (+) terminal.
- Sambungkan hujung yang satu lagi hitam cable to the battery's negatif (-) terminal.
Penting: Ensure correct polarity. A spark may occur during the final connection, which is normal due to capacitor charging.
- Sambungan Selamat: Double-check all connections for tightness to prevent loose contacts and overheating.
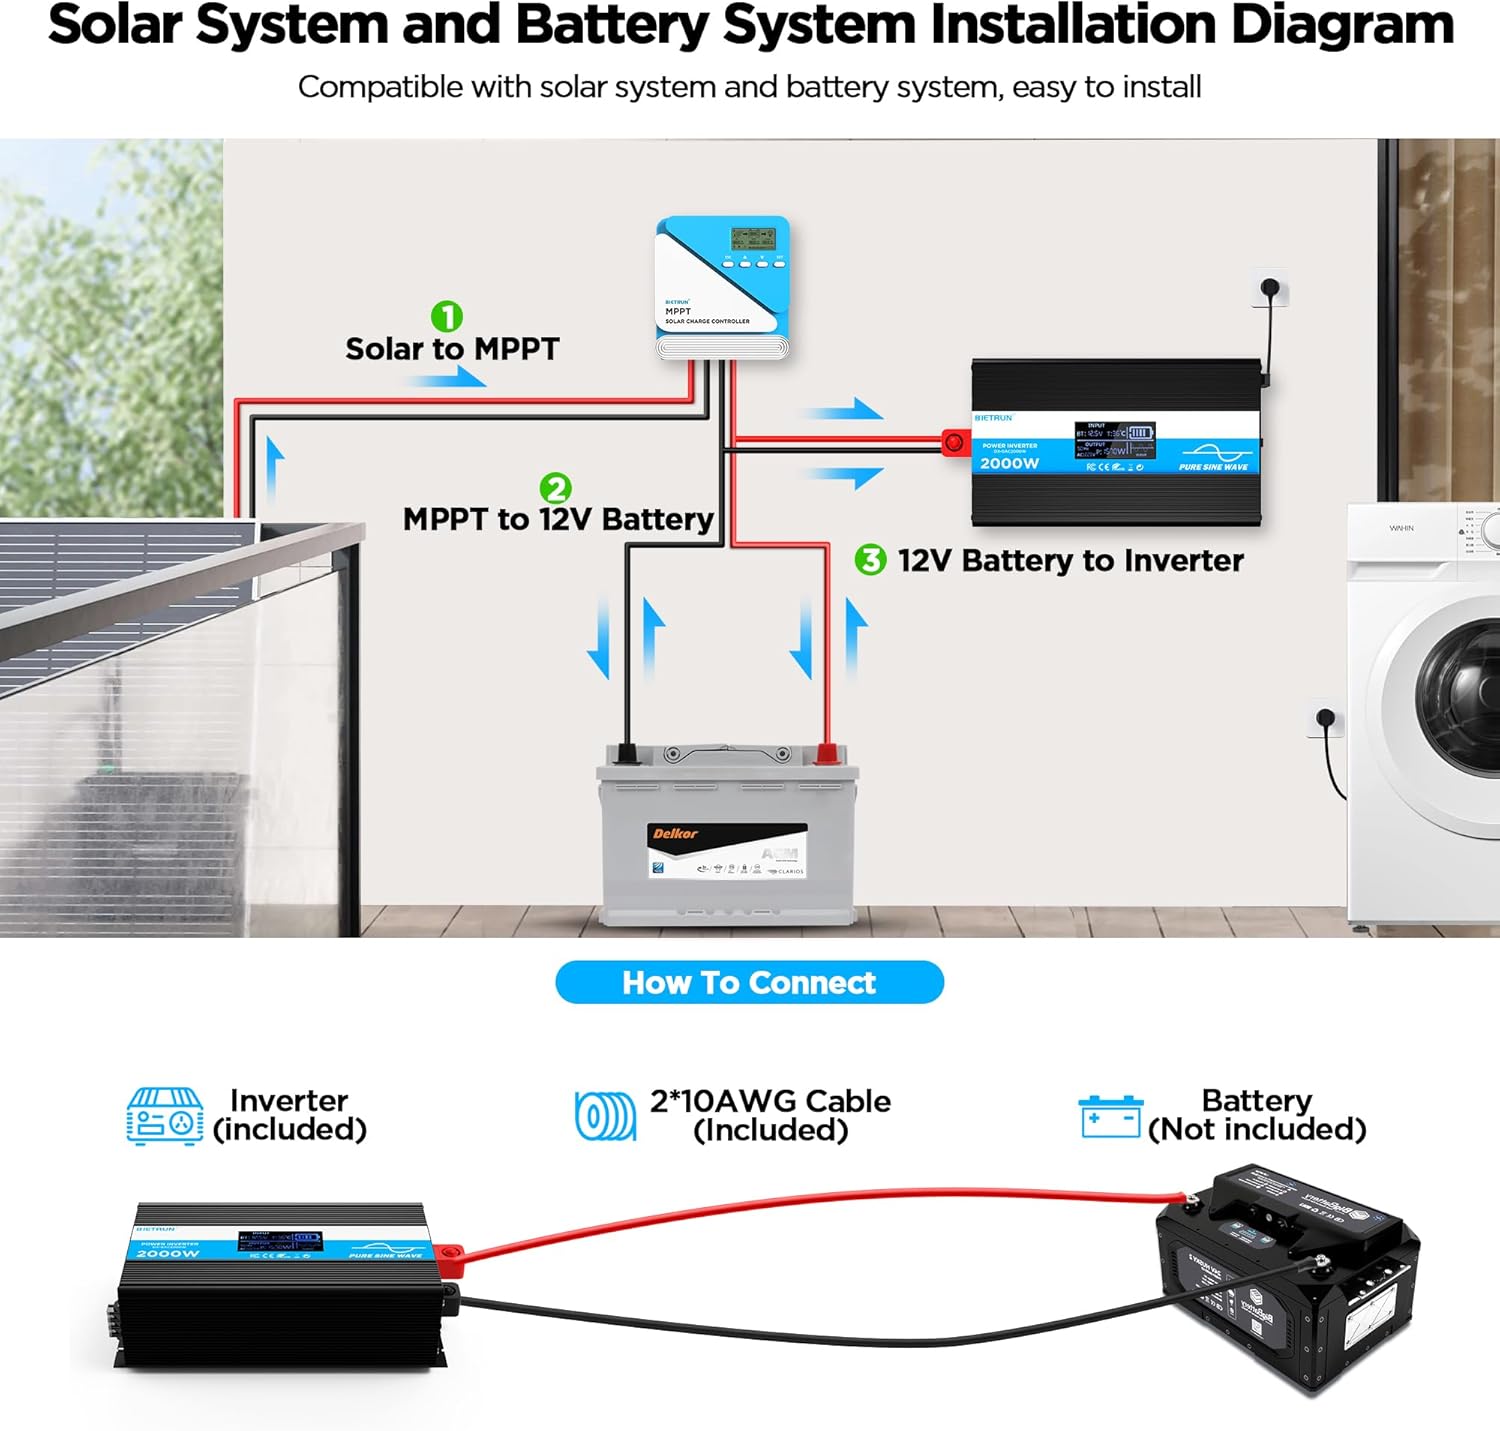
Image 4.2: Basic wiring diagram for connecting the inverter to a 12V battery.
Inverter Interface Overview

Image 4.3: Front panel layout with output interfaces and controls.

Image 4.4: Rear panel layout with battery input terminals and cooling fans.
5. Operasi
Menghidupkan/Mematikan
- Operasi Manual: Flip the ON/OFF switch on the inverter to the 'ON' position to power on. Flip to 'OFF' to power off.
- Operasi Kawalan Jauh: Ensure the inverter's 'REMOTE' switch is in the 'ON' position. Use the ON/OFF buttons on the remote control to operate the inverter.
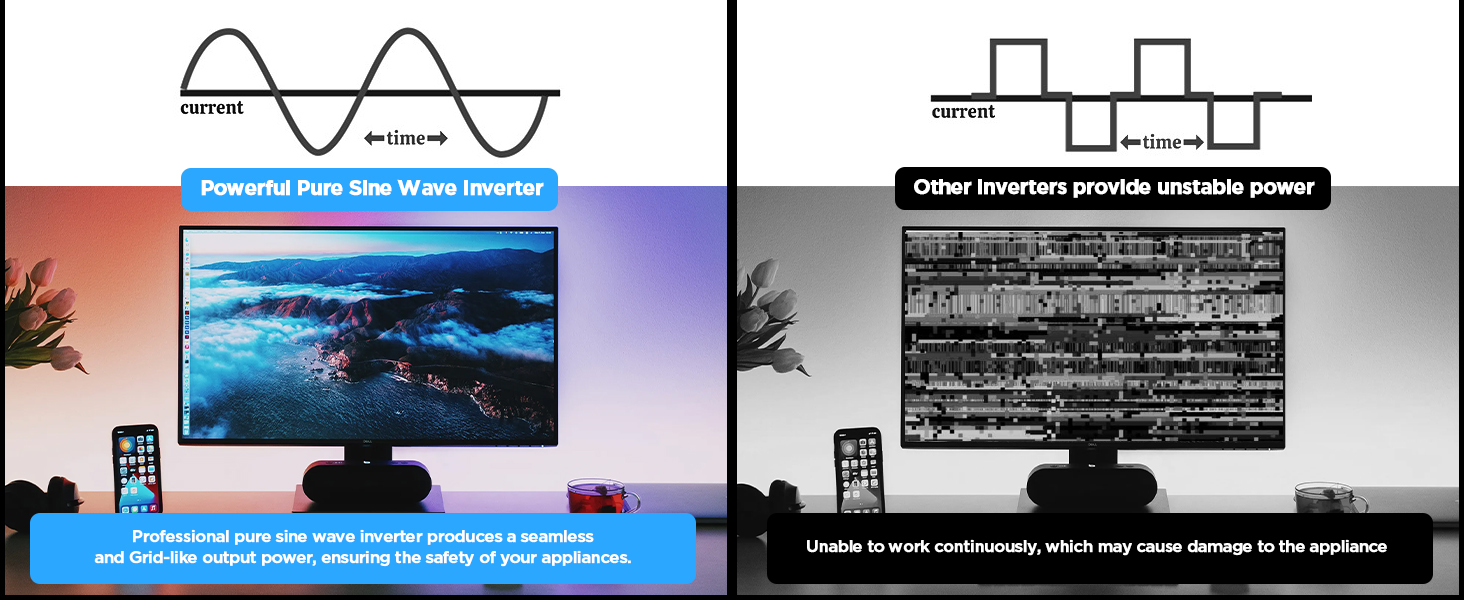
Image 5.1: The remote control allows for convenient operation.
Menyambung Peranti
Once the inverter is powered on, plug your AC devices into the AC outlets or connect to the AC wiring terminal. USB devices can be connected to the USB or Type-C ports.
Ensure the total power consumption of all connected devices does not exceed 2000W continuously.
6. HD Display Information
The integrated HD display provides real-time operational data and fault indications:
- Input: Memaparkan vol. Bateritage (BT) and internal temperature (T).
- Output: Shows output frequency (Hz), AC voltage (AC), and current power consumption (P).
- Status Bateri: Visual indicator of battery charge level.
- Bentuk gelombang: Indicates pure sine wave output.
- Kod Kerosakan: Numeric codes appear for specific issues, aiding in troubleshooting.

Image 6.1: The HD display provides comprehensive status updates and fault codes.
Penerangan Kod Kesalahan
- 2: Vol. Rendahtage Amaran
- 3: Overvoltage Perlindungan
- 4: Vol. Rendahtage Perlindungan
- 5: Amaran Lebihan
- 6: Perlindungan Lebihan
- 7: Perlindungan Suhu Terlebih
- 8: Perlindungan Litar pintas Output
7. Penyelesaian masalah
If the inverter is not functioning correctly, refer to the display for fault codes and consult the table below:
| Masalah | Kemungkinan Punca | Penyelesaian |
|---|---|---|
| Inverter tidak menyala | Sambungan bateri longgar, volum bateri rendahtage, fius yang rosak. | Check battery cable connections. Recharge or replace battery. Check and replace fuses if blown. |
| No AC output (Fault Code 8) | Litar pintas keluaran. | Disconnect all AC loads. Check for short circuits in connected devices or wiring. Reconnect one by one. |
| Overload warning/protection (Fault Code 5/6) | Beban yang disambungkan melebihi kapasiti penyongsang. | Reduce the total power of connected devices. Disconnect high-power appliances. |
| Volum rendahtage warning/protection (Fault Code 2/4) | Bateri voltage terlalu rendah. | Recharge the battery. Check battery health. |
| Overvoltage protection (Fault Code 3) | Masukan voltage terlalu tinggi. | Sahkan vol. bateritage is within the 12V range. Disconnect from charging source if overcharging. |
| Overtemperature protection (Fault Code 7) | Inverter is overheating. | Ensure adequate ventilation. Reduce load. Allow inverter to cool down. Clean fan vents if obstructed. |
If the fault persists after attempting the solutions, contact customer support.
8. Spesifikasi
| Ciri | Spesifikasi |
|---|---|
| Nombor Model | DX-GAC2000W |
| Kuasa Berterusan | 2000W |
| Kuasa Lonjakan Puncak | 4000W |
| Input Voltage | DC 12V |
| Keluaran Voltage | AC 110V-120V |
| Bentuk Gelombang Output | Gelombang Sinus Tulen |
| Herotan Harmonik Jumlah (THD) | < 3% |
| Kecekapan Penukaran | > 90% |
| Kedai AC | 4 |
| Port USB | 2 (5V/2.1A) |
| Pelabuhan Jenis-C | 1 (5V/2.1A) |
| Dimensi (L x W x H) | 19 x 10 x 7 inci |
| Berat Barang | 11.13 paun |
| Sistem Penyejukan | Dwi Kipas Penyejuk |
9. Penyelenggaraan
Regular maintenance ensures optimal performance and longevity of your inverter:
- Pembersihan: Periodically clean the exterior of the inverter with a dry, soft cloth. Ensure cooling vents are free from dust and debris. Do not use liquid cleaners.
- Semakan Sambungan: Periksa sambungan kabel bateri secara berkala untuk memastikan ia ketat dan berkarat. Bersihkan sebarang kakisan dengan berus dawai dan larutan soda penaik.
- Pengudaraan: Ensure the inverter always has adequate airflow. Do not operate in enclosed spaces without ventilation.
- Penggantian fius: If a fuse blows, replace it only with a fuse of the same type and rating as specified in the package contents.
10. Waranti dan Sokongan
For warranty information or technical support, please refer to the contact details provided with your purchase or visit the official Bietrun webtapak. Simpan resit pembelian anda sebagai bukti pembelian.


