
NB ERGONOMIC G80
NB ERGONOMIC G80 Extra Height Gaming Monitor Arm Instruction Manual
Model: G80
1. Pengenalan
This manual provides detailed instructions for the safe and efficient installation, operation, and maintenance of your NB ERGONOMIC G80 Extra Height Gaming Monitor Arm. Please read this manual thoroughly before installation and retain it for future reference. This monitor arm is designed to support monitors from 32 to 60 inches, weighing between 2 kg and 20 kg, with VESA 75x75mm or 100x100mm mounting patterns.
2. Maklumat Keselamatan
Warning: Please be careful when releasing the arm to avoid injury from mechanical spring force. Always follow the installation steps carefully.
- Ensure your desktop is suitable for monitor arm installation. Avoid fragile surfaces like marble or glass, desktops with too narrow clamp surfaces due to bottom baffles, or those with irregular or beveled edges.
- Verify your monitor's VESA compatibility (75x75mm or 100x100mm). If your monitor has an embedded hole, ensure the panel can be placed directly. If not, use the provided heightening pads and lengthened screws.
- Do not exceed the maximum weight capacity of 20 kg (44 lbs) or the specified screen size range (32-60 inches).
- Jauhkan kanak-kanak dan haiwan peliharaan semasa pemasangan.
- Tighten all screws securely but do not overtighten.
3. Kandungan Pakej
Sila sahkan bahawa semua komponen hadir sebelum memulakan pemasangan:

Image: All parts included in the NB ERGONOMIC G80 monitor arm package.
- Monitor Arm Assembly (Main Arm, Pole, Base)
- Plat VESA
- C-Clamp Perkakasan Pemasangan
- Perkakasan Pemasangan Grommet
- Klip Pengurusan Kabel
- Hex Keys and Installation Tools
- Various Screws and Spacers for VESA Mounting
4. Persediaan dan Pemasangan
4.1 Pemeriksaan Pra-Pemasangan
Before mounting, ensure your desk and monitor meet the compatibility requirements.

Imej: Cthamples of desktop types unsuitable for monitor arm mounting.
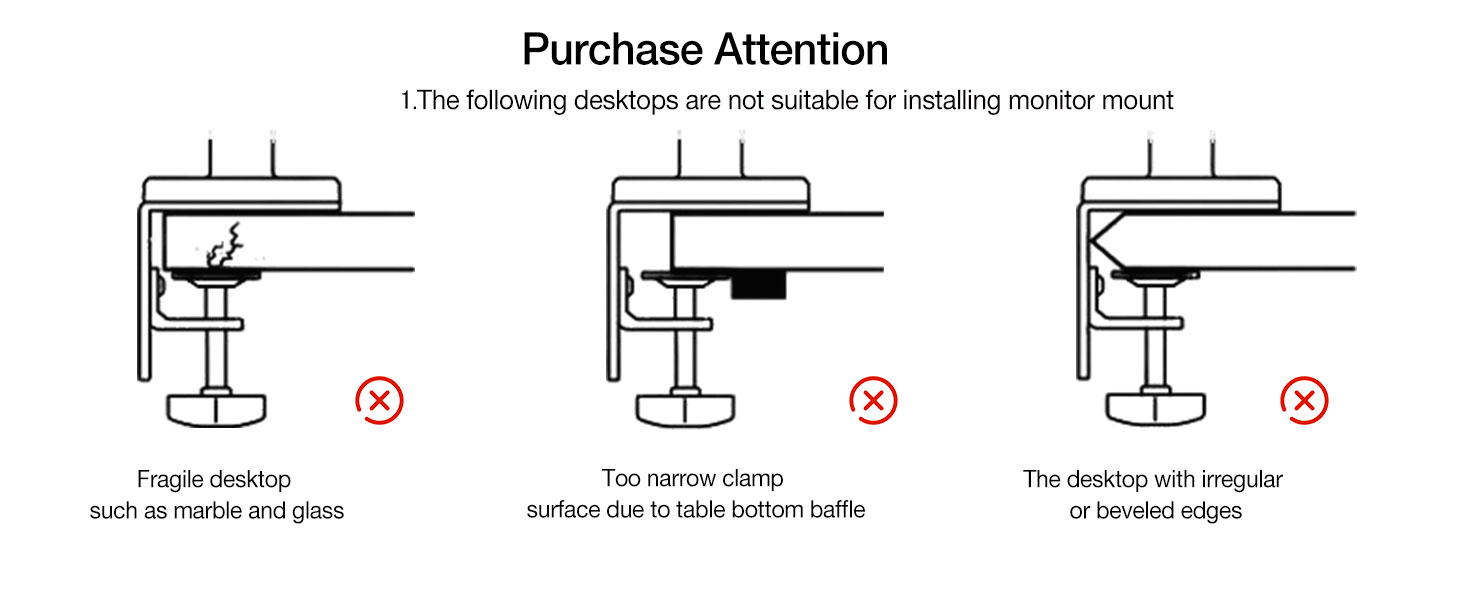
Image: Guide to confirming VESA hole positions on your monitor.
4.2 Pilihan Pemasangan
The G80 monitor arm offers two installation methods: C-Clamp and Grommet.

Image: Two available mounting methods: Grommet and C-Clamp.
C-Clamp Jenis:
- Suitable for desk thickness: 20-90mm (0.8"-3.5").
- Minimum depth of bottom above: 50mm (1.97").
Grommet Type:
- Suitable for desk thickness: 20-90mm (0.8"-3.5").
- Hole diameter: 10-60mm (0.4"-2.3").
4.3 Pemasangan Langkah demi Langkah

Image: Product Installation Guide, steps 1-4.
- Pasang Pangkalan: Securely attach the chosen mounting base (C-Clamp or Grommet) to your desk. Ensure it is stable and tight.
- Prepare the Arm: The arm comes pre-compressed. Carefully press the upper arm down to relieve tension.
- Release Spring Force: While pressing the upper arm, slowly release the wrapping tape that secures the arm. Maintain control to prevent sudden movement.
- Unfold the Bracket: Slowly release the arm until the bracket is fully unfolded.
4.4 Lampiran Monitor
The G80 features a quick-release VESA plate for easy monitor attachment.

Image: Quick Installation and Disassembly of the VESA plate.
- Attach the VESA plate to the back of your monitor using the appropriate screws and spacers.
- Slide the VESA plate with the attached monitor onto the arm's mounting head until it clicks securely into place.
5. Operasi
5.1 Melaraskan Kedudukan Monitor
The G80 monitor arm offers extensive adjustability for optimal viewkeselesaan.

Image: Monitor arm demonstrating swivel, rotation, and tilt adjustments.
- Pelarasan Ketinggian: The arm allows for significant vertical movement, rising up to 27 inches above the desk.
- Condong: Adjust the monitor angle from -50° to +50° to reduce glare and optimize viewing.
- Pusing: Rotate the monitor arm 360° horizontally.
- Putaran: Putar monitor 360° dari orientasi landskap ke potret.
- Sambungan: The arm provides a maximum extension of 25 inches (635mm).
5.2 Pelarasan Ketegangan
Adjust the arm's tension to match your monitor's weight for smooth movement and stable positioning.

Image: Guide for adjusting arm tension based on monitor weight.
- If the monitor rises: Turn the adjustment screw in the '–' direction to reduce tension for a lighter monitor.
- If the monitor falls: Turn the adjustment screw in the '+' direction to increase tension for a heavier monitor.
- Nota: Always hang your monitor before performing tension adjustment.
5.3 Kawalan Pencahayaan RGB
The integrated RGB lighting adds aesthetic appeal to your setup.

Image: Instructions for controlling the RGB lighting on the monitor arm base.
- Hidupkan: Press the button on the base once to turn on the RGB light.
- Laraskan Mod: Press the button again to cycle through different light modes/colors.
- Matikan: Tekan lama butang untuk mematikan lampu RGB.
6. Penyelenggaraan
To ensure the longevity and optimal performance of your monitor arm, follow these maintenance guidelines:
- Periksa semua skru dan sambungan secara berkala untuk memastikan ia kekal ketat.
- Clean the arm and base with a soft, dry cloth. Avoid abrasive cleaners or solvents.
- Do not apply excessive force when adjusting the arm; it is designed for smooth movement.
- Periodically check the cable management system to ensure cables are not pinched or damaged.
7. Penyelesaian masalah
| Masalah | Kemungkinan Punca | Penyelesaian |
|---|---|---|
| Monitor arm rises too high or won't stay down. | Tension is too high for the monitor's weight. | Turn the tension adjustment screw in the '–' direction to decrease tension. |
| Lengan monitor kendur atau tidak mahu terus bangun. | Tension is too low for the monitor's weight. | Turn the tension adjustment screw in the '+' direction to increase tension. |
| Monitor wobbles or feels unstable. | Mounting base or VESA plate not securely tightened. | Check and tighten all screws on the desk clamp/grommet and the VESA plate connection. Ensure desk is stable. |
| RGB light is not working. | Power cable not connected or light is off. | Ensure the USB power cable for the RGB light is properly connected. Press the control button on the base to turn it on. |
| Difficulty adjusting arm movement. | Tension is not correctly set for monitor weight. | Adjust the tension screw as described in Section 5.2. |
8. Spesifikasi
| Ciri | Spesifikasi |
|---|---|
| Model | G80 |
| Keserasian Saiz Skrin | 32 to 60 inches (Curved / Ultra-wide / Flat) |
| Kapasiti Muatan | 2 kg hingga 20 kg (4.4 paun hingga 44 paun) |
| Keserasian VESA | 75x75mm, 100x100mm |
| Pelarasan Ketinggian | Up to 27 inches above desk (Max. 29.1" / 740mm lift, 10.2" / 260mm range) |
| Sudut Kecondongan | ±50° (-50° to +50°) |
| Sudut Pusing | 360° |
| Sudut Putaran | 360° (±90° at VESA plate) |
| Sambungan Lengan Maksimum | 25 inci (635mm) |
| Kaedah Pemasangan | C-Clamp atau Grommet |
| Ketebalan Meja (C-Clamp/Grommet) | 20-90mm (0.8"-3.5") |
| Diameter Lubang Grommet | 10-60mm (0.4"-2.3") |
| bahan | Aluminum alloy, Cold-rolled steel, ABS |
| Ciri Khas | Built-in RGB-Light, Mechanical ProSpring Technology, Cable Management |
9. Waranti dan Sokongan
For warranty information and technical support, please refer to the product packaging or contact NB ERGONOMIC customer service through the retailer where the product was purchased. Keep your proof of purchase for warranty claims.
Ask a question about this manual
Ask about setup, troubleshooting, compatibility, parts, safety, or missing instructions. Manuals+ will review the question and use this page’s manual context to help answer it.