pengenalan
This manual provides detailed instructions for the installation, operation, and maintenance of your GIGABYTE B860M GAMING X WIFI6E Motherboard. Please read this manual thoroughly before installing or using the product to ensure correct operation and to prevent damage.
The GIGABYTE B860M GAMING X WIFI6E Motherboard is designed to support Intel Core Ultra Series CPUs, featuring a robust power delivery system, DDR5 memory support, and advanced connectivity options including PCIe 5.0, M.2, 2.5GbE LAN, WIFI 6E, and USB 4.
Panduan Persediaan
1. Membongkar dan Pemeriksaan
Carefully remove the motherboard from its packaging. Inspect for any signs of damage during transit. Ensure all accessories listed in the package contents are present.
- GIGABYTE B860M GAMING X WIFI6E Motherboard
- Kabel SATA
- Antena Wi-Fi
- Manual Pengguna (dokumen ini)
- CD/USB pemacu (jika disertakan)
2. Susun Atur Papan Indukview
Biasakan diri anda dengan komponen dan penyambung utama pada papan induk.
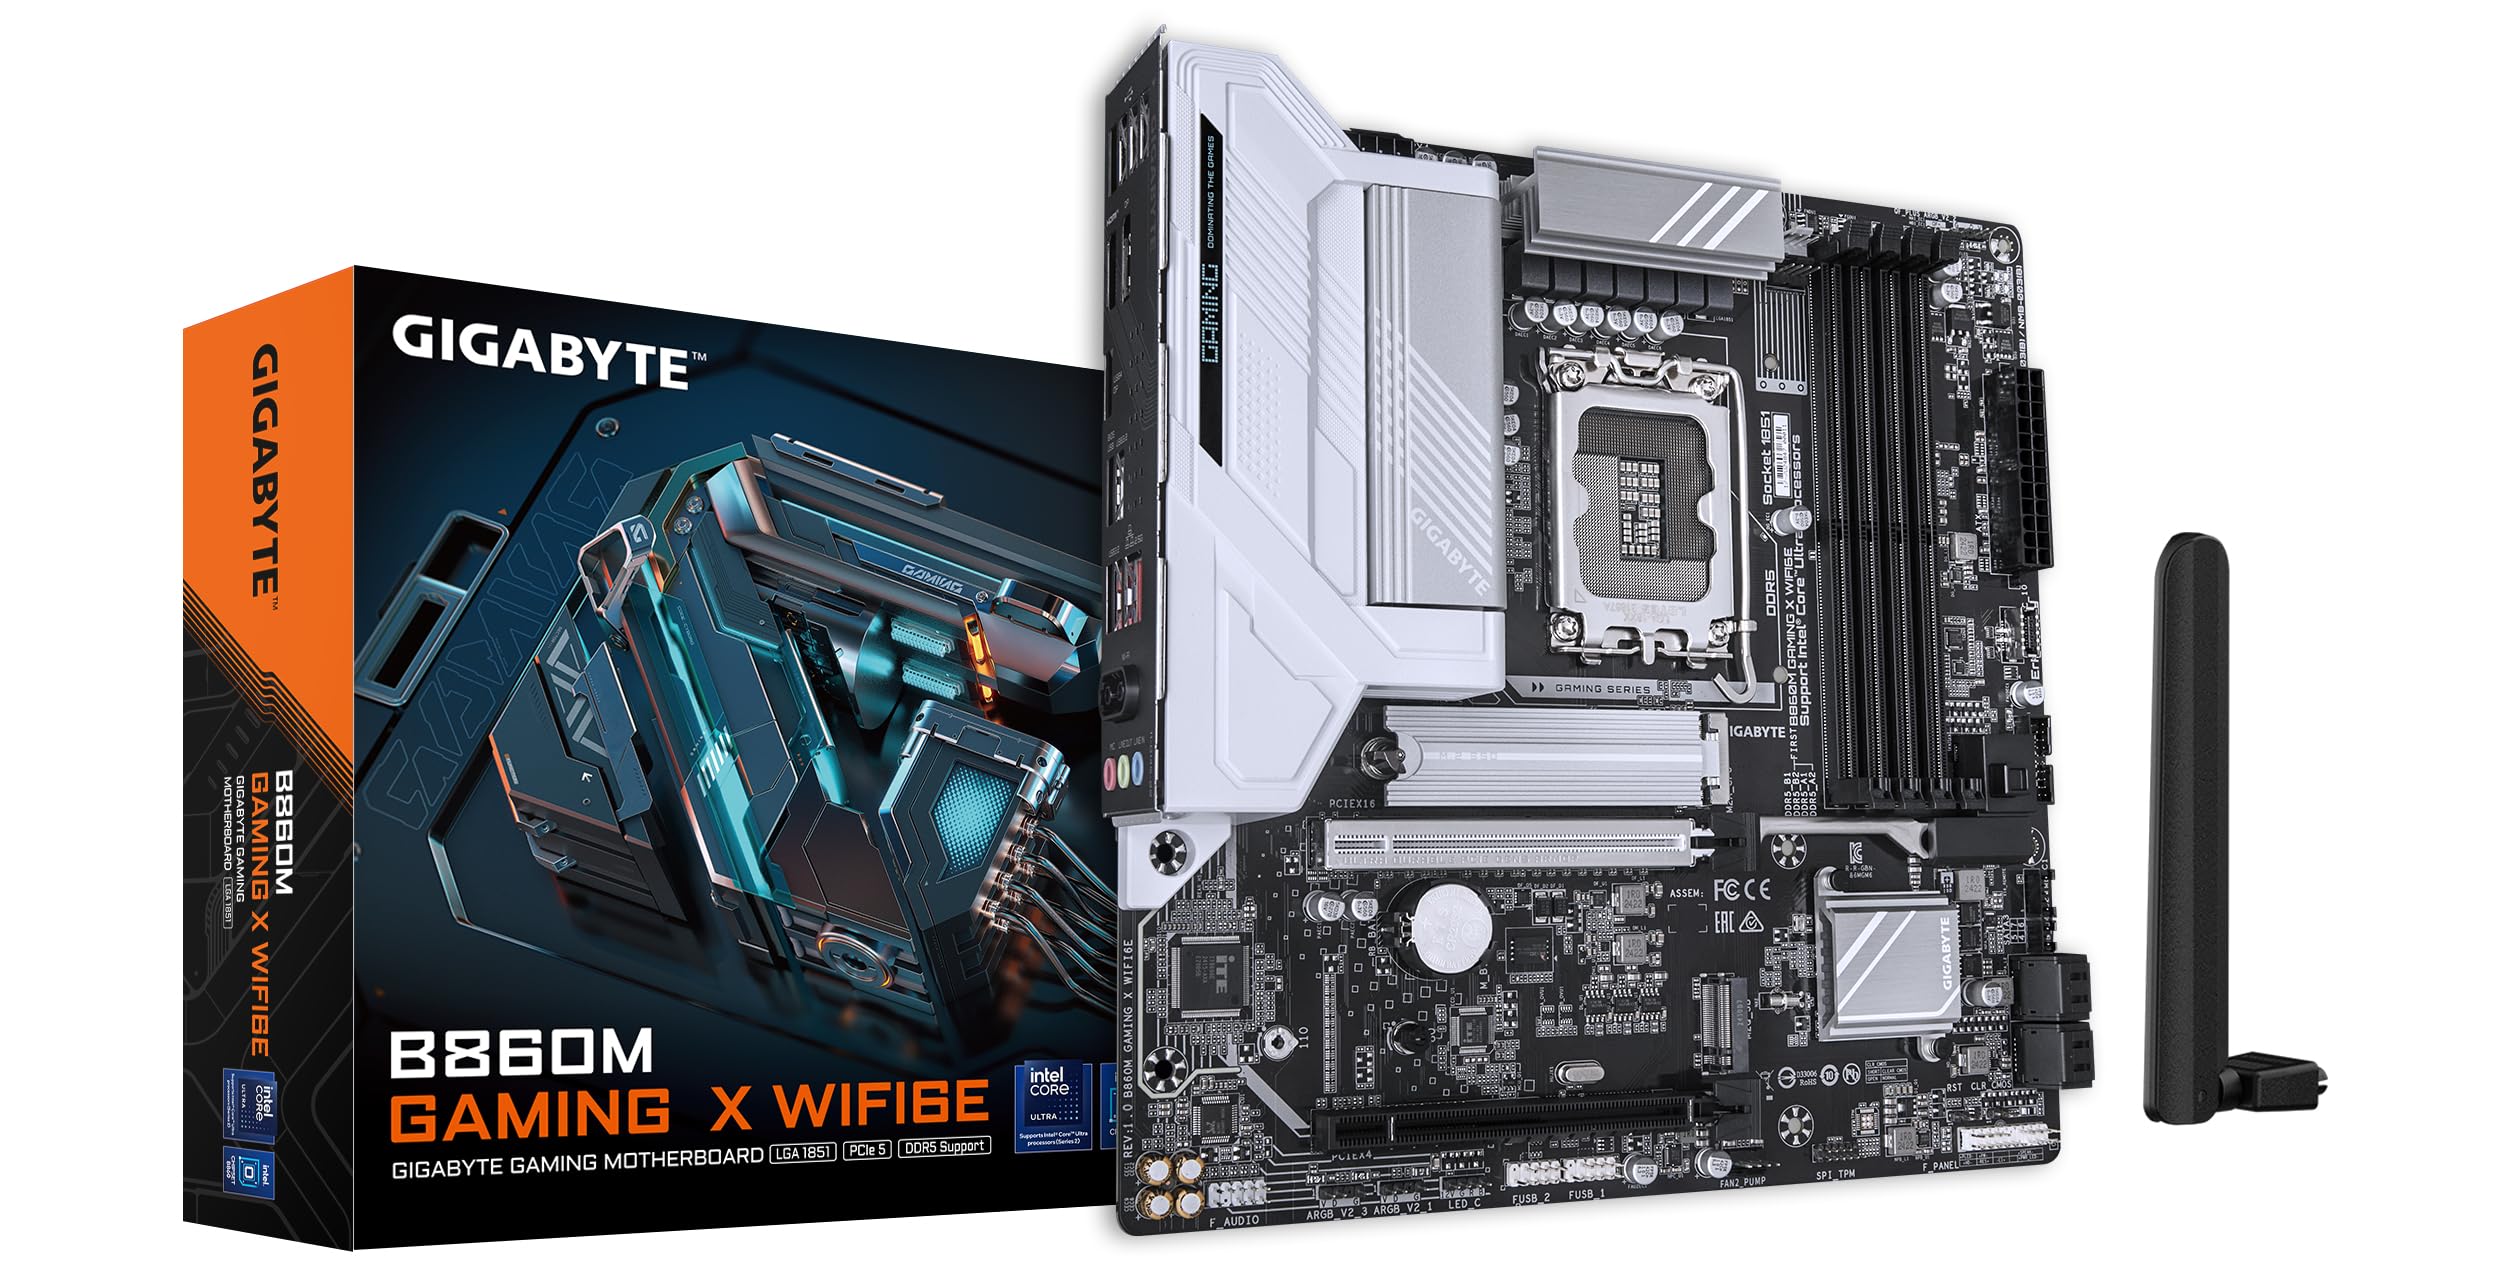
Imej: Atas ke bawah view of the GIGABYTE B860M GAMING X WIFI6E Motherboard, highlighting the CPU socket, DDR5 DIMM slots, PCIe slots, and M.2 slots.

Imej: Bersudut view of the GIGABYTE B860M GAMING X WIFI6E Motherboard, showing the heatsinks and overall board design.
3. CPU Installation (LGA 1851)
- Buka tuil soket CPU.
- Align the CPU with the socket, ensuring the triangular mark on the CPU matches the mark on the socket.
- Perlahan-lahan letakkan CPU ke dalam soket tanpa memaksanya.
- Tutup tuil soket untuk mengunci CPU.
4. Memory (DDR5) Installation
- Buka klip di kedua-dua hujung slot DIMM.
- Jajarkan modul memori dengan slot, pastikan takuk pada modul sepadan dengan kunci dalam slot.
- Tekan ke bawah dengan kuat pada kedua-dua hujung modul memori sehingga klip terpasang pada tempatnya.
- For dual-channel operation, install modules in the recommended slots (refer to motherboard diagram for specific slots).
5. Storage Device Installation (M.2 SSDs)
- Cari slot M.2 pada papan induk.
- Tanggalkan heatsink M.2 dan skru penyangga.
- Masukkan SSD M.2 ke dalam slot pada sudut.
- Push down the SSD and secure it with the stand-off screw.
- Reattach the M.2 heatsink for thermal protection.
6. Graphics Card (PCIe 5.0) Installation
- Open the latch on the PCIe 5.0 x16 slot.
- Align your graphics card with the slot and press down firmly until it is fully seated and the latch closes.
- Lindungi kad grafik pada bekas PC anda dengan skru.
7. Menyambung Peranti dan Kuasa
Connect the 24-pin ATX power connector and the 8-pin CPU power connector from your power supply to the motherboard. Connect front panel headers (power button, reset, USB, audio) according to the motherboard manual diagram. Install the Wi-Fi antenna to the rear I/O panel.

Image: Rear I/O panel of the GIGABYTE B860M GAMING X WIFI6E Motherboard, showing USB ports, HDMI, DisplayPort, 2.5GbE LAN, Wi-Fi antenna connectors, and audio jacks.
Arahan Operasi
1. But Pertama dan Persediaan BIOS
After assembling your system, power it on. Press the DEL kekunci semasa permulaan untuk memasuki utiliti persediaan BIOS/UEFI. Di sini anda boleh mengkonfigurasi susunan but, masa sistem dan tetapan lanjutan yang lain.
2. Pemasangan Pemandu
Once the operating system is installed, install the necessary drivers for the motherboard components (chipset, LAN, Wi-Fi, audio, etc.). These can be found on the included driver disk/USB or downloaded from the official GIGABYTE webtapak.
3. Wi-Fi 6E Connectivity
Ensure the Wi-Fi antenna is securely connected. In your operating system's network settings, select the appropriate Wi-Fi 6E network and enter the password to connect.
4. Q-Flash Plus
The Q-Flash Plus feature allows you to update the BIOS without installing a CPU, memory, or graphics card. Download the latest BIOS file daripada GIGABYTE website, rename it as instructed, and save it to a USB flash drive. Insert the USB drive into the designated Q-Flash Plus USB port on the rear I/O panel and press the Q-Flash Plus button.
Penyelenggaraan
1. Kemas Kini BIOS
Periksa GIGABYTE secara berkala website for the latest BIOS updates. BIOS updates can improve system stability, performance, and add support for new hardware. Follow the instructions provided by GIGABYTE carefully when performing a BIOS update.
2. Kemas Kini Pemandu
Keep your motherboard drivers updated to ensure optimal performance and compatibility. Download drivers only from the official GIGABYTE support page.
3. Pembersihan
Bersihkan habuk dari papan induk dan komponen secara berkala menggunakan udara termampat. Pastikan sistem dimatikan dan dicabut plag sebelum dibersihkan. Elakkan menggunakan cecair atau bahan yang melelas.
Menyelesaikan masalah
1. System Does Not Power On
- Pastikan semua sambungan kuasa (ATX 24-pin, CPU 8-pin) dipasang dengan selamat.
- Sahkan bekalan kuasa berfungsi dengan betul.
- Ensure the front panel power button header is correctly connected.
2. Tiada Output Paparan
- Confirm the graphics card is properly seated in the PCIe slot and connected to the power supply (if required).
- Check that the monitor cable is securely connected to both the graphics card and the monitor.
- If using integrated graphics, ensure the monitor is connected to the motherboard's video output (HDMI/DisplayPort).
3. Ketidakstabilan atau Ranap Sistem
- Verify that all components (CPU, RAM, GPU) are correctly installed.
- Check for overheating issues; ensure CPU cooler and case fans are working.
- Update BIOS and all drivers to the latest versions.
- Test memory modules individually if you suspect RAM issues.
4. Isu Ketersambungan Wi-Fi
- Ensure the Wi-Fi antenna is securely attached to the rear I/O panel.
- Check if Wi-Fi drivers are installed correctly.
- Verify that the Wi-Fi module is enabled in the BIOS.
Spesifikasi
| Ciri | Perincian |
|---|---|
| Nama Model | B860M GAMING X WIFI6E |
| Soket CPU | LGA 1851 |
| Pemproses yang Serasi | Intel Core Ultra Series CPUs |
| Chipset | Intel B860M |
| Teknologi Memori RAM | DDR5, Dual Channel (4 x DIMMs) |
| Max Memory Clock Speed | Sehingga 6400MHz (OC) |
| Slot PCIe | 1x PCIe 5.0 x16, 1x PCIe 4.0 |
| Slot M.2 | Multiple M.2 slots with Thermal Protection |
| LAN | LAN 2.5GbE |
| Kesambungan Wayarles | Realtek 2x2 Wi-Fi 6E |
| Port USB | USB 4.0 Type-C, USB 3.2 Gen 2 Type-C, various USB 3.2/2.0 |
| VRM | Hybrid Digital 8+1+2+2 Phase 60A DrMOS |
| Dimensi | 9.61 x 9.61 x 1.38 inci |
| Berat Barang | 2.65 paun |
Waranti dan Sokongan
GIGABYTE motherboards come with a limited warranty. Please refer to the official GIGABYTE website or your product packaging for specific warranty terms and conditions applicable to your region.
Untuk sokongan teknikal, muat turun pemacu, kemas kini BIOS dan maklumat produk lanjut, sila lawati sokongan rasmi GIGABYTE. webtapak:
https://www.gigabyte.com/support
When contacting support, please have your motherboard model name (B860M GAMING X WIFI6E) and serial number ready.


