
1. Pengenalan
This manual provides detailed instructions for the installation, operation, and maintenance of your NB ERGONOMIC Gaming Monitor Arm A6. Designed for heavy-duty use, this monitor arm supports flat, ultrawide, and curved monitors ranging from 27 to 50 inches, with a load capacity of 2-18 kg (4-40 lbs). It features universal VESA 75x75mm/100x100mm compatibility and advanced mechanical spring technology for stable and precise monitor positioning.
Please read this manual thoroughly before installation and use to ensure proper setup and to maximize the ergonomic benefits of your monitor arm.
2. Maklumat Keselamatan
WARNING: Failure to follow these instructions may result in property damage or personal injury.
- Ensure your desk surface is stable and strong enough to support the combined weight of the monitor arm and your monitor.
- Jangan melebihi kapasiti berat maksimum 18 kg (40 lbs).
- Verify that your monitor has VESA 75x75mm or 100x100mm mounting holes.
- Jauhkan bahagian kecil daripada kanak-kanak.
- Use only the provided hardware. Using incorrect screws may damage your monitor.
- Adjust tension screws only after the monitor is securely mounted to prevent sudden movement.
- Do not attempt to modify the monitor arm.
Nota Penting: Certain desktop types are not suitable for monitor mount installation:

Desktop yang Tidak Sesuai: Fragile desktops (e.g., marble, glass), desks with too narrow clamping surfaces due to baffles, or desks with irregular/beveled edges are not recommended for clamp pemasangan.
3. Kandungan Pakej
Before proceeding with installation, please verify that all components are present and undamaged. Refer to the image below for a visual guide to the included parts.

Penerangan Imej: This image displays all parts of the monitor arm kit, including the main arm, VESA plate, desk clamp components, grommet mount parts, various screws (M4x10, M4x12, M6x10, M6x12), washers, Allen wrenches, and cable management accessories.
4. Persediaan
4.1 Pemeriksaan Pra-Pemasangan
- Desk Compatibility: Ensure your desk is suitable for mounting. Avoid fragile materials like glass or marble. For C-clamp mounting, the desk thickness should be 20-90mm (0.8"-3.5") and the bottom depth above 50mm (1.97"). For grommet mounting, the desk thickness should be 20-90mm (0.8"-3.5") and the hole diameter 10-60mm (0.4"-2.3").
- Keserasian VESA: Locate the VESA mounting holes on the back of your monitor. The arm supports 75x75mm and 100x100mm patterns. If your monitor has an embedded hole, ensure the panel can be placed directly. If the embedded position is small, use the heightening pads and lengthened screws provided.

Penerangan Imej: This image shows how to identify VESA mounting holes on a monitor, including removing a back panel if necessary. It also illustrates the use of heightening pads and different screw sizes for monitors with embedded VESA mounts.

Penerangan Imej: This diagram specifies the required desk dimensions for both Grommet and C-Clamp mounting methods, including desk thickness and hole diameter for grommet, and desk thickness and bottom depth for C-clamp.
4.2 Memasang Lengan pada Meja
The monitor arm supports two mounting methods: C-Clamp and Grommet.
- C-Clamp Pemasangan:
- Pasangkan C-clamp base to the edge of your desk.
- Ketatkan clamp screws securely until the base is firm and stable.
- Insert the main pole of the monitor arm into the C-clamp asas.
- Pemasangan Grommet:
- If your desk has a grommet hole, insert the grommet base through the hole.
- Secure the base from underneath the desk using the provided plate and nut.
- Insert the main pole of the monitor arm into the grommet base.

Penerangan Imej: A terperinci view of the C-clamp base, showing how it attaches to the desk edge with two tightening screws for stability.
4.3 Memasang Monitor
- Attach the VESA plate to the back of your monitor using the appropriate screws (M4x10, M4x12, M6x10, M6x12) and washers. Ensure the screws are not too long to avoid damaging the monitor's internal components.
- Carefully lift the monitor with the attached VESA plate and slide it onto the monitor arm's mounting head. Ensure it clicks securely into place.
- Confirm the quick-release mechanism is engaged.

Penerangan Imej: This image demonstrates the quick installation of the monitor onto the arm. The VESA plate, already attached to the monitor, slides down onto the arm's head, with an inset showing the red quick-release lever in the locked position.
Penerangan Imej: This image reiterates the quick installation and easy disassembly process, showing the VESA plate being attached to the arm's head and the red lever for securing or releasing monitor.
4.4 Pengurusan Kabel
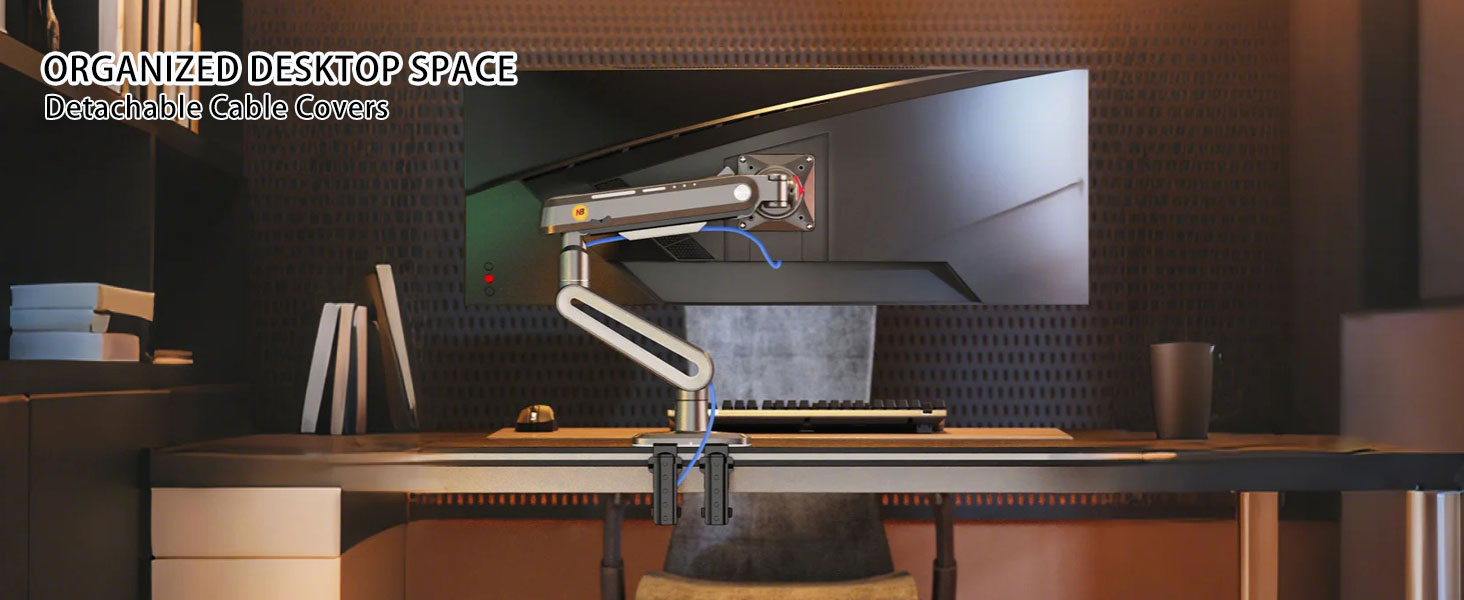
Route your monitor cables through the integrated cable management channels on the arm to maintain a tidy workspace.

Penerangan Imej: Satu jarak dekat view of the monitor arm's cable management system, illustrating how a blue cable is neatly tucked into the arm's channel.
5. Operasi
5.1 Melaraskan Kedudukan Monitor
The NB ERGONOMIC Gaming Monitor Arm A6 offers extensive adjustability for optimal viewkeselesaan:
- Height Adjustment (Lift): The arm provides 260mm (10.2 inches) of vertical lift. Gently push or pull the monitor to the desired height.
- Condong: Adjust the monitor tilt by ±50° to reduce glare and find your preferred viewsudut ing.
- Pusing: Swivel the monitor 360° at the VESA plate for easy screen sharing or portrait mode.
- Putaran: The arm allows 360° rotation at two points for flexible positioning.
- Sambungan: The arm can extend up to 620mm (24.4 inches) from the mounting point.

Penerangan Imej: This image illustrates the maximum extension (24.4 inches / 620mm) and vertical lift (10.2 inches / 260mm) capabilities of the monitor arm, demonstrating its range of motion.

Penerangan Imej: This image visually explains the arm's articulation, including 360° swivel, 360° rotation at two joints, and ±50° tilt, showcasing fleksibilitinya.
5.2 Pelarasan Ketegangan
The arm's gas spring tension needs to be adjusted to match the weight of your monitor for optimal performance and stability. This adjustment should only be done selepas the monitor is mounted.
- Locate the tension adjustment screw on the arm (usually covered by a cap).
- Use the provided Allen wrench to turn the screw.
- Jika monitor raises up on its own: Turn the screw towards the "-" direction to reduce tension for a lighter monitor.
- Jika monitor falls down on its own: Turn the screw towards the "+" direction to increase tension for a heavier monitor.
- Adjust gradually until the monitor stays at the desired height without drifting up or down.

Penerangan Imej: This image illustrates the tension adjustment process. It shows the monitor arm with a monitor and an inset detailing the tension screw. Instructions guide the user to adjust tension based on whether the monitor raises or falls, emphasizing that adjustment should occur after mounting.
6. Penyelenggaraan
- Periksa semua skru dan sambungan secara berkala untuk memastikan ia kekal ketat dan kukuh.
- Bersihkan lengan monitor dengan kain lembut,amp kain. Elakkan pembersih atau pelarut yang melelas.
- If movement becomes stiff or jerky, a thin layer of silicone grease can be applied to the joints, if accessible, to improve glide.
7. Penyelesaian masalah
| Masalah | Kemungkinan Punca | Penyelesaian |
|---|---|---|
| Monitor sags or falls down. | Insufficient gas spring tension for monitor weight. | Increase tension by turning the adjustment screw towards "+" (clockwise). Ensure monitor is mounted before adjusting. |
| Monitor floats up or is difficult to push down. | Excessive gas spring tension for monitor weight. | Decrease tension by turning the adjustment screw towards "-" (counter-clockwise). Ensure monitor is mounted before adjusting. |
| Arm feels loose or unstable. | Mounting screws or clamp not fully tightened. | Check and tighten all mounting screws (desk clamp/grommet and VESA plate screws). |
| Monitor tidak sesuai dengan plat VESA. | Corak VESA atau saiz skru salah. | Verify monitor VESA pattern (75x75mm or 100x100mm). Use correct screw length and heightening pads if necessary. |
8. Spesifikasi
| Ciri | Perincian |
|---|---|
| Model | A6 |
| Keserasian Saiz Skrin | 27 to 50 inches (Flat, Ultrawide, Curved) |
| Kapasiti Berat | 2-18 kg (4-40 paun) |
| Keserasian VESA | 75x75mm, 100x100mm |
| Kaedah Pemasangan | C-Clamp, Grommet |
| bahan | Aluminum alloy, Cold-rolled steel, ABS |
| Height Adjustment (Lift) | 260mm (10.2 inci) |
| Sudut Kecondongan | ±50° |
| Sudut Pusing | 360° |
| Sudut Putaran | 360° |
| Sambungan Maksimum | 620mm (24.4 inci) |
| Ketebalan Meja (C-Clamp) | 20-90mm (0.8"-3.5") |
| Ketebalan Meja (Grommet) | 20-90mm (0.8"-3.5") |
| Diameter Lubang Grommet | 10-60mm (0.4"-2.3") |
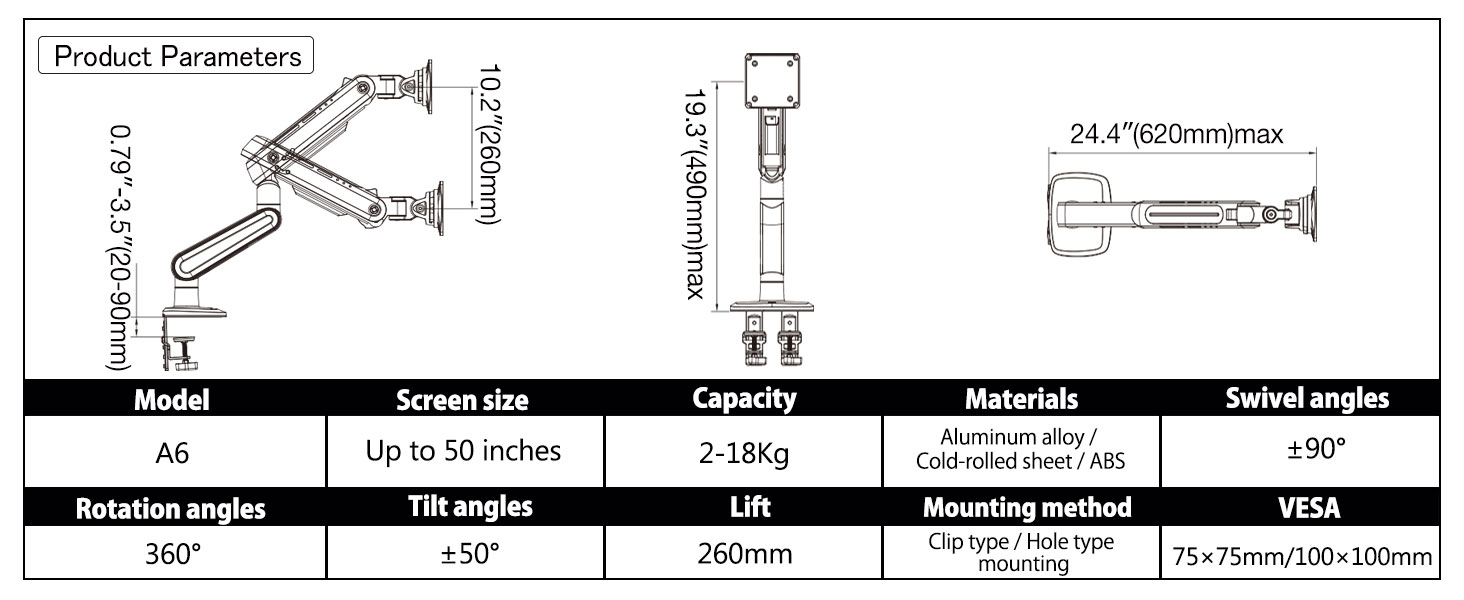
Penerangan Imej: This diagram provides a summary of the product's key specifications, including dimensions, weight capacity, VESA standards, and articulation ranges.
9. Waranti
The NB ERGONOMIC Gaming Monitor Arm A6 is backed by a Waranti 2 tahun. This warranty covers manufacturing defects and ensures the product meets its stated performance standards. Please retain your proof of purchase for warranty claims.
10. Sokongan Pelanggan
For technical assistance, warranty claims, or any questions regarding your NB ERGONOMIC Gaming Monitor Arm A6, please contact our customer support team. Refer to the product packaging or the official NB ERGONOMIC weblaman web untuk maklumat hubungan.