1. Produk Lebihview
The Yottamaster NAS Kit DM3 is a versatile SSD/HDD enclosure designed for personal cloud storage. It supports both 2.5-inch and 3.5-inch SATA drives, offering a maximum capacity of 8TB. This device allows you to store, access, and share photos, videos, and documents from various devices, including mobile phones and PCs, through its dedicated Weline APP and secure SDVN encryption technology.

Figure 1: Yottamaster NAS Kit DM3 in a typical usage scenario, connected to a laptop and smartphone.
2. Panduan Persediaan
Follow these steps for quick and tool-free installation of your Yottamaster NAS Kit DM3.
- Insert HDD/SSD: Open the magnetic cover and insert your 2.5-inch or 3.5-inch SATA HDD/SSD into the device. Ensure it is securely seated.
- Sambungkan Kabel: Connect the DC power adapter and the LAN cable to the appropriate ports on the NAS device.
- Hidupkan kuasa: Press the switch button. The blue LED indicator will light up, signifying the device is powered on.
- Install Weline APP: Download the Weline APP from the Apple App Store (for iOS) or Google Play Store (for Android). Alternatively, scan the QR code in the user manual or on the product packaging.
- Register and Bind Device: Open the Weline APP, register a unique ID user, and then scan the product's code to bind the device to your account.
- Start Personal Cloud Storage: Once bound, you can begin using your personal cloud storage.

Figure 2: Step-by-step guide for hardware installation and Weline APP setup.

Figure 3: Weline app installation and supported platforms.
3. Arahan Operasi
3.1. Accessing and Sharing Data
The Yottamaster NAS Kit DM3 allows you to access and share your stored data from anywhere, anytime, using the Weline APP. This includes photos, videos, and documents.
- Akses Mudah Alih: Use the Weline APP on your iOS or Android device to browse, upload, and download files.
- Akses PC: Connect the NAS to your PC to manage files secara langsung.
- Perkongsian: Easily share large data files, videos, and photos with family and friends through the Weline APP.

Figure 4: Remote access and data sharing capabilities.

Figure 5: Storing and sharing precious moments and important files.
3.2. Fungsi Mod Dwi
The DM3 can operate in two modes:
- NAS Mode: Connected via LAN for network access and private cloud features.
- Mobile Hard Drive Enclosure Mode: Connect directly to a computer via USB-C for 5Gbps high-speed data transfer, functioning as a direct-attached storage device.
3.3. Samba Function (Network Drive Assignment)
The DM3 supports Samba protocol, allowing you to assign it as a network drive on Windows and macOS for easy file pengurusan.
3.3.1. Windows Network Drive Assignment
- Open the Weline app and navigate to the Samba settings.
- Set a Samba password for security.
- On your Windows PC, open "Run" (Windows Key + R) and type the NAS IP address (e.g.,
\192.168.x.x). - Enter your Samba credentials when prompted.
- Right-click on the desired folder (e.g., 'home' or 'public') and select "Map network drive...".
- Choose a drive letter and click "Finish".

Rajah 6: Persediaan Samba Windows, langkah 1-3.

Rajah 7: Persediaan Samba Windows, langkah 4-6.
3.3.2. macOS Network Drive Assignment
- On your macOS device, go to "Finder" > "Go" > "Connect to Server...".
- Enter the NAS IP address with
smb://prefix (e.g.,smb://192.168.x.x) and click "Connect". - Select "Registered User" and enter your Samba username and password.
- Choose the desired shared folder (e.g., 'home' or 'public') to mount.

Rajah 8: persediaan macOS Samba, langkah 1-4.

Rajah 9: persediaan macOS Samba, langkah 5-8.
3.4. DLNA Function for TV
The DM3 supports DLNA, allowing you to stream media content directly to compatible smart TVs.
- In the Weline app, click on "DLNA" to open the settings interface.
- Enable the DLNA protocol and set the access path for your media files.
- On your smart TV, navigate to the "Program Source" or "Input" menu. The NAS should appear as a media server. Select it to access your content.

Figure 10: DLNA setup and usage for TV.
4. Ciri-ciri Utama
4.1. Advanced Data Encryption (SDVN)
The Weline APP utilizes SDVN technology to establish an encrypted channel between your device and the NAS server. This enables secure remote access via VPN. Encryption keys are stored locally on your private cloud, eliminating concerns about data leakage. The Weline app operates in a full-closed safety mode for enhanced security.

Figure 11: Data security features with SDVN encryption.
4.2. Free Private Cloud Storage
Unlike commercial cloud storage services, the Yottamaster NAS Kit DM3 offers a private cloud solution without subscription fees. You can share photos and videos across various devices and systems. The master account can grant permissions to multiple users and create both public and private spaces. All data is stored on your local hard disk, not on a public cloud, ensuring privacy and control.
4.3. High-Performance Processing
Equipped with a quad-core CPU and a USB 3.2 Gen1 USB-C interface, the Yottamaster NAS Kit DM3 is designed for rapid and efficient processing of large data volumes.
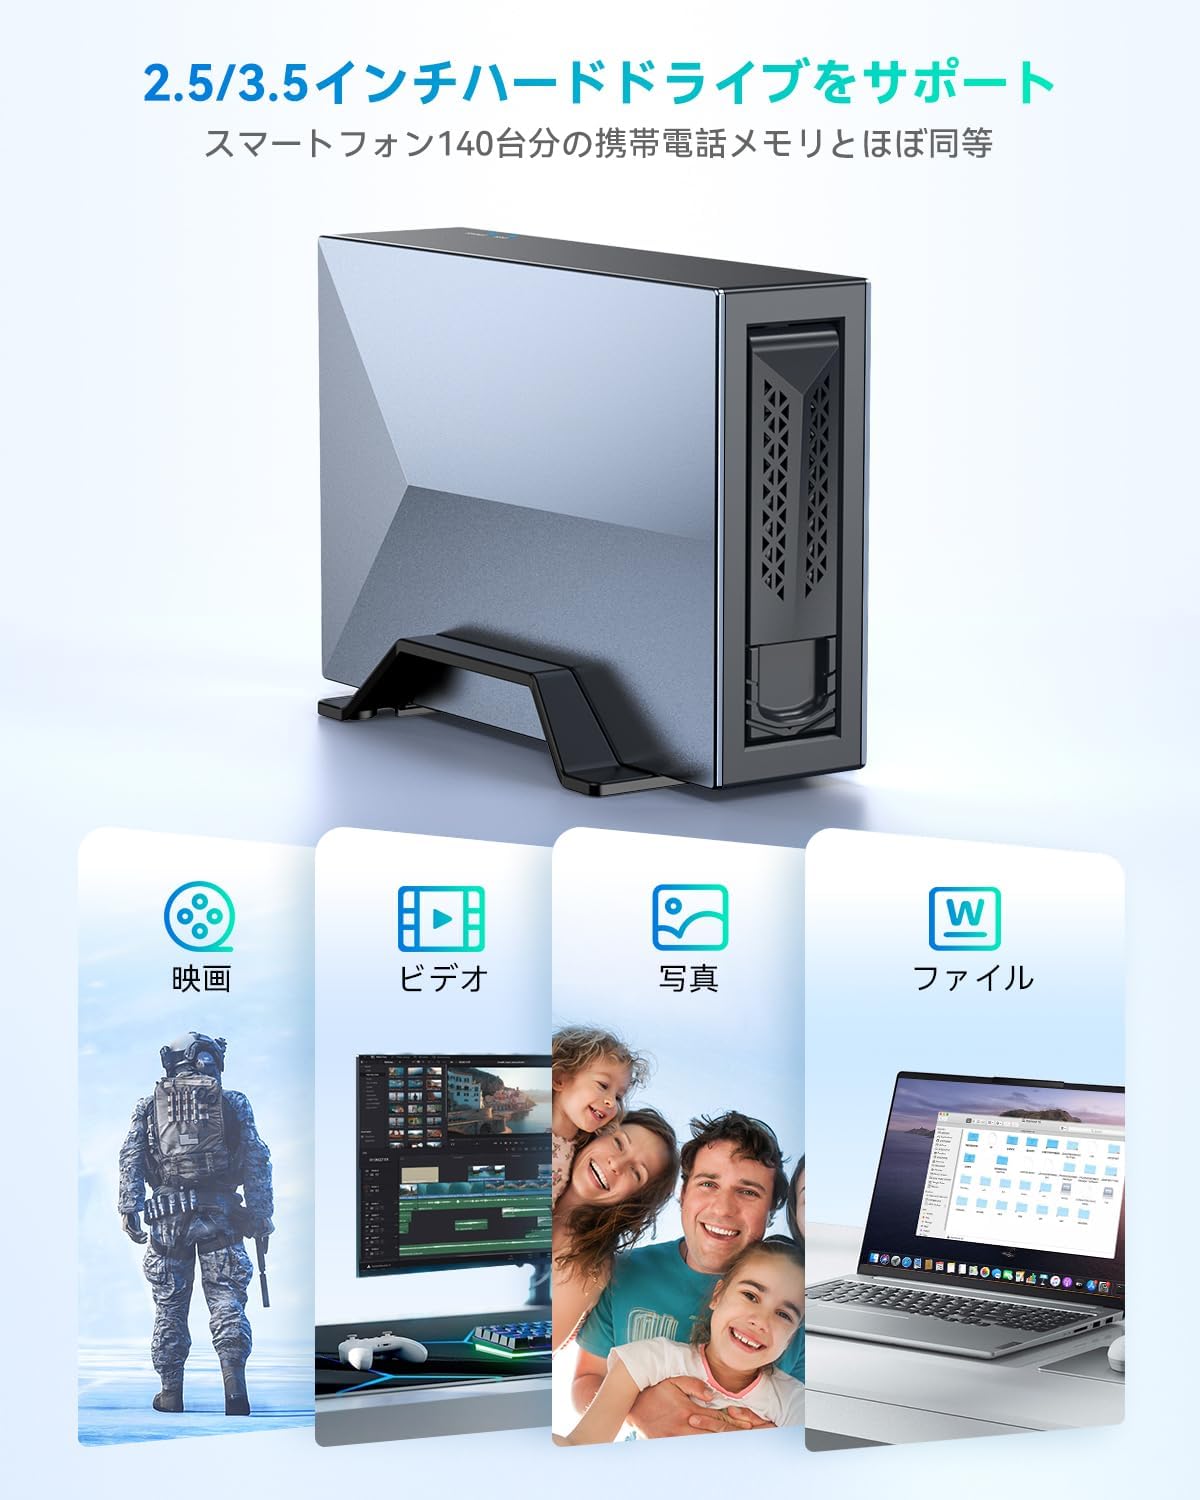
Figure 12: Support for 2.5/3.5 inch drives and various file jenis.

Figure 13: Compatibility with various file formats and large storage capacity examples.
4.4. Peluasan Storan
The NAS storage space can be expanded by connecting additional Yottamaster disk enclosures (2/4/5 bay models, including RAID versions) to further increase capacity.

Figure 14: Expanding NAS storage with additional enclosures.
5. Ketersambungan dan Keserasian
The Yottamaster NAS Kit DM3 offers flexible connectivity and broad compatibility.
- Keserasian Drive: Supports 2.5-inch and 3.5-inch SATA HDD/SSD.
- Keserasian Sistem Pengendalian: Compatible with Windows, macOS, Android, and iOS.
- Antara muka: USB 3.2 Gen1 USB-C for high-speed direct connection.
- Rangkaian: Gigabit Ethernet port for fast intranet transmission (up to 120MB/s). Wi-Fi speed up to 60MB/s.

Figure 15: Intranet transmission speeds and connectivity.
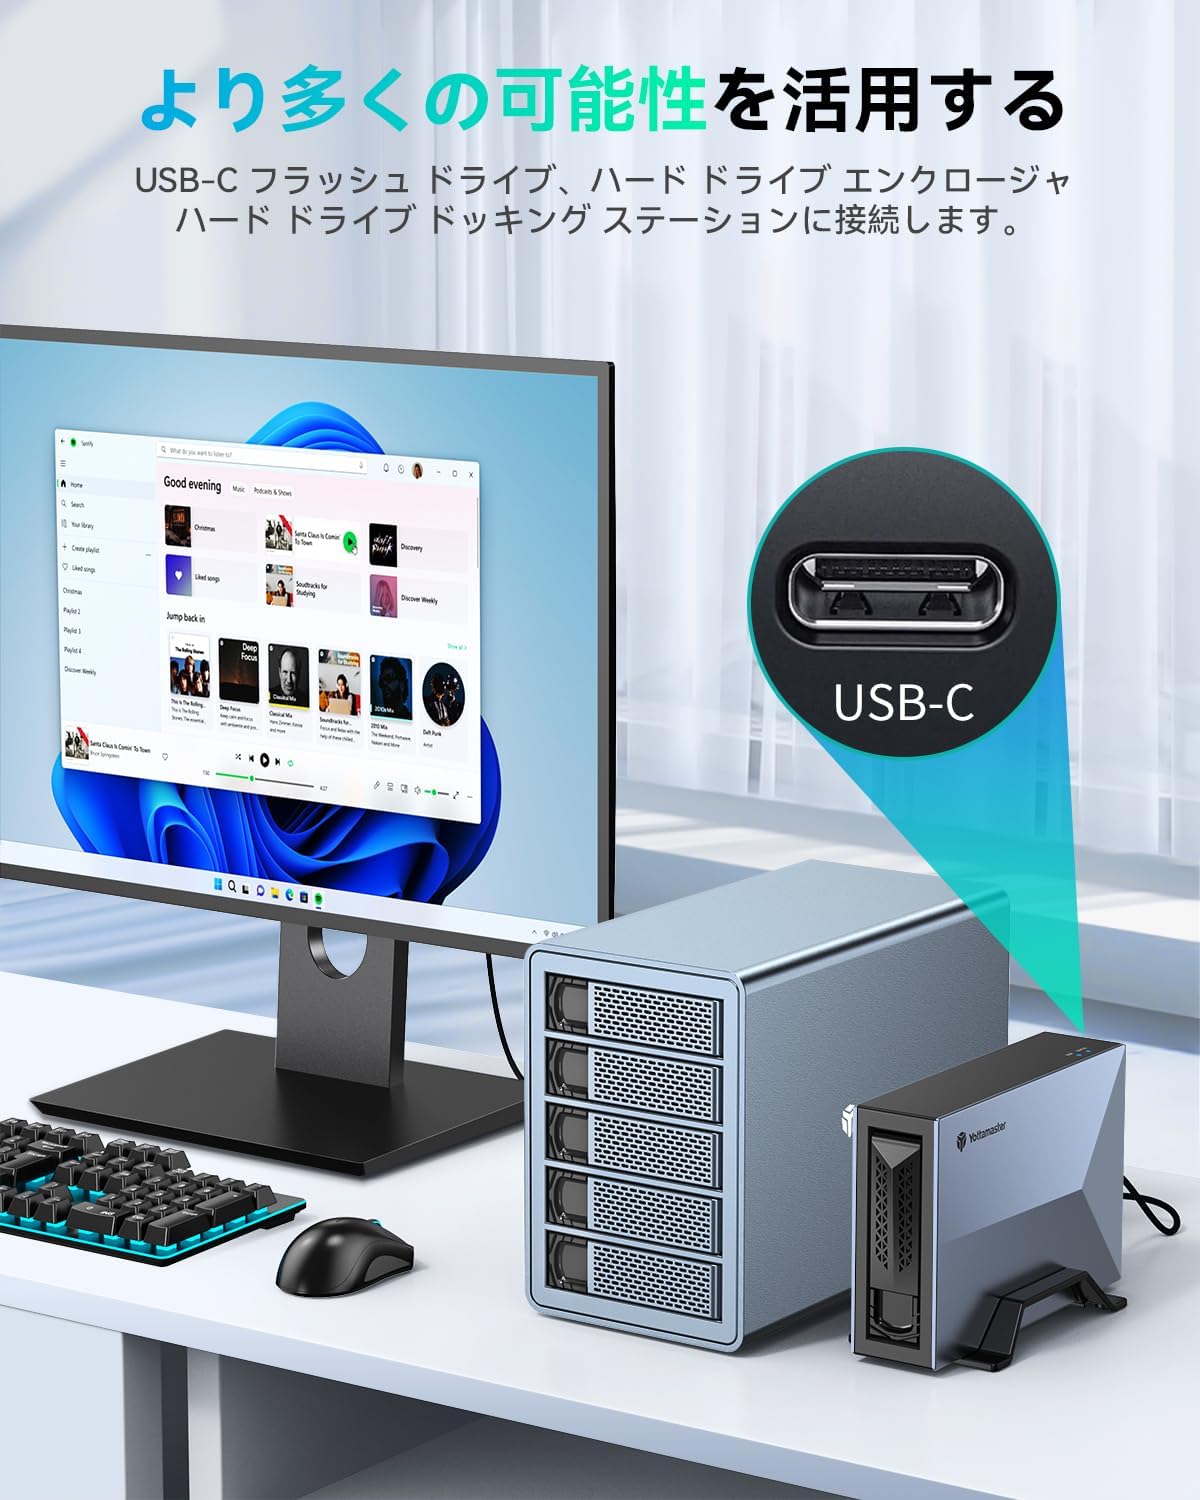
Figure 16: USB-C connectivity for expanded possibilities.
6. Penyelenggaraan
To ensure optimal performance and longevity of your Yottamaster NAS Kit DM3, consider the following maintenance tips:
- Sandaran Biasa: While the NAS provides secure storage, it is always recommended to maintain external backups of critical data.
- Kemas kini Firmware: Check the Yottamaster official website or Weline APP for any available firmware updates to ensure the device operates with the latest features and security patches.
- Kebersihan: Pastikan peranti bebas daripada habuk dan serpihan. Gunakan kain lembut dan kering untuk membersihkan. Jangan gunakan pembersih cecair terus pada peranti.
- Pengudaraan: Pastikan peranti diletakkan di kawasan yang mempunyai pengudaraan yang baik untuk mengelakkan pemanasan melampau. Jangan tutup lubang pengudaraan.
- Penutupan Selamat: Always power off the device properly through the Weline APP or by safely ejecting it from your computer before disconnecting power to prevent data corruption.
7. Penyelesaian masalah
If you encounter issues with your Yottamaster NAS Kit DM3, refer to the following common troubleshooting steps:
- Peranti Tidak Dihidupkan:
- Ensure the DC power adapter is securely connected to both the device and a working power outlet.
- Verify the power switch is pressed and the blue LED is illuminated.
- Cannot Access NAS via Network:
- Check if the LAN cable is properly connected to both the NAS and your router/switch.
- Ensure your router is functioning correctly and providing network access.
- Verify that the Weline APP is installed and the device is successfully bound to your account.
- Confirm that your computer or mobile device is on the same network as the NAS.
- If using Samba, double-check the IP address and credentials.
- HDD/SSD Not Detected:
- Ensure the HDD/SSD is correctly inserted into the enclosure.
- Try re-inserting the drive.
- Test the HDD/SSD in another compatible enclosure or directly connect it to a computer (if possible) to rule out drive issues.
- If the drive is new, it may need to be formatted. Refer to the Weline APP or your operating system's disk management tools for formatting options.
- Pemindahan Data Lambat:
- When using USB-C direct connection, ensure you are using a USB 3.2 Gen1 compatible cable and port on your computer.
- For network transfers, check your network speed and ensure there are no other bandwidth-intensive activities occurring.
- Ensure your LAN cable is a Gigabit Ethernet cable for optimal wired speeds.
- Weline APP Issues:
- Ensure your Weline APP is updated to the latest version.
- Cuba mulakan semula aplikasi atau peranti mudah alih anda.
- Check your internet connection if experiencing issues with remote access.
If these steps do not resolve your issue, please contact Yottamaster customer support for further assistance.
8. Spesifikasi
| Jenama | Yottamaster |
| Nombor Model | DM3 |
| warna | Kelabu |
| Keserasian Drive | 2.5-inch & 3.5-inch SATA HDD/SSD |
| Kapasiti Storan Maks | Up to 8 TB (per drive) |
| CPU | Empat teras |
| Antara muka | USB 3.2 Gen1 Jenis-C |
| Antara Muka Rangkaian | Gigabit Ethernet |
| Data Transfer Speed (USB) | Sehingga 5Gbps |
| Data Transfer Speed (LAN) | Up to 120MB/s (Intranet) |
| Data Transfer Speed (Wi-Fi) | Sehingga 60MB/s |
| Sistem Operasi | Windows, macOS, Android, iOS |
| Ciri Keselamatan | SDVN Encryption, VPN Remote Access, Full-closed Safety Mode |
| Ciri Khas | Tool-free installation, Magnetic cover, Dual Mode (NAS/Mobile Enclosure), Samba, DLNA |
9. Kandungan Pakej
The Yottamaster NAS Kit DM3 package includes the following items:
- Yottamaster NAS Kit DM3 Device
- Kabel Rangkaian
- Penyesuai Kuasa
- Kabel USB-A ke Jenis-C
- Manual Pengguna

Figure 17: Package contents of the Yottamaster NAS Kit DM3.
10. Waranti dan Sokongan
Yottamaster products come with a standard manufacturer's warranty. For detailed warranty information, please refer to the warranty card included in your package or visit the official Yottamaster webtapak.
For technical support, product inquiries, or assistance with troubleshooting, please contact Yottamaster customer service through their official webtapak atau maklumat hubungan yang diberikan dalam manual pengguna.
Official Yottamaster Webtapak: www.yottamaster.com


