1. Pengenalan
This manual provides comprehensive instructions for the safe and effective operation, setup, maintenance, and troubleshooting of your FLARING 155Amp MIG Welder. This versatile 3-in-1 machine supports Gasless MIG, Stick, and Lift TIG welding, designed for various applications from home projects to professional use.
2. Maklumat Keselamatan
Sentiasa mengutamakan keselamatan semasa mengendalikan peralatan kimpalan. Kegagalan mematuhi garis panduan keselamatan boleh mengakibatkan kecederaan serius atau kematian.
- Pakai peralatan pelindung diri (PPE) yang sesuai, termasuk topi keledar kimpalan, sarung tangan, dan pakaian pelindung.
- Pastikan pengudaraan yang mencukupi untuk mengelakkan terhidu asap kimpalan.
- Jauhkan bahan mudah terbakar dari kawasan kimpalan.
- Always disconnect power before performing maintenance or changing accessories.
- Do not operate the welder in wet conditions.
- Consult local safety regulations and standards.
3. Produk Lebihview
The FLARING 155Amp MIG Welder (Model FM155-42CA) is a compact and powerful 3-in-1 welding machine. It features a large LED digital display for clear control and easy operation.
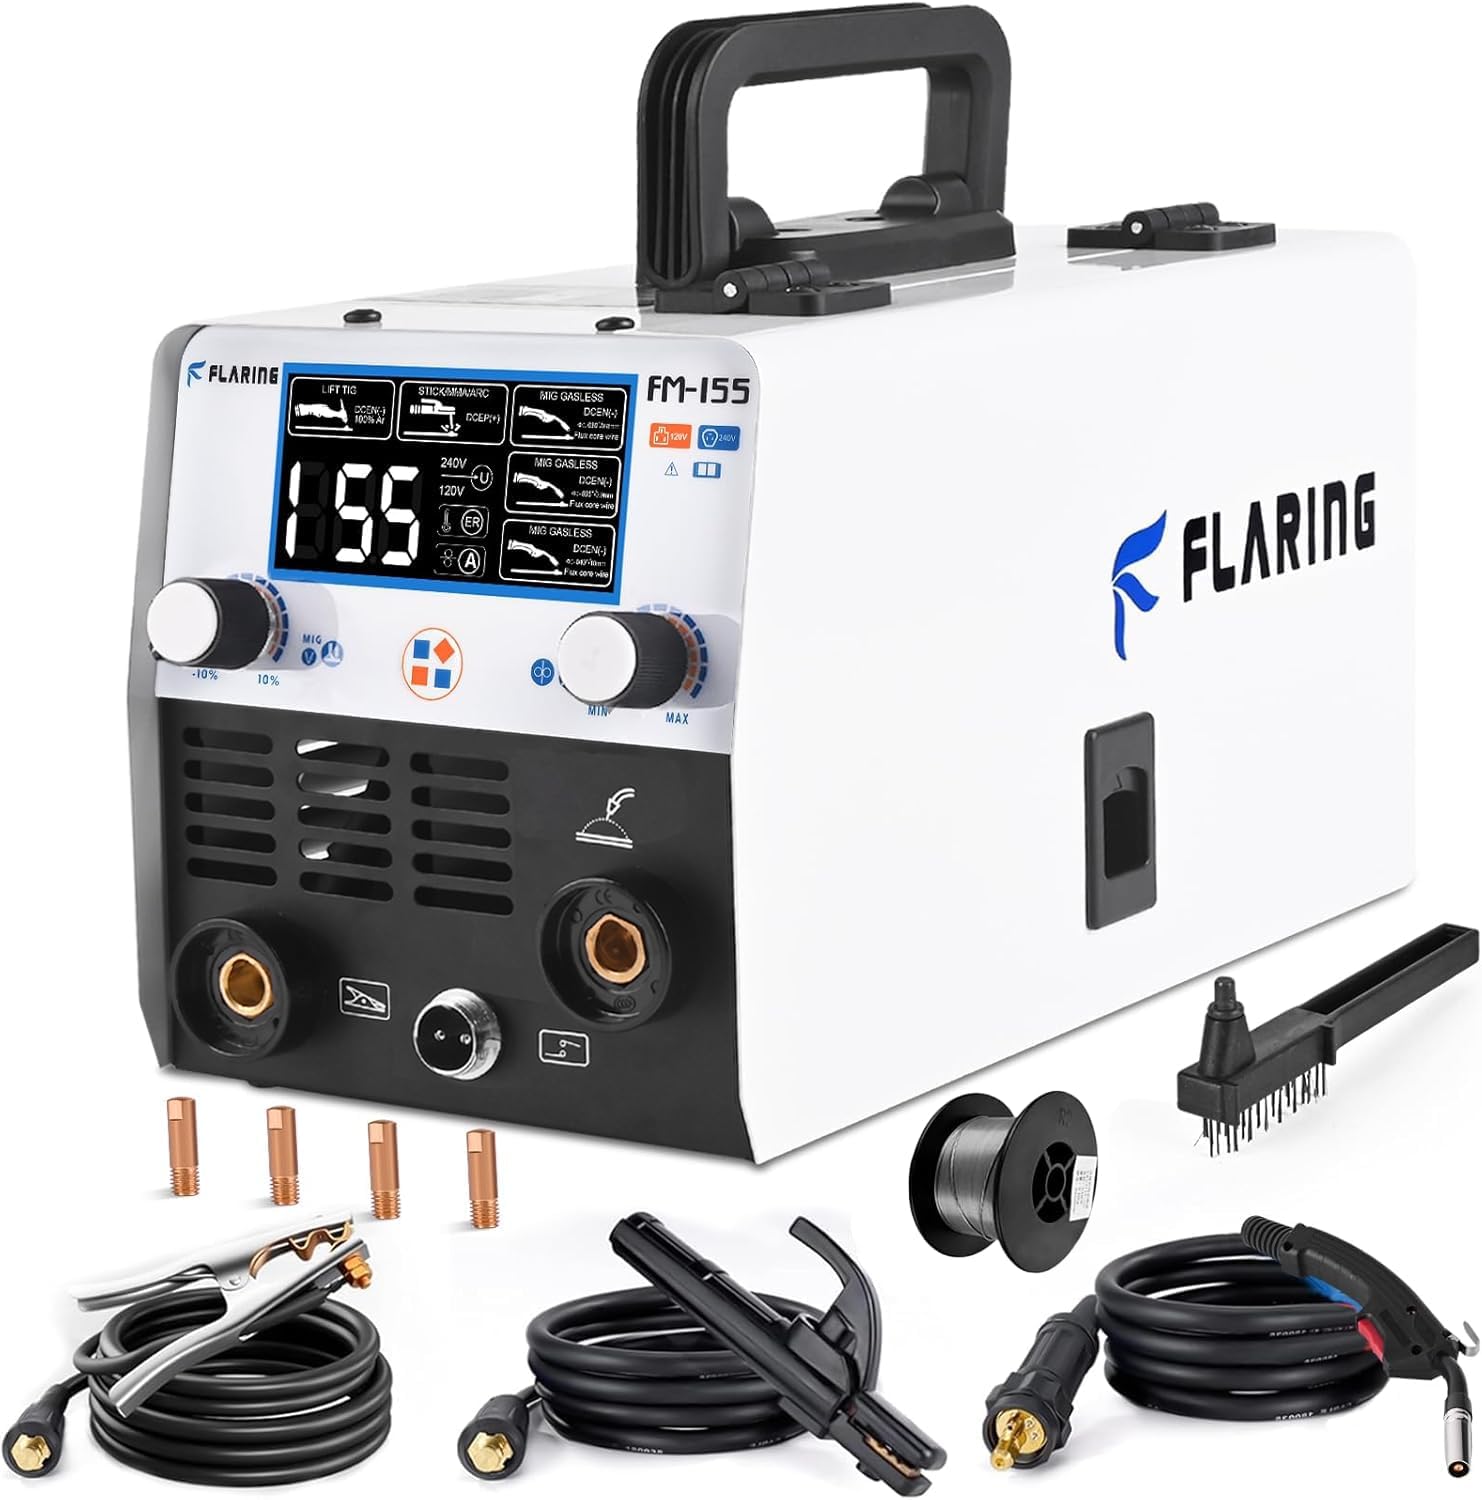
Figure 3.1: FLARING 155Amp MIG Welder and included accessories.
3.1 Ciri Utama:
- 3-in-1 Multi-function: Capable of Gasless MIG, Stick (MMA), and Lift TIG welding. (Note: Lift TIG torch sold separately).
- Prestasi Tinggi: Maximum output of 155A, suitable for mild steel up to 4mm (3/20"). Supports 0.8mm, 0.9mm, and 1.0mm flux-cored wire.
- Paparan Digital LED Besar: Provides clear readings for welding mode, current, and voltage, enhancing operational efficiency.
- Reka Bentuk Mudah Alih: Weighs only 12 pounds (5.67 kg) with a convenient handle for easy transport.
- Teknologi Lanjutan: Incorporates IGBT inverter technology for stable and smooth arc performance, along with overheat/overload protection and efficient cooling.

Figure 3.2: Illustration of the 3-in-1 multi-function capabilities of the FM-155 welder.

Rajah 3.3: Jarak dekat view of the large LED digital display, showing welding parameters.
4. Persediaan
4.1 Membongkar dan Pemeriksaan:
Carefully unpack all components and inspect for any shipping damage. Retain original packaging for future transport or storage.
- 1 x MIG155A Welder
- 1 x MIG Welding Torch (3M)
- 1 x 0.8 Flux Cored Wire (0.5kg)
- 1 x Electronic Holder
- 1 x Berus & Tukul
- 1 x Cl Tanahamp (2J)
- 4 x Contact tips
- 2 x Gaiser
- 1 x Manual Pengguna (dokumen ini)

Figure 4.1: All standard accessories included with the FLARING FM155 welder.
4.2 Connecting the Welder:
- Connect the MIG Welding Torch to the appropriate port on the front panel.
- Attach the Ground Clamp ke bahan kerja atau meja kimpalan, memastikan sentuhan elektrik yang baik.
- For Stick welding, connect the Electronic Holder to the positive terminal and the Ground Clamp ke terminal negatif.
- For Lift TIG welding, connect the TIG torch (sold separately) to the appropriate terminal and the Ground Clamp ke terminal negatif.
4.3 Installing Flux-Cored Wire (for MIG Gasless):
The welder features a stable and smooth wire feed structure.
- Buka petak suapan wayar.
- Letakkan gelendong dawai teras fluks 0.5kg pada gelendong.
- Thread the wire through the wire pressing wheel and into the automatic wire feed mechanism.
- Ensure the wire feeding wheel is correctly sized for the 0.8mm flux-cored wire. The welder supports 0.030" (0.8mm), 0.035" (0.9mm), and 0.040" (1.0mm) flux core wire sizes.
- Tutup petak.
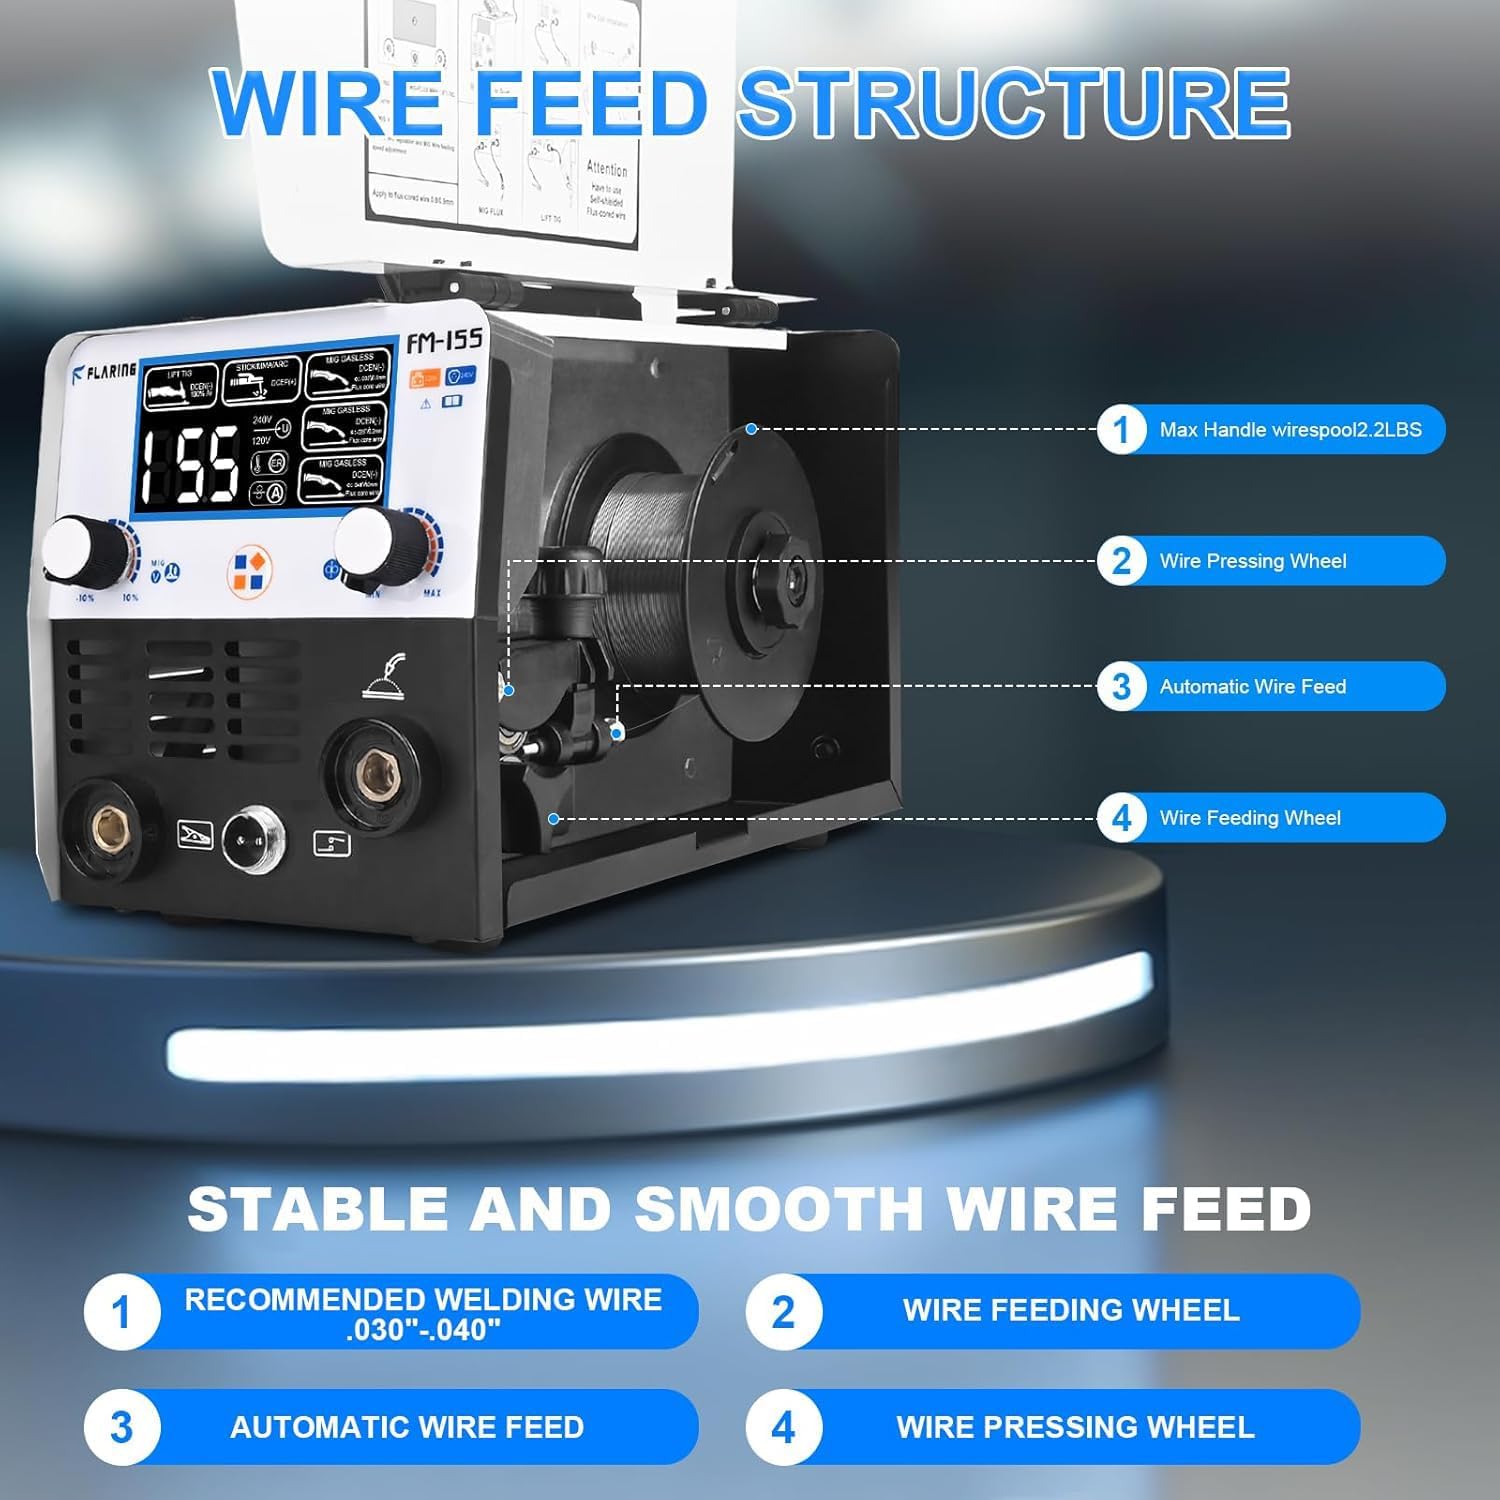
Gambar 4.2: Dalaman view of the wire feed structure, showing the spool and feeding mechanism.
5. Arahan Operasi
The FLARING FM155 offers three welding modes: Gasless MIG, Stick (MMA), and Lift TIG. Select the appropriate mode using the controls on the large LED digital panel.

Figure 5.1: Visual representation of the three welding modes: MMA/Stick, Flux Cored Wire (MIG), and Lift TIG.
5.1 Gasless MIG Welding:
This mode is ideal for welding stainless steel, carbon steel, and thicker steel without the need for external shielding gas, using flux-cored wire.
- Ensure flux-cored wire is correctly installed (refer to Section 4.3).
- Select "MIG Gasless" mode on the control panel.
- Adjust current and voltage settings as required for your material thickness. The machine provides clear digital readouts.
- Begin welding, maintaining a consistent travel speed and arc length.
Video 5.1: Demonstration of FLARING FM155 Flux Core MIG Gasless Welding. This video illustrates the process and results of gasless MIG welding with the FM155.
Video 5.2: Bekasample of MIG Gasless welding on 4mm carbon steel using 0.8mm flux core wire. This video provides a visual guide to achieving a weld on thicker carbon steel.
Video 5.3: Bekasample of MIG Gasless welding on 3mm carbon steel using 0.8mm flux core wire. This video demonstrates the welding process on thinner carbon steel.
5.2 Stick (MMA) Welding:
For stick welding, ensure the electronic holder and ground clamp are connected as described in Section 4.2.
- Insert the appropriate electrode into the electronic holder.
- Select "Stick/MMA/ARC" mode on the control panel.
- Adjust the current (amperage) according to the electrode type and material thickness.
- Strike an arc and maintain a consistent arc length and travel speed for optimal results.
Video 5.4: Demonstration of FLARING FM155 Stick Welding. This video shows the stick welding process and the resulting weld bead.
5.3 Lift TIG Welding:
For Lift TIG welding, an additional Lift TIG torch is required (sold separately). This mode provides precise control for delicate welding tasks.
- Connect the Lift TIG torch and ensure proper tungsten electrode installation.
- Select "Lift TIG" mode on the control panel.
- Adjust current settings.
- Initiate the arc by gently touching the tungsten to the workpiece and lifting slightly.
5.4 Welding Samples:
The FLARING FM155 is capable of welding various materials and shapes, including iron blocks, galvanized pipes, round tubes, chairs, stainless steel, and steel frames.

Gambar 5.2: Cthamples of welds performed on different materials and structures, showcasing the versatility of the welder.
6. Penyelenggaraan
Penyelenggaraan tetap memastikan jangka hayat dan prestasi optimum mesin kimpalan anda.
- Pembersihan: Periodically clean the welder's exterior and ventilation openings to prevent dust and debris buildup. Use a dry, soft cloth.
- Petua Hubungi: Inspect and replace contact tips regularly, especially for MIG welding, to ensure consistent wire feeding and arc stability.
- Tanah Clamp & Cables: Semak tanah clamp and all cables for damage or loose connections before each use.
- Storan: Simpan mesin kimpal di persekitaran yang kering dan bersih apabila tidak digunakan.

Figure 6.1: The welder features internal cooling and protection systems to ensure durability and safe operation.
7. Penyelesaian masalah
This section addresses common issues you might encounter with your FLARING 155Amp MIG Welder.
| Masalah | Kemungkinan Punca | Penyelesaian |
|---|---|---|
| Tiada kuasa kepada unit. | Kord kuasa tertanggal, pemutus litar terpelantik, suis kuasa rosak. | Check power connections, reset circuit breaker, contact support if switch is faulty. |
| Poor arc starting or unstable arc. | Improper ground connection, incorrect settings, worn contact tip (MIG), damp electrodes (Stick). | Ensure solid ground connection, adjust current/voltage, replace contact tip, dry electrodes. |
| Isu penyuapan wayar (MIG). | Incorrect wire tension, clogged liner, wrong contact tip size, tangled wire spool. | Adjust wire tension, clean/replace liner, use correct contact tip, untangle wire. |
| Overheat indicator (ER) on. | Exceeded duty cycle, insufficient ventilation. | Allow the machine to cool down, ensure clear airflow around the unit. |
8. Spesifikasi
Detailed technical specifications for the FLARING 155Amp MIG Welder (Model FM155-42CA).
| Spesifikasi | Nilai |
|---|---|
| Pengeluar | MENJALANKAN |
| Nombor Bahagian | FM155 |
| Dimensi Produk | 30.51 x 14.3 x 17.5 cm |
| Nombor Model Item | FM155-42CA |
| Corak | MIG Welder-7GEN-155A-120V |
| Sumber Kuasa | AC |
| Voltage | 110 Volt |
| Berat Barang | 5.67 kg (12 paun) |
| Bateri Diperlukan? | Tidak |
| Pertama Tersedia | 16 Ogos 2024 |

Figure 8.1: Detailed specification label for the FLARING FM-155 welder.
9. Waranti dan Sokongan
For warranty information, technical support, or service inquiries, please refer to the contact details provided with your purchase documentation or visit the official FLARING webtapak. Simpan resit pembelian anda sebagai bukti pembelian.


