1. Pengenalan
This manual provides essential instructions for the installation, operation, and maintenance of your GLEDOPTO ESP32 WLED Digital LED Controller (Model GL-C-015WL-D). Please read this manual thoroughly before using the product to ensure proper function and safety.
2. Maklumat Keselamatan Penting
- The controller chip is ESP32. Verify firmware version information carefully before upgrading. Incorrect firmware upgrades can damage the product.
- Pastikan input voltage (5-24V DC) matches your power supply and LED strip requirements.
- Do not exceed the maximum output current of 10A per channel or 15A total.
- Operate the device within the specified temperature range of -20 to 45 °C.
- Produk ini direka untuk kegunaan dalaman sahaja.
- Putuskan sambungan kuasa sebelum melakukan sebarang pendawaian atau penyelenggaraan.
3. Produk Lebihview
3.1 Kandungan Pakej
- 1 x GLEDOPTO ESP32 WLED Digital LED Controller with Mic / UART (Model: GL-C-015WL-D)
- 1 x Manual Pengguna
- 1 x 3cm Damper
3.2 Ciri-ciri Utama
- ESP32 Chip: High-performance processing and stable network connectivity.
- Mikrofon Bersepadu: Captures ambient sounds for music synchronization and dynamic lighting effects.
- UART Download Port: Facilitates firmware upgrades and debugging without complex hardware operations.
- Simple Wiring & Expandability: Easy connection ports and an added IO33 port for customization.
- Mod Dinamik Kaya: Over 100 dynamic lighting effects available.
- Keserasian Luas: Supports various addressable LED strips including WS2811, WS2812, WS2812B, FL19038, SK6812, SM16703P, SM16703SP3, TM1814, WS2813, WS2815, and FCOB.
- Penggunaan Kuasa Rendah: Integrated switching regulator for ESP32 power and a MOSFET relay to disable output power when WLED is off.
4. Spesifikasi
| Nombor Model | GL-C-015WL-D |
| Input Voltage | DC 5-24V |
| Max Addressable ICs | 800 |
| Output Semasa setiap Saluran | 10A Maks |
| Jumlah Arus Keluaran | 15A Maks |
| Dimensi | 108 x 45 x 18 mm |
| Suhu Operasi | -20 hingga 45 °C |
| Supported LED Strip ICs | WS2811, WS2812, WS2812B, FL19038, SK6812, SM16703P, SM16703SP3, TM1814, WS2813, WS2815, FCOB, etc. |
| Ketersambungan | WiFi (ESP32) |
| Ciri Khas | Dimmable, Microphone Function, UART Port |
5. Persediaan dan Pemasangan
5.1 Susun Atur Pengawal

5.2 Arahan Pendawaian
Follow these steps for proper wiring of your LED strip to the controller:

- Connect the positive (+) terminal of your power supply to the V+ input on the controller.
- Connect the negative (-) terminal of your power supply to the V- input on the controller.
- Connect the VCC wire from your LED strip to the V output terminal on the controller.
- Connect the DATA wire from your LED strip to the D (GPIO16) output terminal on the controller. This is the default output. The other D (GPIO2) can be used after configuration in the app.
- Connect the GND wire from your LED strip to the G output terminal on the controller.
5.3 Reka Bentuk Port Sambungan Pantas
The controller features a quick connect port design for convenient wiring:

- Buka penyambung ke atas.
- Insert the stripped wire into the port.
- Press down on the connector to secure the wire.
6. Operasi
6.1 Fungsi Butang
The controller has two physical buttons for basic control:

- Butang Mulakan Semula: Pressing this button will temporarily power off the controller module. Releasing it will power it back on. This is useful for restarting the controller after configuring the microphone or other settings.
- Butang Pilih:
- Akhbar Ringkas: Menghidupkan atau mematikan peranti.
- Tekan Lama (1 saat): Switches between available colors or effects.
- Tekan Lama (10 saat): Resets the WLED controller and activates the WLED-AP hotspot for initial setup or re-configuration.
6.2 Kawalan Apl
The GLEDOPTO controller is primarily managed through the WLED application, offering extensive control over your LED strips.
6.2.1 Kesan Dinamik
The WLED app provides access to over 100 dynamic lighting effects, allowing for personalized ambiance.

6.2.2 Kawalan Warna Bersegmen
Customize individual segments of your LED strip to display different colors simultaneously.

6.2.3 Microphone Function
The built-in microphone allows the LED lights to synchronize with music or ambient sounds, creating immersive audio-reactive lighting experiences.


6.3 Integrasi Alexa
The controller supports integration with Amazon Alexa for voice control. Follow these steps to connect:
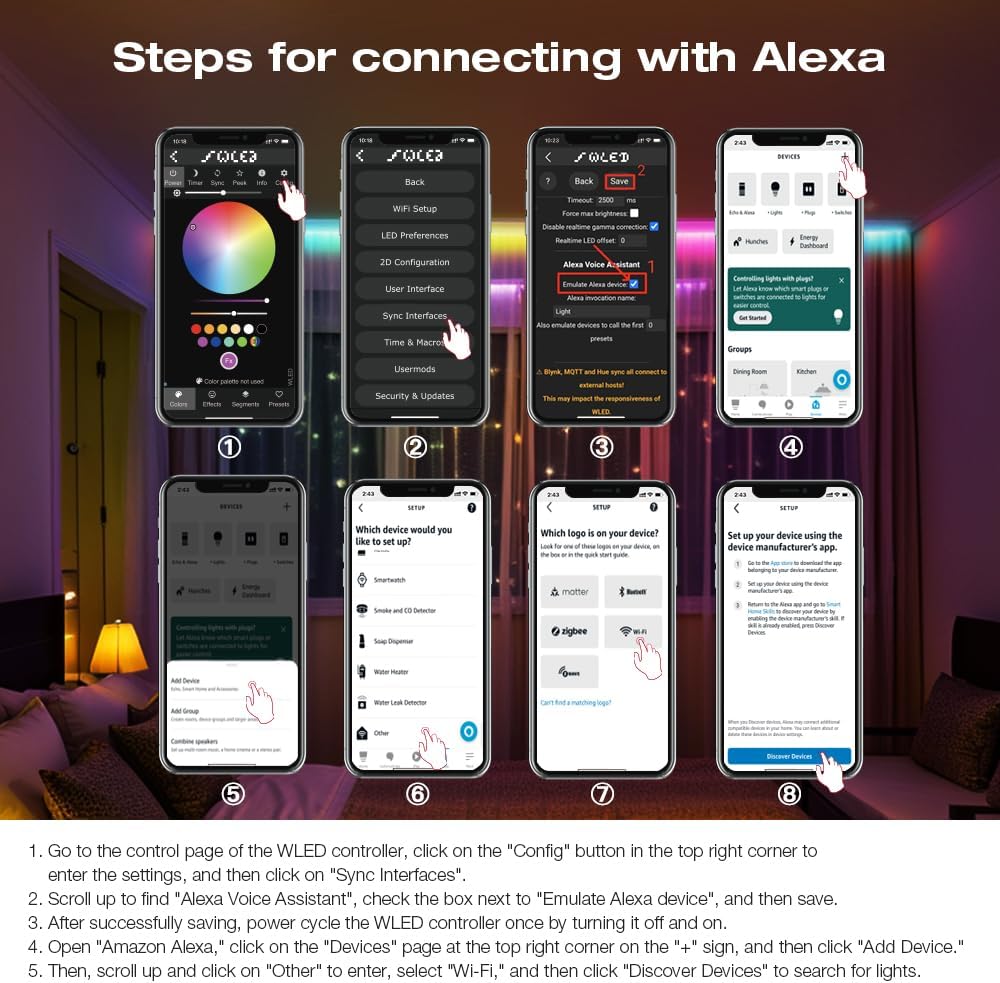
- Go to the control page of the WLED controller in the app, click on the "Config" button in the top right corner to enter the settings, and then click on "Sync Interfaces".
- Tatal ke atas untuk mencari "Alexa Voice Assistant", tandai kotak di sebelah "Emulate Alexa device", dan kemudian simpan.
- Selepas berjaya menyimpan, kitar kuasa pengawal WLED sekali dengan mematikan dan menghidupkannya.
- Open the Amazon Alexa app, click on the "Devices" page at the top right corner on the "+" sign, and then click "Add Device".
- Kemudian, tatal ke atas dan klik pada "Lain-lain" untuk masuk, pilih "Wi-Fi", dan kemudian klik "Discover Devices" untuk mencari lampu.
7. Kemas Kini Perisian Tegar
The integrated UART port allows for convenient firmware updates. Refer to the official WLED documentation or GLEDOPTO support resources for detailed instructions on how to perform firmware updates. Always ensure you are using the correct firmware version for your ESP32 chip to prevent damage.
8. Penyelenggaraan
- Pastikan pengawal bersih dan bebas daripada habuk. Gunakan kain kering dan lembut untuk pembersihan.
- Elakkan daripada mendedahkan pengawal kepada kelembapan atau suhu yang melampau.
- Pastikan pengudaraan yang betul di sekeliling peranti untuk mengelakkan terlalu panas.
9. Penyelesaian masalah
- Pengawal tidak dihidupkan: Check power supply connections and ensure the input voltage berada dalam julat 5-24V DC.
- Jalur LED tidak menyala: Verify all wiring connections (VCC, DATA, GND) are secure and correct. Ensure the LED strip type is supported by the controller.
- Tiada sambungan Wi-Fi: Perform a long press (10 seconds) on the Opt button to reset the controller and activate the WLED-AP hotspot for re-configuration. Ensure your router is operating on a 2.4GHz band.
- Alexa integration issues: Double-check that "Emulate Alexa device" is enabled in the WLED app settings and that you have power cycled the controller after saving. Ensure the Alexa app is discovering devices on the correct network.
- Incorrect colors or effects: Verify the LED strip type and IC settings in the WLED app.
10. Waranti dan Sokongan
For warranty information and technical support, please refer to the GLEDOPTO official webtapak atau hubungi peruncit anda. Simpan resit pembelian anda untuk tuntutan waranti.


