1. Pengenalan
The Yale Assure Lock 2 Touch Deadbolt offers a secure and convenient way to manage access to your home. Featuring a biometric fingerprint scanner, a touchscreen keypad, and built-in Wi-Fi, this key-free smart lock provides multiple entry options and remote control capabilities through the Yale Access App. This manual will guide you through the installation, operation, maintenance, and troubleshooting of your new smart lock.

Image: Yale Assure Lock 2 Touch Keypad and Yale Access App Interface showing locked/unlocked status.

Image: Close-up of the fingerprint scanner on the Yale Assure Lock 2 Touch, highlighting its biometric capability.
Video: Tamatview of the Yale Assure Lock 2, showcasing its unique features and seamless integration into daily life.
2. Persediaan dan Pemasangan
The Yale Assure Lock 2 Touch is designed for easy installation, typically requiring only a screwdriver. Follow these steps carefully to ensure proper setup.
2.1 Apa yang Termasuk

Image: All components included with the Yale Assure Lock 2 Touch, including the keypad, interior lock, deadbolt latch, mounting hardware, batteries, and Wi-Fi module.
2.2 Alat yang Anda Mungkin Perlukan
- Pemutar skru kepala Philips
- Pahat tanggam kayu (pilihan)
- Pensel (pilihan)
- Gerudi (pilihan)
- Pisau utiliti (pilihan)
- Pita pengukur (pilihan)
2.3 Langkah Pemasangan
For a visual guide, please refer to the installation video below. Detailed steps are also provided.
Video: A comprehensive guide to installing the Yale Assure Lock 2 Key-Free model.
- Sediakan Pintu: Before installing your lock, prepare your door by removing any existing deadbolt. Use a screwdriver to remove the two screws from the deadbolt.
- Measure Backset: Measure the dimension from the edge of the door to the center of the deadbolt hole. The Assure Lock 2 supports backsets of 2-3/8" or 2-3/4". If your backset is 2-3/4", you must adjust your deadbolt latch by twisting the bolt.
- Kelegaan Ukuran: Ensure the space between your deadbolt hole and your lever is greater than 1-7/8".
- Measure Face Bore: The Assure Lock 2 supports bore holes of 2-1/8" or 1-1/2". If your bore hole is 1-1/2", remove the bore hole cup from the keypad by unscrewing the two screws on the inside of the keypad.
- Measure Cross Bore: The diameter of your cross bore hole must be 1".
- Measure Strike Pocket: This hole must be 1" in diameter and 1" deep.
- Pasang Deadbolt Latch: Put the deadbolt latch in the retracted, unlocked position. The deadbolt orientation should be placed into the door with the side marked "UP". Verify that the deadbolt is centered in the hole in the door, then secure it with the two small screws.
- Pasang Strike Plate: Pasang plat pemogokan ke dalam bingkai pintu dengan dua skru kecil yang tinggal.
- Install Keypad on Front of Door: Make sure the cable is positioned under the deadbolt latch. Additionally, ensure the keypad is flush to the door and is straight.
- Pasang Pendakap Pelekap: Install the mounting bracket on the inside of your door. Place the two prongs through the two holes in the keypad. Then, guide the keypad wire through the hole in the mounting bracket.
- Pendakap Pemasangan Selamat: Use the long screws (silver, black, or blue) you selected while measuring your door thickness. Thread the through bolts through the two holes in the mounting bracket. Make sure they also thread properly through the deadbolt latch and the keypad. Continue to thread until tightened and so that the keypad is sitting flushing on the front of the door.
- Attach Cable: Attach the cable from the keypad to the connector on the inside of the lock. Be sure to route the wire under the wire guide without crimping it.
- Place Tailpiece in Position: Put the tailpiece in the horizontal position and place it through the mounting bracket and the deadbolt latch. Make sure the interior lock is on the mounting bracket by hooking the bottom of the interior of the lock to the latch on the mounting bracket.
- Install Interior Lock (continued): Screw in the two pre-installed screws inside of the lock's battery cover. When tightening down these screws, the lock will adjust itself to sit flush on the door.
- Test Lock Operation: Test the operation of the lock by moving the thumbturn. The thumbturn should move smoothly and the latch should move to the extended or locked position.
- Install Yale Smart Module (optional): If you have a Yale Smart Module, install it in the interior of the lock in the module slot. The module must be installed prior to installing the batteries. If your batteries are already installed, remove one battery prior to installing the module.
- Pasang Bateri: Unlock the deadbolt before installing the batteries. For easy battery removal in the future, pull up the ribbon to cover the battery terminals. Then, install the bottom back battery, followed by the top back battery, and finally the two front batteries before sliding the battery cover back in place.
- Pasang Penutup Bateri: Install the battery cover by sliding it into place.

Image: A hand using a screwdriver to remove an existing deadbolt from a door, preparing it for the new Yale lock.

Image: A person measuring the backset of a door to ensure compatibility with the Yale Assure Lock 2.

Image: A hand adjusting the face bore of the door to fit the Yale Assure Lock 2 keypad.

Image: A person measuring the cross bore hole on the door to ensure it meets the required 1-inch diameter for the Yale Assure Lock 2.

Image: A hand inserting the deadbolt latch into the door, ensuring it is in the retracted position and correctly oriented.

Image: A person using a screwdriver to install the strike plate into the door frame, securing it with two screws.

Image: A hand positioning the Yale Assure Lock 2 keypad on the exterior side of the door, ensuring the cable is correctly routed.

Image: A hand installing the mounting bracket on the interior side of the door, guiding the keypad wire through the bracket hole.

Image: A person securing the mounting bracket to the door using a screwdriver, ensuring the keypad is flush and the bolts are tightened.

Image: A hand connecting the keypad cable to the interior lock assembly, ensuring proper routing to avoid crimping.

Image: A hand positioning the tailpiece horizontally through the mounting bracket and deadbolt latch, ensuring the interior lock is correctly hooked.

Image: A hand using a screwdriver to secure the interior lock to the door, tightening the screws inside the battery cover.

Image: A hand testing the smooth operation of the thumbturn on the installed Yale Assure Lock 2.
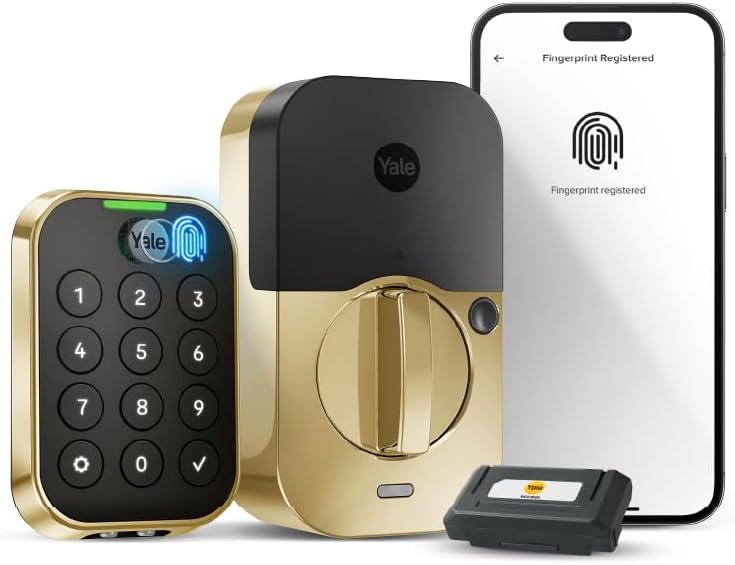
Image: A hand inserting the Yale Smart Module into the designated slot within the interior lock assembly.

Image: A hand installing AA batteries into the Yale Assure Lock 2, ensuring the ribbon is positioned for future removal.

Image: A hand sliding the battery cover onto the Yale Assure Lock 2 interior assembly after battery installation.
3. Operating Your Yale Assure Lock 2 Touch
3.1 Membuka kunci dengan Cap Jari
The biometric keypad allows for quick and secure access using your unique fingerprint. With 99% accuracy and less than 0.5-second recognition time, simply place your registered finger on the scanner to unlock the door.
Video: Demonstrates the convenience of key-free entry with the Yale Assure Lock 2, highlighting fingerprint access.
3.2 Using the Touchscreen Keypad
Enter your unique entry code on the touchscreen keypad to unlock the door. The keypad is backlit for visibility in low light conditions.

Image: A woman using the touchscreen keypad of the Yale Assure Lock 2 Touch to enter her home.
3.3 Auto-Unlock Feature
With the hands-free Auto-Unlock feature, the lock can automatically unlock as you approach your door, providing seamless entry without needing to touch the lock or your phone.

Image: A woman carrying groceries approaches her front door, which is equipped with the Yale Assure Lock 2, demonstrating the Auto-Unlock feature.
3.4 Ciri Kunci Automatik
Never worry about forgetting to lock your door again. The Auto-Lock feature automatically locks the door after a user-specified amount of time, provided the door is closed.
3.5 Remote Access via Yale Access App
Control your lock from anywhere using the Yale Access App. You can lock, unlock, share access, and receive notifications on your smartphone, ensuring peace of mind even when you're away.

Image: A smartphone displaying the Yale Access App interface, showing the current locked status of the door.
3.6 Setting Up Entry Codes
Easily create and manage entry codes for family and trusted guests through the Yale Access App. You can set codes for permanent, recurring, or temporary access.
Video: A tutorial on how to set up entry codes for the Yale Assure Lock 2 using the Yale Access App.
3.7 Integrasi Rumah Pintar
The Yale Assure Lock 2 Touch integrates with popular smart home platforms, including Amazon Alexa, Google Assistant, and Apple HomeKit, allowing for voice control and automation.

Image: Graphic illustrating the Yale Assure Lock 2's compatibility with various smart home ecosystems like Google Home, Alexa, and Apple Home.
4. Penyelenggaraan
4.1 Penggantian Bateri
The lock operates on 4 AA batteries (included). When replacing batteries, ensure the deadbolt is unlocked. For easier future removal, position the ribbon under the batteries to cover the terminals. Replace the bottom back battery first, then the top back, and finally the two front batteries before reattaching the battery cover.
4.2 Pembersihan
Untuk membersihkan bahagian luar kunci, gunakan lembut, damp kain. Elakkan pembersih atau pelarut yang melelas yang boleh merosakkan kemasan atau komponen elektronik.
5. Penyelesaian masalah
- Hayat Bateri Pendek: If batteries deplete quickly, especially when Wi-Fi is enabled, consider disabling Wi-Fi if remote access is not constantly needed. Ensure good Wi-Fi signal strength to minimize battery drain.
- Inaccurate Battery Indicator: The battery indicator in the app may only show low battery when it's nearly depleted. It is recommended to replace batteries proactively or when the first low battery warning appears.
- DoorSense Calibration Issues: If the lock frequently forgets door open/closed settings, recalibrate the DoorSense system through the Yale Access App.
- Fingerprint Recognition Problems: If the fingerprint reader requires multiple attempts, ensure your finger is clean and dry, and apply firm pressure. Re-registering your fingerprint might improve recognition.
- Smart Home Integration Difficulties: If you experience issues integrating with smart home apps (e.g., Google Home, Apple Home), consult the specific integration guides provided by Yale or the smart home platform.
- Selak Tidak Beroperasi Dengan Lancar: Ensure the deadbolt latch is properly adjusted for your door's backset (2-3/8" or 2-3/4"). Verify that the door frame's strike pocket is correctly aligned and deep enough.
6. Spesifikasi
| Ciri | Perincian |
|---|---|
| Jenama | Yale |
| Nama Model | Yale Assure Lock 2 Touch with Wi-Fi |
| Nombor Model Item | YRD430-F-WF1-BSP |
| Jenis Kunci | Biometrik, Deadbolt, Pad kekunci |
| Ciri Khas | Kunci Automatik, Pad Kekunci Bercahaya Belakang, Penunjuk Bateri, Cap Jari, Buka Kunci Kod Laluan |
| Protokol Ketersambungan | Bluetooth, Wi-Fi (2.4 GHz sahaja) |
| Kaedah Kawalan | Apl, Sentuh |
| Jenis Pengawal | Amazon Alexa, Android, Apple HomeKit, Google Assistant, iOS |
| bahan | Zink |
| warna | Suede Hitam |
| Dimensi Item (L x W x H) | 0.9 x 2.5 x 3.75 inci |
| Berat Barang | 3.58 paun |
| Bateri | 4 bateri AA diperlukan (termasuk) |
| Penggunaan yang Disyorkan | Pintu Luar, Pintu Depan |
7. Waranti
The Yale Assure Lock 2 Touch Deadbolt comes with a limited lifetime warranty on finishes and mechanical components, and a one-year warranty on electronics. For extended coverage, optional protection plans are available:
- Pelan Perlindungan 3 Tahun: One-time payment of $36.99
- Pelan Perlindungan 4 Tahun: One-time payment of $47.99
- Asurion Complete Protect: Monthly billing of $16.99 (covers all eligible past and future purchases)
Please retain your proof of purchase for warranty claims. For detailed terms and conditions, refer to the warranty documentation included with your product or visit the official Yale webtapak.
8. Sokongan
For further assistance, technical support, or to report any issues with your Yale Assure Lock 2 Touch Deadbolt, please contact Yale customer service. You can find contact information on the official Yale website or within the Yale Access App.


