1. Pengenalan
Terima kasih kerana membeliasing the DWVO 52-inch Tropical Ceiling Fan with Light and Remote. This manual provides detailed instructions for the safe and efficient operation of your new ceiling fan. Please read all instructions carefully before assembly, installation, and use. Keep this manual for future reference.

Image 1.1: DWVO 52-inch Tropical Ceiling Fan (Walnut finish).
2. Maklumat Keselamatan
AMARAN: Untuk mengurangkan risiko kebakaran, kejutan elektrik atau kecederaan diri, sentiasa ikuti langkah berjaga-jaga asas ini:
- Baca semua arahan sebelum memasang kipas.
- Ensure the installation location can support the fan's weight.
- Semua pendawaian mestilah mengikut kod elektrik nasional dan tempatan.
- Matikan kuasa pada pemutus litar sebelum pemasangan atau servis.
- Jangan kendalikan kipas dengan bilah yang rosak.
- Jangan masukkan objek ke dalam laluan bilah kipas.
3. Kandungan Pakej
Sahkan bahawa semua komponen hadir sebelum memulakan pemasangan. Jika ada bahagian yang hilang atau rosak, hubungi khidmat pelanggan.
- Perumahan Motor
- 5 Palm Leaf Blades
- Kurungan Bilah
- Light Kit with LED Bulb
- Kaca Lampteduh
- Alat Kawalan Jauh dan Penerima
- Downrods (4.5" dan 12")
- Pendakap Pemasangan
- Pek Perkakasan (skru, pencuci, kacang dawai)
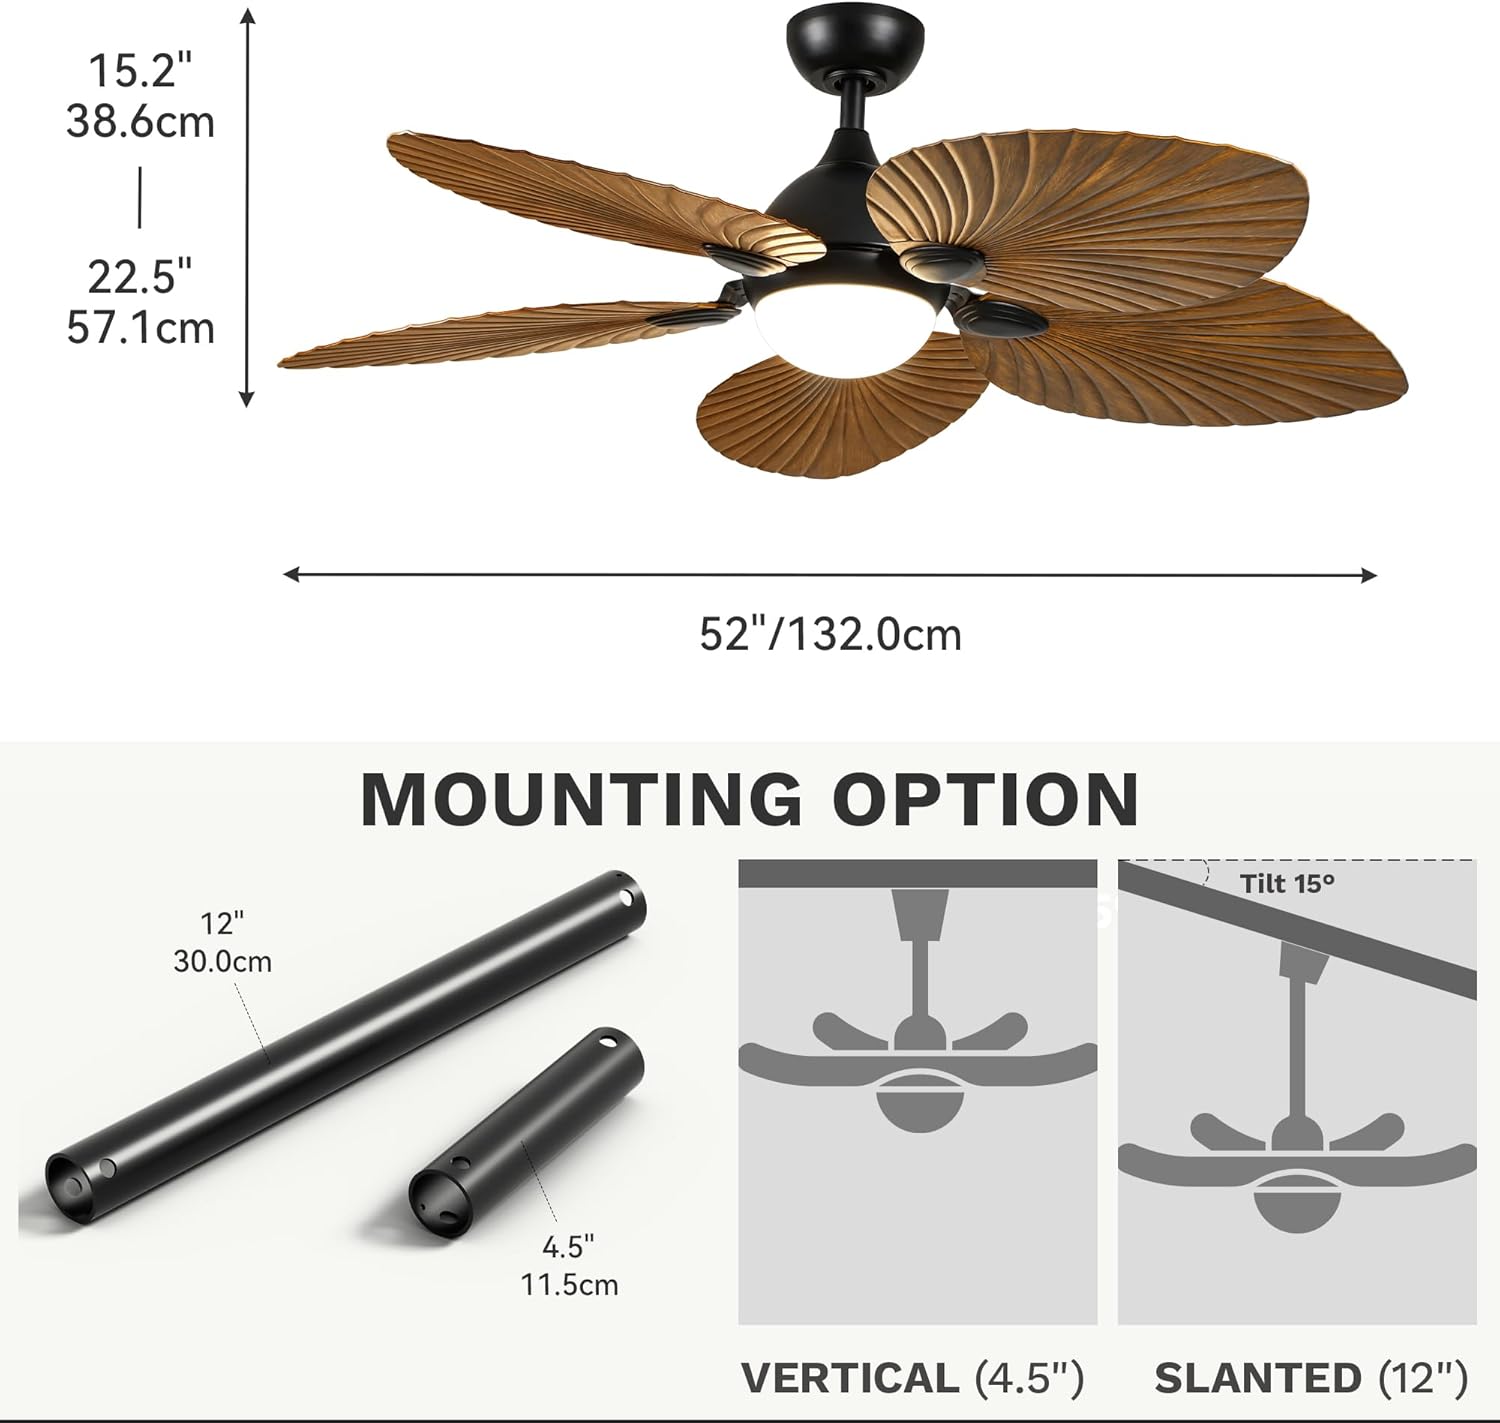
Imej 3.1: Selesaiview of fan components and dimensions (52" diameter, 22.5" height with 12" downrod).
4. Perhimpunan
Follow these steps to assemble your ceiling fan:
- Attach Blades to Blade Brackets: Secure each palm leaf blade to its corresponding blade bracket using the provided screws. Ensure they are tightened firmly.
- Attach Blade Assemblies to Motor Housing: Carefully attach the assembled blade and bracket units to the motor housing. Use the provided screws and ensure all connections are secure.
- Pasang Downrod: Feed the electrical wires from the motor housing through the chosen downrod (4.5" or 12"). Insert the downrod into the motor housing and secure it with the provided screws and pins.
- Connect Receiver Wires: Connect the receiver wires to the fan motor wires according to the wiring diagram in the full manual. Use wire nuts to secure connections.
- Pasang Kit Lampu: Connect the light kit wires to the fan's light wires. Secure the light kit to the bottom of the motor housing.
- Pasang Lampteduh: Pasang kaca l dengan berhati-hatiampshade to the light kit.
Video 4.1: Detailed assembly instructions for the DWVO Tropical Ceiling Fan.
5. Pemasangan
Before installation, ensure the power is OFF at the circuit breaker. This fan supports both vertical and slanted ceiling mounting.
- Pemasangan Braket Pemasangan: Secure the mounting bracket to your ceiling junction box. Ensure it is firmly attached and can support the fan's weight.
- Sambungan Pendawaian: Connect the household electrical wires to the fan's wiring (including the ground wire) as per local electrical codes. Refer to the wiring diagram in the full manual for specific connections.
- Gantungkan Kipas: Carefully lift the assembled fan and hang it onto the mounting bracket.
- Kanopi Selamat: Slide the canopy up to cover the mounting bracket and secure it with the provided screws.
Image 5.1: The fan can be mounted vertically or on a slanted ceiling up to 15 degrees, using either the 4.5-inch or 12-inch downrod.
6. Arahan Operasi
Your DWVO ceiling fan is designed for efficient and quiet operation with multiple features for comfort.
6.1 Reversible Design (Summer/Winter Modes)
The fan features a reversible motor, allowing for year-round use. In Summer Mode (Downdraft), the fan blades rotate counter-clockwise, pushing cool air down to create a refreshing breeze. In Winter Mode (Updraft), the blades rotate clockwise, drawing cool air up and pushing warm air down from the ceiling, helping to distribute heat evenly.

Image 6.1: Visual representation of summer (downdraft) and winter (updraft) modes for optimal air circulation.
6.2 Quiet DC Motor
Equipped with an energy-efficient DC motor, this fan operates at noise levels below 35 decibels, ensuring a tranquil environment. This makes it ideal for bedrooms, living rooms, and dining rooms where quiet operation is desired.

Image 6.2: The fan's DC motor ensures quiet operation, ideal for sleeping or quiet activities.
6.3 6-Speed Settings and Natural Wind Mode
The fan offers 6 adjustable speed settings to customize airflow. Additionally, a natural wind mode simulates a gentle, fluctuating breeze for enhanced comfort.
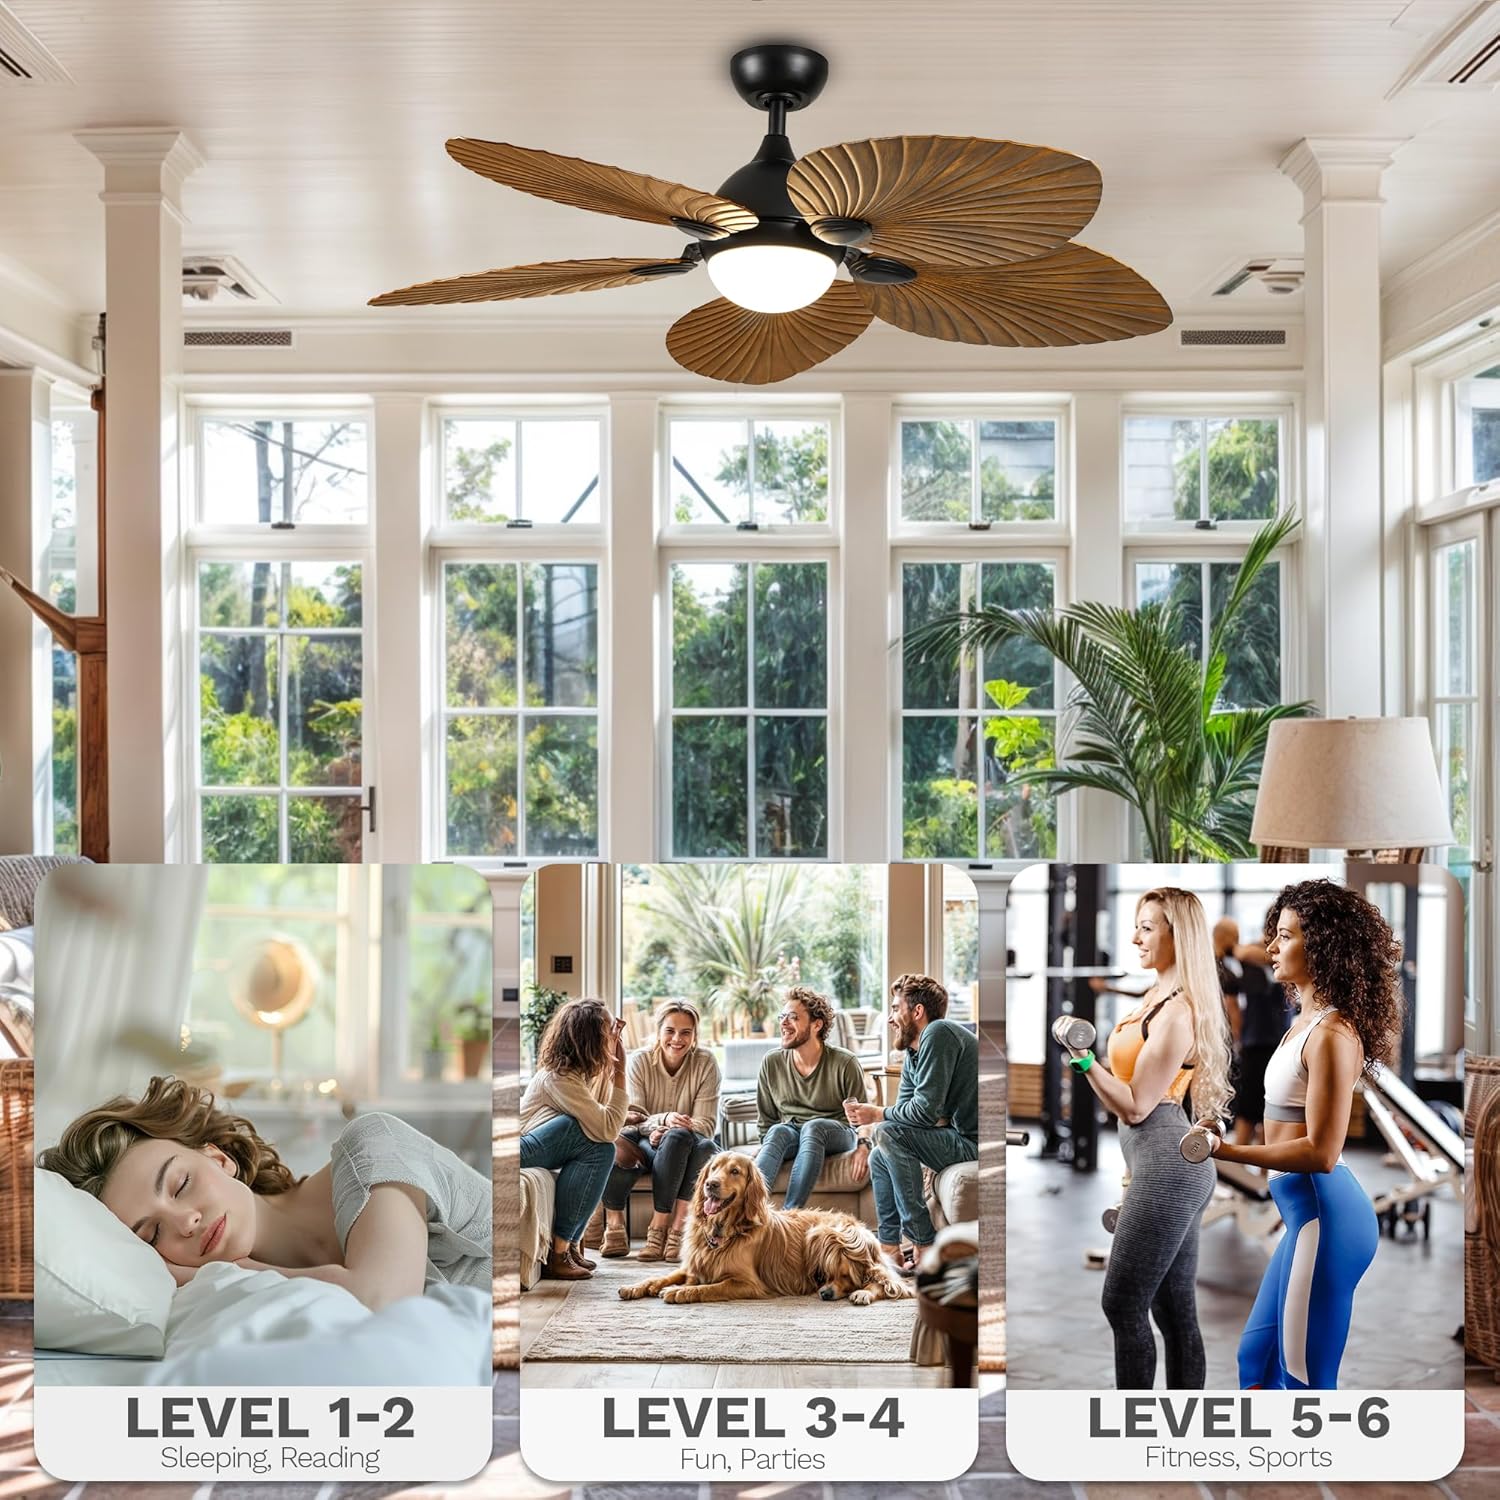
Image 6.3: Choose from various wind levels to suit different activities and preferences.
7. Fungsi Alat Kawalan Jauh
The included multi-function remote control provides convenient operation of your ceiling fan and light.
Imej 7.1: Susun atur dan fungsi alat kawalan jauh.
- Butang Kuasa: Menghidupkan/mematikan kipas dan lampu.
- Butang Kelajuan Kipas (1-6): Melaraskan kelajuan kipas dari rendah (1) ke tinggi (6).
- Butang Hidup/Mati Lampu: Menghidupkan atau mematikan lampu.
- Butang Suhu Warna: Cycles through 3000K (Warm White), 4500K (Natural White), and 6000K (Cool White).
- Mod Angin Semulajadi: Activates a fluctuating breeze.
- Mod tidur: Automatically cycles between 1-3 wind speeds for comfortable sleep.
- Putaran ke hadapan/balikan: Changes the direction of blade rotation for summer or winter modes.
- Butang Pemasa (1H, 2H, 4H, 8H): Menetapkan kipas supaya mati secara automatik selepas tempoh yang dipilih.
7.1 Adjustable Light Color Temperature
The integrated LED light offers three color temperature options: 3000K (Warm White), 4500K (Natural White), and 6000K (Cool White). Use the dedicated button on the remote to cycle through these options. The fan also features a memory function that retains the last-used color temperature setting.
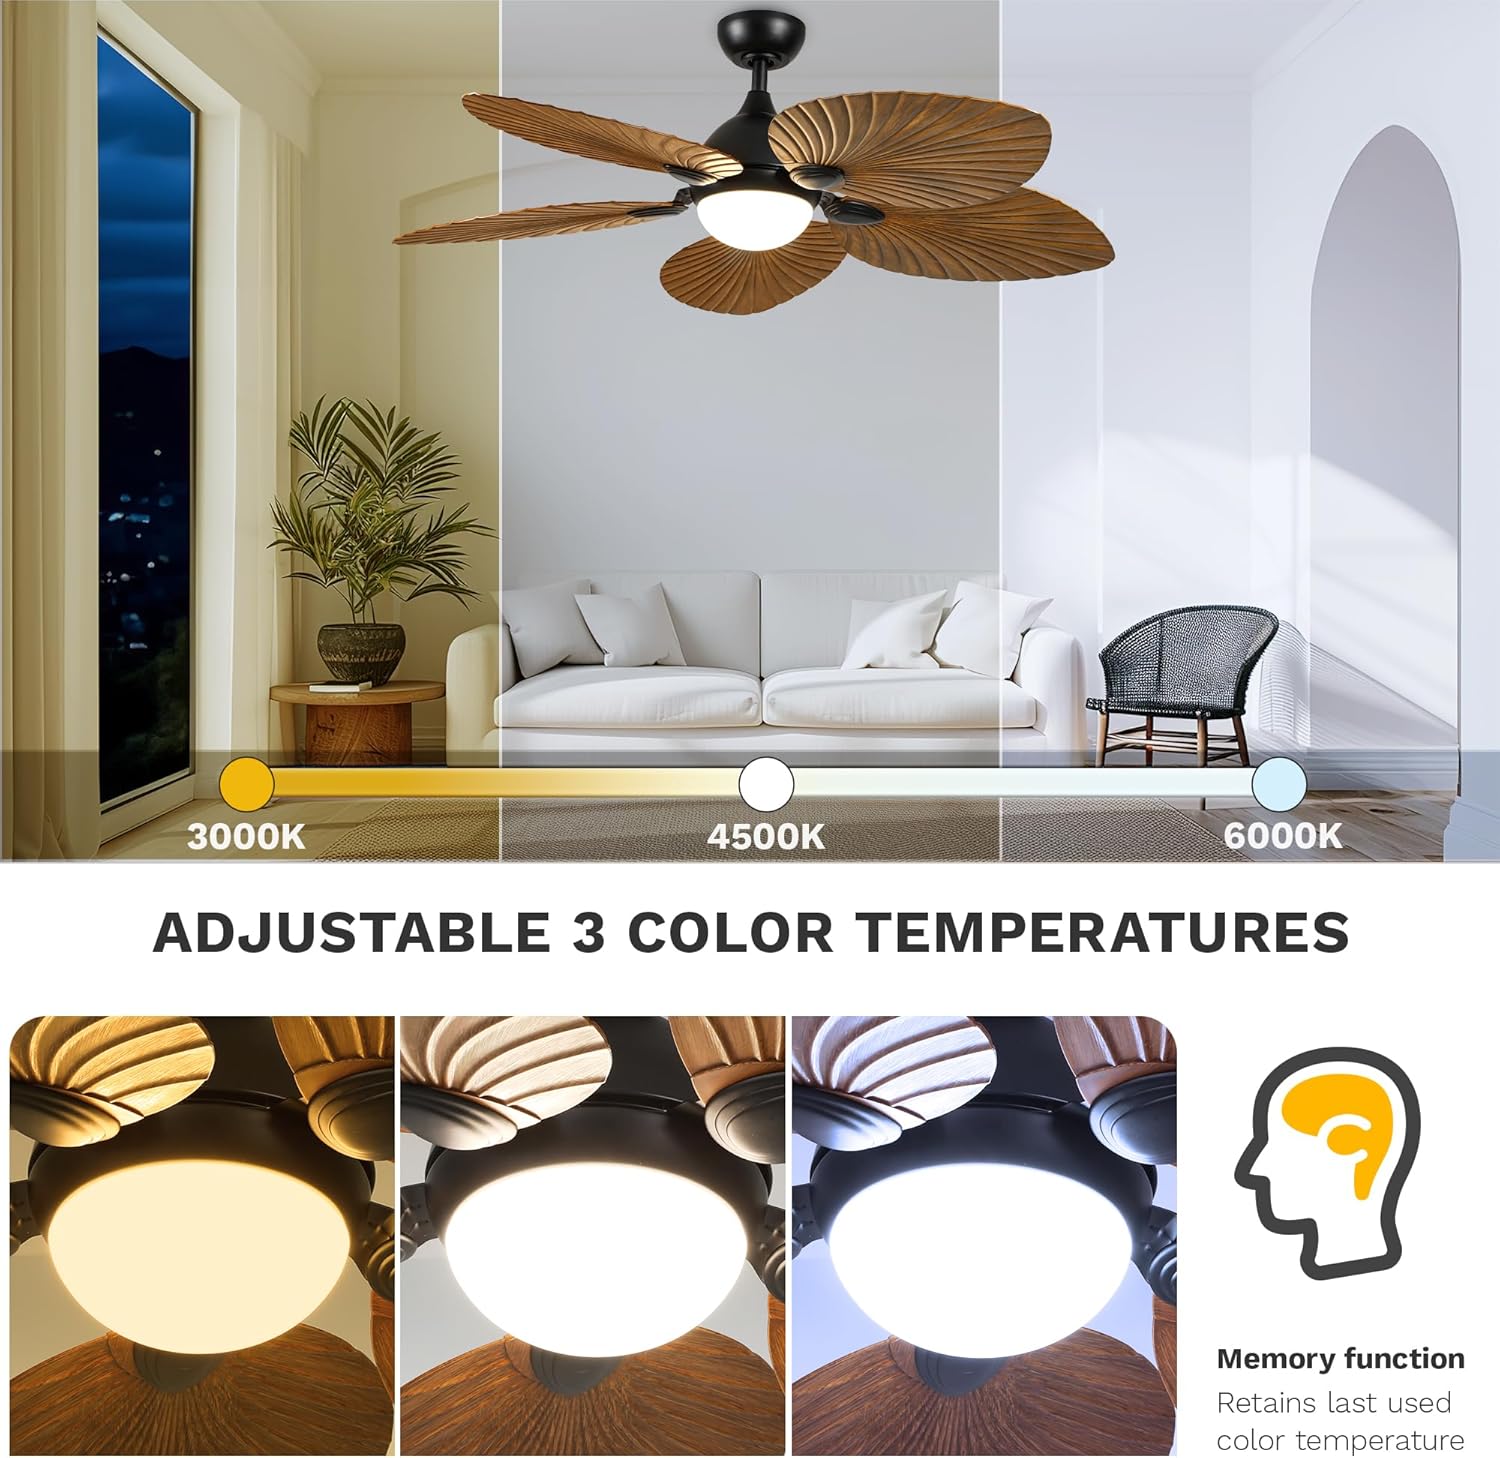
Image 7.2: Easily switch between warm, natural, and cool white light settings.
8. Penyelenggaraan
Penyelenggaraan tetap memastikan prestasi optimum dan jangka hayat kipas siling anda.
- Pembersihan: Gunakan yang lembut, damp kain untuk membersihkan bilah kipas dan perumah motor. Jangan gunakan pembersih atau pelarut yang melelas.
- Imbangan Bilah: If the fan wobbles, check that all blade screws are tight. Use the included balance clip if necessary.
- Sumber Cahaya: The LED light source is integrated and generally does not require replacement. If issues occur, contact customer service.
9. Penyelesaian masalah
Jika anda mengalami masalah dengan kipas anda, rujuk masalah dan penyelesaian biasa berikut:
| Masalah | Kemungkinan Punca | Penyelesaian |
|---|---|---|
| Kipas tidak bermula | Tiada kuasa kepada kipas; Sambungan wayar longgar; Bateri kawalan jauh lemah. | Periksa pemutus litar; Sahkan semua sambungan wayar selamat; Gantikan bateri kawalan jauh. |
| Kipas bergoyang | Skru bilah longgar; Bilah yang tidak seimbang; Pendakap pelekap longgar. | Tighten all blade screws; Use balancing kit; Ensure mounting bracket is secure. |
| Cahaya tidak berfungsi | Loose wire connection; Faulty LED driver. | Check light kit wiring; Contact customer service for LED driver replacement. |
| Jauh tidak berfungsi | Battery low/dead; Incorrect pairing. | Replace battery; Re-pair remote with receiver (refer to full manual for pairing instructions). |
10. Spesifikasi
| Ciri | Perincian |
|---|---|
| Jenama | DWVO |
| Nama Model | Ceiling Fan (MADWVGPDtK) |
| Dimensi Produk | 52"D x 52"W x 22.5"H |
| warna | kenari |
| Reka Bentuk Kipas Elektrik | Kipas siling |
| Sumber Kuasa | DC |
| Bilangan Bilah | 5 |
| Tetapan Kelajuan | 6 RPM |
| Tahap Kebisingan | 35 Desibel |
| Wattage | 18 watt (Lampu LED) |
| Jenis Mentol | LED (3000K, 4500K, 6000K) |
| Kaedah Kawalan | Jauh |
| Penggunaan Dalaman/Luar | Dalaman |
| Ciri Khas | Reversible Motor, Timer, Natural Wind Mode |
| UPC | 197839264960 |
11. Waranti dan Sokongan
This DWVO ceiling fan comes with a limited lifetime warranty. For warranty claims or technical support, please refer to the contact information provided with your purchase or visit the official DWVO webtapak.
Video 11.1: Selesaiview of the DWVO tropical ceiling fan with light and remote.


