1. Pengenalan
This manual provides detailed instructions for the installation, operation, and maintenance of your ECOCONUT Solar Wireless Backup Camera system. This system is designed to enhance driving safety by providing a clear rear view for various vehicles, including cars, trucks, trailers, and RVs. Key features include solar charging, IR night vision, IP69K waterproofing, and a quick installation process.

Figure 1: ECOCONUT Solar Wireless Backup Camera System Overview
2. Kandungan Pakej
Sila sahkan bahawa semua item yang disenaraikan di bawah disertakan dalam pakej anda:
- 1 x Solar Backup Camera
- Monitor 1 x 5 inci
- 1 x Pengecas Kereta
- 1 x Battery Charging Cable
- 1 x Manual Pengguna
- 1 x Gunung
- 3 x Screws and screwdrivers
- 1 x Fixed bracket and double-sided tape

Rajah 2: Komponen Termasuk
3. Persediaan & Pemasangan
3.1 Pemasangan Kamera
The solar backup camera is designed for quick and easy installation on your vehicle's license plate. No complex wiring or drilling is required.
- Tanggalkan plat lesen kenderaan anda.
- Position the solar backup camera bracket behind the license plate, aligning the screw holes.
- Secure the camera and license plate using the provided screws and screwdriver. Ensure the camera is firmly attached and the solar panel faces upwards for optimal charging.

Figure 3: Camera Installation Process
3.2 Pemasangan Monitor
The 5-inch monitor can be mounted on your dashboard or windshield using the provided suction cup mount.
- Clean the desired mounting surface (dashboard or windshield) to ensure a strong suction.
- Attach the suction cup mount to the monitor.
- Press the suction cup firmly onto the clean surface and engage the locking mechanism.
- Connect the monitor to the car charger via the battery charging cable and plug the car charger into your vehicle's cigarette lighter socket.
3.3 Pengecasan Awal
Before first use, it is recommended to fully charge the camera's internal battery using the provided USB charging cable and a power bank or USB adapter. The solar panel will maintain the charge during sunny conditions.
3.4 Adjusting Camera Angle
The camera lens can be adjusted by up to 80 degrees vertically to achieve the optimal viewsudut untuk kenderaan anda.
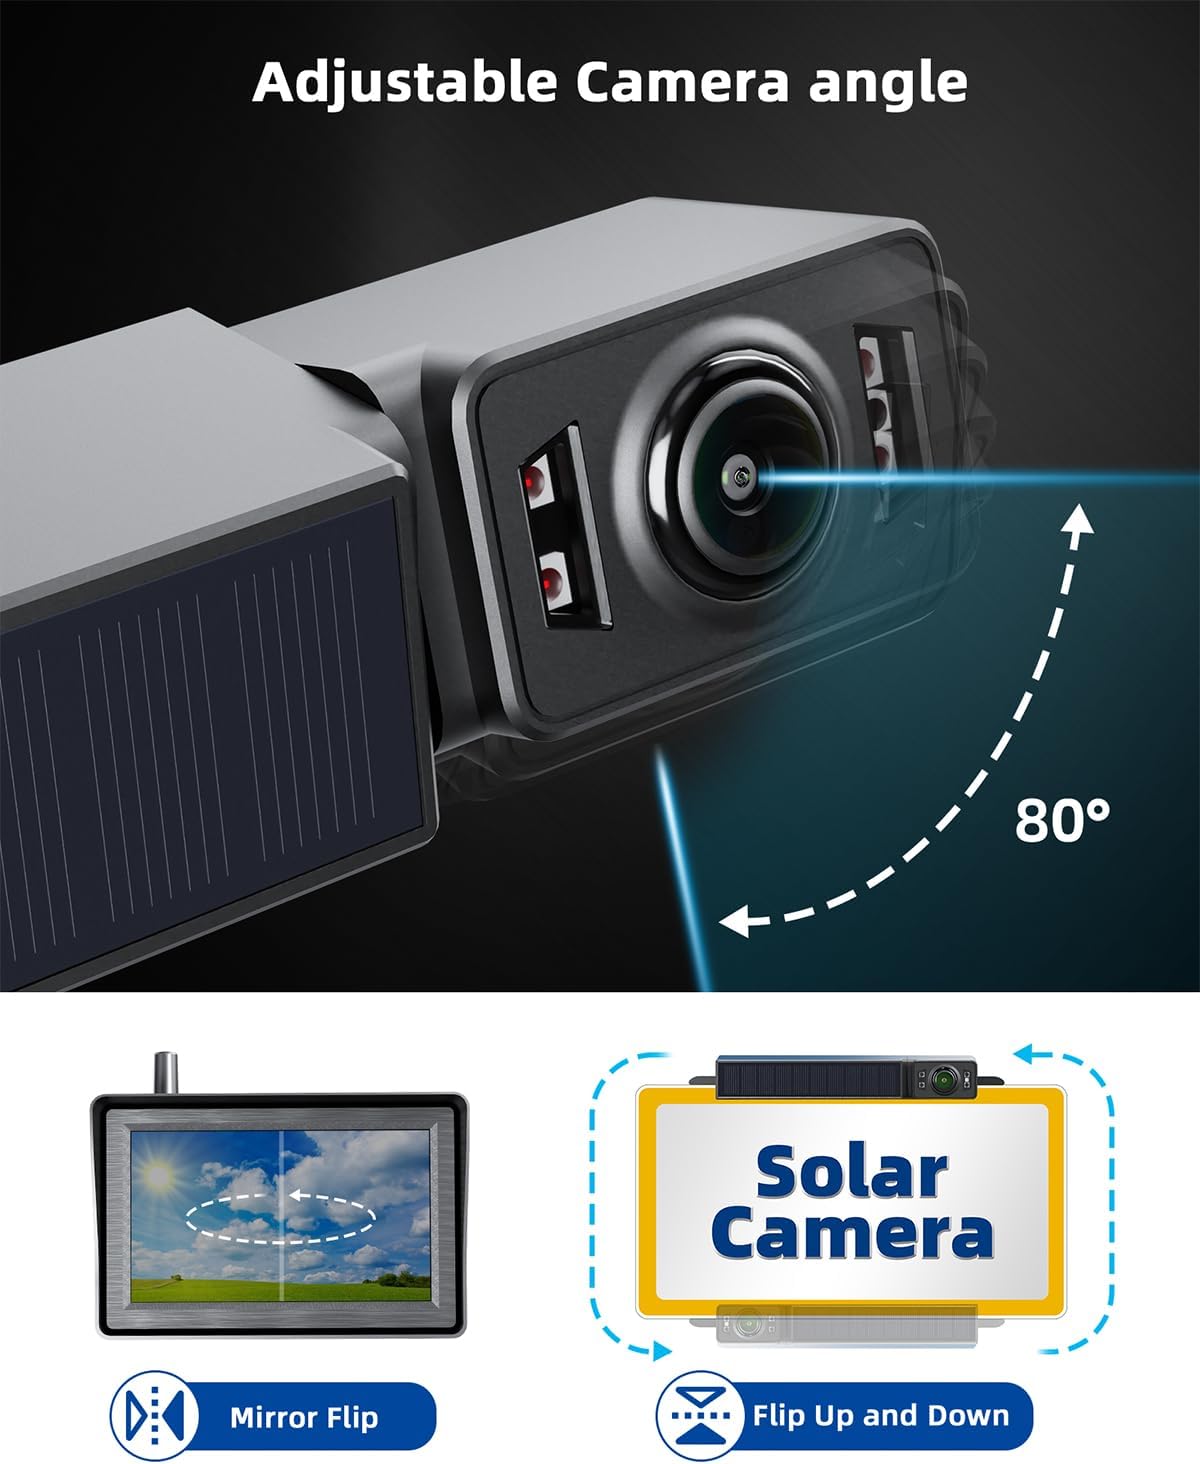
Figure 4: Adjustable Camera Angle
4. Operasi
4.1 Menghidupkan/Mematikan
To activate the monitor, press the button on the car charger plugged into the cigarette lighter. The monitor will display real-time images immediately.
4.2 Menu Navigasi
The monitor features three buttons for navigation: Up, Menu, and Down. These buttons allow you to access and adjust various settings.
4.3 Tetapan Paparan
- Balik Cermin: Use the menu to toggle the image horizontally, useful if the camera is installed in a non-standard orientation.
- Up/Down Flip: Use the menu to flip the image vertically, ensuring correct orientation regardless of camera mounting.
4.4 Reversing Time Settings
You can set the duration the monitor stays active after the vehicle is started. Options typically include 60 seconds, 90 seconds, or 120 seconds. Adjust this setting via the monitor's menu to suit your needs.
4.5 Mod Penjimatan Kuasa
The camera automatically enters a low-energy sleep mode when the vehicle is not in use for an extended period. This conserves battery life and extends operational time. The monitor also has an automatic screen rest mode.

Figure 5: Power Saving Mode
4.6 Solar Charging & Battery Display
The camera features a solar panel that continuously charges the battery in sunny conditions. The monitor displays the camera's real-time power level and indicates when it is charging.

Rajah 6: Pengecasan Solar

Figure 7: Battery Display on Monitor
4.7 IR Night Vision
Equipped with 4 IR LEDs, the camera provides clear night vision up to 30 feet in dark environments, ensuring visibility during nighttime reversing maneuvers.

Figure 8: IR Night Vision Capability
4.8 1080P HD Image
The system provides a 1080P HD image with a 130-degree wide-angle view, offering realistic image colors and comprehensive coverage behind your vehicle.

Figure 9: 1080P HD Image Quality and 130° View sudut
5. Penyelenggaraan
5.1 IP69K Waterproofing
The ECOCONUT backup camera is designed with IP69K waterproofing, featuring PCB-Coating, sealing adhesive, and potting. This ensures the camera remains functional in extreme weather conditions, including rain, snow, and car washes, preventing water or fog issues.

Figure 10: IP69K Waterproof Design
5.2 Mengecas Kamera
While the solar panel provides continuous charging, in periods of low sunlight or during winter, you may recharge the camera using a USB port power bank and the provided battery charging cable.
5.3 Penjagaan Am
Bersihkan kanta kamera dan skrin monitor secara berkala dengan kain lembutamp cloth to ensure clear visibility. Avoid using harsh chemicals or abrasive materials that could damage the surfaces.
6. Penyelesaian masalah
- No image on monitor:
- Ensure the car charger is securely plugged into the cigarette lighter and the power button on the charger is pressed.
- Check if the camera battery is charged. Recharge via USB if necessary.
- Verify the wireless connection between the camera and monitor.
- Kualiti imej yang lemah:
- Clean the camera lens and monitor screen.
- Pastikan tiada halangan yang menghalang kamera view.
- Check for strong wireless interference, though the system is designed for stable connection.
- Camera not charging via solar:
- Pastikan panel solar bersih dan terdedah kepada cahaya matahari langsung.
- Consider charging via USB in low-light conditions or during extended periods of non-use.
- Monitor suction cup not holding:
- Pastikan permukaan pelekap bersih dan kering.
- Press firmly and engage the locking mechanism.
- If issues persist, consider alternative mounting options or using stronger adhesive tape for the mount base.
7. Spesifikasi
| Ciri | Spesifikasi |
|---|---|
| Dimensi Produk | 5 x 1.5 x 3.3 inci (Monitor) |
| Berat Barang | 1.65 paun |
| Bateri | 2 bateri Litium Polimer (termasuk) |
| Teknologi Paparan | LCD |
| Saiz Skrin | 5 Inci |
| Jenis Pemasangan | Lekapan Permukaan |
| Voltage | 5 Volt (DC) |
| Teknologi Penderia Optik | CMOS |
| Jenis Kanta | Sudut Lebar Tetap |
| Sudut Sebenar daripada View | 130 Darjah |
| Jenis Penyambung | Tanpa wayar |
8. Waranti dan Sokongan
For warranty information or technical support, please refer to the contact details provided with your product packaging or visit the official ECOCONUT webtapak. Simpan resit pembelian anda untuk tuntutan waranti.