1. Pengenalan
This manual provides detailed instructions for the installation, maintenance, and troubleshooting of the ERKUL WingCarrier V3 Roof Rack Cross Bar Left Mount (Clamp) replacement part. This component is specifically designed for ERKUL Crossbars WingCarrier V3 systems on vehicles with fixed point roofs. Please read these instructions carefully before proceeding with installation to ensure proper fitment and safe operation.
2. Maklumat Keselamatan
- Always ensure the vehicle is parked on a level surface and the parking brake is engaged before beginning installation.
- Do not exceed the maximum load capacity specified for your ERKUL WingCarrier V3 roof rack system. Refer to your primary roof rack manual for specific load limits.
- Regularly inspect all components of the roof rack system, including this replacement mount, for signs of wear, damage, or loose connections.
- If you are unsure about any step of the installation process, consult a qualified professional or contact ERKUL customer support.
- Jauhkan bahagian kecil daripada kanak-kanak.
3. Kandungan Pakej
Sahkan bahawa semua komponen ada dan tidak rosak sebelum meneruskan pemasangan.
- 1 x ERKUL WingCarrier V3 Roof Rack Cross Bar Left Mount (Clamp)
- Necessary fasteners (screws, washers) for attachment to the crossbar and vehicle's fixed point.
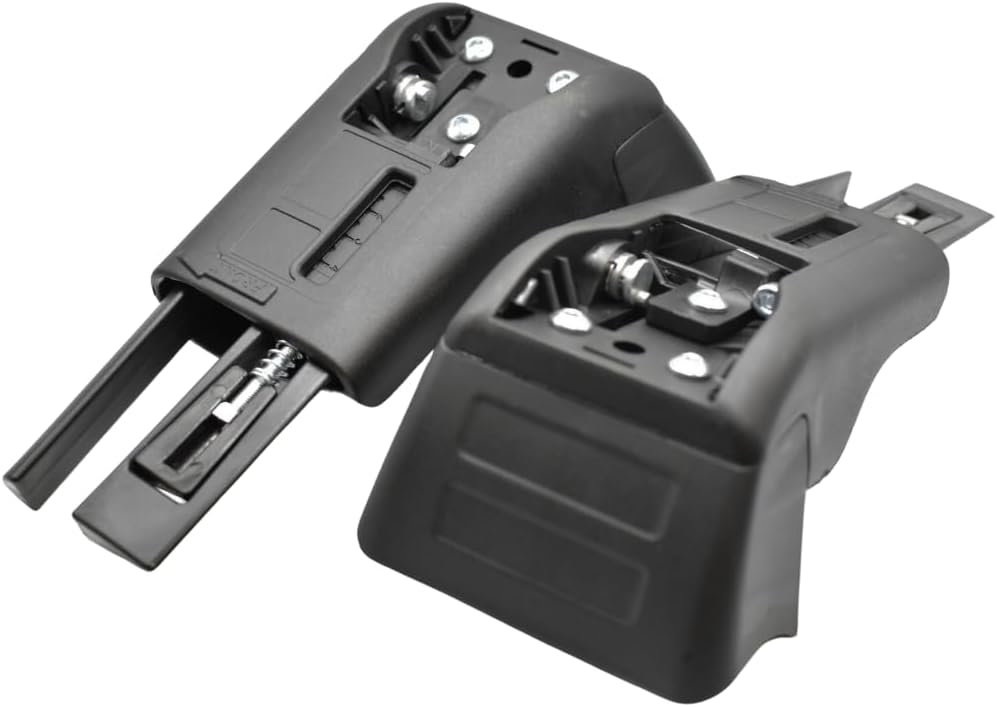
Figure 3.1: The ERKUL WingCarrier V3 Left Mount (Clamp) replacement part, showing its internal components and design for attachment to the crossbar.

Rajah 3.2: Alternatif view of the ERKUL WingCarrier V3 Left Mount (Clamp), highlighting its structural details.
4. Persediaan dan Pemasangan
This section details the process for replacing or installing the left mount for your ERKUL WingCarrier V3 roof rack system. Ensure you have the correct part for your vehicle's fixed points.
4.1. Semakan Pra-Pemasangan
- Identify the fixed points on your vehicle's roof where the crossbars attach.
- Confirm that the replacement mount matches the existing mounts or the requirements for your WingCarrier V3 system.
- Gather necessary tools: typically a hex key or wrench for the fasteners.
4.2. Attaching the Mount to the Crossbar
- Slide the mount onto the end of the ERKUL WingCarrier V3 crossbar. Ensure it is oriented correctly for the left side of the vehicle.
- Align the pre-drilled holes on the mount with the corresponding slots or holes on the crossbar.
- Insert the provided screws and washers. Hand-tighten initially.
4.3. Securing the Crossbar Assembly to the Vehicle
- Carefully place the crossbar assembly onto the fixed points of your vehicle's roof.
- Align the mount's base with the vehicle's fixed point attachment.
- Insert the long bolt (if applicable) through the mount and into the vehicle's fixed point. Nota: Some users have reported that bolts may require additional length or specific extensions for optimal threading. If you encounter difficulty, ensure the rubber components are fully compressed and consider contacting customer support for guidance or alternative fasteners.
- Tighten all screws and bolts securely using the appropriate tool. Do not overtighten, as this can damage the components or the vehicle.
- Repeat the process for the other mounts and crossbars if you are installing a full system.
After installation, gently pull on the crossbars to confirm they are firmly attached and do not wobble. Re-check all fasteners after the first few miles of driving and periodically thereafter.
5. Operasi
Once the left mount and the entire roof rack system are securely installed, the crossbars are ready for use with compatible accessories such as bike carriers, ski carriers, or cargo boxes. Always ensure that any attached accessories are also securely fastened and that the total load does not exceed the system's weight capacity.
6. Penyelenggaraan
- Pemeriksaan Berkala: Periodically check all bolts, screws, and connections for tightness. Vibrations during driving can cause fasteners to loosen over time.
- Pembersihan: Clean the mounts and crossbars with mild soap and water. Avoid harsh chemicals or abrasive cleaners that could damage the finish or materials.
- Storan: If removing the roof rack for extended periods, store the mounts and crossbars in a dry, protected area to prevent corrosion or damage.
7. Penyelesaian masalah
7.1. Loose Fit or Wobbling
- Penyelesaian: Re-check all fasteners for tightness. Ensure the mount is correctly seated on the vehicle's fixed point. If the issue persists, verify that the mount is the correct part for your specific vehicle model and roof type.
7.2. Difficulty Threading Bolts
- Penyelesaian: Ensure the mount is pressed firmly against the vehicle's fixed point to compress any rubber components. If bolts still do not thread easily, they may be too short for your specific application. Contact ERKUL customer support for assistance or to inquire about alternative bolt lengths.
7.3. Bahagian yang Hilang atau Rosak
- Penyelesaian: Immediately contact ERKUL customer service with your purchase details to arrange for replacement parts. Do not attempt to use incomplete or damaged components.
8. Spesifikasi
| Jenama | ERKUL |
| Model | WingCarrier V3 (Replacement Mount) |
| Jenis Bahagian | Roof Rack Cross Bar Left Mount (Clamp) |
| Keserasian | ERKUL Crossbars WingCarrier V3 Fixed Points Roofs |
| Berat Barang | 8 auns |
| Dimensi Pakej | 10 x 7 x 4 inci |
9. Waranti dan Sokongan
ERKUL Auto LLC stands behind the quality of its products. For specific warranty information, please refer to the documentation included with your original ERKUL WingCarrier V3 roof rack system or visit the official ERKUL website. Replacement parts are sent directly from the ERKUL Auto manufacturing factory.
For any questions, concerns, or assistance with installation, please contact ERKUL customer service. Our team is available to help confirm correct fitment and address any issues you may encounter.
Maklumat Hubungan: Please refer to your purchase documentation or the ERKUL webtapak untuk butiran hubungan perkhidmatan pelanggan terkini.
10. Related Product Information (General Overview)
Video berikut memberikan gambaran umumview of ERKUL AUTO's product range and brand philosophy. It is not an installation guide for this specific replacement part but offers insight into the broader product ecosystem.
Video 10.1: Discover Everything ERKUL AUTO Has To Offer! This video showcases various ERKUL automotive accessories, including different types of crossbars, running boards, bike carriers, and ski carriers, demonstrating the brand's diverse product line. It provides a general brand overview rather than specific installation instructions for the left mount.


