1. Pengenalan
This manual provides essential instructions for the safe and effective operation, assembly, and maintenance of your LASER TREE K1 Pro 30W Laser Engraver. This high-precision machine is designed for engraving and cutting various materials including wood, metal, paper, acrylic, glass, and leather. Please read this manual thoroughly before initial use to ensure optimal performance and safety.

Image 1.1: The LASER TREE K1 Pro 30W Laser Engraver with examples of its engraving capabilities on different materials.
2. Maklumat Keselamatan
The LASER TREE K1 Pro 30W is a Class 4 laser product. Improper use can result in serious injury, including eye damage, skin burns, and fire. Adhere to all safety guidelines.
- Perlindungan Mata: Always wear appropriate laser safety goggles (OD6+) when operating the machine. Never look directly into the laser beam or its reflection.
- Pengudaraan: Operate the engraver in a well-ventilated area to dissipate fumes and smoke produced during engraving and cutting.
- Hentian kecemasan: Familiarize yourself with the emergency stop button and its location. In case of any malfunction or emergency, press it immediately.
- Penyeliaan: Jangan sekali-kali meninggalkan mesin tanpa pengawasan semasa operasi.
- Keselamatan Bahan: Ensure materials being processed are safe for laser engraving/cutting and do not produce toxic fumes or ignite easily.
- Physical Protections: The machine is equipped with limit switches, temperature alerts, position movement protection (15° tilt detection), and beam detection for enhanced safety. For additional safety resources and product information, you may visit pautan ini.
- Kanak-kanak dan Haiwan Kesayangan: Jauhkan kanak-kanak dan haiwan peliharaan dari kawasan operasi.

Imej 2.1: Selesaiview of the K1 Pro's safety features, including limit switches, temperature alert, position movement protection, and the emergency stop switch.

Image 2.2: Further details on safety mechanisms such as tilt detection, eye protection, beam detection, and the emergency stop.
3. Kandungan Pakej
Verify that all components are present and undamaged upon opening the package. If any items are missing or damaged, contact customer support.

Image 3.1: Complete packing list for the LT-K1 Pro 30W kit.
| item | Kuantiti |
|---|---|
| Perhimpunan X-Axis | 1 |
| Y-Axis Frame | 2 |
| Rangka Depan | 1 |
| Bingkai Belakang | 1 |
| Kaki Sokongan | 3 |
| Kotak Kawalan Utama | 1 |
| Y-Axis Timing Belt | 2 |
| Kabel USB | 1 |
| Tiub Udara | 1 |
| Modul Laser | 1 |
| Kad TF | 1 |
| Spare Laser Protective Lens | 2 |
| Kabel Clamp | 1 |
| Pembaca Kad | 1 |
| Penyesuai Kuasa | 1 |
| Kabel AC | 1 |
| Cables (Main, Motor, Laser) | 3 |
| M5*20 Skru Bulat | 16 |
| M5*10 Skru Bulat | 3 |
| M5*20 Flat Screw | 1 |
| Limiting Column Sleeve | 1 |
| T-Nut | 4 |
| M4*5 Fasten Screw | 4 |
| L-Allen Wrench (2mm, 2.5mm, 3mm, 4mm) | 4 |
| Pengikat Kabel | 1 |
| Berus Bersih | 1 |
4. Pemasangan dan Persediaan
The LASER TREE K1 Pro 30W requires assembly before use. Refer to the included instructions and the official installation video for detailed guidance. Ensure all connections are secure and components are correctly aligned.
- Membongkar: Keluarkan semua komponen daripada pembungkusan dengan berhati-hati dan sahkannya dengan senarai kandungan pakej.
- Pemasangan Bingkai: Assemble the X-axis and Y-axis frames according to the provided diagrams.
- Pemasangan Modul: Install the laser module onto the X-axis assembly.
- Pendawaian: Connect all necessary cables (power, USB, motor, laser) to the main control box and respective components.
- Air Assist Pump Connection: Connect the air assist pump to the laser module using the air tube.
- Pelarasan Panjang Fokus: Utilize the Z-shaped lifting device to adjust the height of the laser module and quickly set the focal length.
- Pemasangan Perisian: Install the recommended software (LightBurn or LaserGRBL) on your computer (Mac OS/Windows).
- Ujian Permulaan: Perform a small test engraving on a scrap piece of material to confirm proper functionality and calibration.
For visual assistance, please refer to the official installation video provided by LASER TREE (if available).
5. Arahan Operasi
5.1 Operasi Asas
- Hidupkan kuasa: Connect the power adapter and press the power button on the main control box.
- Ukiran Luar Talian: The machine supports offline engraving using a TF card. Load your G-code files onto the TF card and insert it into the designated slot.
- Y-axis Locking Switch: Use the Y-axis locking switch to secure the Y-axis during setup or when moving the machine.
- Laser Head Temperature Display: Monitor the temperature display on the laser head to ensure it operates within safe limits.
5.2 Keserasian Perisian
The LASER TREE K1 Pro 30W is compatible with popular laser control software:
- LightBurn: A powerful, paid laser control software known for its extensive features and intuitive interface.
- LaserGRBL: A free, open-source software suitable for basic engraving tasks.
Both software options are compatible with Mac OS and Windows operating systems. Refer to the respective software documentation for detailed usage instructions.

Image 5.1: Software compatibility with LightBurn and LaserGRBL on Windows and Mac OS.
5.3 Sistem Bantuan Udara
The integrated electromagnetic air assist pump significantly improves cutting and engraving quality by clearing smoke and debris from the laser's path, reducing charring, and preventing material discoloration.
- Pelarasan Manual: The air assist can be manually adjusted steplessly via a knob on the pump.
- Kawalan Automatik: The system supports automatic air assist control through LightBurn, allowing the software to manage airflow based on the operation (engraving vs. cutting).
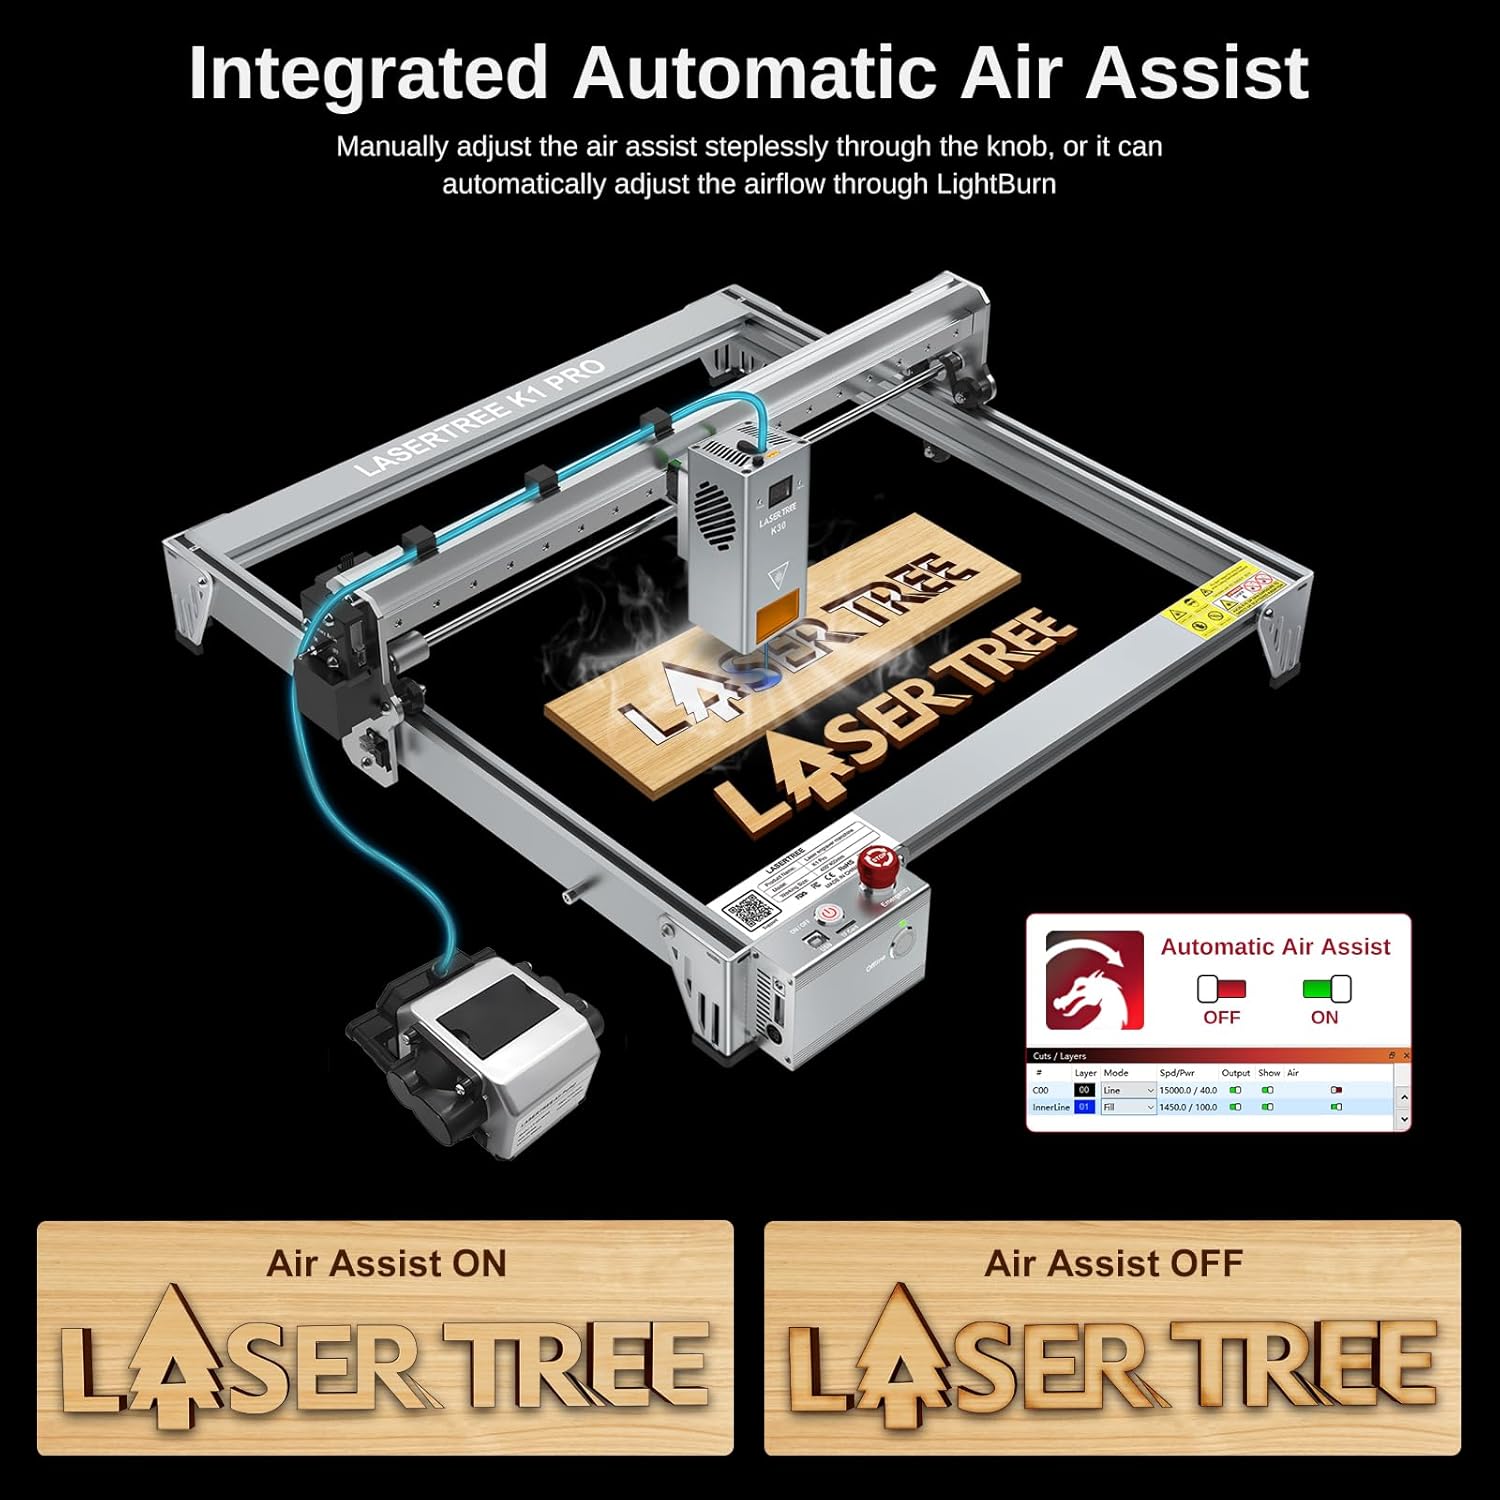
Image 5.2: The integrated air assist system and its control interface.
5.4 Material Compatibility and Cutting/Engraving Parameters
The K1 Pro 30W laser engraver offers powerful cutting capabilities across various materials. Optimal parameters may vary based on material density and desired outcome.

Imej 5.3: Cthamples of one-pass cutting capabilities with recommended speeds.
| bahan | Ketebalan | Kelajuan |
|---|---|---|
| Papan lapis Basswood | 15mm | 100mm/min |
| Kayu Pine | 20mm | 95mm/min |
| Akrilik Hitam | 15mm | 25mm/min |
| MDF | 9mm | Tidak dinyatakan |
Nota: These parameters are starting points. Always perform test cuts on scrap material to determine the best settings for your specific material and desired outcome.
6. Penyelenggaraan
Penyelenggaraan berkala memastikan jangka hayat dan prestasi optimum pengukir laser anda.
- Bersihkan Lensa: Periodically clean the laser lens with a specialized lens cleaning solution and cloth to maintain beam quality.
- Bersihkan Mesin: Use the provided clean brush to remove dust and debris from the machine's frame, rails, and moving parts.
- Pelincir Bahagian Bergerak: Apply a small amount of appropriate lubricant to the linear guides and screws as needed to ensure smooth movement.
- Periksa Kabel: Regularly check all cables for wear or damage. Replace any damaged cables immediately.
7. Penyelesaian masalah
Bahagian ini menangani isu biasa yang mungkin anda hadapi. Untuk masalah yang lebih kompleks, hubungi sokongan pelanggan.
| Masalah | Kemungkinan Punca | Penyelesaian |
|---|---|---|
| Laser tidak menyala atau output lemah | Dirty lens, incorrect focus, low power setting, damaged laser module. | Clean the laser lens. Adjust focal length. Increase power setting in software. Inspect laser module for damage. |
| Mesin tidak bersambung ke komputer | Isu kabel USB, pemacu tidak dipasang, port COM yang dipilih salah, konflik perisian. | Try a different USB cable. Install necessary drivers. Select the correct COM port in LightBurn/LaserGRBL. Restart software and machine. |
| Engraving/cutting quality is poor (burnt edges, uneven lines) | Incorrect speed/power settings, no air assist, dirty lens, material issues. | Adjust speed and power settings. Ensure air assist is active and properly configured. Clean the laser lens. Test on different material. |
| Machine movement is jerky or inaccurate | Loose belts, dirty linear guides, motor issues, incorrect software settings. | Check and tighten Y-axis timing belts. Clean and lubricate linear guides. Verify software settings for speed and acceleration. |
| Emergency Stop activated unexpectedly | Safety sensor triggered (e.g., tilt, limit switch), electrical issue. | Check for any obstructions or machine tilt. Inspect limit switches. Power cycle the machine. |
If you encounter issues not listed here or require further assistance, please contact LASER TREE technical support.
8. Spesifikasi
| Ciri | Perincian |
|---|---|
| Model | K1 Pro 30W Kit |
| Kuasa Keluaran Laser | 30000mW (30W) |
| Ketepatan Ukiran | 0.01mm |
| Kelajuan Ukiran | Up to 20,000mm/min |
| Kawasan Kerja | 400mm x 400mm |
| Dimensi Produk | 17.5 x 17.5 x 7.5 inci |
| Berat Barang | 25.8 paun |
| Sistem Bantuan Udara | Integrated Electromagnetic Pump, LightBurn control compatible |
| Ukiran Luar Talian | Supported via TF Card |
| Keserasian Perisian | LightBurn, LaserGRBL |
| Sistem Operasi | Mac OS, Windows |
| Ciri Keselamatan | Limit Switches, Temperature Alert, Position Movement Protection (15°), Beam Detection, Emergency Stop Switch, Eye Protection |
| Bahan Bingkai | All Aluminum Frame with Industrial Grade Linear Guide |

Image 8.1: Industrial-grade linear bearings for enhanced precision and speed.
9. Waranti dan Sokongan
LASER TREE is committed to providing excellent customer service and support for your K1 Pro 30W Laser Engraver.
- Polisi Pemulangan: Enjoy a 30-day return guarantee for any reason.
- Waranti: The product is backed by a 1-year warranty from the date of purchase.
- Sokongan Teknikal: Lifetime technical support is available. A dedicated technical and support team is ready to assist with any questions or issues you may encounter.
For support, please visit the official LASER TREE weblaman web atau hubungi khidmat pelanggan mereka secara langsung. Anda juga boleh mendapatkan lebih banyak maklumat dan sumber di LASER TREE Store on Amazon.
10. Video Produk Rasmi
No official seller videos were provided in the product data for this manual.


