
1. Pengenalan
The JoFomp Digital Wall Clock is designed to provide clear and comprehensive timekeeping, environmental monitoring, and alarm functions for various indoor settings. Its large 9-inch LED display ensures excellent visibility, day or night. This manual provides detailed instructions for setup, operation, and maintenance of your new digital clock.

Image: The digital clock shown with its dimensions (8.98" / 22.8cm length, 2.95" / 7.5cm height, 1.38" / 3.5cm depth) and icons representing its multiple functions: Dual Alarm, Temperature, Week, Brightness Control, Drowsiness (Snooze), Humidness, Memory Function, and Date.
2. Kandungan Pakej
- JoFomp Digital Wall Clock (Model: 5503)
- Kabel Kuasa USB
- Penyesuai Kuasa
- Mounting Nails (x2)
- Manual Pengguna (dokumen ini)
3. Maklumat Keselamatan
- Ensure the power adapter and cable are undamaged before use.
- Jangan dedahkan peranti kepada suhu yang melampau, cahaya matahari langsung atau kelembapan yang tinggi.
- Jauhkan daripada kanak-kanak.
- Do not attempt to disassemble or repair the clock yourself. Refer to qualified personnel for service.
- Use only the provided USB cable and adapter, or a compatible 5V/1A power source.
- Buang bateri secara bertanggungjawab mengikut peraturan tempatan.
4. Persediaan
4.1 Sambungan Kuasa
- Connect the USB power cable to the clock's USB port (located on the back).
- Pasangkan hujung kabel USB yang satu lagi ke dalam penyesuai kuasa yang disediakan.
- Insert the power adapter into a standard wall outlet. The clock display will illuminate.
4.2 Memory Battery Installation (Optional but Recommended)
The clock requires a constant power supply to operate. A memory battery ensures that time data is retained during power outages, preventing the need to reset the time. Two 1.5V AAA batteries are required (not included).
- Cari petak bateri di belakang jam.
- Buka penutup petak bateri.
- Masukkan dua bateri AAA 1.5V, perhatikan kekutuban yang betul (+/-).
- Tutup penutup petak bateri dengan selamat.
4.3 Pilihan Pemasangan
The JoFomp Digital Wall Clock can be placed on a desk or mounted on a wall.
- Penempatan Meja: Simply place the clock on any flat, stable surface.
- Pemasangan Dinding: Use the two provided mounting nails. Insert the nails into the wall at the desired location, ensuring they are level and spaced correctly to fit the hanging holes on the back of the clock. Carefully hang the clock onto the nails.

Image: The back panel of the clock, highlighting the "SET", "UP", and "DOWN" buttons, the memory battery storage compartment, the wall hanging hole, and the USB power outlet.

Image: Two illustrations demonstrating the clock's versatility: one showing it hung on a wall, and another showing it placed on a desktop.
5. Arahan Operasi
5.1 Menetapkan Masa dan Tarikh
- Tekan dan tahan "SET" button on the back of the clock to enter time setting mode.
- Gunakan "UP"dan"TURUN" buttons to adjust the hour. Press "SET" to confirm and move to minutes.
- Repeat the process to set minutes, year, month, and day.
- After setting the date, press "SET" to exit the setting mode.
5.2 12/24 Hour Format Switch
In normal time display mode, short press the "UP" button to switch between 12-hour (with AM/PM indicator) and 24-hour formats.
Video: Demonstration of the JoFomp digital clock's features, including switching between 12-hour and 24-hour time formats, changing temperature units, and showing timer and countdown functions. This video highlights the clock's versatility and ease of use.
5.3 Daylight Saving Time (DST) Function
To enable or disable DST, short press the "TURUN" button in the time display state. The clock will automatically adjust the time by one hour forward or backward as appropriate.

Image: The clock display illustrating the Daylight Saving Time (DST) function, showing how the time shifts by one hour when DST is enabled or disabled, along with visual cues for "Spring Forward" and "Fall Back".
5.4 Kawalan Kecerahan
The clock features automatic and manual brightness adjustment modes.
- Kecerahan Automatik: The built-in light sensor adjusts display brightness based on ambient light.
- Kecerahan Manual: You can manually set the brightness level to your preference.
- Mod tidur: A light-sensitive sleep mode is available for minimal disturbance during rest.

Image: The clock display showing different brightness settings: "L-AU" (Third Gear Auto-Brightness), "L-SL" (Fourth Gear Sleep Mode Auto-Brightness), "L-01" (Low light level), "L-02" (Medium brightness), and "L-03" (High brightness).

Image: A side-by-side comparison of the clock's display brightness during the day (bright) and at night (dimmed), demonstrating its automatic brightness adjustment feature for optimal visibility.
5.5 Dual Alarm Function
Jam ini menyokong dua penggera bebas.
- Tekan butang "SET" button repeatedly until "AL1" or "AL2" appears on the display.
- Tekan dan tahan "SET" to enter alarm setting mode.
- Gunakan "UP"dan"TURUN" to set the alarm hour and minutes.
- Tekan "SET" to confirm each step.
- To activate/deactivate an alarm, short press the "UP" atau "TURUN" button when "AL1" or "AL2" is displayed. An alarm icon will appear when active.
- When an alarm sounds, press any button to activate snooze, or press and hold "SET" to turn off the alarm.

Image: The clock display showing two alarm icons, indicating the dual alarm function. The image also depicts scenarios like "Wake Up Time" and "Exercise Time" to illustrate practical uses of the dual alarms.

Image: A visual representation of the dual alarm feature, showing the clock in two different environments (a kitchen and a gym), suggesting its utility for setting multiple reminders for various daily activities.
5.6 Paparan Suhu dan Kelembapan
The clock continuously displays temperature in Celsius (°C) or Fahrenheit (°F) and relative humidity (%).
- To switch between °C and °F, short press the "TURUN" button when the temperature is displayed.
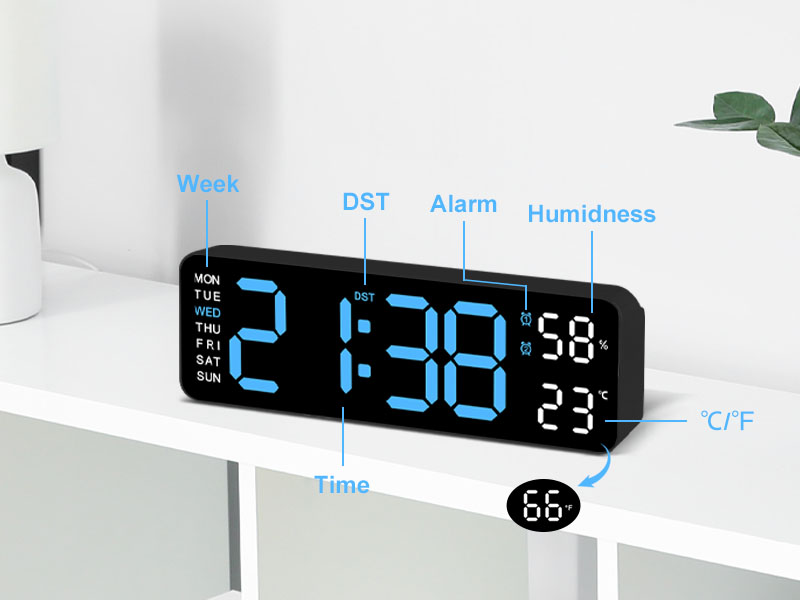
Imej: A terperinci view of the clock's display, with labels pointing to the Week, DST, Alarm, Humidness, Temperature (°C/°F), and Time indicators, along with a small icon for the temperature sensor.
6. Penyelenggaraan
- Bersihkan jam dengan kain lembut dan kering. Jangan gunakan pembersih atau pelarut yang melelas.
- Avoid placing the clock in areas with excessive dust or moisture.
- If not in use for an extended period, disconnect the power and remove the memory batteries.
7. Penyelesaian masalah
| Masalah | Kemungkinan Punca | Penyelesaian |
|---|---|---|
| Paparan jam dimatikan. | Tiada bekalan kuasa. | Ensure USB cable is securely connected and power adapter is plugged into a working outlet. |
| Time/Date resets after power outage. | Memory batteries not installed or depleted. | Install two new 1.5V AAA batteries in the memory compartment. |
| Temperature/Humidity reading seems inaccurate. | Clock placed near heat/cold source or in direct sunlight. | Relocate the clock to an area with stable ambient temperature and humidity. Allow time for readings to stabilize. |
| Penggera tidak berbunyi. | Alarm not activated or volume too low (if applicable). | Ensure the alarm is set and activated (alarm icon visible). Check if there's a volume setting (refer to specific alarm setting instructions). |
8. Spesifikasi
| Ciri | Perincian |
|---|---|
| Jenama | JoFomp |
| Nombor Model | 5503 |
| Jenis Paparan | LED digital |
| Saiz Paparan | 9 inci |
| Dimensi Produk | 11.8"W x 4"H (approx. 22.8cm x 7.5cm x 3.5cm) |
| Sumber Kuasa | Corded Electric (USB 5V/1A) |
| Bateri Memori | Bateri AAA 2 x 1.5V (tidak termasuk) |
| Ciri Khas | Dual Alarm, Adjustable Brightness (Auto/Manual), Calendar, Large Display, Temperature (°C/°F), Humidity, DST, 12/24H Format, Snooze |
| Jenis Pemasangan | Wall Mount or Desk Placement |
| bahan | Akrilonitril Butadiena Stirena (Plastik) |
| Penggunaan Dalaman/Luar | Dalaman Sahaja |
9. Waranti dan Sokongan
JoFomp products are manufactured with high-quality standards. For any issues or inquiries regarding your digital wall clock, please contact JoFomp customer support through the retailer's platform or the official JoFomp webtapak.
Please retain your purchase receipt for warranty claims. Specific warranty terms and conditions may vary by region and retailer.
Untuk bantuan lanjut, lawati JoFomp Store on Amazon.


