1. Produk Lebihview
The Milerong A25+64Card Dash Cam is a comprehensive vehicle recording system designed to enhance driving safety and provide evidence in case of incidents. It features a 1080P Full HD front camera and a 720P waterproof rear camera, ensuring wide coverage and clear video capture. The integrated 3-inch IPS screen allows for real-time monitoring and easy playback. Key functionalities include super night vision, G-sensor for emergency locking, automatic loop recording, and a 24-hour parking monitor.
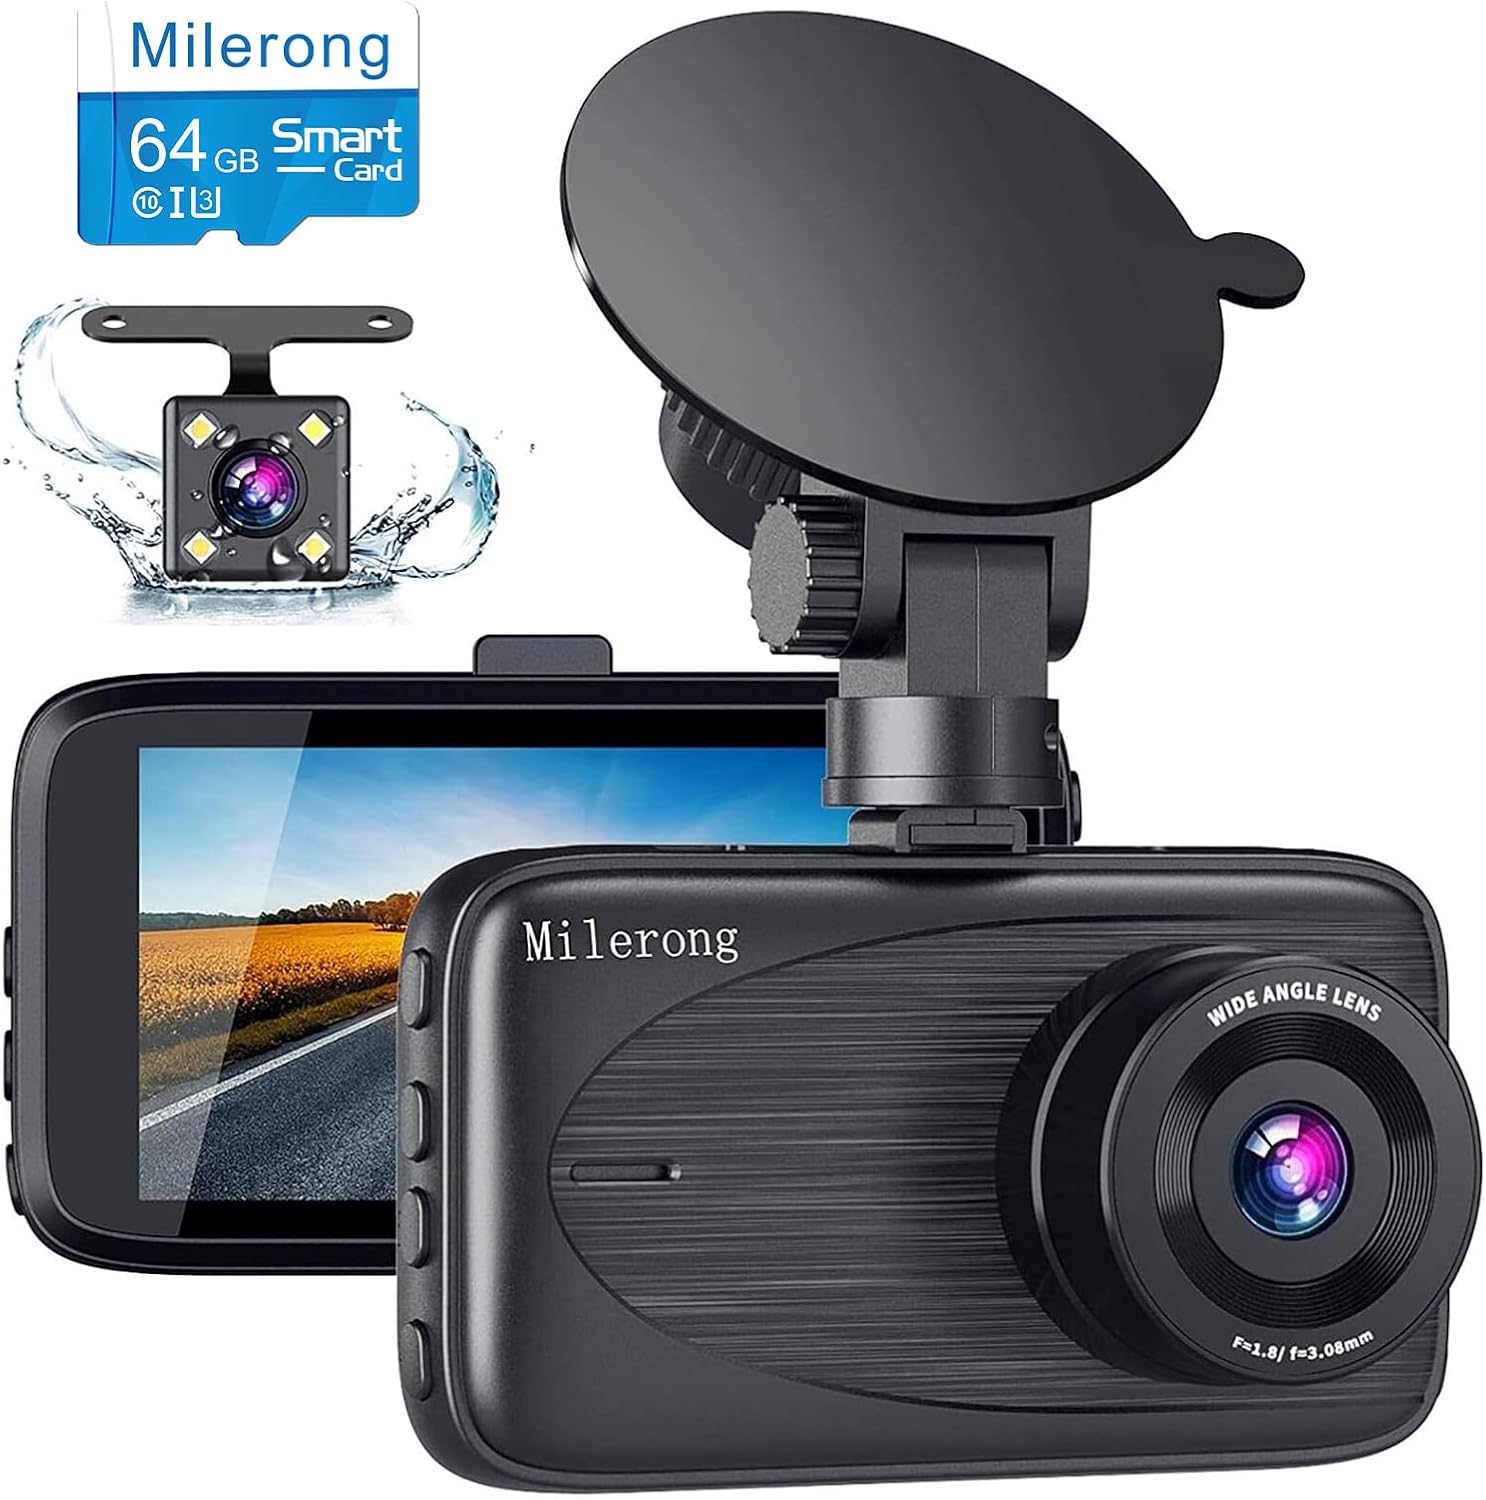
Image 1.1: Milerong A25+64Card Dash Cam, showing the main unit, rear camera, and included 64GB memory card.
2. Kandungan Pakej
Sahkan bahawa semua item yang disenaraikan di bawah disertakan dalam pakej anda. Jika ada item yang hilang atau rosak, sila hubungi sokongan pelanggan.
- Kamera Pemuka (Unit Utama)
- Rear Cam & Rear Cam Cable
- Mount Piala Sedutan
- Pembaca USB
- Pengecas Kereta
- 64GB Card (Pre-installed or separate)
- Manual Pengguna
- 5 Cable Hiding Clips
- Kain Pembersih
- Alat Potong Kawat
- Rear Cam Install Tool

Image 2.1: All components included in the Milerong Dash Cam A25+64Card package.
3. Persediaan
3.1 Memory Card Insertion and Formatting
Before first use, insert the included 64GB Class 10 Micro SD card into the dash cam's card slot. It is crucial to format the memory card directly on the dash cam for optimal performance and to prevent 'card full' errors. Refer to the 'Settings' menu on the device to find the 'Format' option.
3.2 Pemasangan Kamera Depan
- Clean the windshield area where you intend to mount the dash cam. Ensure it is free of dust and grease.
- Pasang pelekap cawan sedutan pada sesondol pemuka.
- Tekan cawan sedutan dengan kuat pada cermin depan dan balikkan tuil untuk menguncinya. Letakkan kamera untuk memastikan jelas view jalan raya tanpa menghalang penglihatan pemanduan anda.
- Connect the car charger to the dash cam's power port and plug the other end into your vehicle's cigarette lighter socket. Route the cable neatly along the windshield edge and dashboard using the provided cable hiding clips.
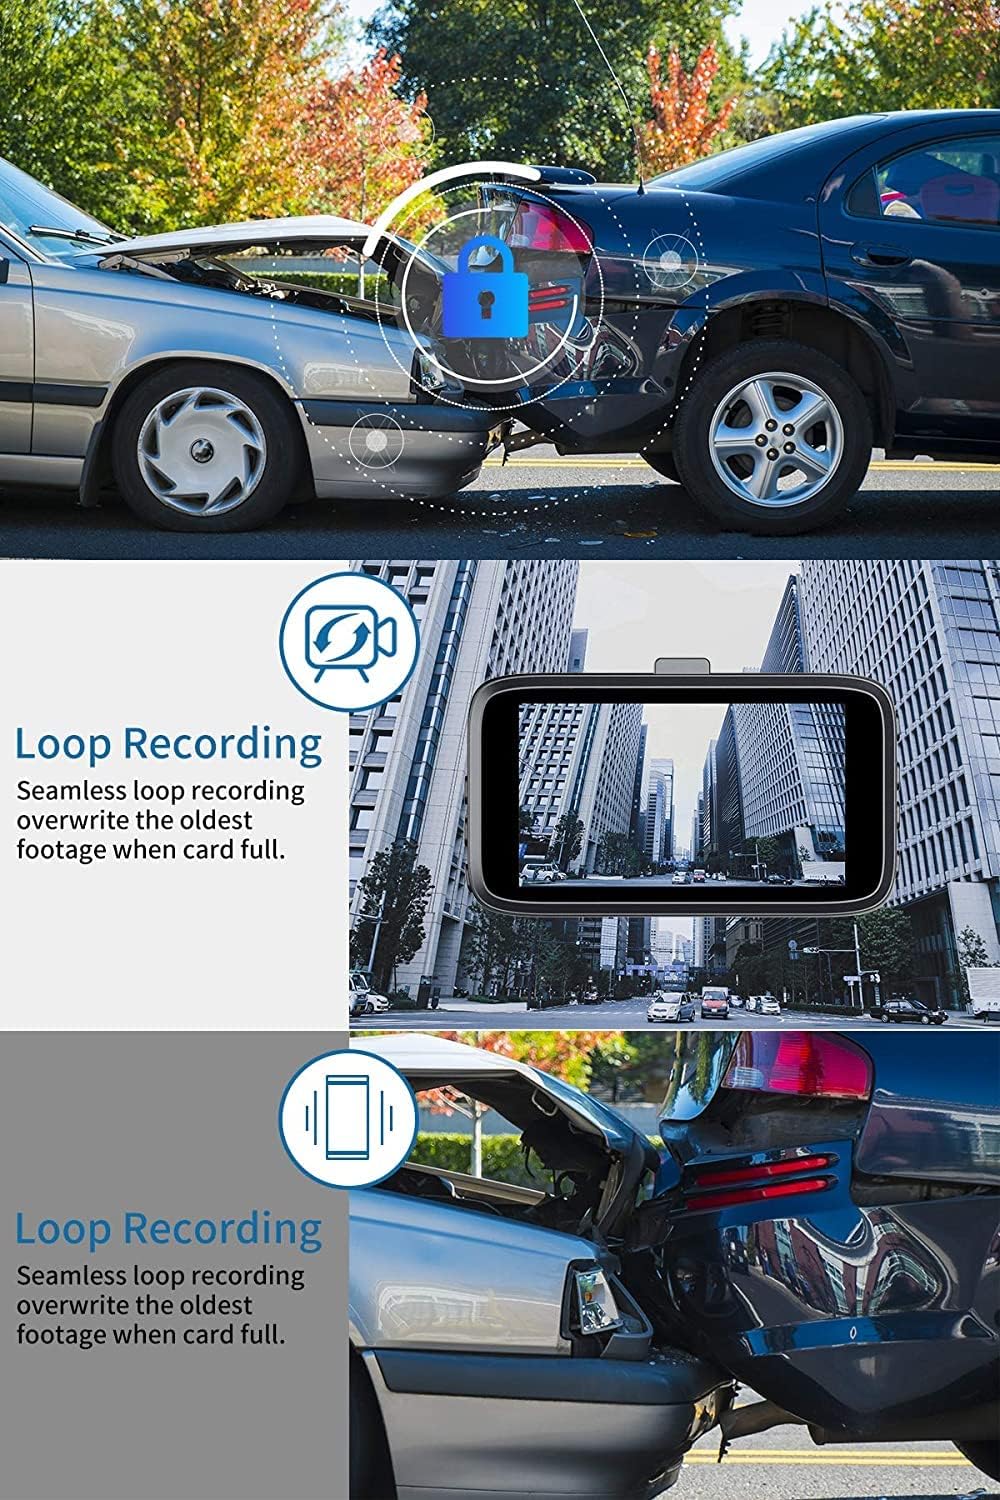
Image 3.1: Front dash cam mounted on the windshield, providing a clear view jalan raya.

Image 3.2: Steps for attaching the suction cup mount and securing the dash cam.

Image 3.3: Recommended cable routing for the front dash cam power cable.
3.3 Pemasangan Kamera Belakang
- Determine the optimal mounting location for the rear camera. It can be installed inside the rear window or externally near the license plate (if applicable to your vehicle and desired setup).
- Sambungkan kabel kamera belakang ke unit kamera papan pemuka utama.
- Route the rear camera cable from the front unit to the rear of the vehicle. Use the wire trim tool to tuck the cable neatly under the headliner and trim panels.
- Jika menyambung ke l pembalikamp for parking assistance, connect the red wire from the rear camera cable to the positive lead of your vehicle's reversing lamp.

Image 3.4: Milerong waterproof rear camera.

Image 3.5: Rear camera wiring diagram.

Image 3.6: Cable routing options for the rear camera.
4. Arahan Operasi
4.1 Operasi Asas
The dash cam will automatically power on and begin recording when connected to power and the vehicle's ignition is turned on. It will power off automatically when the ignition is turned off.
4.2 Recording Modes and Features
- Rakaman Serentak: The front camera records in 1080P FHD and the rear camera in 720P, capturing both views serentak.
- Rakaman Gelung: This feature ensures continuous recording by overwriting the oldest unlocked footage when the memory card is full. Emergency locked videos are protected from being overwritten.
- G-Sensor (Emergency Lock): The built-in G-sensor detects sudden impacts or collisions. When triggered, it automatically locks the current video segment (typically 10 seconds before and 10 seconds after the event) to prevent it from being overwritten by loop recording.
- Monitor Tempat Letak Kereta: When enabled, the dash cam will automatically start recording if motion or impact is detected while the vehicle is parked and the engine is off. This provides surveillance even when you are away from your car.
- Penglihatan Malam Super: Equipped with F1.8 aperture, HDR, and WDR technology, the dash cam enhances video clarity and detail in low-light conditions, ensuring brighter and more detailed night recordings.

Image 4.1: Simultaneous recording capability of the Milerong Dash Cam.

Imej 4.2: Selesaiview of Milerong Dash Cam features.

Image 4.3: Loop recording and G-sensor emergency lock in action.

Image 4.4: Super Night Vision capability for clear recordings in the dark.

Image 4.5: 24-hour parking monitoring in effect.
4.3 Pelarasan Tetapan
- Sensitiviti G-Sensor: If you frequently encounter 'card full' messages despite loop recording, adjust the G-sensor sensitivity to 'Low' or turn it off. This prevents minor bumps or vibrations from triggering emergency locks unnecessarily.
- Motion Detection & Parking Monitor: For seamless continuous recording while driving, it is recommended to turn off 'Motion Detection' and 'Parking Monitor' functions. These features are primarily for when the vehicle is stationary.
- Gambar skrin: To have the screen turn off while the dash cam continues recording, enable the 'Screen Saver' option in the settings.
5. Penjagaan dan Penyelenggaraan
- Pembersihan: Use the provided cleaning cloth or a soft, dry cloth to wipe the camera lens and screen. Avoid using abrasive cleaners or solvents.
- Suhu: Do not expose the dash cam to extreme temperatures (e.g., direct sunlight for prolonged periods in hot climates) as this may affect battery life and component integrity.
- Kad Memori: Periodically format the memory card (once a month is recommended) to maintain optimal recording performance and prevent data corruption. Back up any important footage sebelum memformat.
6. Panduan Penyelesaian Masalah
| Masalah | Kemungkinan Punca | Penyelesaian |
|---|---|---|
| "Card Full" error message | G-sensor sensitivity too high; too many locked files. | Adjust G-sensor sensitivity to 'Low' or 'Off' in settings. Format the memory card. |
| Dash cam stops recording while driving | Motion Detection or Parking Monitor enabled. | Turn off 'Motion Detection' and 'Parking Monitor' functions while driving. |
| Suction mount does not stick firmly | Windshield surface is dirty or greasy; suction cup is dirty. | Clean the windshield and the suction cup thoroughly. Ensure the surface is dry before re-attaching. |
| Kualiti penglihatan malam yang lemah | Lens is dirty; extreme low light conditions. | Clean the camera lens. Ensure HDR/WDR is enabled in settings. |
| Kamera belakang tidak dipaparkan | Kabel tidak disambung dengan betul. | Check all cable connections between the rear camera and the main unit. |
7. Spesifikasi Produk
| Ciri | Perincian |
|---|---|
| Nama Model | A25 Dash Cam Front and Rear with 64GB |
| Dimensi Produk | 3.54 x 0.59 x 1.8 inci |
| Berat Barang | 13.4 auns |
| Resolusi Kamera Depan | 1080P FHD (1920*1080P) |
| Resolusi Kamera Belakang | 720P |
| Saiz Skrin | Skrin IPS 3" |
| Sudut Kamera Depan | Sudut Lebar 170° |
| Sudut Kamera Belakang | 140° Waterproof |
| Sokongan Storan | Max 64GB Class 10 Micro SD Card (64GB included) |
| Ciri Khas | Night Vision (HDR & WDR), G-Sensor, Loop Recording, Parking Monitor |
| Ketersambungan | Connects through cigarette lighter |
| Sumber Kuasa | 1 bateri Polimer Litium (termasuk) |
8. Waranti dan Sokongan Pelanggan
Milerong is committed to providing high-quality products and excellent customer service. Your satisfaction is our priority.
- Perkhidmatan 24 Jam: We offer prompt responses with professional assistance around the clock.
- Polisi Pemulangan 30 Hari: You have the right to return or exchange the product for any reason within 30 days of purchase.
- Waranti 365 Hari: Replacement of the product and availability of accessories are guaranteed within one year from the date of purchase.
- Perkhidmatan Selepas Jualan Sepanjang Hayat: We provide lifetime after-sales support to every customer.

Image 8.1: Milerong Warranty and Service Commitments.
Untuk sebarang pertanyaan atau sokongan, sila hubungi kami di:

Image 8.2: Milerong Customer Service Contact.


