1. Pengenalan
Thank you for choosing the GoolRC Triple Channel Dash Cam. This device is designed to enhance your driving safety by providing comprehensive video recording from the front, inside, and rear of your vehicle. This manual provides detailed instructions for installation, operation, and maintenance to ensure optimal performance and longevity of your dash cam.
2. Kandungan Pakej
Sila sahkan bahawa semua item yang disenaraikan di bawah disertakan dalam pakej anda:
- Host with Front Camera and In-Car Camera
- belakangview Kamera
- Car-use Power Cable
- Manual Pengguna (dokumen ini)
- Installation Tools Set
- Memory Card (if included with your specific model)
3. Produk Lebihview
The GoolRC Triple Channel Dash Cam features a compact design with integrated front and cabin cameras, and a separate rear camera for comprehensive coverage.

Rajah 3.1: Depan view of the GoolRC Dash Cam, displaying the main screen, front camera lens, and control buttons. This image illustrates the primary components visible from the driver's perspective.

Rajah 3.2: Berbilang views of the GoolRC Dash Cam, including top, bottom, front, back, and side profiles. This provides a detailed look at all ports, buttons, and camera lenses for better understanding of the device's physical layout.
The dash cam is equipped with a triple channel system:
- Kamera Depan: 140° wide-angle lens to capture the road ahead.
- Cabin Inside Camera: 90° lens to record the vehicle's interior.
- Kamera Belakang: 90° lens for recording the view di belakang kenderaan.

Rajah 3.3: A visual representation of the dash cam's triple channel system, showing the coverage areas of the front (140°), cabin (90°), and rear (90°) cameras. This diagram clarifies how the three cameras provide comprehensive surveillance.
4. Pemasangan
Follow these steps for proper installation of your GoolRC Dash Cam:
- Sediakan Lokasi Pemasangan: Pilih lokasi pada cermin depan anda yang tidak menghalang anda view jalan raya. Biasanya, ini adalah di belakang belakangview mirror. Clean the area thoroughly to ensure proper adhesion.
- Pasang Unit Utama: Attach the main dash cam unit to the windshield using the provided suction cup mount or adhesive pad. Ensure it is securely fastened and the front camera has a clear view jalan raya.
- Pasang Kamera Belakang: Connect the rear camera to the main unit using the provided cable. Route the cable neatly along the vehicle's headliner and pillars to the rear of the vehicle. Mount the rear camera on the rear windshield, ensuring a clear view.
- Sambungkan Kuasa: Plug the car-use power cable into the dash cam's power port and then into your vehicle's 12V power outlet (cigarette lighter socket). Route the cable discreetly to avoid interference with driving.
- Masukkan Kad Memori: Insert a compatible MicroSD card (up to 128GB, not included) into the designated slot on the dash cam. Ensure the card is inserted correctly.

Rajah 4.1: The GoolRC Dash Cam installed on a car windshield, illustrating its user-friendly setup process. The image shows the dash cam positioned to capture the road ahead without obstructing the driver's view.
5. Persediaan Awal
After installation, perform the following initial setup steps:
- Hidupkan kuasa: Start your vehicle. The dash cam should automatically power on and begin recording.
- Format Kad Memori: It is highly recommended to format the MicroSD card within the dash cam's settings menu before first use and periodically thereafter. This ensures optimal performance and prevents data corruption.
- Tetapkan Tarikh dan Masa: Navigate to the settings menu to set the correct date and time. This is crucial for accurate timestamps pada rakaman anda.
- Pemilihan Bahasa: Select your preferred language from the available options (Russian, Japanese, French, Italian, German, English, Chinese (simplified), Chinese (Traditional), Korean, Spanish, Portuguese).
6. Arahan Operasi
The GoolRC Dash Cam is designed for automatic operation, but also offers various features for enhanced recording.
6.1. Rakaman Automatik
Once powered on, the dash cam will automatically begin recording. When the vehicle is turned off, the dash cam will save the current recording and power down.
6.2. Rakaman Gelung
The dash cam continuously records video in short segments (e.g., 1, 3, or 5 minutes). When the memory card is full, the oldest unlocked recordings are automatically overwritten by new footage. This ensures continuous recording without manual intervention.

Rajah 6.1: An illustration depicting the automatic deletion feature of the GoolRC Dash Cam, where older, unlocked video files are overwritten to make space for new recordings once the memory card reaches its capacity.
6.3. G-Sensor (Collision Lock)
The built-in G-sensor detects sudden impacts or collisions. When a collision is detected, the current video segment is automatically locked and protected from being overwritten by loop recording. These locked files serve as crucial evidence.

Rajah 6.2: This image highlights the seamless loop recording and collision lock function of the GoolRC Dash Cam. It shows a car accident scenario with a lock icon, indicating that video footage of the event is automatically secured by the G-sensor.
6.4. Parking Monitoring (24-Hour)
When enabled, the dash cam can monitor your vehicle even when parked. If a collision or vibration is detected while the vehicle is off, the dash cam will automatically power on, record a short video, and then power off. This feature requires a continuous power supply (e.g., hardwire kit, not included) to function for 24 hours.
6.5. Clear Night Viewing
Equipped with advanced night viewing technology, the dash cam ensures clear and detailed footage even in low-light conditions, improving visibility during nighttime driving or in dark environments.

Rajah 6.3: A visual comparison demonstrating the effectiveness of the GoolRC Dash Cam's night viewing technology, with a split screen showing how visibility is enhanced in low-light conditions compared to standard recording.
7. WiFi Connectivity (Optional)
For models equipped with a built-in WiFi module, you can connect the dash cam to your mobile phone for real-time viewing, video playback, and settings adjustments.
- Muat turun Aplikasi: Cari untuk the designated dash cam application on your smartphone's app store (iOS or Android).
- Dayakan WiFi: Turn on the WiFi function on your dash cam via the settings menu.
- Sambung ke Dash Cam: On your smartphone, go to WiFi settings and connect to the dash cam's WiFi network (SSID and password usually displayed on the dash cam screen or in the manual).
- Ciri Akses: Buka apl ke view hidup footage, download recordings, or modify settings directly from your phone.
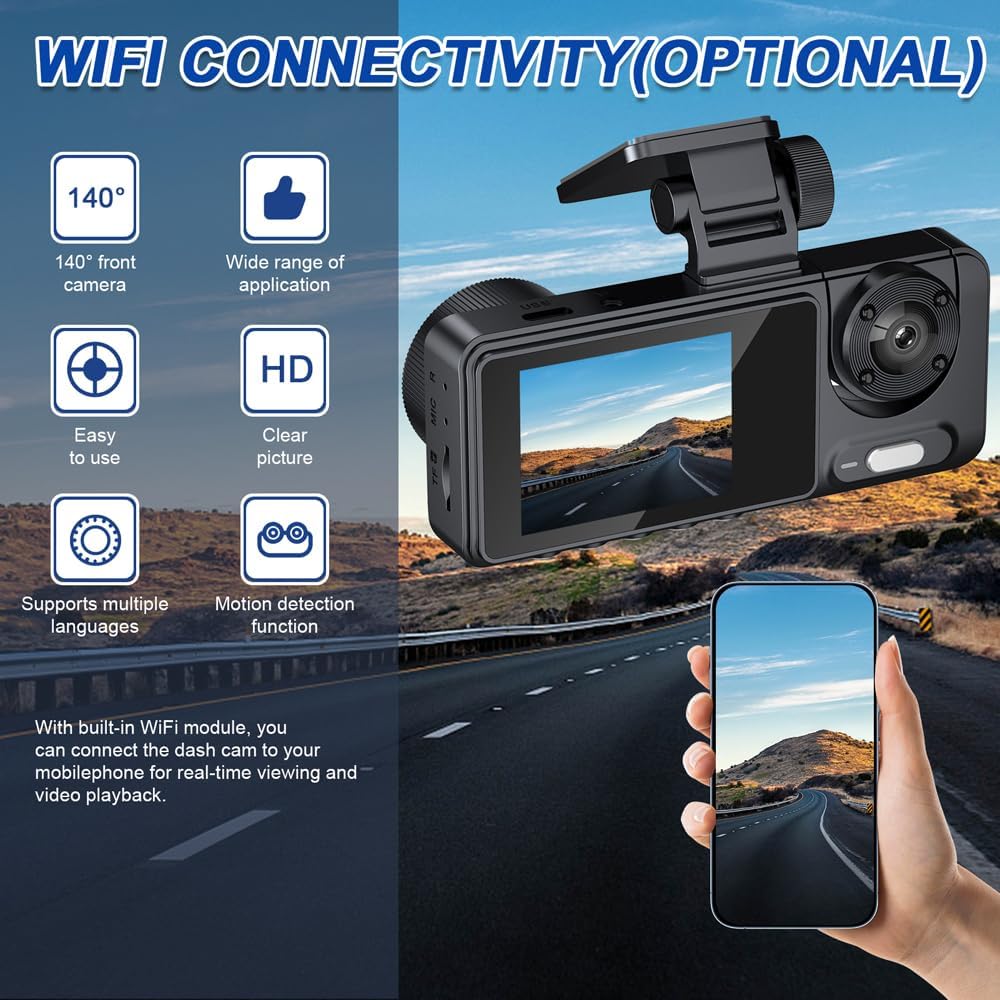
Rajah 7.1: This image illustrates the optional WiFi connectivity feature of the GoolRC Dash Cam, showing how it can connect to a smartphone for remote access and control. Various icons highlight key features such as wide-angle front camera, HD resolution, multi-language support, and motion detection.
8. Penyelenggaraan
Proper maintenance ensures the longevity and reliable operation of your dash cam.
- Pembersihan: Use a soft, dry cloth to clean the dash cam's lenses and screen. Avoid using abrasive cleaners or solvents.
- Kad Memori: Format the MicroSD card regularly (e.g., once a month) to prevent data corruption and ensure smooth recording. Back up important files sebelum memformat.
- Suhu: Avoid exposing the dash cam to extreme temperatures for extended periods. If the vehicle is parked in direct sunlight, consider removing the dash cam or using a sunshade.
- Kemas kini Firmware: Check the GoolRC official website periodically for any available firmware updates. Follow the instructions carefully for updating the device.
9. Penyelesaian masalah
Jika anda menghadapi masalah dengan kamera papan pemuka anda, rujuk masalah dan penyelesaian biasa berikut:
| Masalah | Kemungkinan Punca | Penyelesaian |
|---|---|---|
| Dash cam tidak dihidupkan. | Tiada bekalan kuasa; kabel rosak; soket 12V kenderaan tidak berfungsi. | Check power cable connection. Test 12V outlet with another device. Try a different power cable if available. |
| Dash cam stops recording. | Memory card full; memory card error; power interruption. | Format the memory card. Replace with a new, high-speed MicroSD card. Ensure stable power connection. |
| Video footage adalah kabur atau tidak jelas. | Filem pelindung pada kanta; kanta kotor; fokus yang salah. | Remove any protective film. Clean lenses with a soft cloth. Ensure dash cam is securely mounted and not vibrating. |
| Isu sambungan WiFi. | Incorrect password; app issues; dash cam WiFi not enabled. | Verify WiFi password. Restart dash cam and smartphone. Reinstall the app. Ensure WiFi is enabled on the dash cam. |
| Kamera papan pemuka membeku atau ranap. | Memory card error; firmware issue. | Format or replace memory card. Perform a factory reset (refer to settings menu). Check for firmware updates. |
10. Spesifikasi
Technical specifications for the GoolRC Triple Channel Dash Cam:
- Jenis: With WiFi, Without WiFi (optional)
- Resolusi: 1920*1080P (Front) + 1280*720P (Cabin) + 640*480P (Rear)
- paparan: Skrin 2 inci
- View Sudut: 140° (Front) + 90° (Cabin) + 90° (Rear)
- Piksel: 1.3 million (Front) + 500,000 (Cabin) + 300,000 (Rear)
- Bateri: 3.7V, 150mAh
- Kekerapan Semasa: 50/60HZ
- Sokongan Bahasa: Russian, Japanese, French, Italian, German, English, Chinese (simplified), Chinese (Traditional), Korean, Spanish, Portuguese
- Kad Memori: Maks. 128GB (tidak termasuk)
- Saiz Item: 105 * 44 * 40mm / 4.1 * 1.7 * 1.6in
- Berat Barang: Kira-kira 12.5 auns
- Teknologi Ketersambungan: Wi-Fi (pilihan)
- Kaedah Kawalan: Sentuh
11. Waranti dan Sokongan
GoolRC products are manufactured to high-quality standards. For warranty information, technical support, or service inquiries, please refer to the contact information provided on the product packaging or the official GoolRC webtapak. Sila simpan bukti pembelian anda untuk tuntutan waranti.


