Produk Selesaiview
The KETOTEK E0160 Wireless Weather Station provides comprehensive indoor and outdoor environmental monitoring. It features a large 8.8-inch color VA LCD display, a wireless outdoor sensor, and various functions including a thermometer, hygrometer, barometer, DCF radio alarm clock, weather forecasts, city sunset/sunrise times, calendar, and moon phases. This manual will guide you through the setup, operation, and maintenance of your weather station.
Kandungan Pakej
Before starting, please verify that all items are present in the package:
- Unit Stesen Cuaca Utama
- Wireless Outdoor Sensor (white)
- Penyesuai Kuasa (EU)
- Perkakasan Pemasangan
- Manual Arahan
Panduan Persediaan
1. Menghidupkan Unit Utama
The main weather station unit can be powered using the included EU power adapter or by batteries (not included). For continuous backlight and full functionality, using the power adapter is recommended.
- Menggunakan Penyesuai Kuasa: Connect the power adapter to the DC 5V port on the side of the main unit and plug it into a wall outlet.
- Menggunakan Bateri: Open the battery compartment on the back of the main unit and insert 3 x AA batteries (not included), observing polarity. Note that the backlight will only stay on for 10 seconds when powered by batteries to conserve energy.

Imej: Belakang view of the main unit showing power input, USB output, battery compartment, and mounting options.
2. Setting up the Wireless Outdoor Sensor
The wireless outdoor sensor transmits temperature and humidity data to the main unit. It requires 2 x AA batteries (not included).
- Open the battery compartment on the back of the outdoor sensor and insert 2 x AA batteries, observing polarity.
- Select a channel (1, 2, or 3) using the "CHANNEL 1/2/3" switch inside the battery compartment. Ensure this matches the channel selected on the main unit if you are using multiple sensors.
- The sensor is IPX4 splash-resistant but not waterproof. Install it in a protected location away from direct rain and sunlight for accurate readings and longevity. The maximum transmission range is 60 meters.
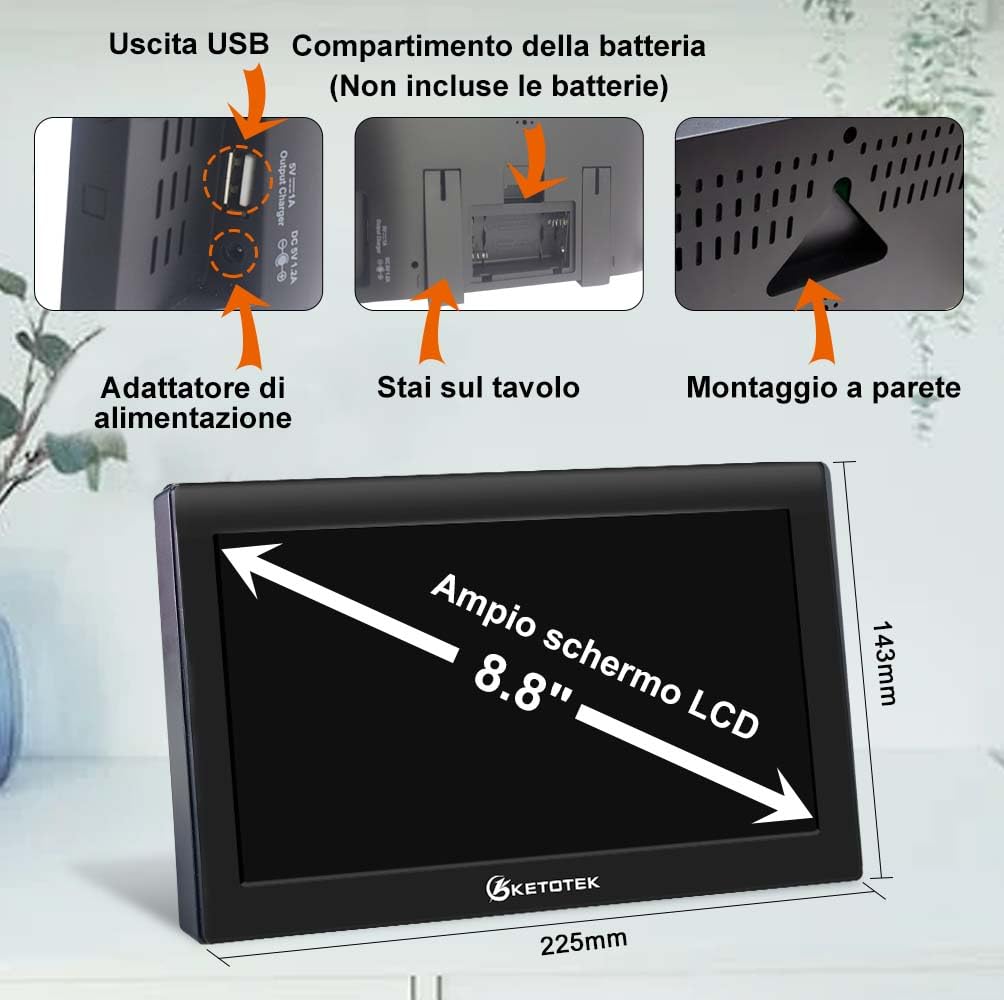
Image: Details of the outdoor sensor's battery compartment and recommended placement.
3. Initial Synchronization (DCF Radio Control)
The weather station automatically synchronizes the time and date via the DCF radio signal. This process usually occurs daily at 1:00, 2:00, or 3:00 AM.
- Place the main unit in an area with good reception, ideally near a window.
- The DCF icon on the display will flash during synchronization. Once successful, it will remain solid.
- If the signal is weak, you can manually force reception by long-pressing the "UP" button.
- The station also supports automatic Daylight Saving Time (DST) adjustment.

Image: Display indicating DCF signal reception and DST function.
Arahan Operasi
Paparan Lebihview
The 8.8-inch VA color LCD display shows indoor and outdoor temperature and humidity, weather forecast, time, date, moon phase, and other relevant information. The large numbers ensure clear visibility from various angles.

Imej: Depan view of the weather station display.
Backlight Adjustment and Night Mode
When powered by the adapter, the backlight has 4 adjustable brightness levels. When powered by batteries, the backlight turns off after 10 seconds to save power.
- Press the light bulb icon button to cycle through brightness levels.
- To activate/deactivate Night Mode, touch and hold the light bulb icon button for 2 seconds. In Night Mode, the display brightness will automatically dim during a set period.

Image: Visual representation of backlight settings and night mode.
Tetapan Masa dan Tarikh
While the DCF function automatically sets the time, you can manually adjust it if needed.
- Press and hold the "SET" button to enter time/date setting mode.
- Use the "UP" and "DOWN" buttons to adjust values.
- Press "SET" to confirm and move to the next setting (e.g., 12/24-hour format, hour, minute, year, month, day, language).
Fungsi Jam Penggera
The weather station supports two daily alarms with a snooze function.
- Menetapkan Penggera: Press the "ALARM" button to view Alarm 1 or Alarm 2. Long-press the "ALARM" button to enter alarm setting mode. Use "UP" and "DOWN" to adjust hour, minute, and repeat cycle (M-F, S-S, M-F S-S).
- Fungsi Tunda: When an alarm sounds, press the "SNOOZE" button (usually the light bulb icon) to activate snooze for 5-60 minutes.

Image: Alarm clock settings and snooze duration.
Weather Forecast and Barometer
The station provides a weather forecast for the next 12 hours based on barometric pressure changes. It displays 6 types of weather icons (sunny, partly cloudy, cloudy, rainy, snowy, stormy) and 12 moon phases.

Image: Weather forecast icons and moon phase display.
Pemantauan Suhu dan Kelembapan
The station displays indoor and outdoor temperature and humidity. It also records maximum and minimum values, shows trends, and provides comfort and mold risk indicators.
- Penunjuk Keselesaan: Displays a face icon (happy, neutral, sad) to indicate comfort levels based on temperature and humidity.
- Penunjuk Risiko Acuan: Shows HI (high), ME (medium), LO (low), or no risk based on humidity levels.
- Penggera Fros: An ice icon flashes when the outdoor temperature is between -1°C (30°F) and 3°C (37°F).
- Penggera Suhu: You can set high and low temperature alerts for the outdoor sensor.

Image: Display showing comfort level, mold risk, and frost alarm.

Image: Setting outdoor temperature alarms for high and low limits.
City Sunset/Sunrise Times
The weather station can display sunrise and sunset times for selected cities. You can manually select a city or customize it.

Image: Display of sunrise and sunset times for various cities.
Output Pengecasan USB
The main unit includes a USB output port, allowing you to charge small electronic devices like phones or PCs.
Penyelenggaraan
- Pembersihan: Use a soft, dry cloth to clean the display and unit. Avoid abrasive cleaners or solvents.
- Penggantian Bateri: Replace batteries in both the main unit and the outdoor sensor when the low battery indicator appears on the display. Ensure correct polarity.
- Peletakan Sensor: Regularly check the outdoor sensor's placement to ensure it remains protected from harsh weather conditions.
Menyelesaikan masalah
- Tiada Paparan/Malapkan Paparan:
- Check if the power adapter is securely connected or if batteries are correctly inserted and charged.
- Adjust backlight brightness using the light bulb icon button.
- Outdoor Sensor Not Displaying Data:
- Ensure the outdoor sensor batteries are fresh and correctly inserted.
- Verify that the channel selected on the sensor matches the channel displayed on the main unit.
- Move the sensor closer to the main unit to improve signal reception (within 60m range).
- Avoid large metal objects or electronic devices that might interfere with the wireless signal.
- Masa/Tarikh yang salah:
- Ensure the DCF signal icon is solid, indicating successful synchronization.
- If the DCF signal is weak, try repositioning the main unit or manually setting the time.
- Bacaan Tidak Tepat:
- Pastikan sensor luar diletakkan di kawasan yang teduh dan mempunyai pengudaraan yang baik, jauh daripada cahaya matahari langsung atau sumber haba.
- Allow some time for the sensor to stabilize after initial setup or battery replacement.
Spesifikasi
| Ciri | Perincian |
|---|---|
| Nombor Model | E0160 |
| Jenis Paparan | 8.8-inch VA Color LCD |
| Julat Suhu Dalaman | -9.9 ° C ~ 50 ° C (15 ° F ~ 122 ° F) |
| Julat Suhu Luar | -40°C ~ 70°C (-40°F ~ 158°F) |
| Julat Kelembapan | 20% RH ~ 95% RH |
| Ketepatan Pengukuran | ±1°C, ±3%RH |
| Sumber Kuasa (Unit Utama) | AC Adapter (EU), 3 x AA Batteries (not included) |
| Sumber Kuasa (Penderia Luaran) | 2 x Bateri AA (tidak termasuk) |
| Julat Tanpa Wayar | Sehingga 60 meter (udara terbuka) |
| Ciri Khas | DCF Radio Clock, Dual Alarms, Snooze, Weather Forecast, Moon Phase, Sunrise/Sunset, Comfort Indicator, Mold Risk, Frost Alarm, USB Charging Output |
| Dimensi | 22.5 x 3.3 x 14.3 cm |
| Berat badan | 670 g |
| bahan | Akrilonitril Butadiena Stirena (ABS) |
Official Product Video: Setup and Settings Guide
Video: A detailed guide on powering the device, setting up the sensor, adjusting night mode, setting time, date, alarms, temperature alerts, and city information.
Waranti dan Sokongan
Untuk maklumat jaminan atau sokongan teknikal, sila rujuk butiran hubungan yang diberikan bersama pembelian anda atau lawati laman web rasmi KETOTEK. webtapak. Simpan resit pembelian anda untuk tuntutan waranti.


