1. Pengenalan
This manual provides detailed instructions for the installation, operation, and maintenance of your darkFlash DRX70 ATX Mid-Tower Gaming PC Case. Please read this manual thoroughly before beginning assembly to ensure proper setup and safe usage. Retain this manual for future reference.
2. Maklumat Keselamatan
- Sentiasa putuskan sambungan kuasa daripada semua komponen sebelum pemasangan atau penyelenggaraan.
- Kendalikan panel kaca terbaja dengan berhati-hati untuk mengelakkan pecah.
- Avoid exposing the case to extreme temperatures or humidity.
- Jauhkan bahagian kecil dan skru daripada kanak-kanak.
- Pastikan pembumian yang betul untuk semua komponen elektrik.
3. Kandungan Pakej
Sahkan bahawa semua komponen terdapat dalam pakej anda:
- darkFlash DRX70 ATX Mid-Tower PC Case
- 3 x 120mm Fixed RGB Fans (pre-installed in front)
- Kotak Aksesori (mengandungi skru, pengikat, pengikat kabel, dll.)
- Manual Pengguna
4. Produk Lebihview
The darkFlash DRX70 is an ATX mid-tower case designed for optimal airflow and component visibility. It features a magnetic mesh front panel for enhanced air intake and a tempered glass side panel to showcase your build.
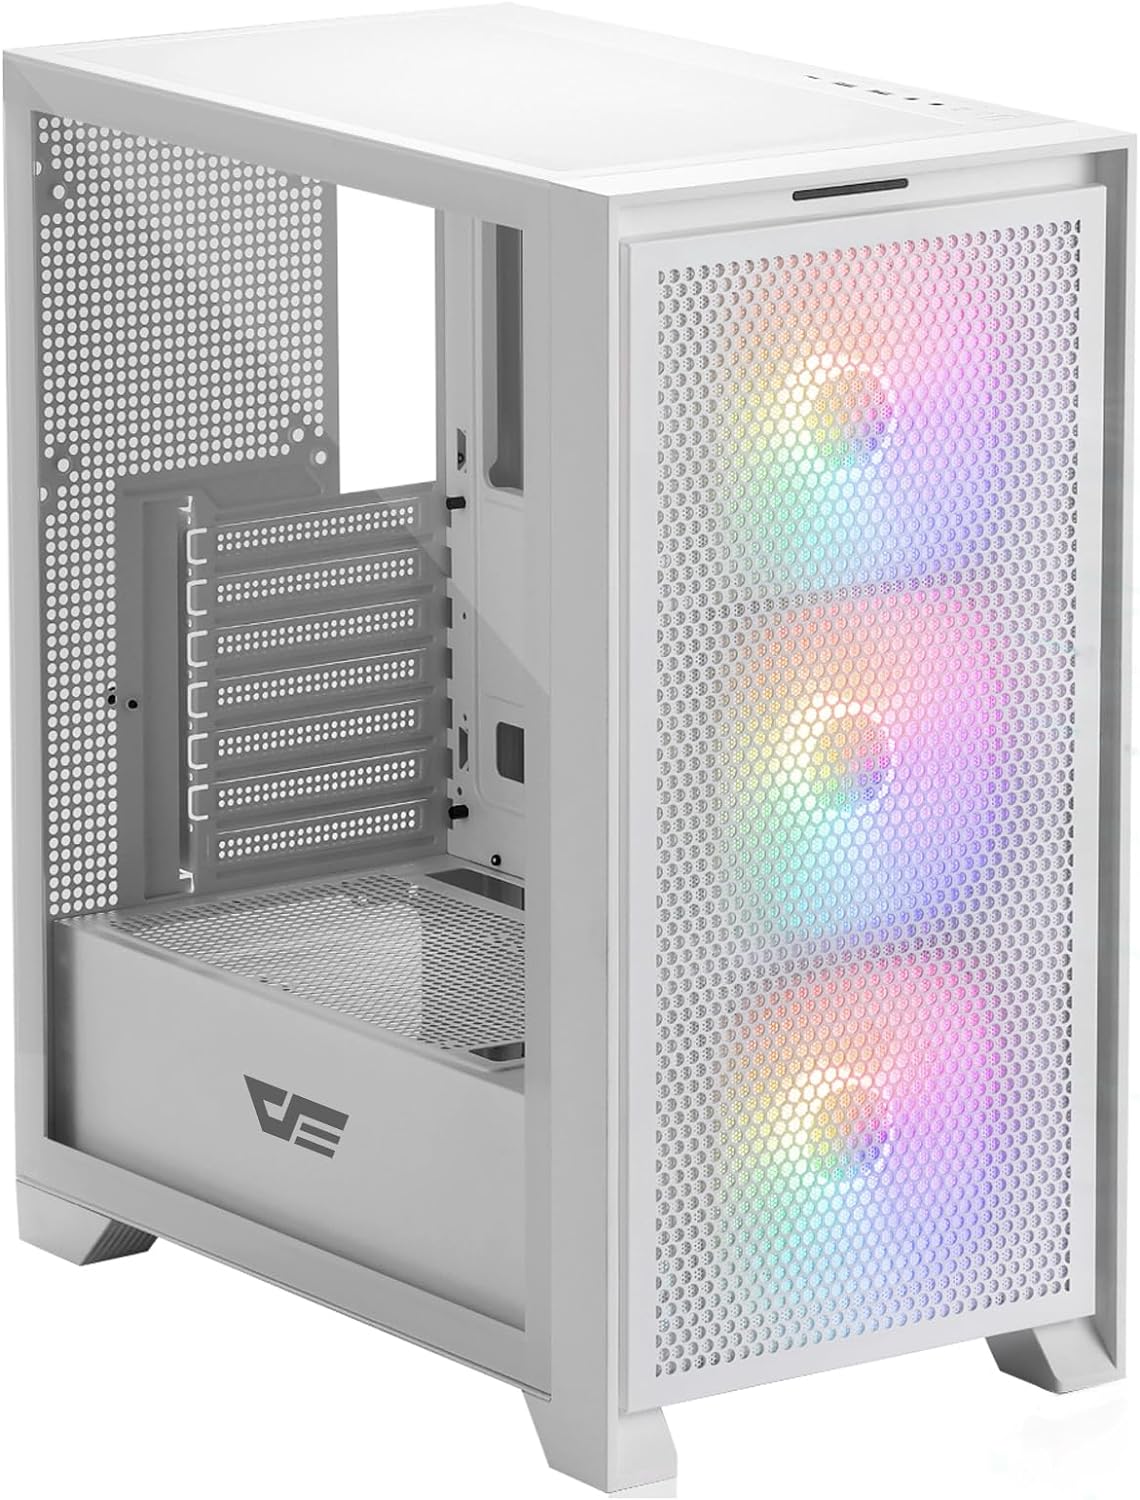
Rajah 4.1: Bahagian hadapan view of the darkFlash DRX70 PC case with pre-installed RGB fans.
Ciri-ciri Utama:
- Magnetic Mesh Front Panel: Optimizes air intake and is easily removable for cleaning.
- Panel Sisi Kaca Terbaja: Menyediakan yang jelas view daripada komponen dalaman.
- Pre-installed 3x120mm Fixed RGB Fans: Enhances cooling and adds aesthetic lighting. Note: Lighting is fixed, not addressable.
- Penapis Habuk: Magnetic dust filters on top and bottom for easy maintenance.
- Anti-slip Bottom Structure: Ensures stability on various surfaces.
- USB 3.0 Ready: Convenient front I/O panel connectivity.
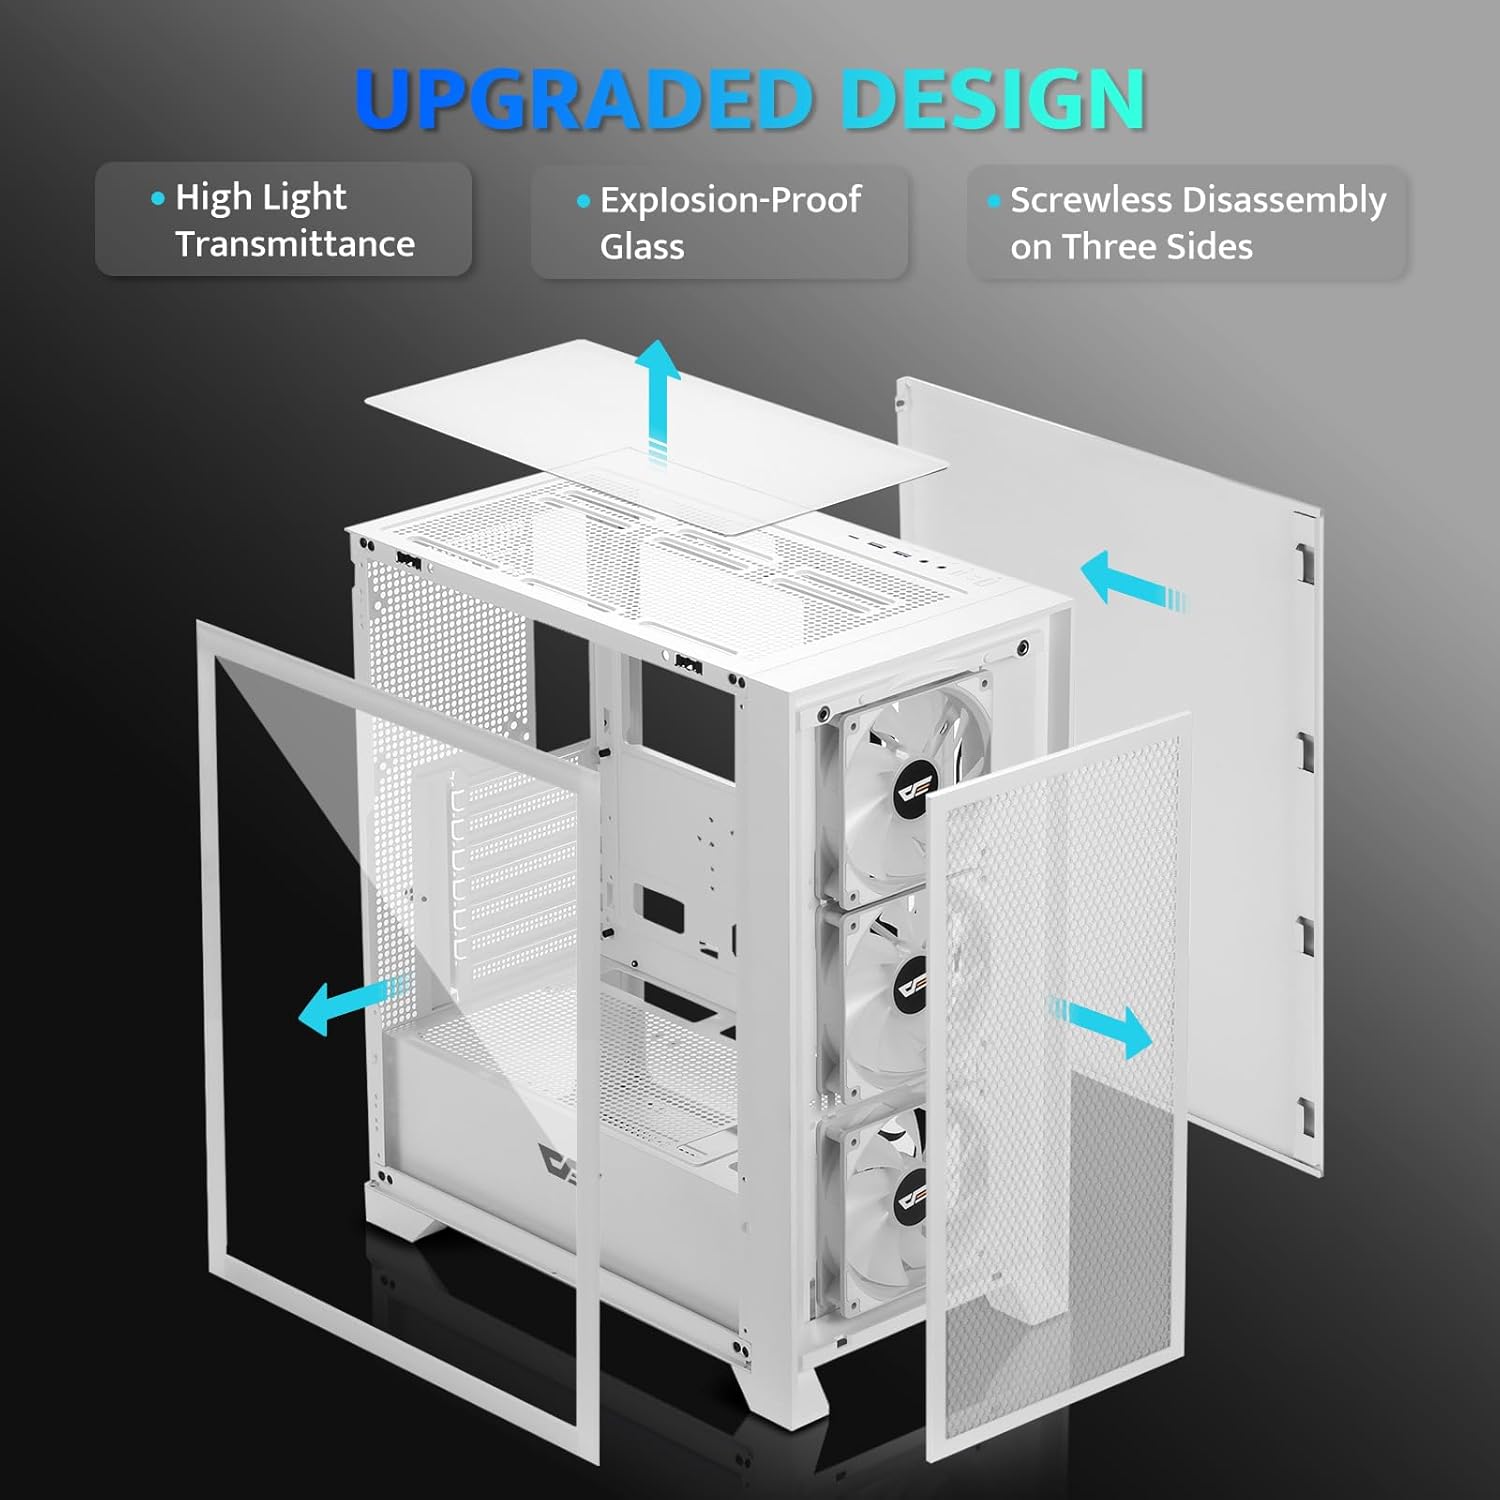
Rajah 4.2: Meletup view illustrating the removable panels for easy access and assembly.

Figure 4.3: Detail of the magnetic mesh front panel, designed for optimal airflow and easy removal.

Figure 4.4: Airflow channels within the DRX70 case, demonstrating efficient cooling paths.

Figure 4.5: The top I/O panel featuring USB 3.0, USB 2.0, HD Audio jacks, Reset, and Power buttons.
5. Persediaan dan Pemasangan
Follow these general steps for assembling your PC within the DRX70 case. Refer to your individual component manuals for specific installation details.
5.1 Menyediakan Kes
- Letakkan bekas di atas permukaan yang stabil dan rata.
- Remove the tempered glass side panel by unscrewing the thumb screws and carefully sliding it off.
- Remove the magnetic mesh front panel by gently pulling it away from the chassis.
- Remove the rear side panel by unscrewing the thumb screws and sliding it back.
5.2 Pemasangan Komponen
- Papan induk: Install the necessary standoffs for your motherboard form factor (ATX, M-ATX, ITX). Carefully place the motherboard into the case and secure it with screws.
- Unit Bekalan Kuasa (PSU): Install the PSU into its designated compartment at the bottom rear of the case. Secure it with screws from the rear.
- Pemacu Storan: Install 2.5" SSDs or 3.5" HDDs into the drive bays. The case supports 1x 2.5" SSD and 2x 2.5"/3.5" HDDs.
- Kad Grafik (GPU): Install your graphics card into the appropriate PCIe slot on the motherboard and secure it. The case supports GPUs up to 350mm in length.
- penyejukan: The case comes with 3x 120mm fixed RGB fans pre-installed in the front. Additional fans or a 280mm radiator can be installed as per the specifications.
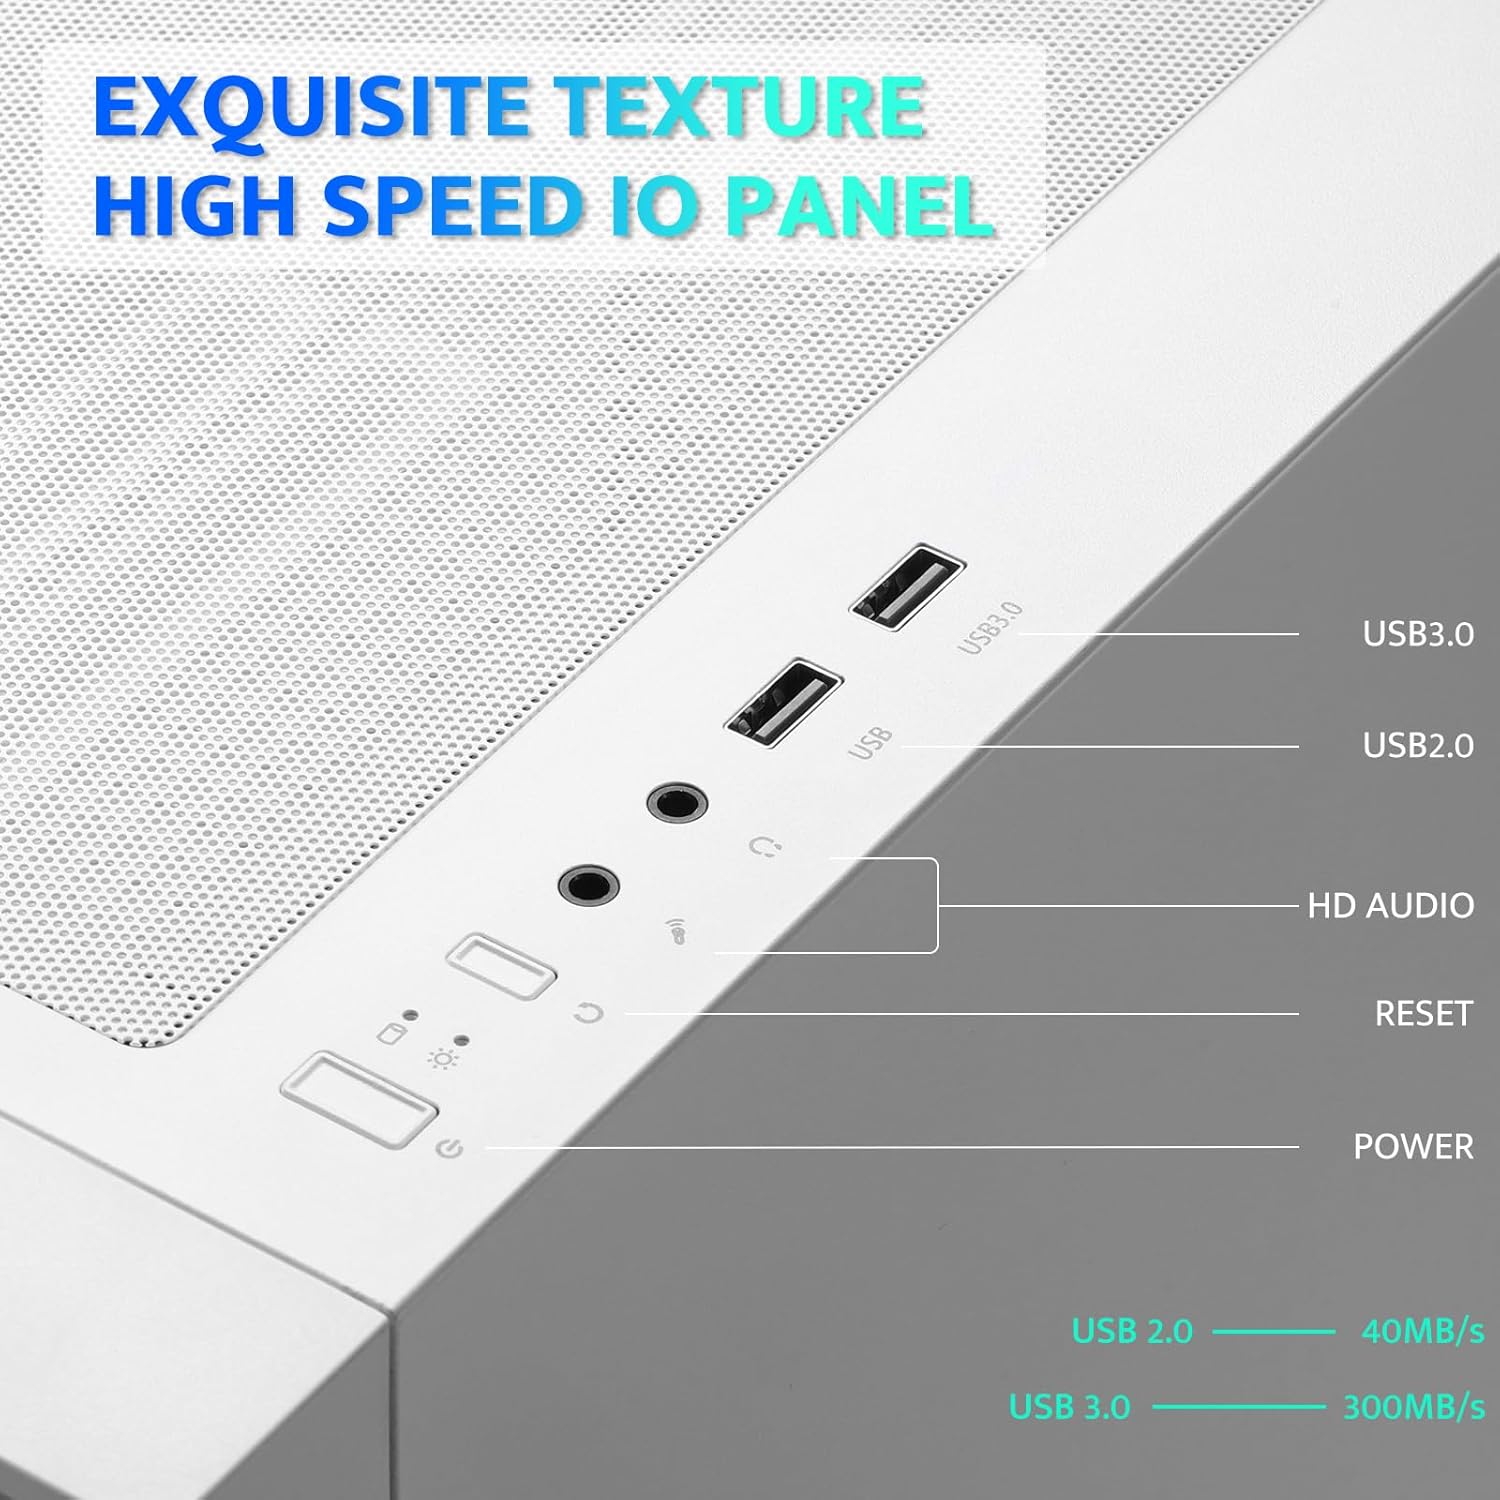
Figure 5.1: Internal layout with maximum component dimensions for CPU cooler, GPU, PSU, and radiator support.
5.3 Pengurusan Kabel
Utilize the cable routing cutouts and tie-down points behind the motherboard tray to manage cables. This improves airflow and aesthetics. The DRX70 is designed to simplify cable management by allowing most connectors to be routed to the rear of the motherboard.

Figure 5.2: Illustration of cable management optimization, showing how cables can be concealed behind the motherboard tray.
6. Arahan Operasi
Sebaik sahaja semua komponen dipasang dan disambungkan, anda boleh menghidupkan sistem anda.
6.1 Menghidupkan/Mematikan
- Tekan ke kuasa button on the top I/O panel to turn on your PC.
- To turn off, use the operating system's shutdown function or press and hold the kuasa button for several seconds.
6.2 Front I/O Panel Functions
- Port USB 3.0: Untuk pemindahan data berkelajuan tinggi dengan peranti yang serasi.
- Port USB 2.0: Untuk peranti USB standard.
- Bicu Audio HD: Untuk menyambungkan fon kepala dan mikrofon.
- Butang Tetapkan Semula: Untuk memulakan semula sistem.
6.3 Operasi Kipas
The pre-installed 120mm fans provide cooling and feature fixed RGB lighting. These fans operate continuously when the system is powered on. The RGB lighting pattern is not user-addressable.
7. Penyelenggaraan
Penyelenggaraan tetap membantu memastikan prestasi optimum dan jangka hayat komponen PC anda.
7.1 Membersihkan Penapis Habuk
The DRX70 case includes magnetic dust filters on the front and top panels, and a panel dust filter at the bottom. These should be cleaned periodically to prevent dust buildup and maintain airflow.
- Gently pull the magnetic dust filters off the chassis.
- Use a soft brush or compressed air to remove accumulated dust.
- Reattach the filters.

Figure 7.1: Magnetic dust filter for easy removal and cleaning.
7.2 Pembersihan Am
Lap bahagian luar bekas dengan lembut, damp cloth. Avoid using harsh chemicals or abrasive materials that could damage the finish or tempered glass.
8. Penyelesaian masalah
If you encounter issues with your PC case, consider the following common solutions:
- Tiada Kuasa: Ensure the PSU is properly connected to the wall outlet and the power switch on the PSU is in the 'ON' position. Verify all internal power cables (24-pin ATX, CPU, GPU) are securely connected. Check front panel power button connections to the motherboard.
- Peminat Tidak Berputar: Confirm that the fan power cables are correctly connected to the motherboard or fan controller.
- Port USB Tidak Berfungsi: Check that the USB headers from the front I/O panel are correctly plugged into the motherboard.
- Bicu Audio Tidak Berfungsi: Ensure the HD Audio cable from the front I/O panel is correctly connected to the motherboard's audio header.
For persistent issues, consult the manuals for your individual PC components or seek professional assistance.
9. Spesifikasi
| Ciri | Spesifikasi |
|---|---|
| Nama Model | DRX70M ATX Computer Case |
| Jenama | darkFlash |
| Jenis Kes | Mid Tower |
| Keserasian Papan Induk | ATX, M-ATX, ITX |
| Dimensi (LxWxH) | 15 x 9 x 18.1 inci (381 x 228.6 x 459.7 mm) |
| Berat Barang | 11.6 paun (5.26 kg) |
| bahan | Logam, Plastik, Kaca Tempered |
| Peminat prapasang | 3 x 120mm Fixed RGB Fans (Front) |
| Max Fan Support | Up to 8 fans |
| Sokongan Radiator | Up to 280mm (Top), 120mm (Rear) |
| Ketinggian Penyejuk CPU Maks | 180mm |
| Panjang GPU Maks | 350mm |
| Ruang Simpanan | 1x 2.5" SSD, 2x 2.5"/3.5" HDD |
| Pelabuhan I / O Depan | 1x USB 3.0, 1x USB 2.0, HD Audio, Power, Reset |
10. Waranti dan Sokongan
darkFlash provides a 1-year assurance for computer cases. This warranty covers manufacturing defects and ensures product quality. For warranty claims or technical support, please contact darkFlash customer service through their official webtapak atau peruncit tempat produk itu dibeli.
Sila simpan bukti pembelian anda untuk pengesahan waranti.


