1. Pengenalan
This user manual provides detailed instructions for the safe and efficient installation, operation, and maintenance of your PUTORSEN Premium Height Adjustable Monitor Wall Mount. Please read this manual thoroughly before installation and keep it for future reference. This mount is designed to securely hold monitors from 13 to 35 inches, weighing up to 22 lbs, with VESA 75x75mm or 100x100mm patterns.
2. Kandungan Pakej
Verify that all components are present and undamaged before proceeding with installation. If any parts are missing or damaged, please contact customer support.
- 1 x PUTORSEN Monitor Wall Mount
- 1 x Hardware Kit (screws, anchors, washers)
- 1 x Manual Arahan (dokumen ini)
- 4 x Cable Ties for cable management
Image: Main components of the PUTORSEN Monitor Wall Mount, including the mount itself and cable ties for organization.
3. Spesifikasi
| Jenama | PUTOR |
| Model | B0CPXHP66Q |
| Keserasian Saiz Skrin | 13" to 35" (standard and ultrawide screens) |
| Kapasiti Berat | Sehingga 22 paun (10 kg) |
| Keserasian VESA | 75x75mm, 100x100mm |
| Jenis Pemasangan | Wall Mount (Wood studs, solid wall, brick wall) |
| Jenis Pergerakan | Articulating (Tilt, Swivel, Rotation, Height Adjustment) |
| bahan | Acrylonitrile Butadiene Styrene (ABS), Alloy Steel, Aluminum |
| warna | Hitam |
| Jarak Dinding | Pro rendahfile, approximately 2 inches from the wall |
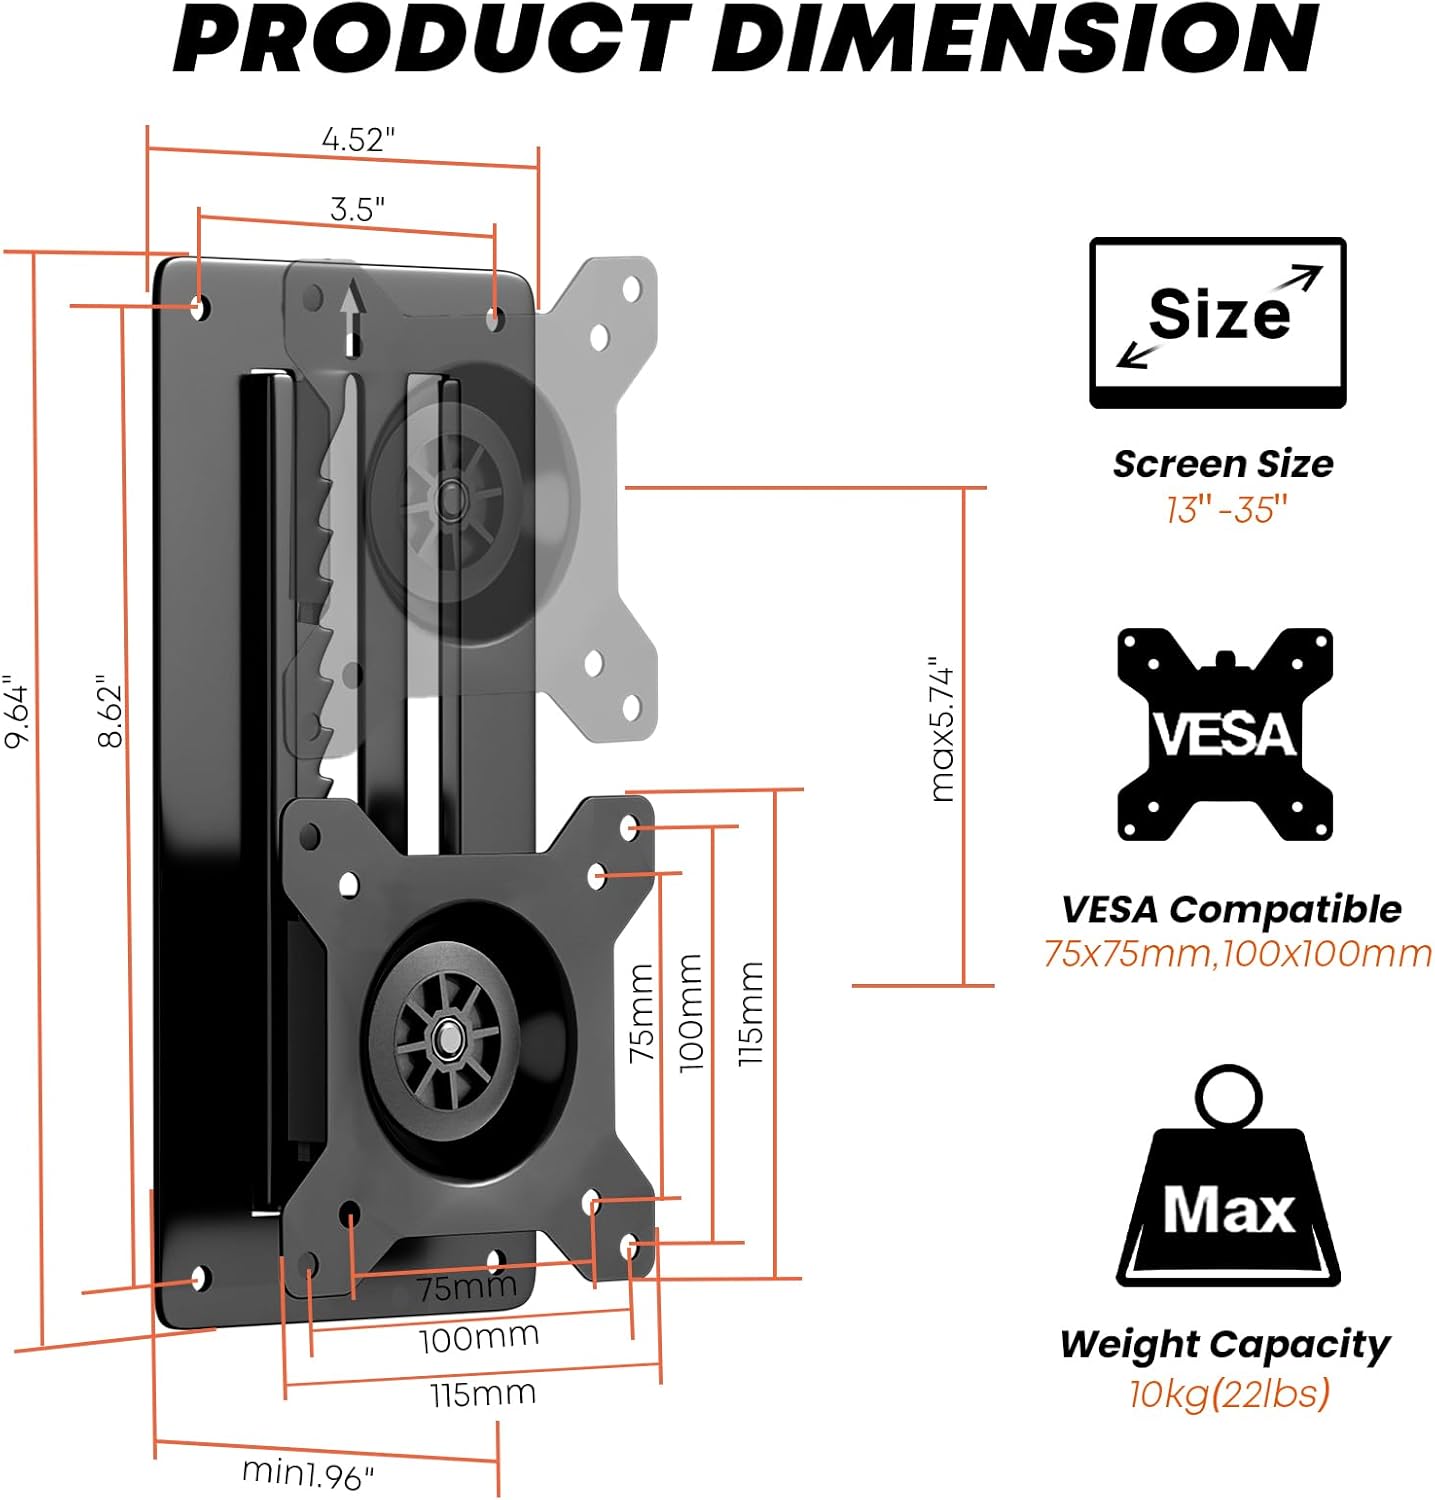
Image: Detailed product dimensions, screen size compatibility (13"-35"), VESA compatibility (75x75mm, 100x100mm), and maximum weight capacity (10kg/22lbs).
4. Persediaan & Pemasangan
Careful installation is crucial for the safety and stability of your monitor. Follow these steps precisely.
4.1 Tools Needed (Not Included)
- Pemutar Skru Phillips
- latih tubi
- Tahap Buih
- Pensel
4.2 Panduan Video Pemasangan
Video: A detailed installation guide for the PUTORSEN Height Adjustable Monitor Wall Mount, demonstrating the steps for secure mounting and adjustment.
4.3 Wall Mounting Steps
- Pilih Lokasi: Choose a suitable wall location. Ensure it can support the weight of the mount and your monitor. This mount is compatible with wood studs, solid walls, or brick walls.
- Tandai Lubang Gerudi: Position the wall plate at the desired height. Use a bubble level to ensure it is perfectly horizontal. Mark the four drill hole locations with a pencil.
- Lubang gerudi:
- For wood studs: Drill pilot holes.
- For solid concrete/brick walls: Drill holes of 8mm (5/16") diameter and 55mm (2.2") depth. Insert wall anchors (W-D) into the drilled holes.
- Pasang Plat Dinding: Align the wall plate with the drilled holes. Secure it to the wall using the appropriate screws (W-A for wood studs, W-C with W-D anchors for concrete/brick) and a Phillips screwdriver. Ensure it is firmly attached.

Imej: Cthamples of the monitor wall mount installed in different environments such as a study, meeting room, reception, kitchen, dining room, and hospital room, showcasing serba bolehnya.
4.4 Attaching Monitor to Mount
- Lampirkan Plat VESA ke Monitor: Secure the VESA plate (the part that attaches to the monitor) to the back of your monitor using the appropriate M-A or M-B screws and M-C washers from the hardware kit. Ensure the screws are tightened securely but do not overtighten.
- Gantung Monitor: Carefully lift the monitor with the attached VESA plate and align it with the wall-mounted bracket. Slide the VESA plate onto the bracket until it clicks into place.
- Secure Monitor: Tighten the security screw on the VESA plate to prevent accidental dislodging.

Image: The monitor mount demonstrating its full adjustability, including tilt (+/-10°), swivel (+/-10°), and rotation (+/-180°), along with vertical height adjustment up to 5.74 inches.
5. Arahan Operasi
Your PUTORSEN monitor wall mount offers various adjustments for optimal viewkeselesaan.
- Pelarasan Ketinggian: This mount features an innovative toothed track system for height adjustment.
- Kepada menaikkan the monitor: Gently lift the monitor until the latch clicks into place at your desired level.
- Kepada lebih rendah the monitor: Lift the monitor all the way up to disengage the latch, then bring it down to the bottom and slowly slide it to the desired position. Ensure there is enough space above the mount for this operation.
- Pelarasan Kecondongan: The monitor can be tilted +/-10 degrees to reduce glare and achieve a comfortable viewsudut ing.
- Pelarasan Pusing: Swivel the monitor +/-10 degrees horizontally to share your screen or adjust your viewkedudukan.
- Pelarasan Putaran: Rotate the monitor +/-180 degrees to switch between landscape and portrait orientation.
- Pengurusan Kabel: Use the provided zip ties to neatly route and secure cables along the mount arm and wall, maintaining a clean workspace.

Imej: Cthamples of customized screen setups, including two monitors mounted side-by-side and two monitors stacked vertically, demonstrating flexible configuration options.
6. Penyelenggaraan
Penyelenggaraan berkala memastikan ketahanan dan operasi yang selamat pada dudukan monitor anda.
- Pembersihan: Lap pelekap dengan kain lembut dan kering. Elakkan pembersih atau pelarut yang kasar yang boleh merosakkan kemasan.
- Semak Sambungan: Periksa semua skru dan sambungan secara berkala untuk memastikan ia kekal ketat dan selamat. Ketatkan semula jika perlu.
- Periksa Pemakaian: Inspect the mount for any signs of wear, damage, or loose parts. If any issues are found, discontinue use and contact customer support.
7. Penyelesaian masalah
If you encounter issues with your monitor mount, refer to the following common problems and solutions:
- Monitor is not holding height:
- Ensure the monitor was lifted all the way up to disengage the latch before attempting to lower it.
- Verify that the monitor weight is within the specified capacity (up to 22 lbs).
- Check if the height adjustment mechanism is free from obstructions.
- Jika masalah berterusan, hubungi sokongan pelanggan untuk mendapatkan bantuan.
- Gunung berasa tidak stabil:
- Recheck all wall mounting screws and monitor attachment screws to ensure they are fully tightened.
- Confirm that the wall material is appropriate for the chosen anchors and screws.
- Ensure the monitor's VESA pattern is correctly aligned and secured to the mount.
- Difficulty with tilt/swivel/rotation:
- Check for any overtightened screws that might be restricting movement.
- Ensure no cables are snagged or preventing free movement.
8. Waranti & Sokongan
PUTORSEN stands behind the quality of its products. If you require assistance, have questions, or need to report a defect, please contact our customer support team.
Maklumat Hubungan: Please refer to the contact details provided with your product packaging or visit the official PUTORSEN webtapak untuk sokongan.
Waranti: Information regarding the product warranty period and terms can be found in the documentation included with your purchase or on the PUTORSEN webtapak.


