1. Pengenalan
This manual provides detailed instructions for the setup, operation, and maintenance of your Irfora Portable Receipt Printer, model MP210. This compact thermal printer is designed for various applications, offering wireless Bluetooth and USB connectivity for compatibility with Android, iOS, and Windows systems. It utilizes 58mm thermal paper for efficient and clear printing without the need for ink cartridges.

Figure 1: Irfora MP210 Portable Receipt Printer with a thermal paper roll.
2. Apa yang ada di dalam Kotak
Sila semak kandungan pakej semasa membuka kotak. Jika ada item yang hilang atau rosak, hubungi sokongan pelanggan.
- 1 x Thermal Printer (MP210)
- 1 x Gulungan Kertas Terma
- 1 x Kabel USB
- 1 x Manual Pengguna (Dokumen ini)

Figure 2: Contents of the Irfora MP210 package, including the printer and USB cable.
3. Spesifikasi
The following table details the technical specifications of the Irfora MP210 Portable Receipt Printer.
| Ciri | Perincian |
|---|---|
| Model | MP210 |
| Dimensi | 121 x 83.5 x 54.8 mm (4.76 x 3.29 x 2.16 inci) |
| Kaedah Mencetak | Percetakan garis titik terma |
| Resolusi | 203dpi, 8 dots/mm |
| Kelajuan Percetakan (Maks) | 70mm/s |
| Lebar Kertas | 58mm |
| Valid Printing Width | 48mm |
| Ketebalan Kertas | 60~80μm |
| Paper Roller Diameter | ≤40mm |
| Antara muka | Bluetooth (BT) and USB |
| Fon Set Aksara | ASCII: 9×17, 12×24, Multiple code pages support |
| Simbol Kod Bar | 1D: UPC-A, UPC-E, EAN8, EAN13, CODE39, ITF, CODEBAR, CODE128, CODE93; 2D: QR code |
| Sokongan Grafik | Bitmap printing with different density and user-defined bitmap printing (Max. 40K per bitmap, Max. 64K total) |
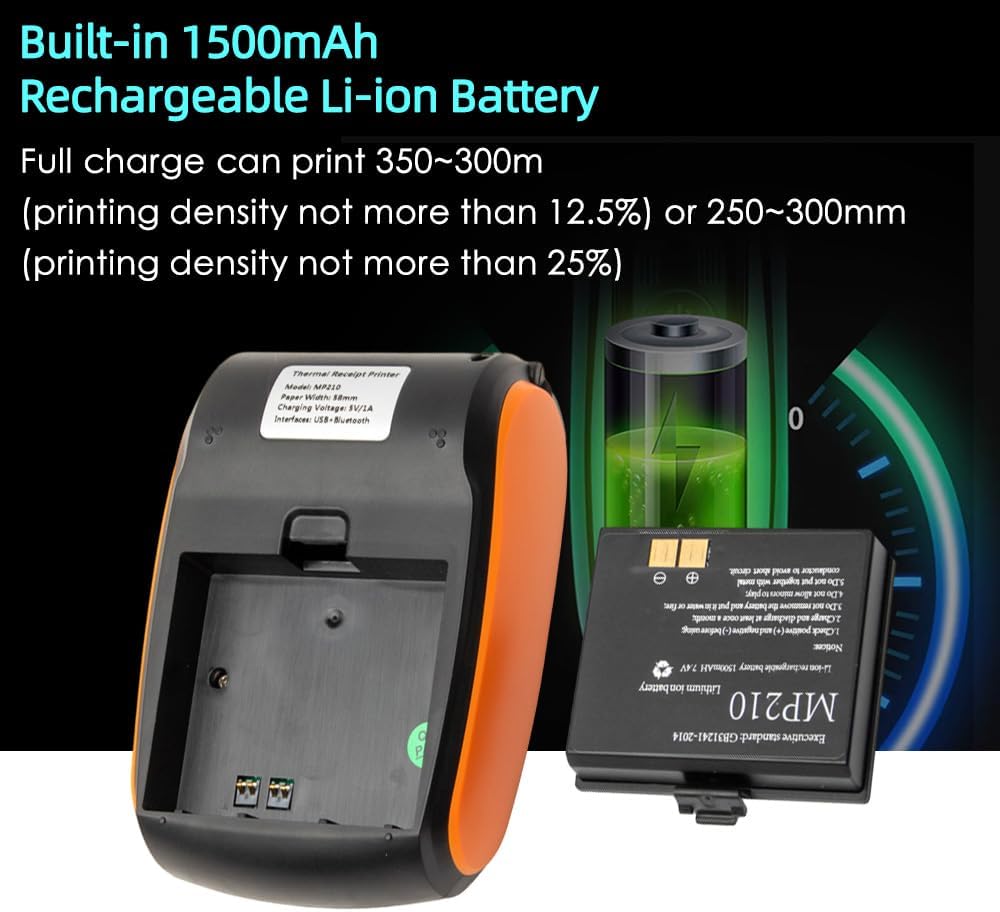
| Bateri | Bateri Li-ion boleh dicas semula 1500mAh/7.4V |
| Hayat Bateri (Caj Penuh) | 350~300m (printing density ≤12.5%) or 250~300mm (printing density ≤25%) |
| Sistem yang Disokong | Android, iOS, Win7/Win8/Win10 |

Figure 3: Visual representation of key specifications for the Irfora MP210 printer.
4. Persediaan
4.1 Pemasangan dan Pengecasan Bateri
The printer comes with a rechargeable Li-ion battery. Before first use, ensure the battery is properly installed and fully charged.
- Open the battery compartment cover on the bottom of the printer.
- Insert the 1500mAh/7.4V Li-ion battery, ensuring the contacts align correctly.
- Tutup penutup petak bateri dengan selamat.
- Connect the printer to a 5V/1A power adapter (not included) using the provided USB cable to charge. The charging indicator light will show the charging status.

Figure 4: Battery compartment and rechargeable Li-ion battery for the MP210 printer.
4.2 Pemasangan Gulungan Kertas
The printer uses 58mm thermal paper rolls.
- Open the paper compartment cover by pressing the release button or latch.
- Insert the thermal paper roll with the printing side facing the print head. Ensure the paper feeds smoothly.
- Tarik sedikit kertas keluar melepasi kepala cetak.
- Tutup penutup petak kertas dengan kuat sehingga ia terkunci pada tempatnya.
4.3 Pemasangan Pemacu dan Perisian
For optimal performance, ensure the correct drivers are installed on your Windows system. For mobile devices, compatible applications are required.
- Windows Drivers: Download the necessary drivers from the official support webtapak:
- Keserasian Apl Mudah Alih: The printer is compatible with various mobile applications. Ensure your chosen app supports external thermal printers. Examples termasuk:
- Loyverse (Retail/Clothing)
- iREAP (Retail/Inventory)
- CasierStock (Shopping/Inventory Management)
- Kyte (Mobile Sales)
Note: Verify compatibility with your specific cellphone and software version.
Gambar 5: Cthamples of mobile applications compatible with the Irfora MP210 printer.
5. Arahan Operasi
5.1 Hidupkan/Mati Kuasa
- Hidupkan kuasa: Press and hold the power button (usually marked with a power symbol) until the indicator light illuminates.
- Matikan: Press and hold the power button again until the indicator light turns off.
5.2 Sambungan Bluetooth
To connect the printer wirelessly via Bluetooth:
- Ensure the printer is powered on and within range of your mobile device (Android/iOS).
- On your mobile device, go to Bluetooth settings and enable Bluetooth.
- Cari untuk available devices. The printer should appear as "MP210" or a similar name.
- Select the printer to pair. If prompted for a PIN, enter "0000" or "1234" (common default PINs).
- Once paired, open your compatible printing application and select the MP210 as the target printer.

Figure 6: The MP210 printer supports both Bluetooth and USB connections for versatile use.
5.3 Sambungan USB
To connect the printer to a Windows computer via USB:
- Ensure the printer drivers are installed on your computer (refer to Section 4.3).
- Sambungkan pencetak ke komputer anda menggunakan kabel USB yang disediakan.
- The computer should recognize the printer. You can then select it from your printing preferences in any application.
5.4 Mencetak
Once connected, you can initiate printing from your chosen application.
- Open the document or receipt you wish to print in your application.
- Select the print option (e.g., File > Cetak).
- Choose the Irfora MP210 printer from the list of available printers.
- Adjust any print settings as needed (e.g., number of copies).
- Klik "Cetak" untuk menghantar kerja ke pencetak.
6. Penyelenggaraan
6.1 Membersihkan Kepala Cetak
Regular cleaning of the print head ensures optimal print quality and extends the printer's lifespan.
- Turn off the printer and disconnect it from any power source.
- Buka penutup petak kertas.
- Gently wipe the thermal print head (the dark strip) with a cotton swab lightly dampditambah dengan isopropil alkohol.
- Biarkan kepala cetak kering sepenuhnya sebelum menutup penutup dan menghidupkan pencetak.
Awas: Do not touch the print head with bare hands as oils can affect print quality. Avoid using abrasive materials or harsh chemicals.
6.2 Penjagaan Bateri
- Cas bateri sepenuhnya sebelum penggunaan pertama.
- Avoid completely draining the battery frequently to prolong its life.
- If storing the printer for an extended period, charge the battery to about 50% and store in a cool, dry place. Recharge every 3-6 months.
- Gunakan hanya kabel USB yang disediakan untuk mengecas.
7. Penyelesaian masalah
This section addresses common issues you might encounter with your Irfora MP210 printer.
7.1 Printer Does Not Power On
- Periksa Bateri: Ensure the battery is correctly installed and fully charged. Connect the printer to a power source and try again.
- Kenalan Bateri: Verify that any protective tape has been removed from the battery contacts.
- Butang Kuasa: Ensure you are pressing and holding the power button for a sufficient duration (typically 2-3 seconds).
7.2 Tidak Boleh Bersambung melalui Bluetooth
- Printer On: Confirm the printer is powered on and its Bluetooth indicator light is active.
- Bluetooth peranti: Pastikan Bluetooth didayakan pada peranti mudah alih anda.
- Kedekatan: Make sure the printer is within close range of your device.
- Unpair/Re-pair: If previously paired, try "forgetting" or "unpairing" the printer from your device's Bluetooth settings, then attempt to pair again.
- Kod PIN: Double-check the PIN code (default usually "0000" or "1234").
- Keserasian Apl: Ensure your printing application supports Bluetooth printing and is configured to use the MP210.
7.3 Poor Print Quality or Blank Pages
- Gulung Kertas: Check if the thermal paper roll is installed correctly with the printing side facing the print head. Thermal paper has a specific side that reacts to heat.
- Jenis Kertas: Ensure you are using thermal paper, not regular paper.
- Print Head Cleanliness: A dirty print head can cause faded or blank lines. Refer to Section 6.1 for cleaning instructions.
- Tahap Bateri: Low battery can affect print quality. Charge the printer fully.
7.4 Printer Not Recognized by Computer (USB)
- Pemandu: Confirm that the correct Windows drivers are installed (refer to Section 4.3).
- Wayar USB: Try a different USB port or cable to rule out a faulty connection.
- Printer On: Pastikan pencetak dihidupkan.
8. Waranti dan Sokongan
For information regarding warranty coverage, technical support, or service, please refer to the warranty card included with your product or contact Irfora customer service through their official webtapak atau peruncit tempat produk itu dibeli.
Please have your model number (MP210) and purchase details ready when contacting support.
