pengenalan
This manual provides essential information for the safe and effective operation, maintenance, and troubleshooting of your VEVOR 100 L/min HVAC Vacuum Pump, Model TW-1K. Please read this manual thoroughly before using the product to ensure proper function and to prevent injury or damage.
Arahan Keselamatan
AMARAN: Kegagalan mematuhi arahan keselamatan ini boleh mengakibatkan renjatan elektrik, kebakaran atau kecederaan serius.
- Always wear appropriate personal protective equipment, including safety glasses and gloves, when operating the vacuum pump.
- Pastikan bekalan kuasa voltage matches the specifications on the pump's nameplate.
- Jangan kendalikan pam dalam keadaan basah atau dedahkannya kepada hujan.
- Pastikan pengudaraan yang mencukupi semasa mengendalikan pam untuk mengelakkan terlalu panas.
- Never touch moving parts of the pump during operation.
- Disconnect the power supply before performing any maintenance or repairs.
- Use only VEVOR-approved vacuum pump oil. Mixing different types of oil can damage the pump.
- Jauhkan kanak-kanak dan kakitangan yang tidak dibenarkan dari kawasan operasi.
- Handle refrigerant hoses and connections with care, as refrigerants can cause frostbite.
Kandungan Pakej
Sahkan bahawa semua item yang disenaraikan di bawah disertakan dalam pakej anda:
- 1 x Pam Vakum
- 1 x Manifold Gauge Set
- 3 x Rubber Hoses (Red, Yellow, Blue)
- 2 x R134a Quick Couplers
- 2 x R410a Adapters
- 1 x R134a Bottle Opener
- 1 x Vacuum Pump Oil (250ml)
- 1 x Toolkit Bag
- 1 x Manual Pengguna

Figure 1: Complete package contents of the VEVOR vacuum pump kit.
Spesifikasi
| Ciri | Spesifikasi |
|---|---|
| Jenama | VEVOR |
| Nombor Model | TW-1K |
| Vacuum Pump Capacity | 3.5 CFM (100 L/min) |
| kuasa | 150 W |
| Jenis Motor | Four Pole Pure Copper Motor |
| Kelajuan Motor | 1440 RPM |
| Dimensi Produk | 36.07 x 29.97 x 25.91 cm |
| Berat Barang | 7.99 kg |
| Penilaian Tekanan Hos | 800 PSI - 4000 PSI |
| Perhimpunan Diperlukan | Tidak |
| ASIN | B0CB3X3XHD |
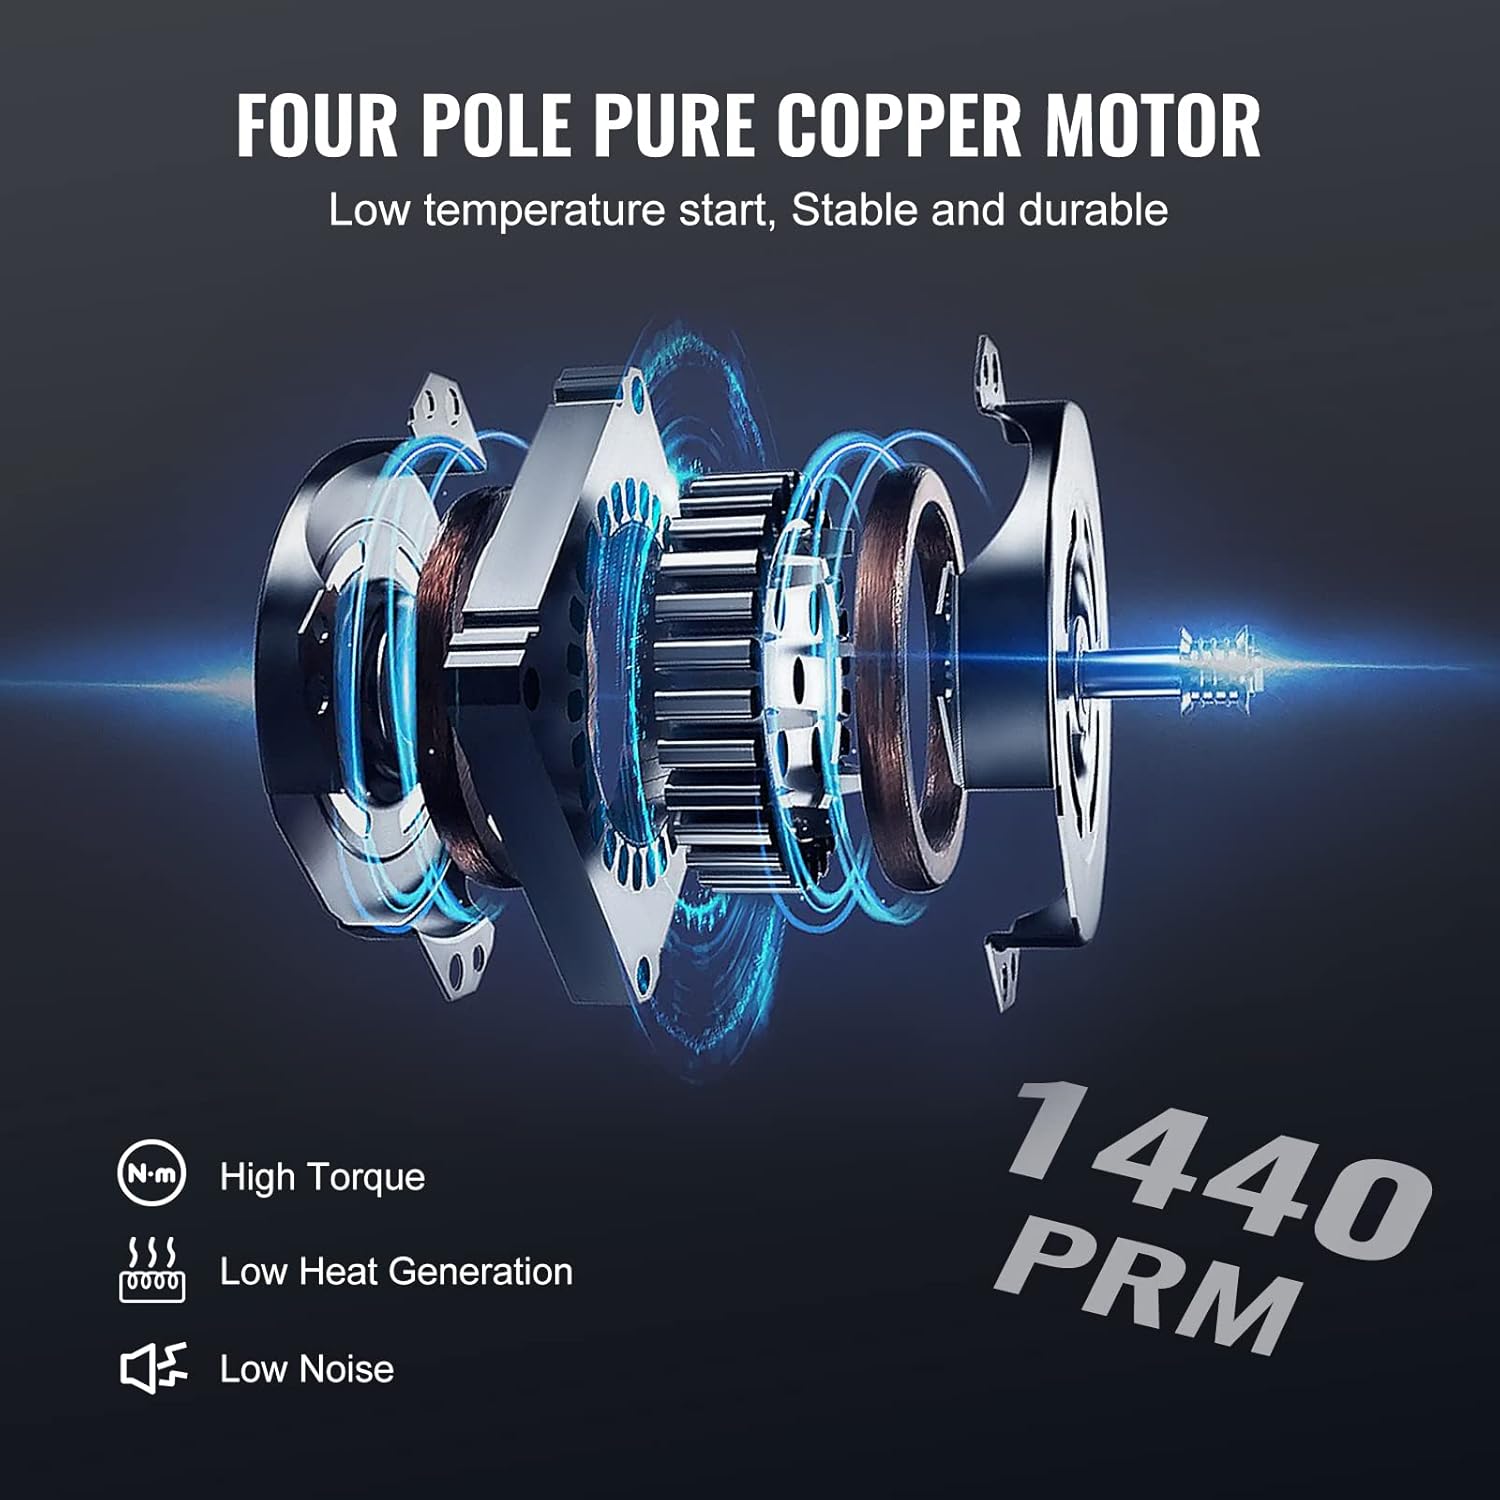
Gambar 2: Dalaman view of the four-pole pure copper motor.
Persediaan
1. Membongkar dan Pemeriksaan
Carefully remove all components from the packaging. Inspect the pump and accessories for any signs of damage during transit. If any damage is found, do not operate the unit and contact customer support.
2. Adding Vacuum Pump Oil
- Locate the oil fill cap on top of the pump.
- Unscrew and remove the oil fill cap.
- Carefully pour the provided vacuum pump oil into the oil reservoir until the oil level is between the MIN and MAX marks on the oil sight glass. Do not overfill.
- Gantikan penutup isi minyak dengan selamat.
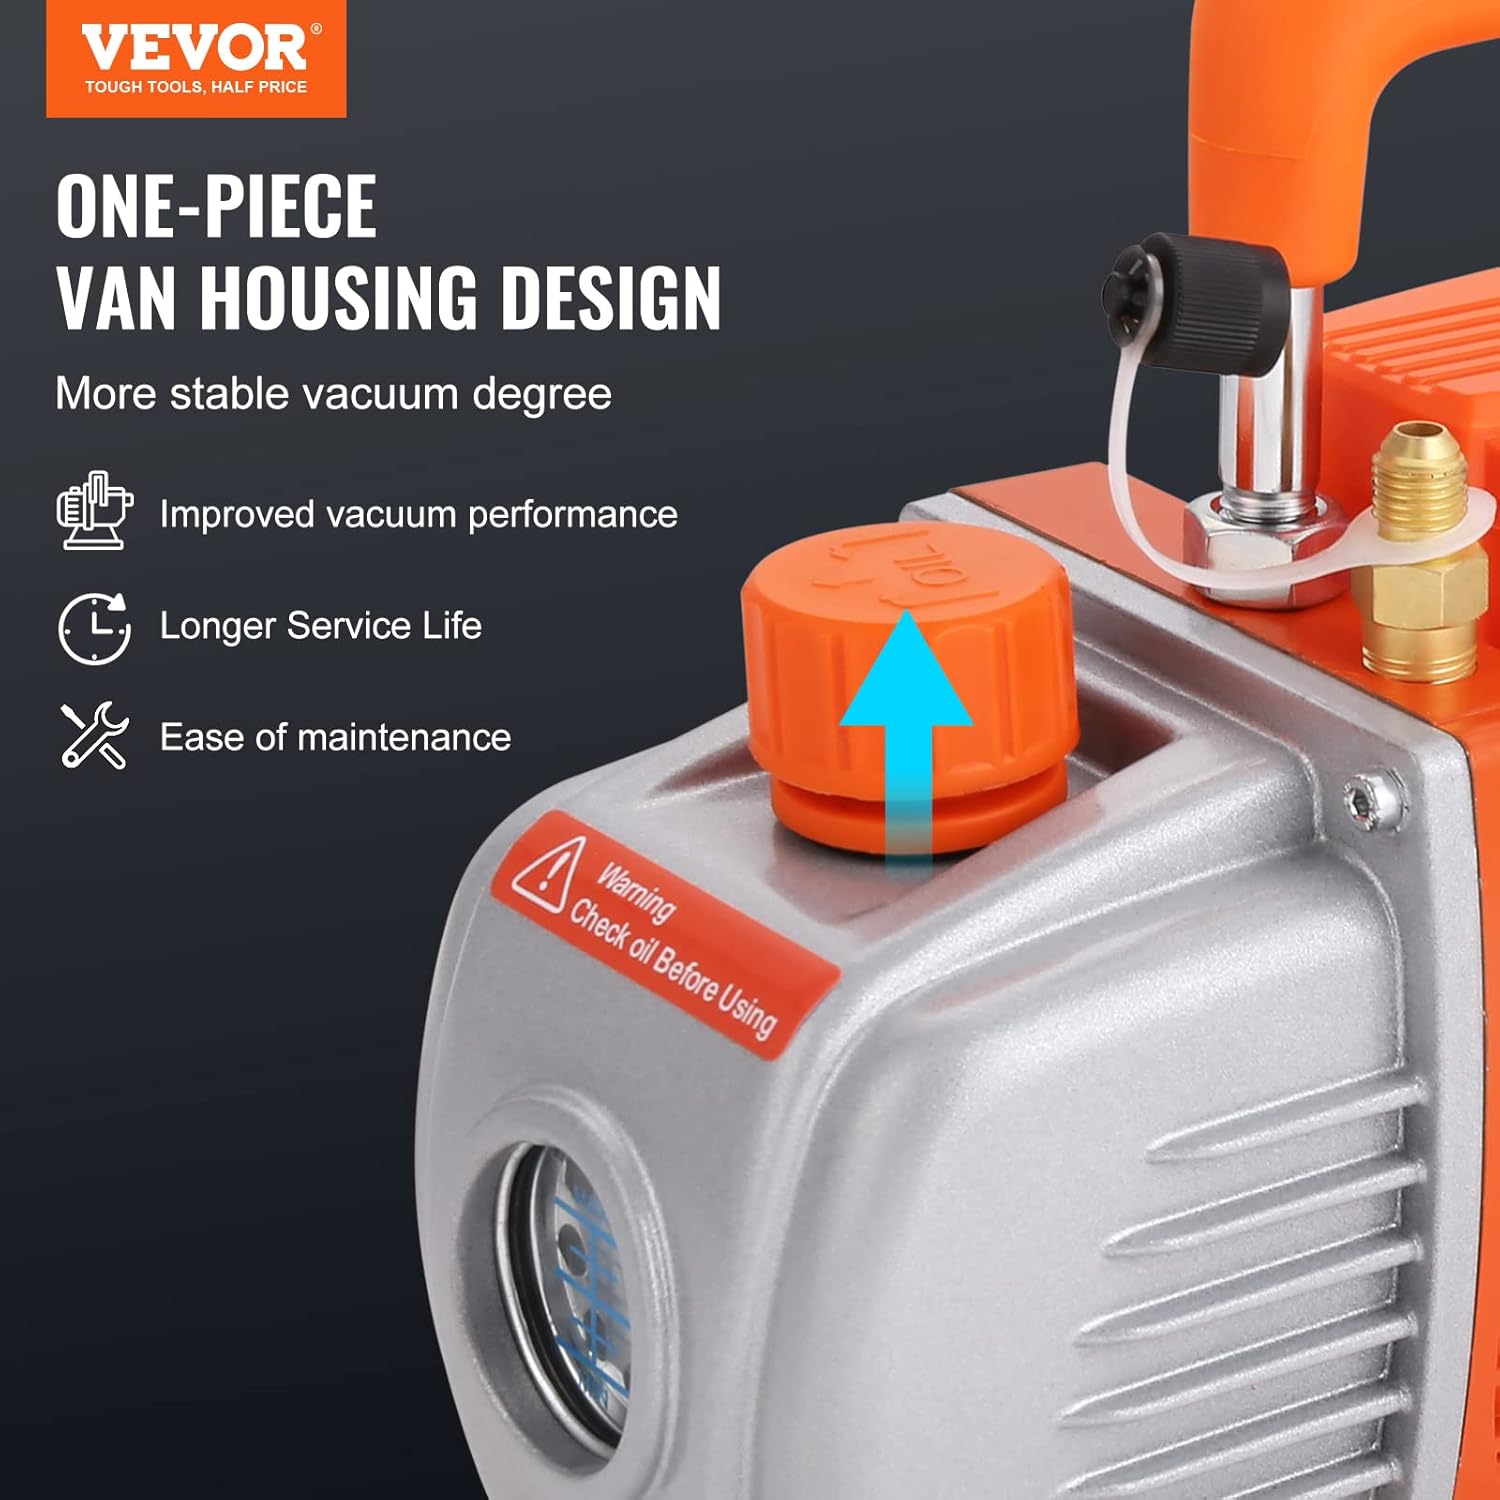
Figure 3: Location of the oil fill cap on the vacuum pump.
3. Connecting the Manifold Gauge and Hoses
- Connect the red hose to the high-pressure side (HI) of the manifold gauge and the system's high-pressure service port.
- Connect the blue hose to the low-pressure side (LO) of the manifold gauge and the system's low-pressure service port.
- Connect the yellow hose to the central service port of the manifold gauge and the vacuum pump's inlet. Use appropriate adapters (R134a or R410a) if necessary.
- Pastikan semua sambungan rapat untuk mengelakkan kebocoran.

Figure 4: Manifold gauge and hoses connected.
Arahan Operasi
1. Preparing for Evacuation
- Pastikan pam vakum diletakkan di atas permukaan yang stabil dan rata.
- Confirm the oil level is correct in the pump's sight glass.
- Connect the manifold gauge and hoses to the HVAC system and the vacuum pump as described in the Setup section.
- Open both the high-pressure (red) and low-pressure (blue) valves on the manifold gauge.
2. Prosedur Pemindahan
- Plug the vacuum pump into a suitable electrical outlet.
- Turn on the vacuum pump. The pump will begin to draw a vacuum on the HVAC system.
- Monitor the manifold gauge. The pressure should drop steadily. Continue pumping until the desired vacuum level is reached (typically below 500 microns for HVAC systems).
- Once the desired vacuum is achieved, close both the high-pressure (red) and low-pressure (blue) valves on the manifold gauge.
- Matikan pam vakum.
- Observe the manifold gauge for a period (e.g., 15-30 minutes) to ensure the vacuum holds, indicating no leaks in the system.
3. Disconnecting the Pump
- After confirming the vacuum holds, slowly open the manifold gauge's central service port (yellow hose connection) to release the vacuum from the hose connected to the pump.
- Disconnect the yellow hose from the vacuum pump.
- Proceed with charging the HVAC system as required.
Penyelenggaraan
1. Memeriksa Paras Minyak
Regularly check the oil level using the oil sight glass. The oil level should always be between the MIN and MAX marks. If the oil appears cloudy or discolored, it indicates contamination and should be changed immediately.

Figure 5: Oil sight glass for monitoring oil level.
2. Changing Vacuum Pump Oil
Vacuum pump oil should be changed after every 10-20 hours of operation or if it appears contaminated. Contaminated oil reduces pump efficiency and lifespan.
- Ensure the pump is off and unplugged.
- Letakkan bekas yang sesuai di bawah palam saliran minyak.
- Remove the oil drain plug and the oil fill cap to allow the old oil to drain completely.
- Pasang semula palam saliran minyak.
- Refill with new VEVOR vacuum pump oil through the oil fill port until the level is between MIN and MAX on the sight glass.
- Lupuskan minyak terpakai secara bertanggungjawab mengikut peraturan tempatan.
3. Pembersihan
Pastikan bahagian luar pam bersih dan bebas daripada habuk dan serpihan. Gunakan iklanamp cloth for cleaning. Do not use harsh chemicals or solvents.
Menyelesaikan masalah
| Masalah | Kemungkinan Punca | Penyelesaian |
|---|---|---|
| Pam tidak bermula | Tiada bekalan kuasa Faulty power cord/switch | Periksa sambungan kuasa dan alur keluar Inspect power cord and switch for damage |
| Pump runs but no vacuum is pulled | Leaky connections Minyak tidak mencukupi Minyak tercemar Pump inlet blocked | Check all hose and system connections for leaks Tambah minyak ke paras yang betul Tukar minyak pam vakum Inspect pump inlet for obstructions |
| Prestasi vakum yang lemah | Minyak tercemar Air leak in system/hoses Worn pump components | Tukar minyak pam vakum Check all connections and system for leaks Contact VEVOR support for service |
| Bunyi atau getaran yang berlebihan | Paras minyak rendah Motor/galas yang rosak Komponen longgar | Periksa dan masukkan minyak Contact VEVOR support Tighten any loose screws or fittings |
| Oil mist from exhaust | Minyak yang terlebih isi Minyak tercemar | Toskan lebihan minyak Tukar minyak pam vakum |
Waranti dan Sokongan Pelanggan
VEVOR products are designed for durability and performance. For warranty information, technical support, or any questions regarding your VEVOR 100 L/min HVAC Vacuum Pump, please visit the official VEVOR support webtapak.
Sokongan Rasmi Webtapak: www.vevor.com/support
Please have your model number (TW-1K) and ASIN (B0CB3X3XHD) ready when contacting support for faster assistance.


