1. Produk Lebihview
The Yaheetech Nightstand with 3 Drawers and Charging Station is designed to provide convenient storage and power access for your bedroom or living space. It features three spacious drawers for organized storage and an integrated charging station with two power outlets and two USB ports, allowing you to charge electronic devices easily.

Rajah 1.1: Assembled Yaheetech Nightstand. This image shows the complete nightstand with its three drawers and the integrated charging station on top.

Rajah 1.2: Yaheetech Nightstand positioned next to a sofa, demonstrating its use as a side table with a lamp and charging devices.
2. Kandungan Pakej
Before assembly, please verify that all components and hardware listed below are present and undamaged. Refer to the installation video for a visual guide to identifying each part.

Rajah 2.1: All parts and hardware laid out for assembly. This image displays the various wooden panels, drawer slides, and fasteners included in the package.
Senarai bahagian:
- Panel Atas
- Panel Sisi (2)
- Panel Bawah
- Kembali Panel
- Hadapan Laci (3)
- Panel Sisi Laci (6)
- Panel Belakang Laci (3)
- Panel Bawah Laci (3)
- Kaki (4)
- Unit Stesen Pengecasan
Senarai perkakasan:
- Skru (pelbagai saiz)
- Dowel Kayu
- Cam Locks and Cam Bolts
- Slaid Laci (6 pasang)
- Drawer Pulls (3)
- Klip Kord Kuasa
- Allen Wrench (if applicable)
3. Arahan Keselamatan
- Sentiasa pasang produk di atas permukaan yang lembut dan bersih untuk mengelakkan calar.
- Pastikan semua skru dan pengikat diketatkan dengan kukuh sebelum digunakan. Periksa secara berkala dan ketatkan semula jika perlu.
- Do not exceed the maximum recommended load capacity of 106 pounds for the top surface.
- Jauhkan bahagian kecil dan perkakasan daripada kanak-kanak untuk mengelakkan bahaya tercekik.
- For electrical safety, do not overload the power outlets or USB ports. Ensure the power cord is not pinched or damaged.
- Do not expose the nightstand to excessive moisture or direct sunlight.
- Use only the provided hardware for assembly. Substituting parts may compromise stability and safety.
4. Arahan Perhimpunan
Follow these steps carefully for proper assembly. It is recommended to have two people for certain steps to ensure stability and ease of construction. An installation video is provided below for visual guidance.
Video 4.1: Installation video for the Yaheetech Nightstand. This video provides a step-by-step visual guide to assembling the nightstand, including attaching drawer slides, constructing the frame, and installing the charging station.
Panduan Langkah demi Langkah:
- Pasang Laci:
- Attach the drawer side panels to the drawer front and back panels using the provided screws and dowels.
- Slide the drawer bottom panel into the grooves.
- Secure the drawer pulls to the drawer fronts.
- Attach the drawer slides (H-2(L) and H-2(R)) to the sides of each drawer using screws.
- Pasang Kerangka Utama:
- Attach the side panels to the bottom panel using cam locks and cam bolts.
- Lindungi panel belakang pada bingkai yang dipasang.
- Attach the main drawer slides (H-1(L) and H-1(R)) to the inner sides of the main frame using screws. Ensure they are aligned correctly for smooth drawer operation.
- Pasang Kaki:
- Insert the wooden dowels into the designated holes on the bottom panel.
- Attach the four solid rubberwood legs to the bottom panel, aligning them with the dowels and securing them with screws.

Rajah 4.1: This image highlights the robust construction of the solid rubberwood legs, emphasizing their strength and stability compared to MDF legs.
- Pasang Panel Atas:
- Place the top panel onto the assembled frame, aligning the pre-drilled holes.
- Secure the top panel using screws.
- Pasang Stesen Pengecasan:
- Carefully feed the power cord of the charging station through the cutout on the top panel.
- Insert the charging station unit into the opening on the top panel.
- Secure the charging station with the provided screws.

Rajah 4.2: Terperinci view of the charging station, showing 2 AC outlets (125V/12A), 2 USB ports (5V/2A), a power switch, and the 6.5-foot power cord with a hook & loop strap for management.
- Sisipkan Laci:
- Carefully slide each assembled drawer into the corresponding drawer slides on the main frame.
- Ensure smooth operation. If a drawer is stiff, check alignment of the slides.

Rajah 4.3: jarak dekat view illustrating the smooth operation of the drawer slides, designed for quiet and effortless opening and closing.
5. Arahan Pengendalian (Stesen Pengecasan)
Stesen pengecasan bersepadu menyediakan akses kuasa yang mudah untuk peranti elektronik anda.
- Sambungan Kuasa: Plug the 6.5-foot power cord into a standard 120V AC wall outlet.
- Cawangan AC: The charging station includes two 125V/12A AC outlets. Use these for devices requiring standard wall power, such as lamps, komputer riba atau peralatan kecil.
- Port USB: Two 5V/2A USB ports are available for charging smartphones, tablets, and other USB-powered devices.
- Suis kuasa: A master power switch controls the flow of electricity to both the AC outlets and USB ports. Press the switch to turn the charging station ON or OFF.
- Pengurusan Kord: Use the included hook & loop strap to manage excess power cord length and keep your space tidy.
Penting: Do not exceed the maximum electrical load capacity of the charging station. Avoid plugging in high-power appliances that may draw more than 12A. If the charging station trips a circuit breaker, unplug devices and reset the breaker before resuming use.
6. Penyelenggaraan dan Penjagaan
Penjagaan yang betul akan membantu mengekalkan penampilan dan ketahanan meja sisi katil anda.
- Pembersihan: Lap permukaan dengan lembut, damp kain. Untuk kesan degil, gunakan pembersih yang lembut dan tidak kasar. Keringkan segera dengan kain bersih.
- Tumpahan: The nightstand features a water-resistant painting. Promptly wipe up any spills to prevent damage to the finish.
- Elakkan Bahan Kimia Keras: Do not use abrasive cleaners, ammonia-based products, or silicone-based polishes, as these can damage the finish.
- Slaid Laci: Periksa slaid laci secara berkala untuk operasi lancar. Jika ia menjadi kaku, sedikit pelincir silikon boleh digunakan.
- Pengikat: Regularly check all screws and bolts to ensure they remain tight. Re-tighten as needed to maintain structural integrity.

Rajah 6.1: Demonstrates wiping water droplets from the nightstand surface, highlighting its easy-to-clean and water-resistant properties.
7. Penyelesaian masalah
If you encounter any issues with your Yaheetech Nightstand, refer to the following common problems and solutions:
| Masalah | Kemungkinan Punca | Penyelesaian |
|---|---|---|
| Laci tidak meluncur dengan lancar. | Slaid laci tidak sejajar atau skru longgar. | Check the alignment of the drawer slides on both the drawer and the main frame. Tighten all screws securing the slides. Apply a small amount of silicone lubricant if needed. |
| Charging station not powering devices. | Power cord not plugged in, power switch off, or circuit overload. | Ensure the power cord is securely plugged into a working wall outlet. Check if the power switch on the charging station is ON. Unplug some devices if overloaded and check your household circuit breaker. |
| Meja sisi katil terasa goyah. | Pengikat longgar atau lantai tidak rata. | Tighten all assembly screws and bolts. Ensure the nightstand is placed on a level surface. If necessary, use furniture pads under the legs to stabilize. |
8. Spesifikasi
- Dimensi Produk: 15.75 x 15.75 x 23.62 inci (L x P x H)
- Berat Barang: 27.2 paun
- Muatan Maksimum Disyorkan: 106 pounds (top surface)
- Drawer Storage Space: 10 x 11.3 x 4 inci (W x D x H)
- Bahan: CARB P2 MDF board, Solid Rubberwood legs
- Stesen Pengecasan:
- Saluran Keluar AC: 2 (125V/12A)
- Port USB: 2 (5V/2A)
- Panjang Kord Kuasa: 6.5 kaki
- Perhimpunan Diperlukan: ya
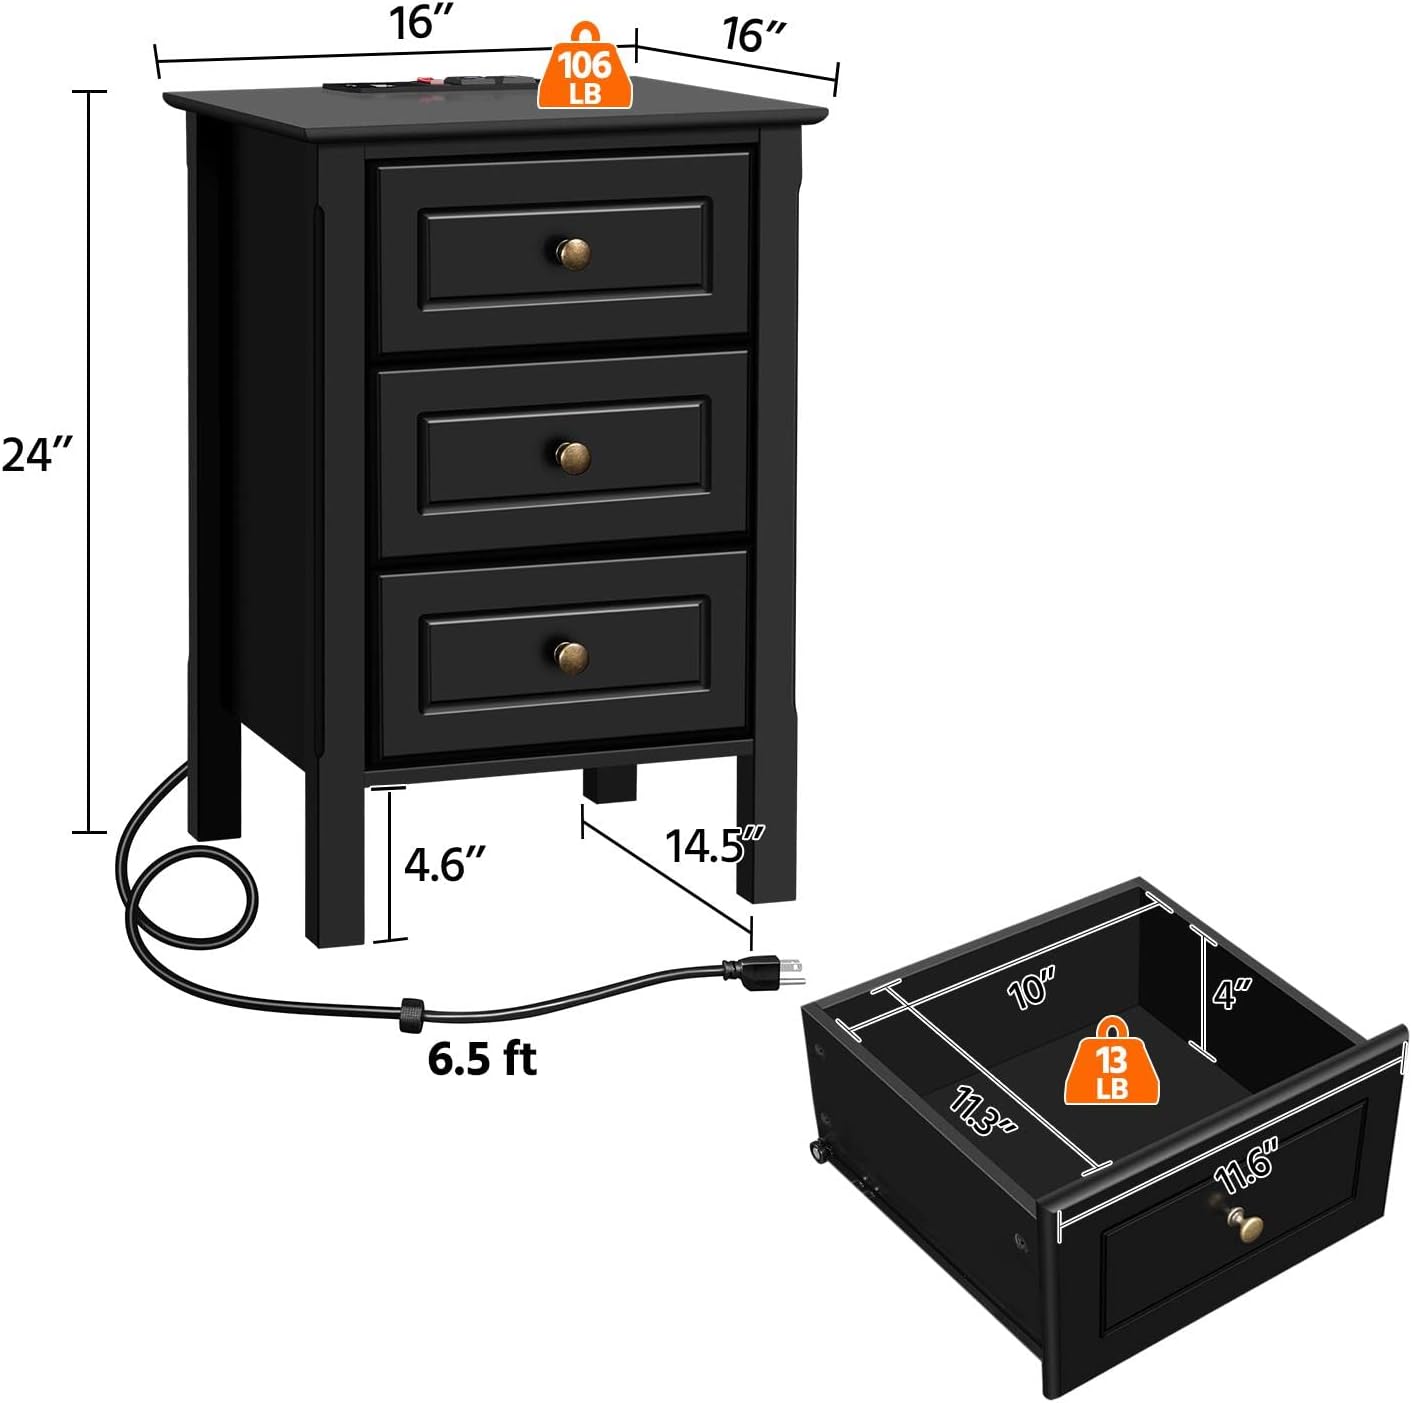
Rajah 8.1: Diagram illustrating the overall dimensions of the nightstand (16" W x 16" D x 24" H) and the internal dimensions of a drawer (10" W x 11.3" D x 4" H), along with weight capacities.
9. Waranti dan Sokongan
For warranty information, technical support, or any questions regarding your Yaheetech Nightstand, please contact Yaheetech customer service. Refer to the product packaging or the official Yaheetech weblaman web untuk maklumat hubungan.
Pengeluar: Yaheetech


