pengenalan
Thank you for choosing the Epson EB-L210SF projector. This manual provides essential information for the safe and efficient use of your projector. Please read it thoroughly before operating the device and keep it for future reference.
The Epson EB-L210SF is a 3LCD Full-HD projector designed for clear and vibrant image projection. It features a laser light source for long-lasting performance.
Maklumat Keselamatan Penting
- Keselamatan Laser: Do not look directly into the projector lens when the laser light source is active. Avoid direct eye exposure to the laser beam.
- Pengudaraan: Ensure adequate ventilation around the projector. Do not block ventilation openings. Overheating can cause damage.
- Sumber Kuasa: Gunakan hanya bekalan kuasa yang dinyatakan untuk projektor ini.
- Pengendalian: Kendalikan projektor dengan berhati-hati. Elakkan daripada menjatuhkan atau mendedahkannya kepada hentaman yang kuat.
- Pembersihan: Putuskan sambungan kord kuasa sebelum membersihkan. Gunakan kain lembut dan kering. Jangan gunakan cecair atau pembersih aerosol.
Persediaan
1. Membongkar dan Meletakkan
Carefully remove the projector and all accessories from the packaging. Place the projector on a stable, level surface. Ensure there is sufficient space around the projector for proper ventilation.

Rajah 1: Depan dan sisi view of the Epson EB-L210SF projector, showing the lens and ventilation grilles.
2. Kuasa Penyambung
- Connect the supplied power cord to the projector's AC inlet.
- Palamkan hujung kord kuasa yang lain ke dalam salur keluar elektrik yang dibumikan.
3. Menyambung Sumber Input
The projector supports various input sources. Connect your device (computer, Blu-ray player, etc.) to the appropriate port on the projector's rear panel.

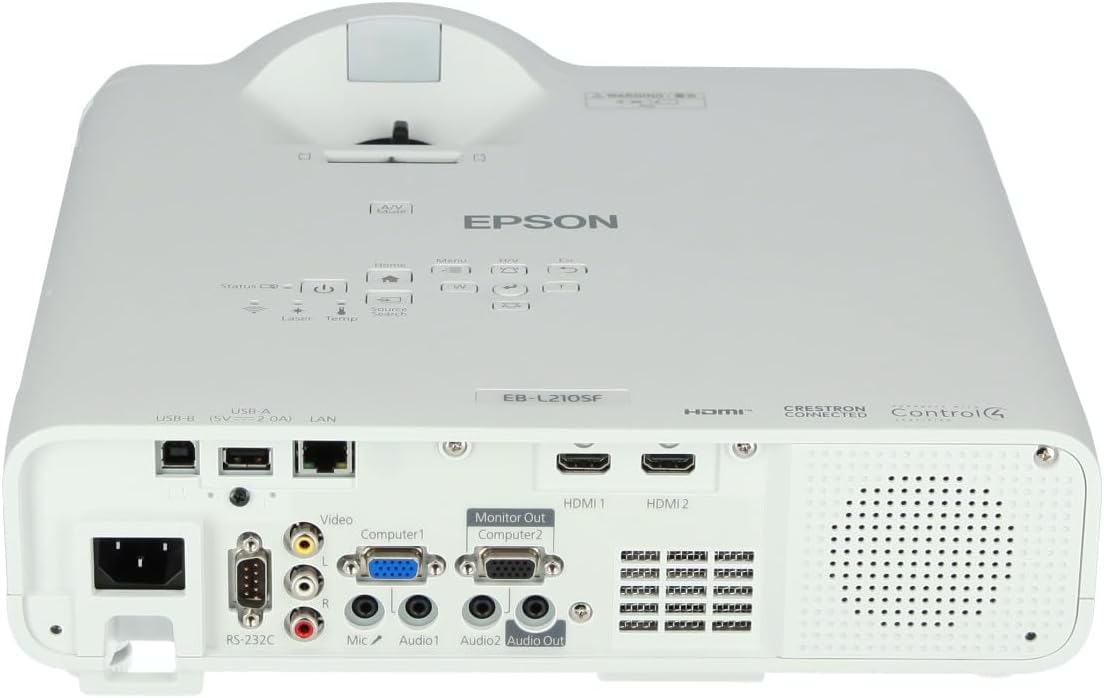
Figure 2: Rear panel of the projector, displaying various input and output ports including HDMI, Computer (VGA), Video, USB, and Audio connections.
- HDMI: Connect an HDMI cable from your device to one of the HDMI ports (HDMI 1 or HDMI 2).
- Komputer (VGA): Connect a VGA cable from your computer to the Computer 1 or Computer 2 port. For audio, connect a separate audio cable to Audio 1 or Audio 2.
- Video: Connect composite video and audio cables to the Video and Audio (R/L) ports.
- USB: Use the USB-A port for connecting USB storage devices or the USB-B port for display over USB.
- LAN: Connect an Ethernet cable for network control and monitoring.
4. Hidupkan Awal dan Pelarasan Imej
- Press the power button on the projector or remote control to turn on the device. The power indicator will illuminate.
- Laraskan cincin fokus around the lens until the image is sharp and clear.
- Gunakan tuil zum (if available) to adjust the image size.
- Jika imej kelihatan trapezoid, gunakan pembetulan batu kunci feature (manual or automatic) to square the image. Refer to the Operating section for details on menu navigation.
Mengendalikan Projektor
1. Panel Kawalan Selesaiview
The control panel on top of the projector allows access to various functions and settings.
Rajah 3: Atas view of the projector, highlighting the control panel with buttons for power, menu, source selection, and navigation.
- Butang Kuasa: Menghidupkan atau mematikan projektor.
- Source Search: Berkitar melalui sumber input yang tersedia.
- Butang Menu: Membuka menu paparan pada skrin (OSD).
- Navigation Buttons (Arrow keys): Digunakan untuk menavigasi melalui pilihan menu.
- Butang Masukkan: Mengesahkan pilihan dalam menu.
- Esc Button: Keluar dari menu semasa atau kembali ke skrin sebelumnya.
- Butang rumah: Accesses the home screen or quick settings.
- Redam A/V: Temporarily mutes audio and blanks the screen.
2. Selecting an Input Source
Tekan ke Pencarian Sumber button on the control panel or remote control to cycle through the connected input sources (e.g., HDMI 1, HDMI 2, Computer 1, Video). The projector will automatically detect and display the active source.
3. Adjusting Image and Audio Settings
Tekan ke Menu button to access the projector's on-screen display (OSD) menu. Use the navigation buttons to browse categories such as:
- Imej: Adjust brightness, contrast, color, tint, sharpness, and color temperature.
- Isyarat: Configure input signal settings, aspect ratio, and overscan.
- tetapan: General projector settings like language, display options, and power management.
- Audio: Adjust volume, mute, and audio input selection.
Pilih pilihan dan tekan Masuk to modify its value. Press Esc untuk keluar dari menu.
Penyelenggaraan
1. Membersihkan Projektor
- Luaran: Wipe the projector's exterior with a soft, dry, lint-free cloth. For stubborn dirt, dampen the cloth slightly with water, then wipe dry.
- Kanta: Lap kanta dengan lembut menggunakan kain pembersih kanta atau kertas kanta. Elakkan penggunaan bahan kasar atau daya yang berlebihan.
- Penapis Udara: Regularly check and clean the air filter to prevent dust buildup, which can affect performance and cause overheating. Refer to the projector's on-screen menu for filter maintenance reminders.
2. Sumber Cahaya Laser
The Epson EB-L210SF uses a laser light source, which offers a long operational life and does not require lamp replacement. No user maintenance is typically required for the laser light source itself.
Menyelesaikan masalah
Jika anda menghadapi masalah dengan projektor anda, rujuk kepada masalah dan penyelesaian biasa berikut:
| Masalah | Kemungkinan Punca / Penyelesaian |
|---|---|
| Tiada imej ditayangkan |
|
| Imej kabur atau tidak fokus |
|
| Image is distorted (trapezoidal) |
|
| Tiada bunyi |
|
| Projector is not wireless | The Epson EB-L210SF is not inherently a wireless projector. Wireless functionality typically requires an optional external wireless adapter, which is sold separately. Please consult Epson's official website or your retailer for compatible wireless adapters. |
| Overheating warning (Temp indicator) |
|
Spesifikasi
| Ciri | Perincian |
|---|---|
| Nombor Model | V11HA75080 |
| Resolusi Paparan | 1920 x 1080 (HD Penuh) |
| Teknologi Ketersambungan | HDMI, VGA, USB, LAN |
| Dimensi Produk | 11.81 x 11.81 x 11.81 inci |
| Berat Barang | 10.14 paun |
| Sumber Cahaya | Laser |
| Pengeluar | Epson |
| Penggunaan yang Disyorkan | Pemantauan |
| Ciri Khas | Ringan |
| Bateri Diperlukan | 1 AAAA (for remote control, not included with projector unit) |
| Tarikh Mula-mula Tersedia | 14 November 2023 |
Waranti dan Sokongan
For detailed warranty information, please refer to the warranty card included with your product or visit the official Epson webtapak. Terma dan syarat waranti mungkin berbeza mengikut wilayah.
Untuk sokongan teknikal, pendaftaran produk atau untuk memuat turun pemacu dan perisian terkini, sila lawati sokongan rasmi Epson. website or contact Epson customer service in your region. Contact information can typically be found on the Epson webtapak.


