pengenalan
Thank you for choosing the Weiser Elements Keyless Entry Deadbolt. This manual provides detailed instructions for the installation, operation, and maintenance of your new electronic door lock. Please read this manual thoroughly before installation and keep it for future reference to ensure optimal performance and security.
Ciri-ciri Produk
- Kemasukan Tanpa Kunci yang Mudah: Easily lock and unlock your door using the keypad without needing physical keys.
- Pengurusan Kod Mudah: Customize up to 12 user codes, 2 one-time user codes, and 1 programming code for flexible access control.
- Fungsi Auto Lock: Enhance security with customizable automatic locking intervals (30 sec, 1 min, 3 min, 5 min, or 10 min).
- Amaran Pencerobohan: An alarm sounds and the keypad disables for 1 minute after 3 consecutive incorrect code entries to deter tampering.
- Easy Low Light Code Entry: Bright LED lights illuminate the keypad for easy code entry in the dark.
Apa yang ada dalam Kotak
Before beginning installation, please verify that all components are present:

Image: All components included in the product packaging, laid out for inspection.
- Perhimpunan Deadbolt Luaran
- Perhimpunan Deadbolt Dalaman
- Selak Boleh Laras
- Pukulan Pukulan
- Plat Pemasangan
- Perkakasan Pemasangan (skru, bolt)
- 1 Weiser Key
- Panduan Pemasangan (dokumen berasingan)
Spesifikasi

Image: Detailed dimensions of the exterior keypad and interior unit, along with the adjustable latch backset.
| Ciri | Penerangan |
|---|---|
| Jenama | Weiser |
| Jenis Kunci | Papan Kekunci Deadbolt |
| bahan | Plastik, Logam |
| Jenis Selesai | Disikat |
| warna | Satin Nickel |
| Ciri Khas | BHMA/ANSI Grade 3, Vacation Mode, Light Up Keypad, Auto-Lock, Motorized Locking |
| Dimensi Item (L x W x H) | 25 x 71 x 117 milimeter |
| Penggunaan yang Disyorkan | Front, Back, Side, Office, Garage, Shed Doors |
Persediaan dan Pemasangan
For detailed step-by-step installation instructions, please refer to the dedicated Panduan Pemasangan included in your product packaging. This section provides a general overview dan pertimbangan penting.
Pemeriksaan Prapemasangan:
- Ensure your door thickness is compatible with the lock.
- Verify the backset measurement (distance from door edge to center of bore hole) is 2 3/8" or 2 3/4". The adjustable latch can accommodate both.
- Gather necessary tools: Phillips head screwdriver, tape measure, pencil.
Langkah Pemasangan Umum:
- Install the latch into the door edge.
- Pasang pemasangan papan kekunci luaran.
- Pasang plat pelekap dalaman.
- Sambungkan kabel dari pemasangan luaran ke pemasangan dalaman.
- Secure the interior assembly to the mounting plate.
- Install batteries (4 AA alkaline batteries, not included).
- Perform the door handing process (automatic or manual, as per the Installation Guide).
Arahan Operasi
Kemasukan Tanpa Kunci

Image: A person entering a code on the keypad to unlock the door, demonstrating the convenience of keyless entry.
To unlock the door, enter your valid 4-8 digit user code on the keypad. The lock will retract the deadbolt. To lock the door, press the lock button on the keypad or use the thumb turn on the interior side.
Pengurusan Kod
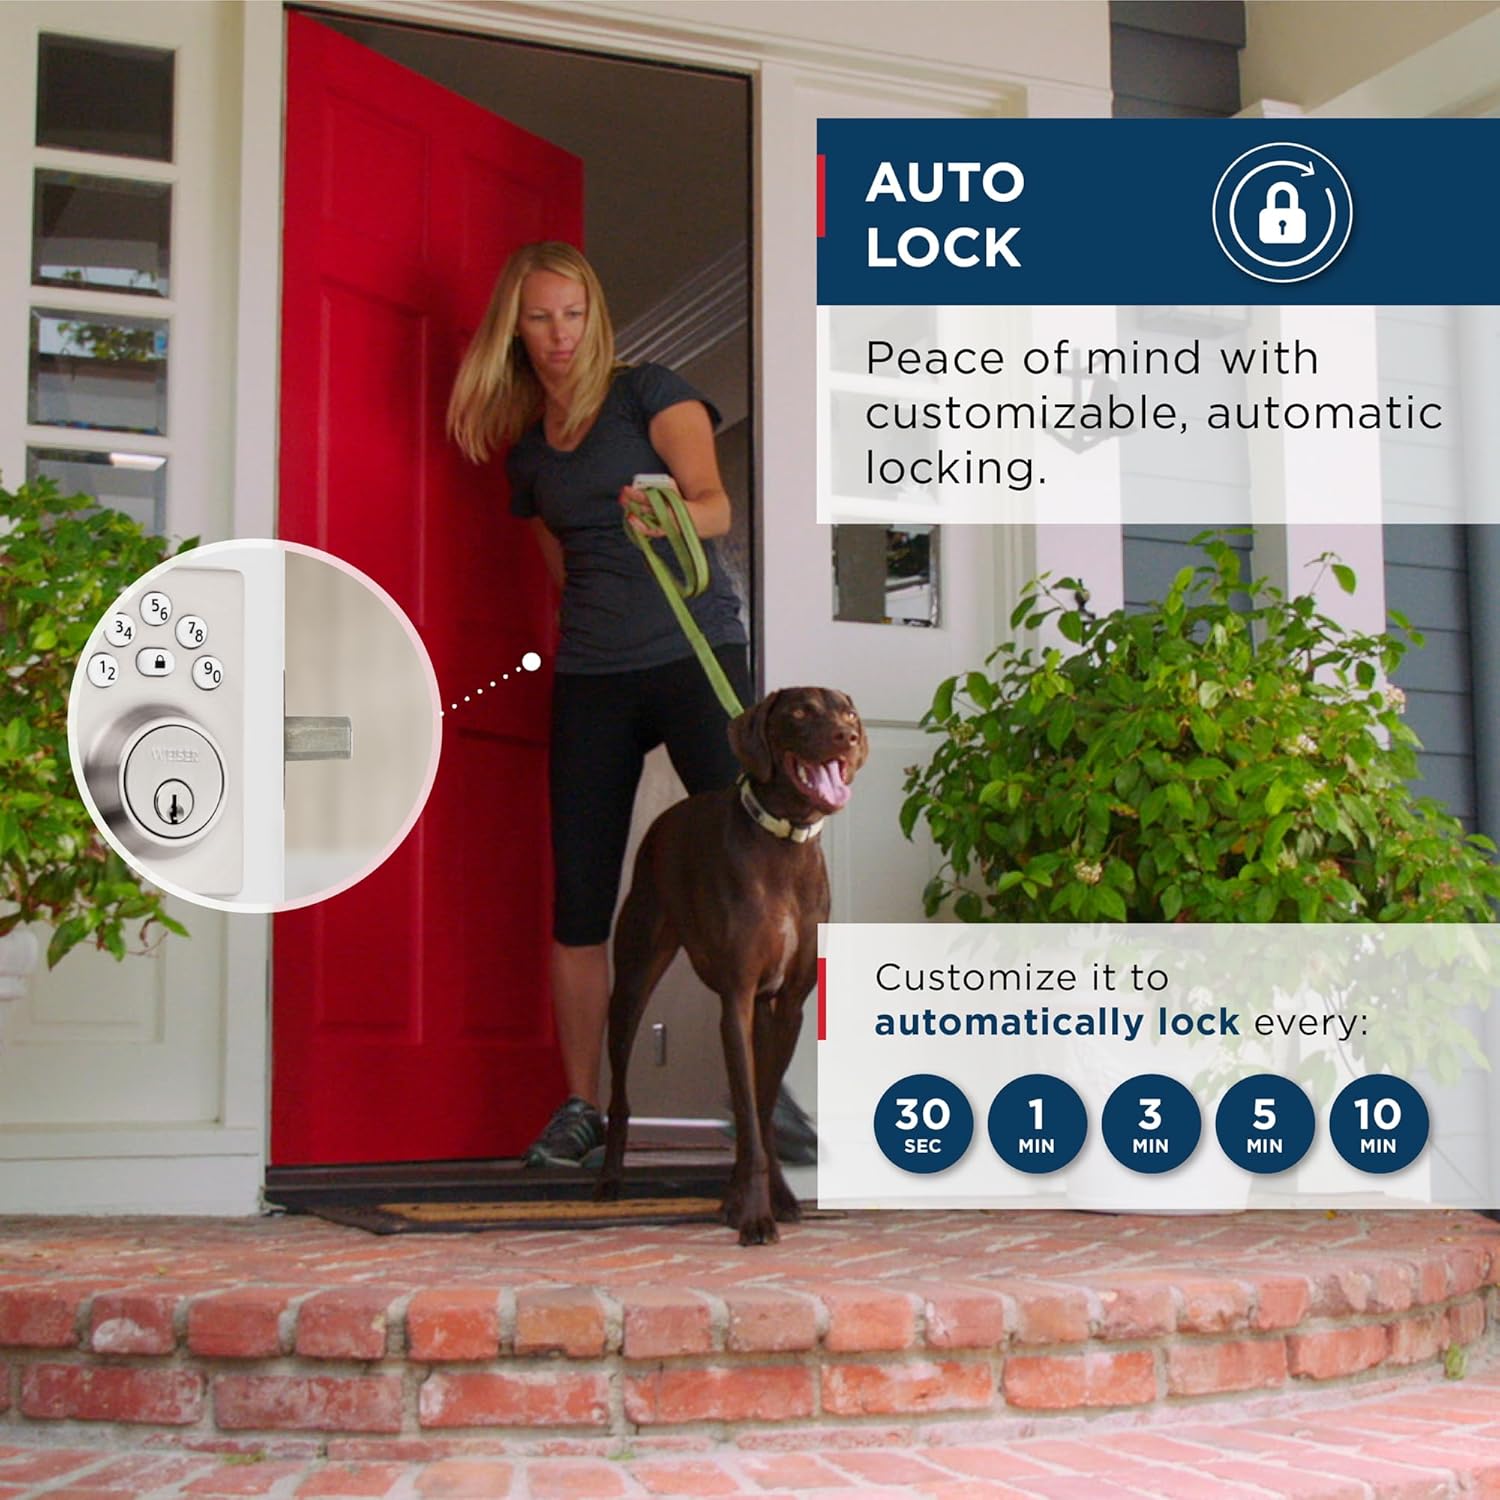
Image: Visual representation of the lock's capacity for 12 regular user codes and 2 one-time user codes.
Your lock supports up to 12 unique user codes and 2 one-time user codes. A programming code is used to add, delete, or modify these user codes. Refer to your Installation Guide for specific steps on programming codes.
Ciri Kunci Auto

Image: A graphic showing the customizable auto-lock intervals: 30 seconds, 1 minute, 3 minutes, 5 minutes, and 10 minutes.
The auto-lock feature automatically locks the deadbolt after a set period of time. You can customize this delay to 30 seconds, 1 minute, 3 minutes, 5 minutes, or 10 minutes. This feature provides added peace of mind, ensuring your door is always secured.
Low Light Code Entry

Image: The keypad of the lock glowing in a dark setting, highlighting the LED illumination feature for night use.
The keypad features bright LED backlighting. Simply tap the keypad to illuminate the numbers, making it easy to enter your code even in complete darkness.
Penyelenggaraan
To ensure the longevity and proper functioning of your Weiser Elements Keyless Entry Deadbolt, follow these maintenance guidelines:
- Penggantian Bateri: The lock requires 4 AA alkaline batteries. Replace all four batteries simultaneously when the low battery indicator appears (usually a series of beeps or a flashing light). Do not mix old and new batteries or different battery types.
- Pembersihan: Clean the keypad and exterior components with a soft, damp kain. Elakkan menggunakan pembersih yang kasar, pelarut atau semburan kimia, kerana ini boleh merosakkan kemasan dan komponen elektronik.
- Pelinciran: Periodically lubricate the latch and deadbolt mechanism with a silicone-based lubricant to ensure smooth operation. Do not use oil-based lubricants.
Menyelesaikan masalah
This section addresses common issues you might encounter with your Weiser Elements Keyless Entry Deadbolt.
Makluman Pencerobohan
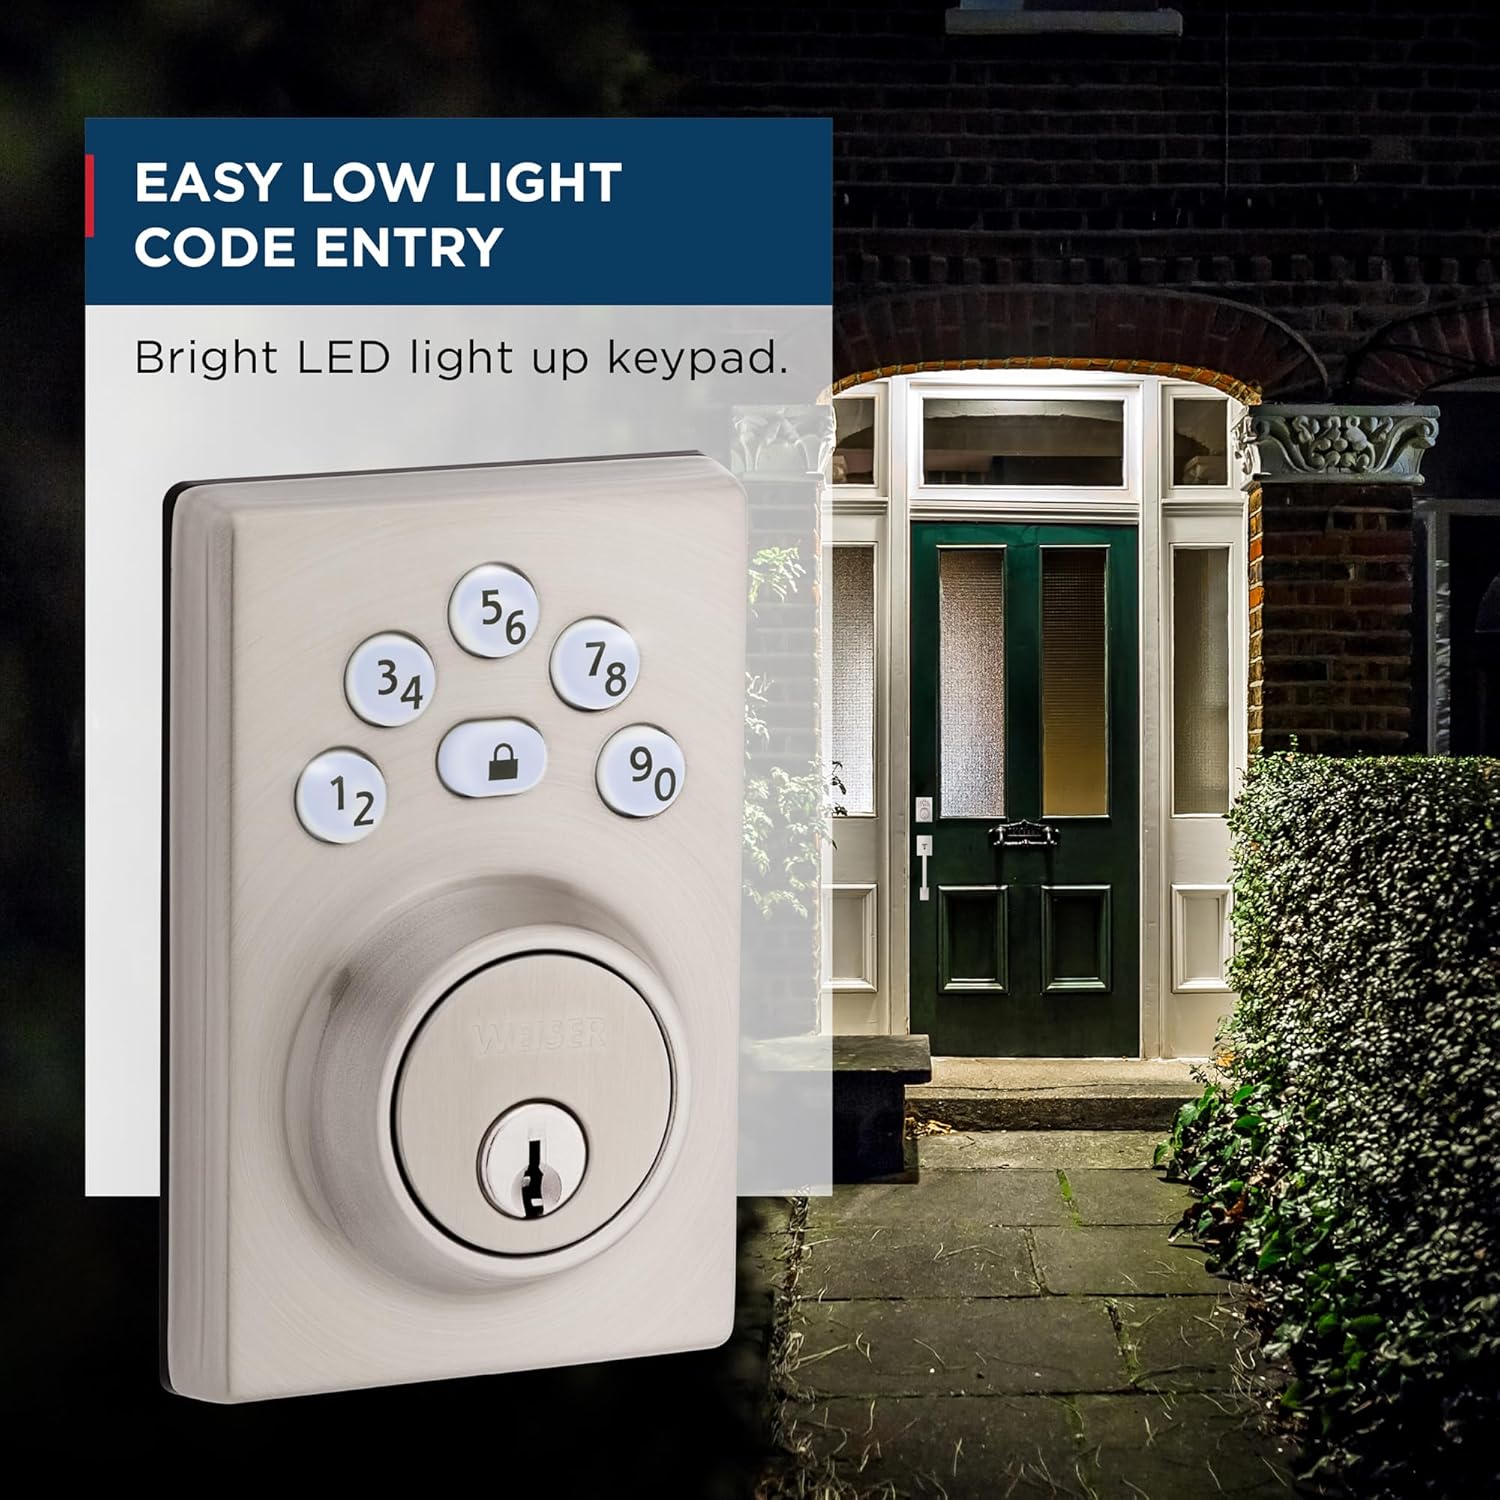
Image: A visual explanation of the intrusion alert system, showing the keypad flashing red and sounding beeps after three incorrect code attempts.
If 3 consecutive incorrect user codes are entered, the lock will sound an alarm and disable the keypad for 1 minute. This is a security feature to prevent unauthorized access. Wait for the 1-minute lockout period to expire before attempting to enter a valid code again.
Isu dan Penyelesaian Biasa:
- Kunci tidak bertindak balas kepada pad kekunci:
- Check batteries and replace if low.
- Ensure the cable connection between the exterior and interior assemblies is secure.
- Verify the programming code and user codes are correct.
- Deadbolt does not extend/retract fully:
- Check for any obstructions in the door frame or strike plate.
- Ensure the latch and deadbolt are properly aligned with the strike plate.
- Verify the door handing process was completed correctly during installation.
- Penunjuk bateri rendah:
- Replace all four AA alkaline batteries immediately.
If you continue to experience issues, please refer to the comprehensive troubleshooting section in your Installation Guide or contact Weiser customer support.
Waranti dan Sokongan
Weiser products are designed for durability and reliability. For information regarding your product's warranty, please refer to the warranty card included in your product packaging or visit the official Weiser webtapak. Simpan bukti pembelian anda untuk tuntutan waranti.
For technical support, replacement parts, or further assistance, please contact Weiser Customer Service. Contact information can typically be found on the Weiser webtapak atau dalam dokumentasi produk anda.


