1. Pengenalan
This manual provides essential information for the safe and efficient operation of your Acekool Portable Air Conditioner. This 3-in-1 unit offers cooling, fan, and dehumidification functions, designed to provide comfort in various indoor environments. Please read this manual thoroughly before installation and use, and retain it for future reference.
2. Maklumat Keselamatan
Untuk mengelakkan kecederaan pada pengguna atau orang lain dan kerosakan harta benda, arahan berikut mesti dipatuhi. Operasi yang salah kerana mengabaikan arahan boleh menyebabkan bahaya atau kerosakan.
- Keselamatan Elektrik: Ensure the power supply matches the unit's requirements (220 Volts). Do not operate with a damaged power cord or plug. Do not share the electrical outlet with other appliances. Always unplug the unit before cleaning or servicing.
- Bahan Penyejuk (R290): This appliance contains R290 refrigerant, which is flammable. Keep the unit away from open flames, heat sources, and ignition sources. Do not puncture or burn the refrigerant circuit.
- penempatan: Place the unit on a flat, stable surface. Maintain a minimum distance of 20 cm from walls or other objects to ensure proper airflow. Do not block air inlets or outlets.
- Kanak-kanak dan Haiwan Kesayangan: Keep children and pets away from the unit. Do not allow children to play with the appliance or its controls.
- Saliran Air: Ensure proper drainage of condensed water, especially during dehumidification mode, to prevent water overflow and damage.
- Penyelenggaraan: Hanya lakukan penyelenggaraan seperti yang diterangkan dalam manual ini. Untuk pembaikan, hubungi kakitangan servis yang berkelayakan.
3. Apa yang ada di dalam Kotak
Carefully unpack the box and ensure all items are present and undamaged. If any items are missing or damaged, contact customer support.
- Portable Air Conditioner Unit (x1)
- Alat kawalan jauh (x1)
- Exhaust Hose (x1)
- Window Sealing Kit (x1)
- Drain Hose (x1)
- Manual Pengguna (x1)

Image: All components included in the product package, clearly labeled with numbers for identification.
4. Persediaan
Ikuti langkah ini untuk menyediakan penghawa dingin mudah alih anda untuk prestasi optimum.
4.1 Penempatan Unit
- Letakkan unit pada permukaan yang kukuh dan rata di dalam bilik yang dikehendaki.
- Ensure there is at least 20 cm of space around the unit for proper air circulation.
- Letakkan unit berhampiran tingkap atau pintu untuk pemasangan hos ekzos.
4.2 Pemasangan Hos Ekzos
- Attach the exhaust hose connector to the back of the air conditioner unit.
- Panjangkan hos ekzos dan pasangkan penyesuai kit tingkap ke hujung yang lain.
- Adjust the window sealing plate to fit your window opening. Secure it in place.
- Insert the window kit adapter into the opening of the window sealing plate.
- Ensure the exhaust hose is as straight and short as possible to maximize efficiency. Avoid kinks or sharp bends.

Image: Visual instructions demonstrating the process of connecting the exhaust hose to the unit and installing it in a window.

Imej: Terperinci view of the exhaust hose connection points, highlighting the ease of installation.
4.3 Sambungan Kuasa
Plug the power cord into a grounded electrical outlet (220V). Do not use extension cords or adapters.
5. Arahan Operasi
Your Acekool Portable Air Conditioner can be operated using the control panel on the unit or the included remote control.
5.1 Panel Kawalan Selesaiview
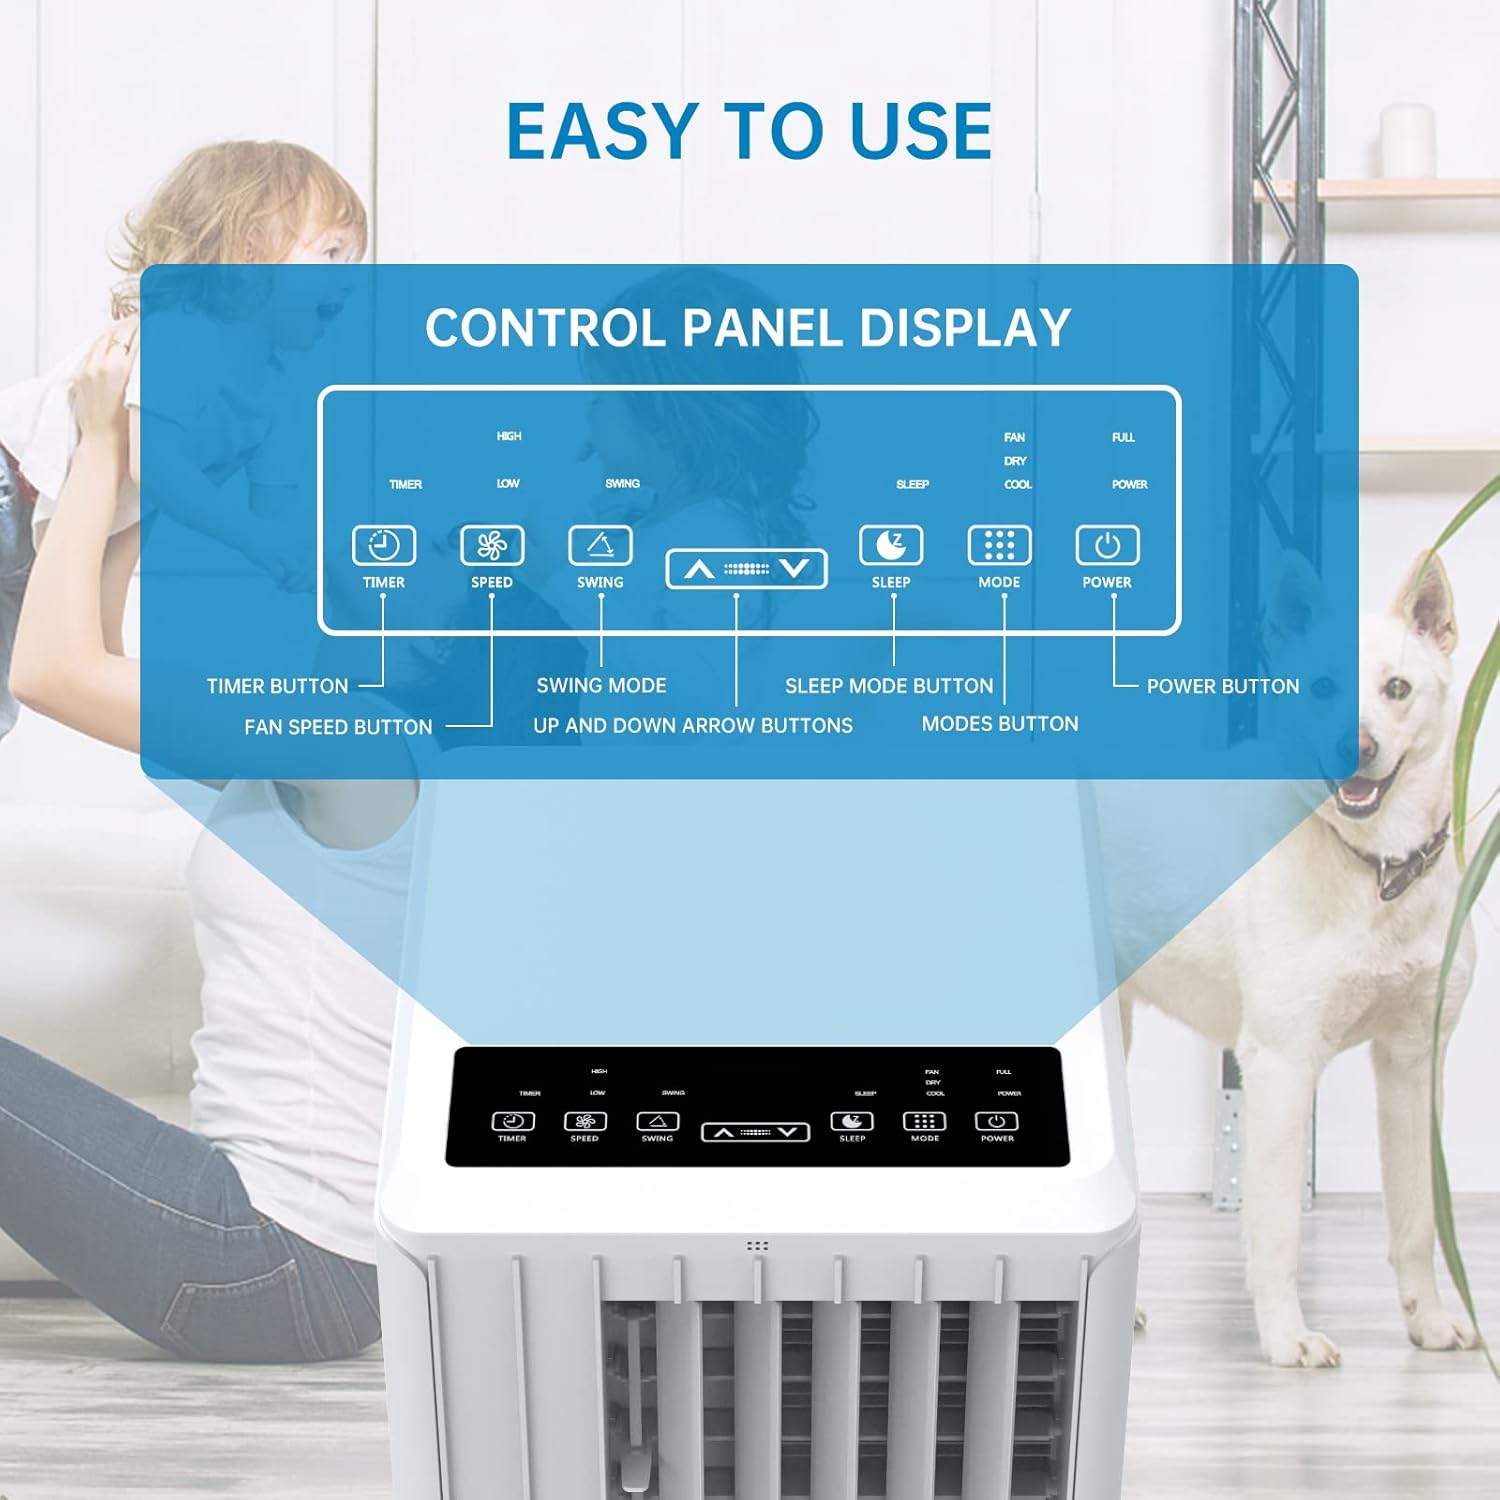
Image: A detailed diagram illustrating the control panel buttons and their functions, including Timer, Speed, Swing, Sleep, Mode, and Power.

Image: A user interacting with the touch-sensitive control panel, demonstrating its intuitive design.
- Butang Kuasa: HIDUPKAN atau MATI unit.
- Butang Mod: Cycles through Cooling, Fan, and Dehumidification modes.
- Butang Kelajuan: Melaraskan kelajuan kipas (Rendah, Sederhana, Tinggi).
- Butang Pemasa: Sets the auto ON/OFF timer (up to 24 hours).
- Butang Ayun: Aktifkan atau nyahaktifkan ayunan louver automatik untuk pengedaran udara yang lebih luas.
- Anak panah atas/bawah: Melaraskan tetapan suhu atau tempoh pemasa.
- Butang Tidur: Activates Sleep Mode for quiet operation and energy saving during sleep.
5.2 Alat Kawalan Jauh
The remote control provides convenient operation from a distance. Ensure there are no obstructions between the remote and the unit's receiver.

Image: The portable air conditioner unit alongside its remote control, demonstrating the convenience of remote operation and the air swing feature.
5.3 Mod Pengendalian
The unit offers three primary operating modes:

Image: A graphic illustrating the three distinct modes of operation: Cooling, Dehumidifying, and Fan, with their respective visual effects.
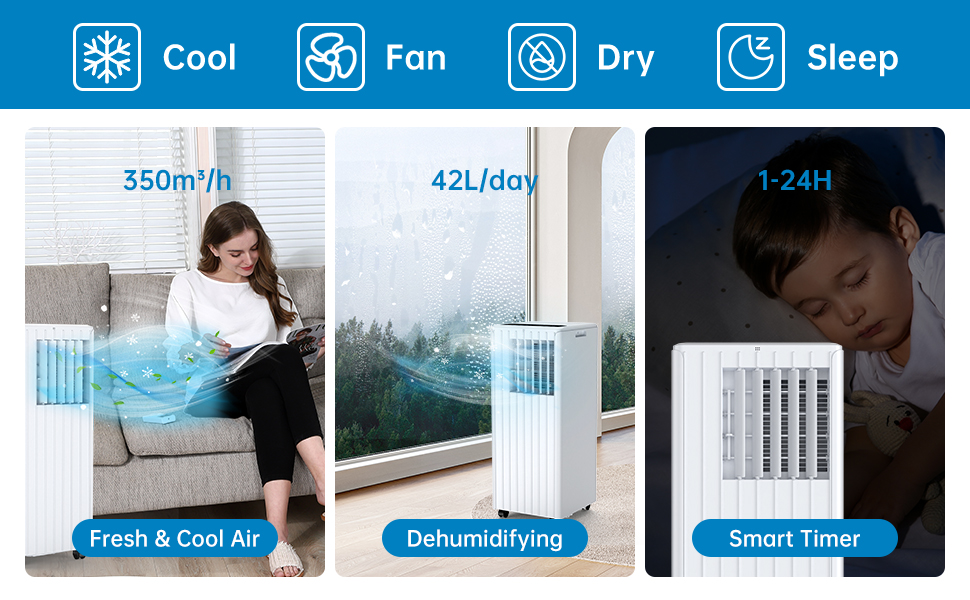
Image: A comprehensive display of the unit's modes, including cooling, fan, dry (dehumidifying), and sleep, along with performance metrics.
- Mod Penyejukan: Provides powerful cooling. Set your desired temperature using the Up/Down arrows. The unit will cool until the room reaches the set temperature.
- Mod Kipas: Circulates air without cooling. Choose from Low, Medium, or High fan speeds.
- Mod Penyahlembapan: Removes excess moisture from the air. The unit will operate at a low fan speed. Ensure the continuous drainage hose is connected for prolonged use in this mode.
5.4 Mod Tidur
Activate Sleep Mode for quiet operation and energy efficiency during nighttime. In this mode, the fan speed is reduced, and the temperature may gradually increase to ensure comfortable sleep.

Image: The portable air conditioner in a bedroom setting, illustrating its quiet operation and features like automatic shut-off and 24-hour smart timer for undisturbed sleep.

Image: A graph depicting the temperature adjustment curve in Sleep Mode, showing how the temperature gradually rises over several hours to maintain comfort.
6. Penyelenggaraan
Penyelenggaraan tetap memastikan jangka hayat dan operasi yang cekap penghawa dingin anda.
6.1 Pembersihan Penapis Udara
Penapis udara perlu dibersihkan setiap dua minggu atau lebih kerap bergantung pada penggunaan dan kualiti udara. Penapis yang kotor boleh mengurangkan kecekapan penyejukan dan aliran udara.
- Cabut palam unit daripada salur keluar kuasa.
- Cari dan keluarkan penapis udara dari bahagian belakang atau sisi unit.
- Basuh penapis di bawah air yang mengalir (suam, bukan panas) atau gunakan pembersih vakum untuk membuang habuk.
- Biarkan penapis kering sepenuhnya sebelum memasukkannya semula ke dalam unit. Jangan dedahkan kepada cahaya matahari langsung.

Imej: Dari dekat view of the washable filter being easily removed from the unit for maintenance.
6.2 Saliran Air
The unit has an internal water collection tank. When the tank is full, the unit will stop operating and display an indicator. You will need to drain the water manually.
- Cabut palam unit.
- Place a shallow pan or bucket under the drainage outlet at the bottom rear of the unit.
- Remove the drainage plug and allow the water to drain completely.
- Replace the drainage plug firmly.
For continuous drainage in dehumidification mode, connect the provided drain hose to the continuous drainage outlet.
6.3 Pembersihan Am
Lap bahagian luar unit dengan lembut, damp kain. Jangan gunakan bahan kimia yang keras, bahan pelelas atau pelarut.
6.4 Penyimpanan
Sebelum menyimpan unit untuk tempoh yang panjang:
- Toskan semua air pekat.
- Bersihkan penapis udara.
- Cabut palam kord kuasa dan gulungkannya dengan kemas.
- Simpan unit di tempat yang kering dan sejuk, jauh daripada cahaya matahari langsung dan suhu yang melampau.
7. Penyelesaian masalah
Jika anda menghadapi masalah dengan penghawa dingin anda, rujuk jadual di bawah untuk masalah dan penyelesaian biasa.
| Masalah | Kemungkinan Punca | Penyelesaian |
|---|---|---|
| Unit tidak dihidupkan | Tiada bekalan kuasa Tangki air penuh Perlindungan terlalu panas diaktifkan | Check power plug and outlet Toskan tangki air Biarkan unit sejuk selama 30 minit |
| Penyejukan yang tidak mencukupi | Penapis udara kotor Hos ekzos tersumbat atau bengkok Saiz bilik terlalu besar Tingkap/pintu terbuka Tetapan suhu terlalu tinggi | Penapis udara bersih Periksa dan bersihkan hos ekzos Pastikan unit sesuai dengan saiz bilik Tutup semua tingkap dan pintu Turunkan suhu yang ditetapkan |
| Kebocoran air | Palam longkang longgar Unit bukan aras Continuous drain hose improperly connected | Secure drain plug Letakkan unit pada permukaan yang rata Ensure drain hose is properly attached and sloped downwards |
| Unit bising | Unit bukan pada permukaan yang rata Komponen dalaman bergetar | Letakkan unit pada permukaan yang rata dan stabil This may be normal operation noise, especially at high fan speeds. Ensure no obstructions. |
| Alat kawalan jauh tidak berfungsi | Bateri mati atau salah dimasukkan Halangan antara alat kawalan jauh dan unit | Gantikan bateri, periksa polariti Remove any obstructions, ensure direct line of sight |
8. Spesifikasi
Technical specifications for the Acekool Portable Air Conditioner Model PAC-M09.
| Ciri | Spesifikasi |
|---|---|
| Nombor Model | PAC-M09 |
| Jenama | Acekool |
| Kapasiti Penyejukan | 9000 BTU |
| Bahan penyejuk | R290 |
| Bekalan Kuasa | 220 Volt |
| Tahap Kebisingan Maksimum | 55 dB(A) |
| Dimensi Produk (L x W x H) | 38.2 x 35 x 88.5 cm |
| Berat Produk | 26 kg |
| Kapasiti Dehumidifikasi | 42 L / Hari |
| Penilaian Kecekapan Tenaga | Kelas A |
| PENAMPAK | 2.8 |
| Kawasan Liputan yang Disyorkan | 30-40 m² |
9. Waranti dan Sokongan
For warranty information, technical support, or service inquiries, please refer to the warranty card included with your product or contact Acekool customer service through their official website or the retailer where the product was purchased. Please have your model number (PAC-M09) and purchase date ready when contacting support.


