1. Pengenalan
This manual provides detailed instructions for the installation, operation, and maintenance of your darkFlash Aquarius Mesh Computer Case. Please read this manual thoroughly before beginning installation to ensure proper setup and safe use of your new computer chassis.
2. Maklumat Keselamatan
Sentiasa patuhi langkah keselamatan berikut:
- Disconnect all power sources before installing or removing any components.
- Pakai tali pergelangan tangan anti-statik untuk mengelakkan kerosakan nyahcas elektrostatik (ESD) pada komponen.
- Handle components carefully to avoid physical damage.
- Jauhkan bahagian kecil dan alatan daripada kanak-kanak.
- Ensure proper ventilation around the computer case.
3. Kandungan Pakej
Sahkan bahawa semua item terdapat dalam pakej anda:
- darkFlash Aquarius Mesh Computer Case
- Kotak Aksesori (skru, pengikat, pengikat kabel, dll.)
- Manual Pengguna (dokumen ini)
4. Persediaan dan Pemasangan
Follow these steps for proper component installation.
4.1. Menyediakan Kes
Before installing components, remove the side panels. The Aquarius Mesh case typically features a tempered glass side panel and a solid metal panel.
- Locate the thumbscrews on the rear of the case securing the side panels.
- Unscrew the thumbscrews and carefully slide the panels backward, then lift them off.

Rajah 1: Depan dan sisi view of the darkFlash Aquarius Mesh case. Note the mesh front panel and tempered glass side panel.

Rajah 2: Belakang view of the darkFlash Aquarius Mesh case, showing expansion slots and rear fan mount.
4.2. Pemasangan Papan Induk
The Aquarius Mesh supports ATX, Micro-ATX, and Mini-ITX motherboards.
- Pasang perisai I/O ke dalam potongan di bahagian belakang sarung.
- Align your motherboard with the pre-installed standoffs. Ensure the I/O ports align with the I/O shield.
- Selamatkan papan induk dengan skru yang sesuai dari kotak aksesori.
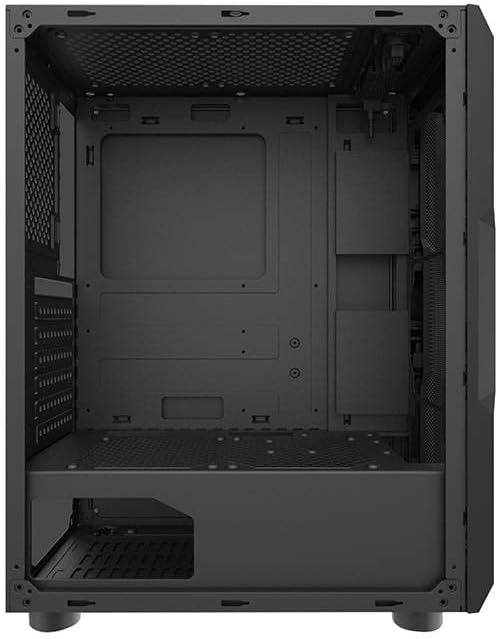
Rajah 3: Dalaman view of the darkFlash Aquarius Mesh case, highlighting the motherboard tray and cable routing options.
4.3. Pemasangan Unit Bekalan Kuasa (PSU).
The PSU mounts at the bottom rear of the case.
- Slide the PSU into its designated compartment from the rear of the case.
- Align the screw holes and secure the PSU with screws.
4.4. Pemasangan Pemacu Storan
The case provides mounting options for 3.5-inch HDDs and 2.5-inch SSDs.
- HDD 3.5": Locate the drive cage usually beneath the PSU shroud or behind the motherboard tray. Slide the HDD into the bay and secure it with screws.
- SSD 2.5": Mount SSDs to dedicated brackets behind the motherboard tray or on the PSU shroud. Secure with screws.

Rajah 4: Bahagian dalam belakang view of the darkFlash Aquarius Mesh case, showing the motherboard cutout and potential SSD mounting points.
4.5. Expansion Card Installation (e.g., GPU)
- Tanggalkan penutup slot pengembangan yang diperlukan dari bahagian belakang bekas.
- Masukkan kad pengembangan ke dalam slot PCIe yang sesuai pada papan induk.
- Secure the card with the provided screws or retention clips.
4.6. Pengurusan Kabel
Gunakan potongan penghalaan kabel dan titik ikat di belakang dulang papan induk untuk menyusun kabel. Ini meningkatkan aliran udara dan estetika.
4.7. Reassembling the Case
Once all components are installed and cables are managed:
- Carefully reattach the side panels, ensuring they slide into place correctly.
- Secure the side panels with the thumbscrews.
5. Arahan Operasi
After assembly, connect your peripherals and power cable.
- Connect your monitor, keyboard, mouse, and other peripherals to the motherboard's I/O ports.
- Sambungkan kabel kuasa ke PSU dan soket dinding.
- Press the power button located on the top panel of the case to start your computer.

Rajah 5: Atas view of the darkFlash Aquarius Mesh case, showing the front I/O panel with power button, reset button, USB ports, and audio jacks.
6. Penyelenggaraan
Penyelenggaraan yang kerap membantu memastikan prestasi optimum dan jangka hayat komponen komputer anda.
- Penapis Habuk: The Aquarius Mesh case features removable dust filters (e.g., on the front, top, and bottom). Regularly remove and clean these filters with water and mild soap, or by vacuuming, to maintain good airflow. Ensure they are completely dry before reinstallation.
- Pembersihan Dalaman: Periodically open the case and use compressed air to remove dust buildup from fans, heatsinks, and other components.
- Pembersihan Luaran: Lap permukaan luar dengan lembut, damp kain. Elakkan bahan kimia yang keras.
7. Penyelesaian masalah
Jika anda menghadapi masalah, pertimbangkan penyelesaian biasa berikut:
- Tiada Kuasa:
- Pastikan suis PSU berada dalam kedudukan 'ON'.
- Periksa semua sambungan kuasa ke papan induk dan komponennya.
- Verify the power cable is securely plugged into the wall outlet and PSU.
- Peminat Tidak Berputar:
- Check fan connections to the motherboard or fan controller.
- Ensure fans are not obstructed by cables or dust.
- Front Panel I/O Not Working:
- Verify that the front panel connectors (USB, audio, power/reset switches) are correctly connected to the motherboard headers. Refer to your motherboard manual for header locations.
8. Spesifikasi
| Ciri | Perincian |
|---|---|
| Jenama | darkFlash |
| Nombor Model | Aquarius Mesh |
| Jenis Kes | Mid-Tower |
| bahan | Keluli Aloi |
| warna | Hitam |
| Kaedah Penyejukan | Udara |
| Penggunaan yang Disyorkan | Komputer |
| Hard Drive Form Factor | 3.5 Inci |
9. Waranti dan Sokongan
For warranty information or technical support, please refer to the official darkFlash webtapak atau hubungi perkhidmatan pelanggan mereka. Simpan bukti pembelian anda untuk tuntutan waranti.
Untuk bantuan lanjut, anda boleh melawati darkFlash official webtapak.


