1. Pengenalan
This manual provides comprehensive instructions for the safe and effective use of your DEPSTECH DS700TL Endoscope. This advanced inspection camera features a revolutionary 7-inch Ultra-Wide IPS Screen, an innovative triple-lens system, and sound recording capabilities, making it an indispensable tool for professional mechanics, plumbers, DIY homeowners, and various industrial applications.
The DS700TL is designed for detailed visual inspection in hard-to-reach areas such as automotive engines, wall cavities, pipes, and HVAC systems. Please read this manual thoroughly before operating the device to ensure optimal performance and longevity.

Figure 1.1: DEPSTECH DS700TL Endoscope Overview
The image displays the DEPSTECH DS700TL Endoscope, showcasing its large 7-inch IPS display unit connected to a flexible gooseneck camera probe. The screen shows a detailed internal view of machinery, highlighting the device's high-resolution imaging capabilities. The control buttons are visible on the right side of the screen unit.
2. Ciri-ciri Utama
- 7-inch Ultra-Wide IPS Screen: Experience unparalleled clarity and precision with a large, crystal-clear display. IPS technology ensures better color accuracy and wider viewing angles, enhancing visibility and reducing the need for repeated inspections.
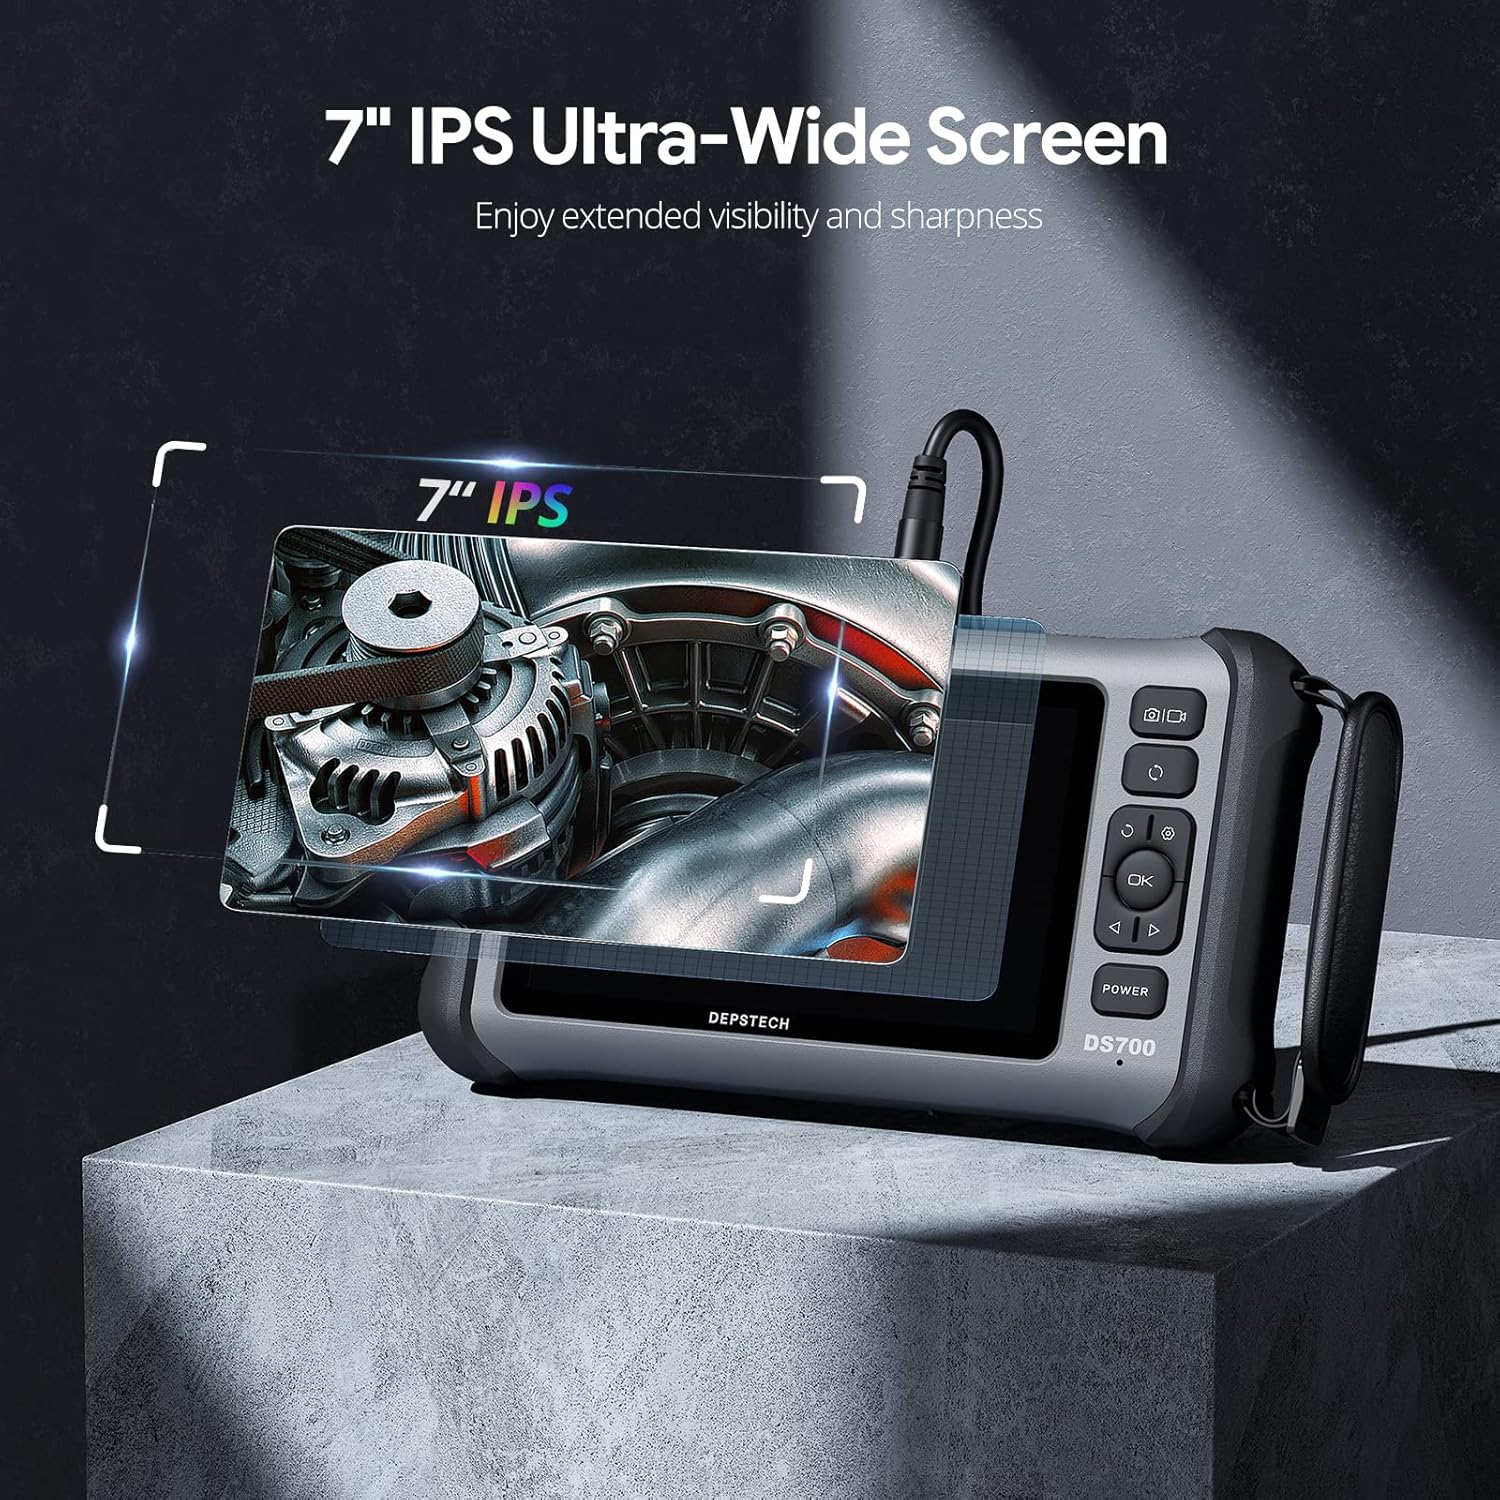
Figure 2.1: Ultra-Wide IPS Screen
This image highlights the 7-inch IPS Ultra-Wide Screen of the DS700TL endoscope, emphasizing its extended visibility and sharpness for detailed inspections.
- Innovative Triple-Lens Endoscope: Equipped with three distinct lenses (front, side B, side C) to capture images from multiple angles, providing a more comprehensive view of complex inspection areas.

Figure 2.2: Triple-Lens System
A detailed diagram illustrating the internal structure of the triple-lens endoscope probe, showing the arrangement of the main lens and two side lenses, along with their respective LED lights for illumination.
- Superb Clarity & Sound Recording: Features a 2.0 megapixel CMOS image sensor and Bluart 3.0 Image Processor for stunningly detailed 1080P HD views. A built-in microphone and speaker allow for seamless audio recording and playback during inspections.
- Efficient Split Screen View: The main camera and side cameras can be used independently or simultaneously. Compare different views side by side in split-screen mode for easier identification of discrepancies.

Figure 2.3: Multiple Camera Angles and Split Screen
This image demonstrates the DS700TL's capability to display multiple camera angles, including a split-screen view, allowing users to inspect areas from different perspectives simultaneously.
- Robust Gooseneck Snake Cable: The 13ft heavy-duty gooseneck cable provides an optimal balance of flexibility and stiffness, allowing precise manipulation into tight spaces. A 3.3ft soft cable section near the head end ensures stability.

Figure 2.4: Robust Gooseneck Snake
The image shows the robust gooseneck snake cable, highlighting its flexible yet sturdy design, ideal for navigating complex environments.
- Durable and User-Friendly Design: Boasts rugged construction, an ergonomic design with a metal stand, and a carrying strap for easy handling and lasting performance. The intuitive interface simplifies menu navigation.


Figure 2.5: Metal Stand and Carrying Strap
These images show the integrated metal stand for stable placement and the convenient carrying strap for enhanced portability and handling of the DS700TL endoscope.
3. Kandungan Pakej
Sila pastikan semua barang ada dan dalam keadaan baik semasa membuka bungkusan.
- DEPSTECH DS700TL Endoscope Unit (with 7-inch IPS Screen)
- Triple-Lens Gooseneck Camera Cable (16.5ft / 5m)
- Sarung Pelindung
- Kabel Pengecasan USB Jenis-C
- Manual Pengguna (dokumen ini)
- Micro SD Card (pre-installed)
- Accessory Kit (e.g., hook, magnet, side mirror - if included with your model)
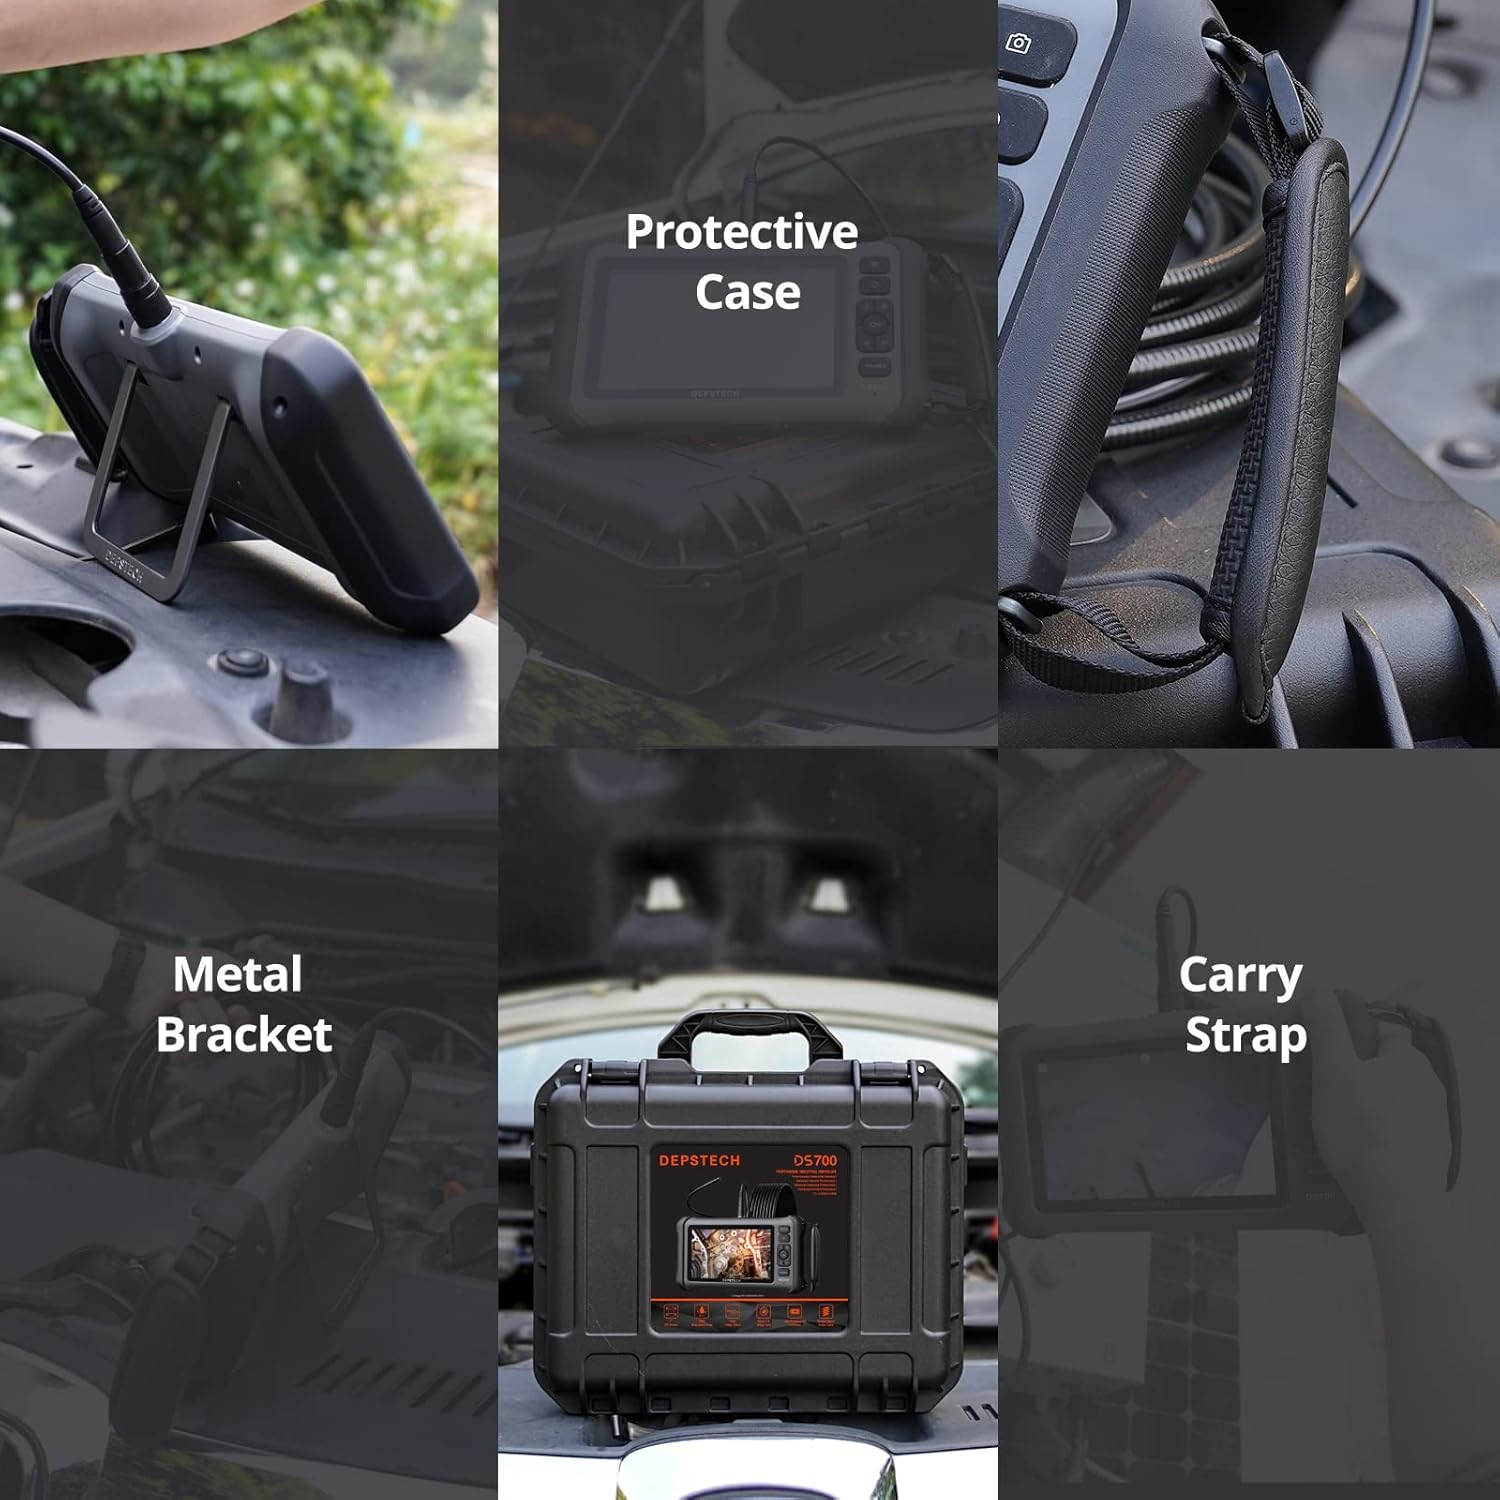
Figure 3.1: Endoscope and Accessories
The image displays the DEPSTECH DS700TL endoscope unit, its gooseneck camera, and various accessories neatly organized within its durable protective carrying case.
4. Panduan Persediaan
- Cas Peranti: Before first use, fully charge the endoscope unit. Connect the provided USB Type-C charging cable to the device's charging port and a suitable USB power adapter (not included). The charging indicator will show the charging status.

Figure 4.1: Charging the Endoscope
The image shows the DS700TL endoscope unit connected to a power strip via its USB-C charging cable, indicating the device is being charged.
- Masukkan Kad SD Mikro: The device comes with a pre-installed Micro SD card. Ensure it is properly seated in the card slot. If replacing or inserting a new card, ensure the device is powered off.
- Attach Camera Cable: Connect the gooseneck camera cable to the designated port on the top of the endoscope unit. Ensure a secure connection.
- Hidupkan kuasa: Tekan dan tahan butang KUASA button located on the right side of the screen unit until the display turns on.
- Tetapan Awal: Upon first power-on, you may need to set the language, date, and time through the on-screen menu. Refer to the "Operating Instructions" section for menu navigation.
5. Arahan Operasi
5.1 Kawalan Asas
- Butang kuasa: Press and hold to turn on/off. Short press to enter/exit menu or confirm selection.
- Butang OK: Confirm selection in menus.
- Anak panah atas/bawah/kiri/kanan: Navigate through menus, adjust LED brightness, or switch camera views.
- Butang Foto/Video: Short press to take a photo. Long press to start/stop video recording.
- Butang Putaran: Rotate the image on the screen.
5.2 Operasi Kamera
- Melaraskan Lampu LED: Use the Up/Down arrow buttons to increase or decrease the brightness of the LED lights on the camera probe. Each lens has independent lighting.
- Switching Lenses: Use the Left/Right arrow buttons to cycle between the front camera (A), side camera B, and side camera C.
- Mod Skrin Pisah: To activate split-screen, navigate to the display settings in the menu. You can view combinations like A+B or A+C simultaneously.
- Menangkap Imej/Video:
- For photos, short press the Photo/Video button.
- For videos, long press the Photo/Video button to start recording. Long press again to stop.
- Rakaman Bunyi: The built-in microphone will record audio during video capture. Playback includes audio.
- Navigating the Gooseneck Cable: Gently guide the gooseneck cable into the inspection area. Its semi-rigid design allows it to retain its shape, making it easier to maneuver around obstacles.

Figure 5.1: Gooseneck Cable Flexibility
This image illustrates the flexible and bendable nature of the gooseneck cable, demonstrating its ability to navigate tight bends and hold its position for effective inspection.
5.3 Viewing dan Pemindahan Files
- Playback on Device: Enter the playback mode via the menu to view captured photos and videos directly on the 7-inch screen.
- Pindahkan ke Komputer: Connect the endoscope unit to your computer using the USB Type-C cable. The device will appear as a removable storage device, allowing you to copy files from the Micro SD card.

Rajah 5.2: Pemindahan Data ke Komputer
The image shows the endoscope unit connected to a laptop, illustrating the process of transferring captured images and videos from the device to a computer.
6. Penyelenggaraan dan Penjagaan
- Membersihkan Lensa: Use a soft, lint-free cloth to gently wipe the camera lens. For stubborn dirt, a small amount of lens cleaning solution can be applied to the cloth, not directly to the lens.
- Membersihkan Skrin: Use a microfiber cloth to clean the IPS screen. Avoid abrasive materials or harsh chemicals.
- Pembersihan Probe: The camera probe is IP67 waterproof. After use in dirty or wet environments, wipe the probe clean with a damp kain. Pastikan ia kering sebelum disimpan.

Figure 6.1: Waterproof Probe
The image shows the waterproof camera probe with water droplets on its surface, indicating its resistance to liquids and ease of cleaning after use in wet conditions.
- Storan: Store the endoscope and its accessories in the provided protective carrying case in a cool, dry place, away from direct sunlight and extreme temperatures.
- Penjagaan Bateri: Untuk memanjangkan hayat bateri, elakkan daripada kerap mencas bateri sepenuhnya. Jika menyimpan untuk tempoh yang lama, cas bateri sehingga kira-kira 50% setiap beberapa bulan.
7. Penyelesaian masalah
| Masalah | Kemungkinan Punca | Penyelesaian |
|---|---|---|
| Peranti tidak dihidupkan. | Low battery; Device frozen. | Charge the device fully. If still unresponsive, try resetting by holding the power button for 10-15 seconds. |
| Poor image quality / Blurry image. | Dirty lens; Insufficient lighting; Incorrect focus distance. | Clean the camera lens. Adjust LED brightness. Ensure the object is within the optimal focal range (1.18-3.93 inches for front camera, 0.79-2.36 inches for side cameras). |
| Tidak boleh merakam foto/video. | Micro SD card full or corrupted; Card not inserted correctly. | Check Micro SD card storage. Format the card (this will erase all data). Reinsert the card properly. Try a different Micro SD card. |
| No sound during video playback. | Volume too low; Speaker blocked. | Increase volume using controls. Ensure the speaker is not obstructed. Figure 7.1: Device Speaker Location The image highlights the location of the speaker on the back of the DS700TL endoscope unit, which is responsible for audio playback. |
8. Spesifikasi Teknikal
| Ciri | Perincian |
|---|---|
| Nombor Model | DS700TL |
| Saiz Skrin | Paparan IPS 7 inci |
| Resolusi Tangkapan Video | 1080p HD |
| Jenis Kamera | Triple-Lens (Front, Side B, Side C) |
| Penderia Imej | CMOS 2.0 Megapiksel |
| Pemproses Imej | Bluart 3.0 |
| Gooseneck Cable Length | 16.5 kaki (5m) |
| Diameter Probe | 7.9 mm |
| Penilaian Kalis Air | IP67 (untuk kuar kamera) |
| Kapasiti Bateri | 5200mAh Lithium Ion (termasuk) |
| Masa Bekerja | Lebih kurang 4 jam |
| Storan Media | Micro SD Card (included) |
| Dimensi Pakej | 14.41 x 11.97 x 4.92 inci |
| Berat Barang | 1 paun |
9. Waranti dan Sokongan
9.1 Waranti Produk
The DEPSTECH DS700TL Endoscope comes with a standard limited warranty. Please refer to the warranty card included in your package or visit the official DEPSTECH website for detailed warranty terms and conditions. This warranty typically covers manufacturing defects and malfunctions under normal use.
9.2 Sokongan Pelanggan
For technical assistance, troubleshooting, or any inquiries regarding your DEPSTECH product, please contact DEPSTECH Customer Support. You can find contact information on the official DEPSTECH website or through the contact details provided in your product packaging.
Kedai Rasmi DEPSTECH: Visit DEPSTECH Store on Amazon


