1. Pengenalan
Thank you for choosing the XUANZIT LED Digital Wall Clock, Model XZT74W. This manual provides essential information for the proper setup, operation, and maintenance of your new clock. Please read these instructions carefully before use to ensure optimal performance and longevity of the product. Keep this manual for future reference.

Figure 1: XUANZIT LED Digital Wall Clock (Model XZT74W)
2. Produk Lebihview
Ciri-ciri Utama
- Paparan Besar: Features 2.8-inch digits for enhanced readability from a distance.
- Auto-Peredupan: Built-in light sensor automatically adjusts display brightness across three levels (high, moderate, low) based on ambient light conditions.
- Format 12/24-Jam: Easily switch between 12-hour and 24-hour time display formats.
- Fungsi Memori: A CR2032 backup battery (not for main power) preserves time settings during power outages.
- Pemasangan Mudah: Designed with positioning pins and multiple mounting options for various wall types.
- Kabel Kuasa Dilanjutkan: Includes a 10-foot USB power cable for flexible placement.
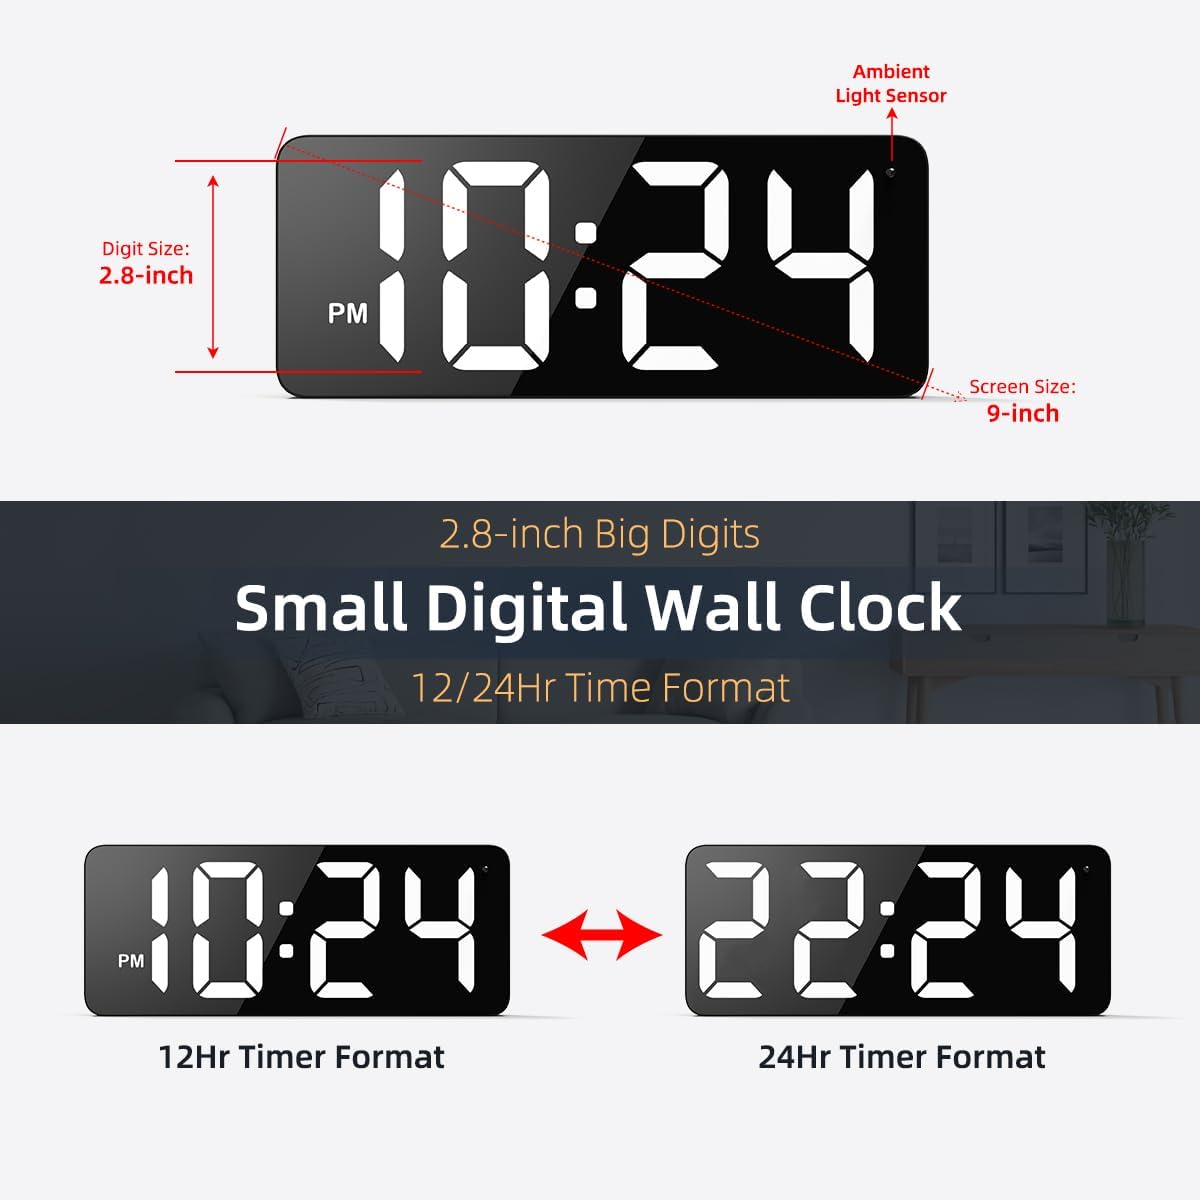
Figure 2: Clock Display Features and Dimensions
Kandungan Pakej
Sahkan bahawa semua item yang disenaraikan di bawah disertakan dalam pakej anda:
- 1 x XUANZIT LED Digital Wall Clock (Model XZT74W)
- 1 x Penyesuai Kuasa USB (DC 5V/1A)
- 1 x USB Power Cable (10 Ft)
- 2 x Cangkuk Pelekat
- 2 x Plastic Anchors & Screws
- 1 x Manual Pengguna

Rajah 3: Kandungan Pakej
3. Maklumat Keselamatan
Penting: This is a PLUG-IN electric wall clock. It requires continuous power from the included USB power adapter and cable to operate. It is NOT battery-operated for its primary function. The internal CR2032 battery serves only as a backup to preserve time settings during a power outage, not to power the display.
- Use only the provided USB power adapter (DC 5V/1A) and cable.
- Jangan dedahkan jam kepada air atau kelembapan berlebihan.
- Avoid placing the clock in direct sunlight or near heat sources.
- Do not attempt to disassemble or repair the clock yourself. Contact customer support for assistance.
4. Arahan Persediaan
4.1 Sambungan Kuasa
- Insert the small end of the USB power cable into the concealed power jack on the back of the clock.
- Plug the large end of the USB power cable into the USB power adapter.
- Plug the USB power adapter into a standard wall outlet. The clock display will illuminate.
4.2 Backup Battery Installation (Optional, for Memory Function)
The clock uses a CR2032 button cell battery (not included) for its memory function. This battery ensures that time settings are retained if the main power is disconnected.
- Cari petak bateri di belakang jam.
- Buka penutup petak.
- Masukkan satu bateri CR2032 dengan sisi positif (+) menghadap ke atas.
- Tutup penutup petak bateri dengan selamat.
4.3 Mounting the Clock
The clock features two positioning pins on the back to assist with marking installation points, along with hanging holes for secure mounting.

Rajah 4: Belakang View with Buttons and Mounting Points
- Marking Points: Press the entire clock against the desired wall location to mark where the nails or screws should go using the positioning pins.
- Sediakan Dinding: Depending on your wall type, install the appropriate hardware:
- Untuk Ceramic Tiles Wall: Use the provided adhesive hooks.
- Untuk Dinding kayu: Hammer in nails or screw in the provided screws directly.
- Untuk Dinding konkrit: Drill holes, insert plastic anchors, then screw in the provided screws.
- Jam Gantung: Carefully align the hanging holes on the back of the clock with the installed nails or screws and hang the clock securely.

Figure 5: Applicable Wall Types and Mounting Hardware
5. Arahan Operasi
The clock features easy-setting buttons located on the back for time adjustment and format switching.
5.1 Menetapkan Masa
Specific button functions for setting the time are typically detailed on the clock's rear panel or in the included quick start guide. Generally, there are buttons for 'SET', 'UP', and 'DOWN' or similar. Refer to the labels on your clock for precise button identification.
- Press the 'SET' button (or equivalent) to enter time setting mode. The hour digits will typically start flashing.
- Use the 'UP' and 'DOWN' buttons (or equivalent) to adjust the hour.
- Press 'SET' again to confirm the hour and move to minute adjustment. The minute digits will flash.
- Use the 'UP' and 'DOWN' buttons to adjust the minutes.
- Press 'SET' one more time to confirm the minutes and exit setting mode.
5.2 Switching 12/24-Hour Format
To switch between 12-hour (with AM/PM indicator) and 24-hour formats, simply press the designated button (often labeled '12/24H' or integrated with the 'SET' button for a quick press). The display will instantly change to the selected format.

Figure 6: 12/24-Hour Time Format Switching
5.3 Auto-Brightness Function
The clock is equipped with an ambient light sensor that automatically adjusts the display brightness to one of three levels:
- Kecerahan yang tinggi: For clear visibility during daylight hours.
- Kecerahan Sederhana: To create a comfortable ambiance indoors at night.
- Kecerahan Rendah: For complete darkness, ensuring a peaceful sleep environment.
This feature operates automatically and does not require manual adjustment.

Figure 7: 3-Level Auto-Brightness in action
6. Penyelenggaraan
To maintain your XUANZIT LED Digital Wall Clock in optimal condition:
- Pembersihan: Gently wipe the clock's surface with a soft, dry cloth. Do not use abrasive cleaners, solvents, or chemical sprays, as these can damage the finish or display.
- penempatan: Ensure the clock is placed in a stable location, away from direct sunlight, extreme temperatures, and high humidity.
- Kabel kuasa: Periodically check the USB power cable for any signs of damage. If damaged, discontinue use and replace with a compatible cable.
7. Penyelesaian masalah
Jika anda menghadapi masalah dengan jam anda, rujuk masalah dan penyelesaian biasa berikut:
| Masalah | Kemungkinan Punca | Penyelesaian |
|---|---|---|
| Paparan jam dimatikan. | Tiada bekalan kuasa. | Ensure the USB power cable is securely connected to the clock and the adapter, and the adapter is plugged into a working wall outlet. |
| Masa tidak betul selepas kuasa outage. | Backup battery is missing or depleted. | Install a fresh CR2032 battery in the battery compartment. Reset the time manually. |
| Paparan terlalu malap atau terlalu terang. | Ambient light sensor reacting to environment. | The auto-brightness feature adjusts automatically. Ensure the light sensor (small dot on the clock face) is not obstructed. This is normal operation. |
| Cannot change time/settings. | Incorrect button usage. | Refer to Section 5.1 for detailed instructions on setting the time. Ensure you are pressing the correct buttons in sequence. |
If the problem persists after attempting these solutions, please contact XUANZIT customer support for further assistance.
8. Spesifikasi
| Ciri | Perincian |
|---|---|
| Jenama | XUANZIT |
| Nombor Model | XZT74W |
| Jenis Paparan | LED |
| Saiz Digit | 2.8 inci |
| Dimensi Produk (W x H) | 3.5" x 1.14" (Note: This seems to be a partial dimension, likely referring to depth and height. The overall screen size is 9-inch as per images.) |
| Sumber Kuasa | Corded Electric (DC 5V/1A USB Adapter) |
| Bateri Sandaran | 1x CR2032 (for memory function only, not included) |
| bahan | Akrilonitril Butadiena Stirena (ABS) |
| Berat Barang | 0.55 paun (lebih kurang 8.8 auns) |
| Ciri Khas | 10ft Long USB Cable, Built-in Light Sensor for Auto-Brightness, Large Display |

Rajah 8: Dimensi Produk
9. Waranti dan Sokongan
XUANZIT products are designed for reliability and performance. For warranty information or technical support, please refer to the contact details provided with your purchase documentation or visit the official XUANZIT webtapak. Sila simpan bukti pembelian anda untuk sebarang tuntutan waranti.