1. Pengenalan
Thank you for choosing the Conentool 21V Cordless Drill Driver Set. This manual provides essential information for the safe and effective use of your new tool. Please read all instructions carefully before operation to ensure proper handling, maximize performance, and prevent injury. Keep this manual for future reference.
2. Arahan Keselamatan
Sentiasa patuhi langkah berjaga-jaga keselamatan asas semasa menggunakan peralatan elektrik untuk mengurangkan risiko kebakaran, kejutan elektrik dan kecederaan diri.
Amaran Keselamatan Alat Kuasa Am
- Keselamatan Kawasan Kerja: Pastikan kawasan kerja anda bersih dan terang. Kawasan bersepah atau gelap mengundang kemalangan. Jangan kendalikan alatan kuasa dalam atmosfera yang mudah meletup, seperti di hadapan cecair mudah terbakar, gas atau habuk.
- Keselamatan Elektrik: Elakkan sentuhan badan dengan permukaan yang dibumikan atau dibumikan seperti paip, radiator, dapur dan peti sejuk. Jangan dedahkan alat kuasa kepada hujan atau keadaan basah.
- Keselamatan Diri: Sentiasa pakai pelindung mata. Gunakan peralatan keselamatan yang sesuai seperti topeng habuk, kasut keselamatan tidak tergelincir, topi keras, atau perlindungan pendengaran apabila perlu. Berpakaian dengan betul; elakkan pakaian atau barang kemas yang longgar.
- Penggunaan dan Penjagaan Alat: Jangan paksa alat kuasa. Gunakan alat kuasa yang betul untuk aplikasi anda. Putuskan sambungan palam daripada sumber kuasa dan/atau keluarkan pek bateri sebelum membuat sebarang pelarasan, menukar aksesori atau menyimpan alatan kuasa.
- Penggunaan dan Penjagaan Pek Bateri: Cas semula hanya dengan pengecas yang ditentukan oleh pengilang. Jangan gunakan pek bateri dengan mana-mana alat kuasa lain.
3. Kandungan Pakej
Your Conentool 21V Cordless Drill Driver Set includes the following items:
- 1x Gerudi Tanpa Kord
- 1x Sarung Bawa
- 2x 1500mAh Lithium-Ion Batteries
- 1x Pengecas
- 9x Socket Wrenches ( 4-12mm)
- 12x Screwdriver Bits
- Conventional Drill Bits
- Tile Drill Bit
- Long Screwdriver Bit
- 1x Flexible Drill Shaft

Image: Complete Conentool 21V Cordless Drill Driver Set with all accessories laid out.
Imej: Jarak dekat view of the various accessories included in the set, such as the drill, batteries, charger, and different types of bits and wrenches.
4. Produk Lebihview
The Conentool 21V Cordless Drill Driver is a versatile and powerful tool designed for various drilling and screwing tasks. It features a robust motor, ergonomic design, and multiple adjustable settings for optimal performance.
Ciri-ciri Utama:
- 45N.m Max Torque: Menyediakan ampkuasa untuk menuntut aplikasi.
- 18+1 Torque Adjustment: Allows precise control for different materials and tasks, from delicate screwing to heavy-duty drilling.
- Two-Speed Setting: Offers flexibility with a low speed (0-400rpm) for high torque applications and a high speed (0-1500rpm) for faster drilling.
- Bateri Dwi 1500mAh: Ensures extended operation time with quick charging.
- Reka bentuk padat dan ringan: Minimizes user fatigue during prolonged use.
- Lampu LED terbina dalam: Menerangi kawasan kerja untuk keterlihatan yang lebih baik dalam keadaan cahaya malap.
- 3/8" (10mm) Self-Locking Chuck: Enables quick and easy bit changes.
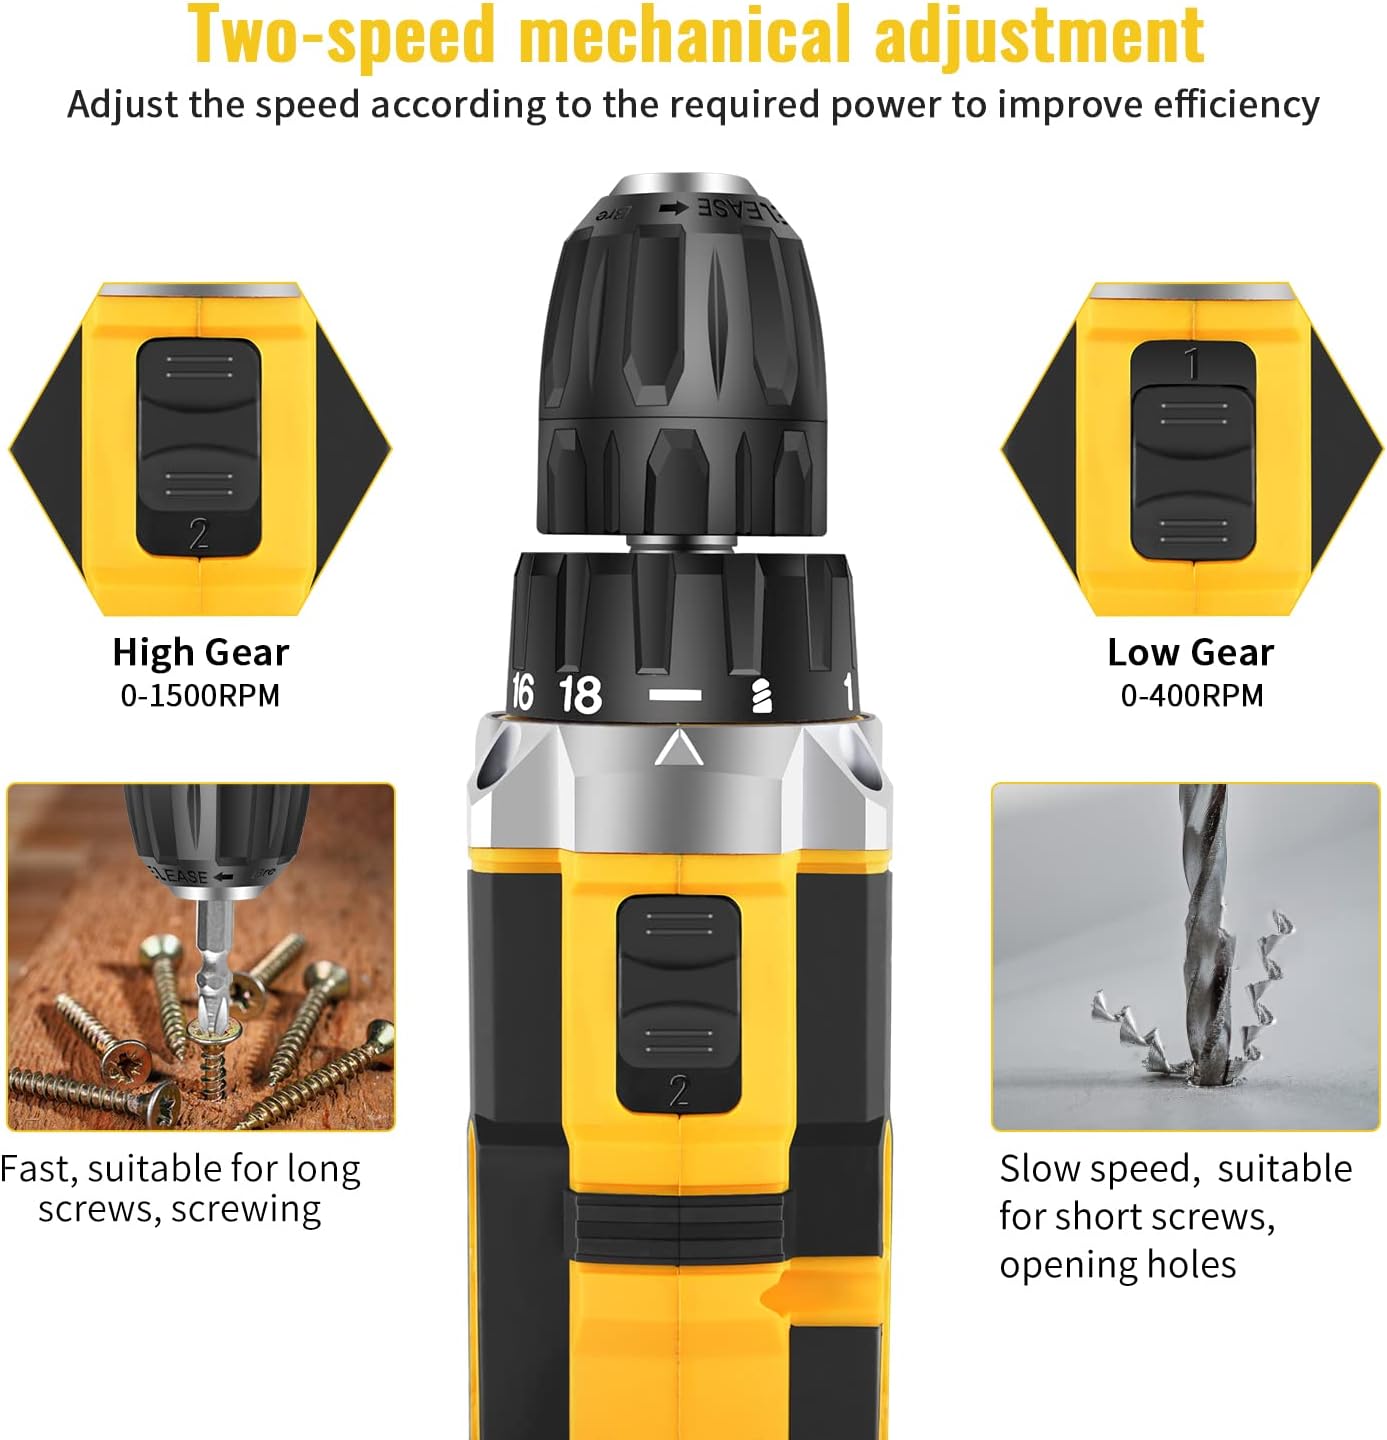
Image: Detailed diagram pointing out various features of the drill, including torque settings, speed selector, ventilation, LED light, and grip.

Image: Visual representation of the drill's internal motor, highlighting its 45N.m maximum torque and efficient heat dissipation.

Image: The drill depicted as lightweight and compact, designed to reduce user fatigue.

Image: Illustration of the drill's motor cooling system, demonstrating effective heat dissipation.

Image: Close-up of the integrated LED light, designed to illuminate the work area.
5. Persediaan
5.1 Mengecas Bateri
The drill comes with two 1500mAh lithium-ion batteries. Before first use, fully charge both batteries. A fast charger is included, and a full charge typically takes about 1 hour.
- Sambungkan pengecas ke salur keluar kuasa standard.
- Luncurkan pek bateri pada pengecas sehingga ia berbunyi klik pada tempatnya.
- The charger indicator light will show the charging status (refer to charger manual for specific light indications).
- Setelah dicas sepenuhnya, keluarkan bateri daripada pengecas.
5.2 Memasang/Membuang Bateri
- Untuk Memasang: Jajarkan pek bateri dengan pangkal pemegang gerudi dan luncurkannya ke dalam sehingga ia terkunci dengan selamat pada tempatnya.
- Untuk Alih Keluar: Press the battery release button located on the front of the battery pack and slide the battery out of the drill handle.

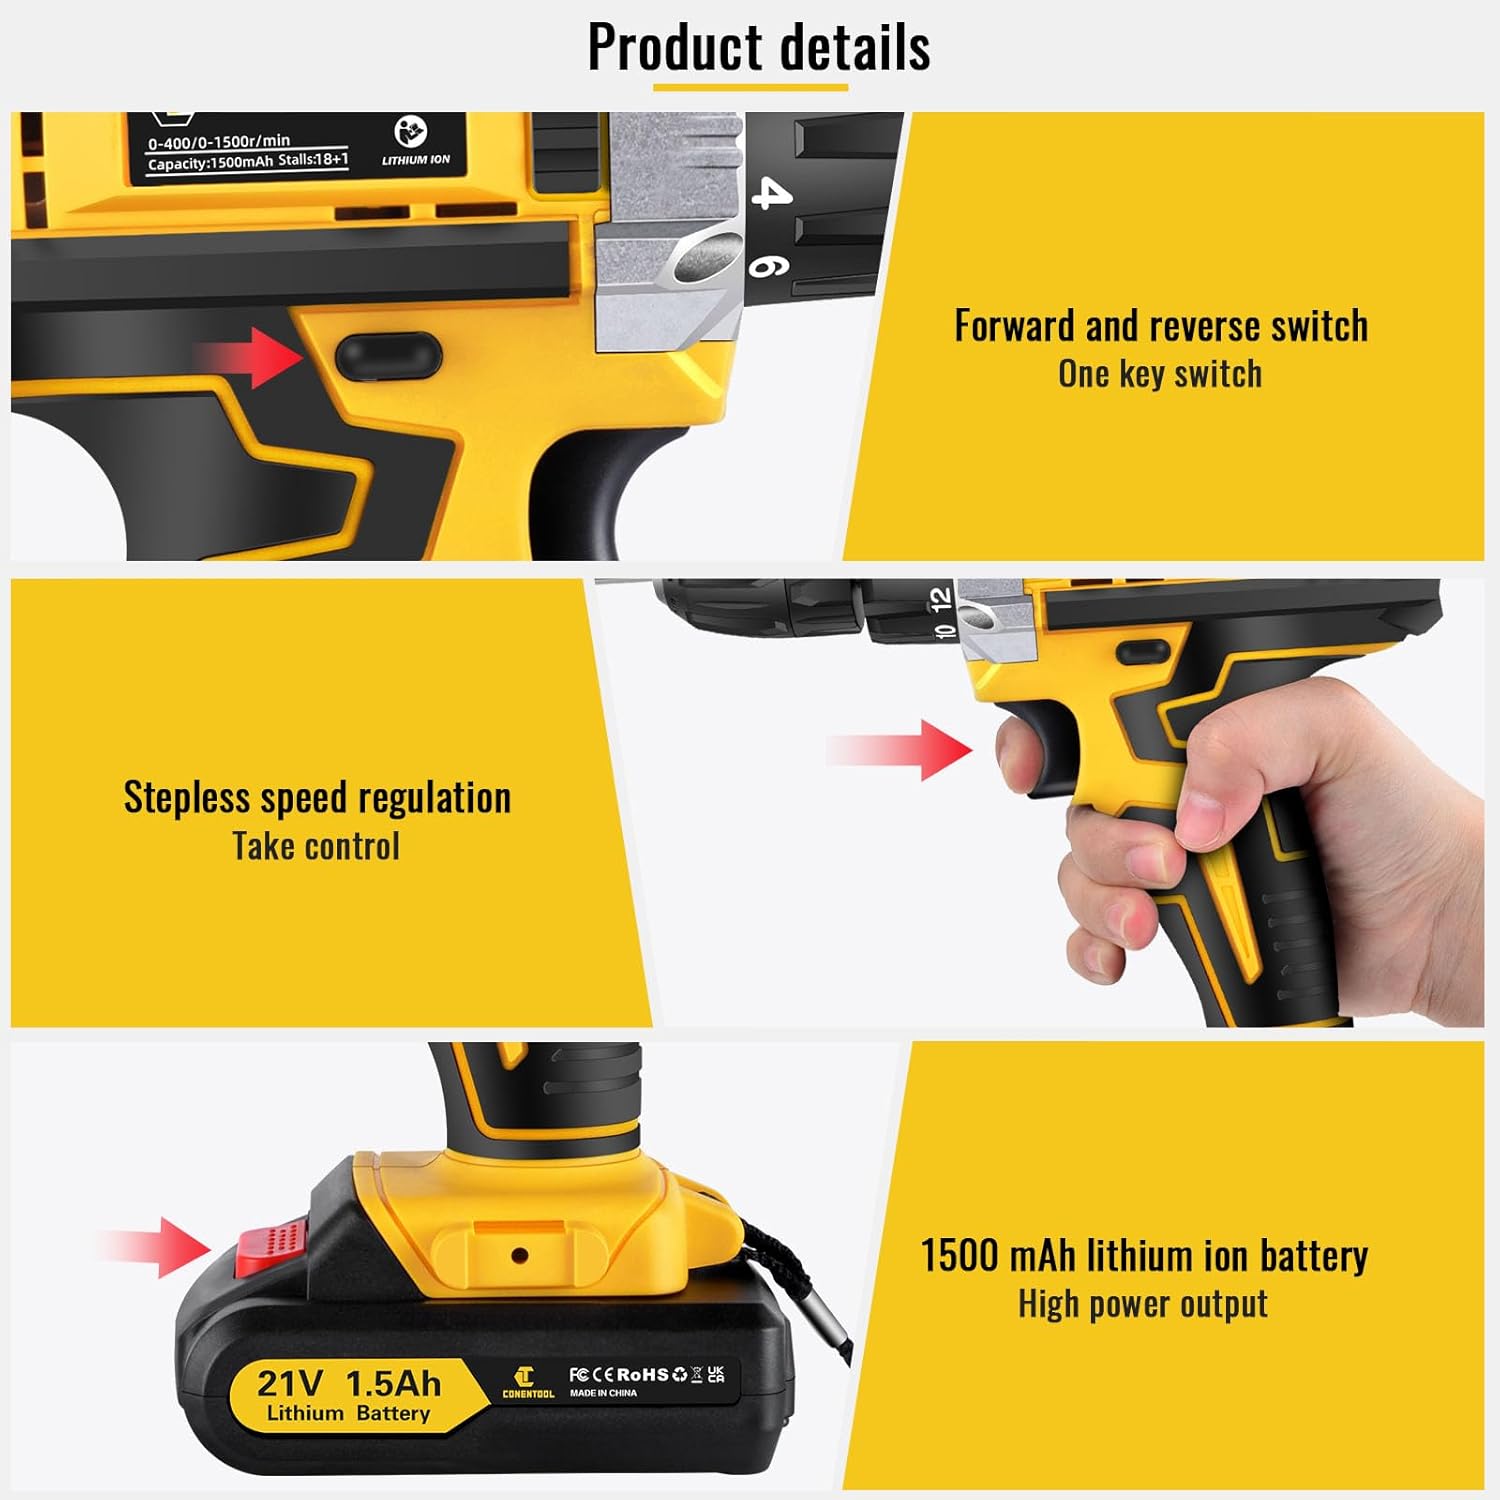
Image: Details on battery installation and removal, along with trigger and switch controls.
5.3 Installing Drill Bits/Screwdriver Bits
The drill features a 3/8" (10mm) self-locking chuck for quick and easy bit changes.
- Putar chuck lawan jam untuk membuka rahang.
- Masukkan mata gerudi atau mata pemutar skru yang dikehendaki ke dalam cuk, pastikan ia terpasang dengan kukuh.
- Rotate the chuck clockwise to tighten the jaws securely around the bit. Ensure the bit is centered and tight before operation.

Image: Close-up of the drill chuck, showing how to insert and secure bits.
6. Arahan Operasi
6.1 Menghidupkan/Mematikan dan Pencetus Kelajuan Boleh Ubah
The drill is activated by pressing the variable speed trigger. The speed of rotation increases as you press the trigger further.
- To start the drill, press the trigger.
- To increase speed, press the trigger further.
- To stop the drill, release the trigger.

Image: Illustration of the variable speed trigger and the forward/reverse button.
6.2 Two-Speed Mechanical Adjustment
The drill has two mechanical speed settings, selected via a switch on top of the drill housing.
- Gear 1 (Low Speed: 0-400rpm): Provides higher torque, ideal for driving screws or drilling into harder materials.
- Gear 2 (High Speed: 0-1500rpm): Provides lower torque but faster rotation, suitable for drilling into softer materials or for quick tasks.

Image: Diagram showing the two-speed selector switch and its corresponding RPM ranges.
6.3 Torque Adjustment (18+1 Settings)
The torque collar allows you to adjust the amount of rotational force the drill applies. This prevents over-tightening screws or damaging materials.
- Rotate the torque collar to select the desired setting from 1 to 18. Lower numbers are for smaller screws and softer materials, higher numbers for larger screws and harder materials.
- The drill icon setting is for drilling applications, providing maximum torque.

Image: The torque adjustment ring with settings for different materials.
6.4 Suis Hadapan/Undur
The forward/reverse switch is located above the trigger and controls the direction of rotation.
- Tolak suis ke kiri untuk putaran ke hadapan (untuk menggerudi dan mengetatkan skru).
- Push the switch to the right for reverse rotation (for loosening screws or removing bits).
- Apabila suis berada di kedudukan tengah, picu dikunci, menghalang permulaan yang tidak disengajakan.
6.5 Menggunakan Lampu LED
Lampu LED bersepadu menyala secara automatik apabila pencetus ditekan, memberikan keterlihatan di kawasan kerja yang bercahaya malap.

Image: The LED light in action, illuminating the work surface, and the onboard bit holder.
7. Penyelenggaraan
Penyelenggaraan yang kerap memastikan jangka hayat dan prestasi optimum gerudi anda.
- Pembersihan: Pastikan bukaan pengudaraan bersih dan bersih. Gunakan yang lembut, damp kain untuk mengelap alat. Jangan gunakan bahan kimia yang keras atau pembersih yang kasar.
- Penjagaan Bateri: Simpan bateri di tempat yang sejuk dan kering jauh dari cahaya matahari langsung. Jangan simpan bateri yang telah dinyahcas sepenuhnya untuk tempoh yang lama. Isi semula mereka secara berkala jika tidak digunakan.
- Storan: Store the drill and all accessories in the provided carry case in a dry, secure location, out of reach of children.
8. Penyelesaian masalah
If you encounter issues with your Conentool drill, refer to the following common problems and solutions:
| Masalah | Kemungkinan Punca | Penyelesaian |
|---|---|---|
| Gerudi tidak bermula | Battery not charged; Battery not properly inserted; Forward/Reverse switch in center (locked) position. | Charge battery; Re-insert battery securely; Move switch to forward or reverse position. |
| Kehilangan kuasa semasa operasi | Battery low; Overload. | Recharge battery; Reduce pressure on the drill or use a lower speed/higher torque setting. |
| Sedikit bergoyang atau jatuh | Chuck not tightened sufficiently; Bit shank damaged. | Re-tighten chuck firmly; Replace damaged bit. |
| Terlalu panas | Penggunaan berat yang berpanjangan; Pengudaraan tersumbat. | Allow tool to cool down; Clear ventilation openings. |
If the problem persists after attempting these solutions, please contact Conentool customer support.
9. Spesifikasi
| Ciri | Spesifikasi |
|---|---|
| Nombor Model | P000125 |
| Voltage | 21V |
| Jenis Bateri | Litium Ion |
| Kapasiti Bateri | 1500mAh (1.5Ah) |
| Max Torque | 45 Nm |
| Tetapan Tork | 18+1 |
| Kelajuan Tanpa Beban (Rendah) | 0-400 RPM |
| Kelajuan Tanpa Beban (Tinggi) | 0-1500 RPM |
| Saiz Chuck | 3/8" (10mm) |
| Sumber Kuasa | Dikuasakan Bateri |
| bahan | logam |
| Berat Barang | 2.5 kg |
| Dimensi Produk | 30.5 x 27 x 10.5 cm |
10. Waranti dan Sokongan
Conentool is committed to providing high-quality tools. For any product-related inquiries, technical assistance, or warranty claims, please contact Conentool customer support. Refer to your purchase documentation for specific warranty terms and contact information.
You can also visit the official Conentool store on Amazon for more information and support: Conentool Store

