1. Pengenalan
Terima kasih kerana membeliasing the MUSE M-175 WI Radio Alarm Clock. This device combines a digital alarm clock with an FM radio, dual alarm functions, and convenient wireless and USB charging capabilities. Please read this manual carefully before operating the unit and retain it for future reference.
2. Maklumat Keselamatan
- Jangan dedahkan perkakas ini kepada air yang menitis atau percikan.
- Jangan letakkan objek yang diisi dengan cecair, seperti pasu, pada perkakas.
- Pastikan pengudaraan yang betul di sekeliling unit. Jangan sekat sebarang bukaan pengudaraan.
- Jauhkan unit daripada cahaya matahari langsung, sumber haba dan medan magnet yang kuat.
- Gunakan hanya penyesuai kuasa yang dibekalkan dengan unit.
- Jangan cuba membuka atau mengubah suai unit. Rujuk semua servis kepada kakitangan yang berkelayakan.
- Bersihkan unit hanya dengan kain lembut dan kering.
3. Kandungan Pakej
- MUSE M-175 WI Radio Alarm Clock
- Penyesuai Kuasa AC
- Manual Pengguna (dokumen ini)
4. Produk Lebihview
Familiarize yourself with the main components and controls of your MUSE M-175 WI.

Imej 1: Depan dan atas view of the MUSE M-175 WI Radio Alarm Clock. The image shows the large white LED display, control buttons on the top panel, and the wireless charging pad indicator.
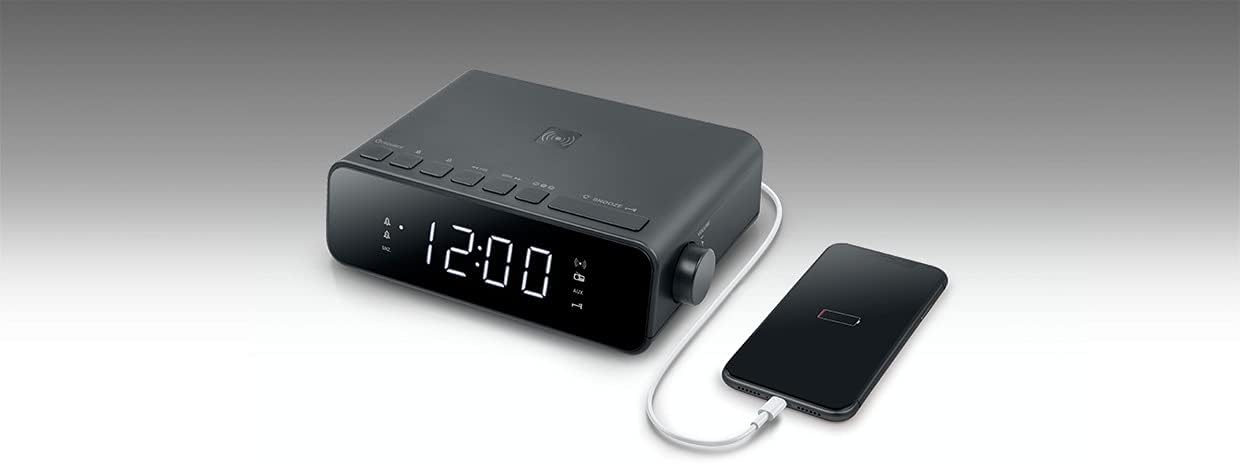
Imej 2: Atas view of the MUSE M-175 WI Radio Alarm Clock demonstrating a smartphone placed on the wireless charging pad. A USB cable is also connected to the side for wired charging.
Kawalan dan Penunjuk:
- Paparan led: Large white 0.9-inch display for time, radio frequency, and alarm indicators.
- Butang SUMBER: To switch between FM radio and AUX input.
- Tuning/Volume Buttons: For adjusting radio frequency or volume.
- Butang Pratetap: To save and recall FM radio stations.
- Butang TUNDA: To temporarily silence the alarm.
- Butang DIMMER: To adjust display brightness (High / Low / Off).
- Pad Pengecasan Wayarles: Terletak di permukaan atas untuk peranti yang serasi.
- Port Pengecasan USB: For wired charging of external devices.
- Input AUX (3.5mm): Untuk menyambungkan sumber audio luaran.
5. Persediaan
5.1. Kuasa Penyambung
- Connect the supplied AC power adapter to the DC IN port on the back of the unit.
- Pasangkan penyesuai ke soket dinding standard.
- The LED display will light up, and the clock will be ready for initial setup.
5.2. Menetapkan Masa
Refer to the specific instructions in your full manual for detailed time setting procedures. Generally, there will be a 'TIME SET' or 'CLOCK' button to initiate time adjustment, followed by 'HOUR' and 'MINUTE' buttons.
6. Arahan Operasi
6.1. Operasi Radio FM
- Tekan ke SUMBER butang untuk memilih mod radio FM.
- Tekan ke Penalaan buttons (e.g., ◀◀ / ▶▶) to manually tune to a desired frequency.
- Untuk mengimbas secara automatik dan menyimpan stesen, tekan dan tahan butang Penalaan buttons. The radio will scan and store up to 20 preset stations.
- Tekan ke Pratetap buttons (e.g., M+ / M-) to cycle through saved stations.
- Laraskan kelantangan menggunakan kawalan kelantangan khusus.
6.2. Menetapkan dan Menggunakan Penggera
The M-175 WI features a dual alarm system.
- To set Alarm 1 or Alarm 2, press and hold the respective PENGGERA 1 or PENGGERA 2 butang.
- Gunakan JAM dan MINIT butang untuk menetapkan masa penggera yang diingini.
- Select the alarm source: Buzzer or Radio. If Radio is selected, the last tuned FM station will be used.
- Tekan ke PENGGERA button again to confirm and activate the alarm. An alarm indicator will appear on the display.
- Apabila penggera berbunyi, tekan MENGEJUTKAN butang untuk menyenyapkan ia buat sementara waktu selama beberapa minit.
- Untuk mematikan penggera sepenuhnya, tekan butang yang sepadan PENGGERA 1 or PENGGERA 2 butang.
6.3. Wireless Charging (5W)
The top surface of the M-175 WI features a 5W wireless charging pad.
- Place your Qi-compatible smartphone or device directly onto the wireless charging pad.
- Pastikan peranti dipusatkan pada pad untuk pengecasan optimum.
- A charging indicator on the display or your device will confirm that charging has begun.
6.4. Port Pengecasan USB
A USB port is provided for charging non-Qi compatible devices or for faster wired charging.
- Connect your device's USB charging cable to the USB port on the unit.
- Sambungkan hujung kabel yang lain ke peranti anda.
- Pengecasan akan bermula secara automatik.
6.5. AUX Input (3.5mm)
Sambungkan peranti audio luaran menggunakan kabel audio 3.5mm.
- Connect one end of a 3.5mm audio cable to the AUX IN port on the unit.
- Sambungkan hujung satu lagi ke bicu fon kepala atau output audio peranti luaran anda.
- Tekan ke SUMBER button until 'AUX' is displayed.
- Mainkan audio daripada peranti luaran anda.
6.6. Paparkan Kecerahan
Tekan ke DIMMER button repeatedly to cycle through display brightness levels: High, Low, and Off.
6.7. Fungsi Tidur
The sleep function allows the radio to play for a set duration before automatically turning off. Refer to your full manual for specific steps to activate and adjust the sleep timer.
7. Penyelenggaraan
- Pembersihan: Disconnect the power adapter before cleaning. Use a soft, dry cloth to wipe the surfaces of the unit. Do not use abrasive cleaners or solvents.
- Storan: If not in use for an extended period, unplug the unit and store it in a cool, dry place.
8. Penyelesaian masalah
| Masalah | Kemungkinan Punca | Penyelesaian |
|---|---|---|
| Tiada kuasa / Paparan dimatikan | Penyesuai kuasa tidak disambungkan atau alur keluar rosak. | Ensure the power adapter is securely connected to the unit and a working wall outlet. |
| Penerimaan radio kurang baik | Isyarat atau gangguan yang lemah. | Adjust the position of the unit. Extend the FM antenna fully. Move away from other electronic devices. |
| Penggera tidak berbunyi | Penggera tidak diaktifkan atau ditetapkan dengan tidak betul. | Verify that the alarm time is set correctly and the alarm is activated (indicator visible on display). Check alarm volume. |
| Pengecasan tanpa wayar tidak berfungsi | Device not Qi-compatible, not centered, or foreign objects on pad. | Ensure your device supports Qi wireless charging. Reposition the device on the pad. Remove any metal objects or thick cases. |
| Pengecasan USB tidak berfungsi | Cable faulty or device not compatible. | Try a different USB cable. Ensure the device is compatible with USB charging. |
9. Spesifikasi
- Jenama: MUSE
- model: M-175 WI
- paparan: 0.9-inch White LED, adjustable intensity
- Radio: PLL FM with 20 preset stations
- penggera: Dual alarm (Radio or Buzzer), Snooze function, Sleep function
- Pengecasan Tanpa Wayar: 5W
- Port Pengecasan USB: ya
- Input Bantu: 3.5mm
- Input Kuasa: DC 5V, 2.5A
- Dimensions (H x D x L): 54mm x 130mm x 175mm (lebih kurang 2.1 x 5.1 x 6.9 inci)
- Berat Bersih: 0.44 kg (kira-kira 0.97 paun)
- Sumber Kuasa: Kabel elektrik
10. Waranti dan Sokongan
MUSE products are designed and manufactured to the highest quality standards. For detailed warranty information and customer support, please refer to the warranty card included with your product or visit the official MUSE webtapak. Simpan bukti pembelian anda untuk sebarang tuntutan waranti.


