1. Pengenalan
Thank you for choosing the FERM PDM1037s 13mm 1010W Drill. This instruction manual provides important information regarding the safe operation, setup, maintenance, and troubleshooting of your new power tool. Please read this manual thoroughly before using the drill and keep it for future reference.
The FERM PDM1037s is a robust corded electric rotary drill designed for various drilling tasks in wood, metal, and masonry. It features a powerful 1010W motor, a 13mm keyed chuck, adjustable speed, reverse rotation, and a hammer function for efficient performance.
2. Arahan Keselamatan
AMARAN: Baca semua amaran keselamatan, arahan, ilustrasi dan spesifikasi yang disediakan dengan alat kuasa ini. Kegagalan mematuhi semua arahan yang disenaraikan di bawah boleh mengakibatkan renjatan elektrik, kebakaran dan/atau kecederaan serius.
Amaran Keselamatan Alat Kuasa Am:
- Keselamatan Kawasan Kerja: Pastikan kawasan kerja anda bersih dan terang. Kawasan bersepah atau gelap mengundang kemalangan. Jangan kendalikan alatan kuasa dalam atmosfera yang mudah meletup, seperti di hadapan cecair mudah terbakar, gas atau habuk.
- Keselamatan Elektrik: Palam alat kuasa mesti sepadan dengan alur keluar. Jangan sekali-kali mengubah suai palam dalam apa jua cara. Jangan gunakan sebarang palam penyesuai dengan alat kuasa yang dibumikan (dibumikan). Elakkan sentuhan badan dengan permukaan yang dibumikan atau dibumikan seperti paip, radiator, julat dan peti sejuk.
- Keselamatan Diri: Always wear eye protection. Use hearing protection when operating noisy tools. Wear a dust mask if operations create dust. Dress properly; do not wear loose clothing or jewelry. Keep hair and clothing away from moving parts.
- Penggunaan dan Penjagaan Alat Kuasa: Jangan paksa alat kuasa. Gunakan alat kuasa yang betul untuk aplikasi anda. Putuskan sambungan palam daripada sumber kuasa sebelum membuat sebarang pelarasan, menukar aksesori atau menyimpan alatan kuasa.
- Perkhidmatan: Minta alat kuasa anda diservis oleh pembaikan bertauliah dengan hanya menggunakan alat ganti yang sama. Ini akan memastikan keselamatan alat kuasa dikekalkan.
3. Komponen Produk
The FERM PDM1037s drill consists of several key components for its operation. Familiarize yourself with these parts before use.
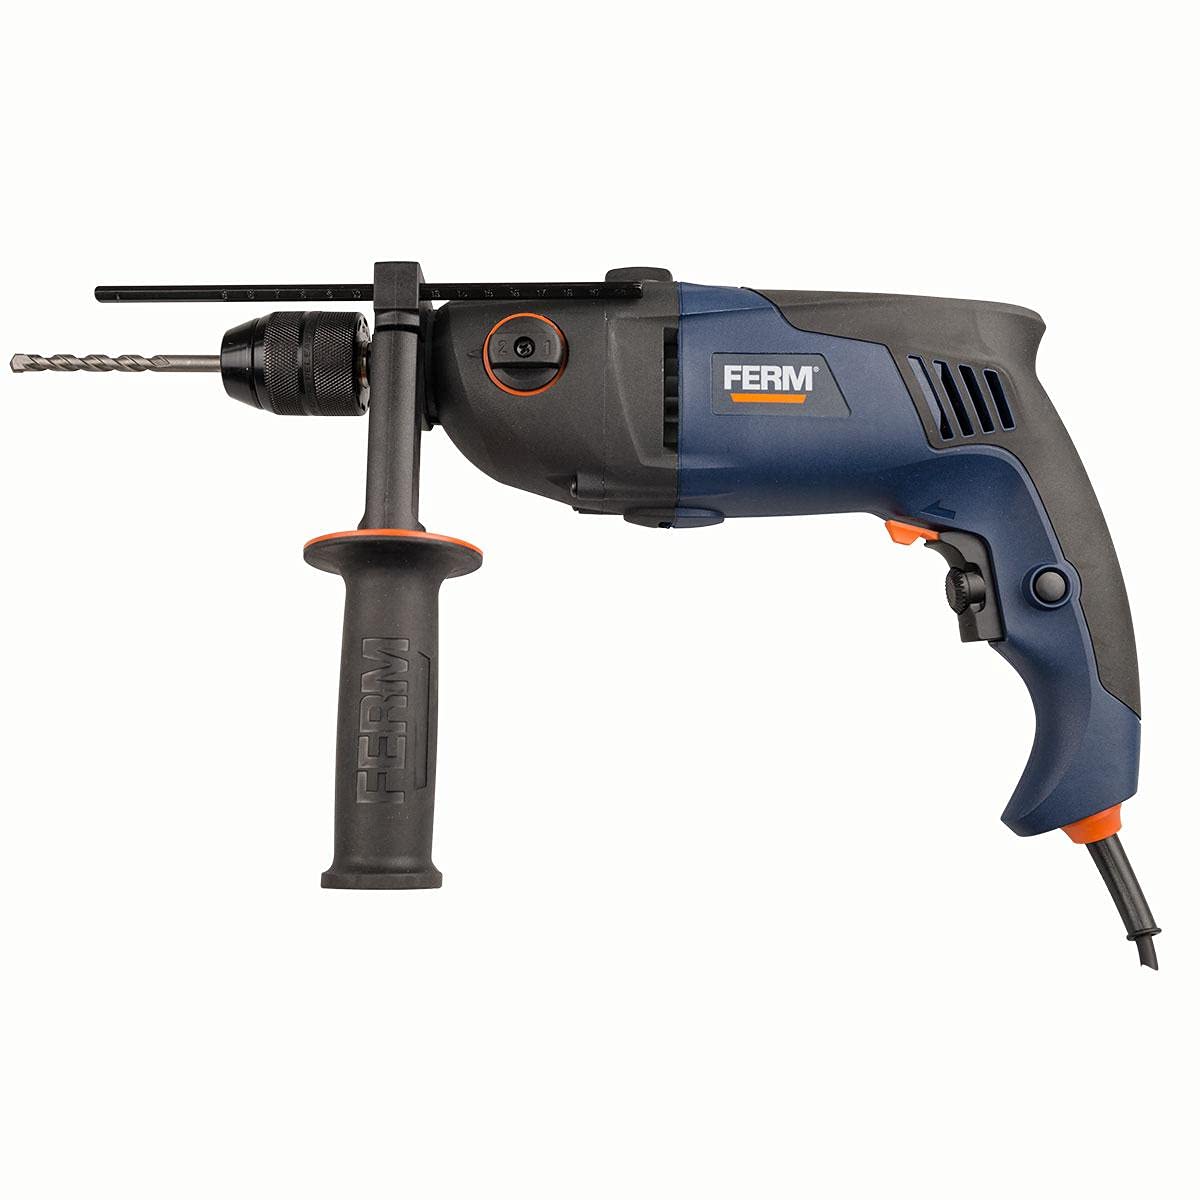
Rajah 1: Berakhirview of the FERM PDM1037s drill. This image shows the main body of the drill, including the chuck, auxiliary handle, and power cord connection point.
- chuck: Holds the drill bits securely. This model uses a keyed chuck.
- Hentian Kedalaman: Digunakan untuk menetapkan kedalaman penggerudian yang dikehendaki.
- Pemegang Bantu: Memberikan cengkaman dan kawalan tambahan semasa operasi.
- Suis Pemilih Mod: For switching between rotary drilling and hammer drilling modes.
- Dail Kawalan Kelajuan: Adjusts the maximum rotational speed.
- Suis Pencetus: Mengaktifkan gerudi.
- Butang Kunci: For continuous operation without holding the trigger.
- Suis Hadapan/Undur: Menukar arah putaran.
- Kord Kuasa: Connects the drill to the electrical supply.
4. Spesifikasi Teknikal
Below are the technical specifications for the FERM PDM1037s drill:
| Ciri | Spesifikasi |
|---|---|
| Nombor Model | FERM PDM1037s |
| Jenama | FERM |
| Sumber Kuasa | Elektrik Bertali |
| Kuasa Maksimum | 1010 Watt |
| Jenis Chuck | Keyed Chuck |
| Saiz Chuck | 13 mm |
| Kelajuan Putaran Maksimum | 3000 RPM |
| Kelajuan Boleh Laras | ya |
| Fungsi Songsang | ya |
| Fungsi Tukul | ya |
| Fungsi Pemutar Skru | ya |
| Berat Barang | 11 gram |
| warna | Pelbagai warna |
| Bateri Diperlukan | Tidak |
| Tarikh Mula-mula Tersedia | 7 Julai 2021 |
| ASIN | B098TZFVWC |
5. Persediaan
5.1 Memasang Pemegang Bantu
The auxiliary handle provides better control and stability. Loosen the handle by twisting it counter-clockwise. Slide it over the chuck and position it to your desired angle. Tighten the handle by twisting it clockwise until secure.
5.2 Memasang Penahan Kedalaman
Insert the depth stop into the hole on the auxiliary handle. Adjust the depth stop to the desired drilling depth by sliding it in or out. Secure it by tightening the screw or lever on the auxiliary handle.
5.3 Memasukkan dan Menanggalkan Mata Gerudi
- Pastikan gerudi dicabut dari sumber kuasa.
- Use the chuck key to loosen the chuck jaws by turning it counter-clockwise.
- Masukkan mata gerudi sepenuhnya ke dalam chuck, pastikan ia berada di tengah.
- Tighten the chuck jaws firmly using the chuck key by turning it clockwise. Ensure the bit is securely held.
- To remove, loosen the chuck jaws with the chuck key and pull out the bit.
6. Arahan Operasi
6.1 Sambungan Kuasa
Connect the power cord to a suitable electrical outlet. Ensure the voltage matches the drill's requirements.
6.2 Memilih Mod Pengendalian
Use the mode selector switch (typically located on the top or side of the drill) to choose between:
- Penggerudian Rotary: For drilling in wood, metal, plastics, and ceramics.
- Penggerudian Tukul: Untuk penggerudian dalam kerja-kerja batu, konkrit dan batu.
6.3 Melaraskan Kelajuan
The drill features an adjustable speed control dial. Rotate the dial to set the maximum speed for your application. Lower speeds are suitable for larger drill bits, softer materials, or screwdriving. Higher speeds are for smaller bits and harder materials.
6.4 Putaran Hadapan/Undur
Use the forward/reverse switch (usually near the trigger) to select the direction of rotation. Forward rotation (clockwise) is for drilling and tightening screws. Reverse rotation (counter-clockwise) is for removing screws or freeing a jammed drill bit.
6.5 Starting and Stopping the Drill
- Untuk mula: Press the trigger switch. The speed is variable depending on how far the trigger is pressed.
- For Continuous Operation: Press the trigger switch fully and then press the lock-on button. Release the trigger.
- To Stop (from continuous operation): Press the trigger switch again and release it.
- To Stop (from momentary operation): Lepaskan suis pencetus.
6.6 Drilling Tips
- Sentiasa pastikan benda kerja anda kukuh untuk mengelakkannya daripada bergerak.
- Sapukan tekanan yang mantap, sekata. Jangan paksa gerudi.
- For deep holes, periodically withdraw the drill bit to clear chips and allow cooling.
- When drilling metal, use cutting oil to prolong bit life and improve cutting efficiency.
- When drilling masonry, ensure the hammer function is engaged and use appropriate masonry drill bits.
7. Penyelenggaraan
Regular maintenance ensures the longevity and safe operation of your FERM PDM1037s drill.
7.1 Pembersihan
- Always unplug the drill before cleaning.
- Pastikan bukaan pengudaraan bersih untuk mengelakkan terlalu panas. Gunakan berus lembut atau udara termampat untuk membersihkan habuk dan serpihan.
- Lap perumah alat dengan iklanamp kain. Jangan gunakan bahan kimia yang keras atau pembersih yang kasar.
7.2 Berus Karbon
The motor is equipped with carbon brushes. If the drill experiences excessive sparking or reduced performance, the carbon brushes may need replacement. This should be performed by a qualified service technician.
7.3 Penyimpanan
Store the drill in a dry, secure location out of reach of children. Protect it from moisture and direct sunlight.
8. Penyelesaian masalah
Bahagian ini menangani isu biasa yang mungkin anda hadapi dengan latihan anda.
| Masalah | Kemungkinan Punca | Penyelesaian |
|---|---|---|
| Gerudi tidak bermula | No power supply; Faulty power cord/plug; Faulty switch; Worn carbon brushes | Check power outlet and cord; Contact qualified service technician for switch or brush replacement. |
| Kuasa/kelajuan berkurangan | Worn carbon brushes; Overload; Incorrect speed setting | Replace carbon brushes (by technician); Reduce load; Adjust speed dial to higher setting. |
| Percikan api yang berlebihan dari motor | Berus karbon haus; Komutator kotor | Have carbon brushes and commutator checked/replaced by a qualified service technician. |
| jem gerudi | Incorrect bit for material; Excessive pressure; Material too hard | Use appropriate bit; Reduce pressure; Consider hammer function for masonry. |
9. Waranti dan Sokongan
FERM products are manufactured to high-quality standards and are guaranteed against manufacturing defects for a period specified by local regulations from the date of purchase. This warranty does not cover damage caused by misuse, abuse, normal wear and tear, or unauthorized repairs.
For warranty claims, technical support, or service inquiries, please contact your local FERM dealer or authorized service center. Please have your proof of purchase and the product model number (PDM1037s) available when contacting support.
For more information, visit the official FERM webtapak: www.ferm.com


