pengenalan
This manual provides essential information for the safe and efficient installation, operation, and maintenance of your ExpertPower 2.5KWH 12V Solar Power Kit. This kit is designed for various off-grid applications, including RVs, trailers, campers, and marine setups. Please read this manual thoroughly before proceeding with any installation or operation.
Komponen Produk
The ExpertPower 2.5KWH 12V Solar Power Kit includes the following main components:
- One 12V 200Ah LiFePO4 Battery
- Four 100W Monocrystalline Solar Panels
- One 2000W Pure Sine Wave Inverter Charger
- One 30A MPPT Solar Charge Controller with Bluetooth
- One pair of 10ft 12AWG MC4 Solar Cables
- One pair of 6ft 12AWG Battery Cables
- Four Solar Panel Mounting Brackets

Imej: Selesaiview of the ExpertPower 2.5KWH 12V Solar Power Kit components.
Persediaan dan Pemasangan
Proper installation is crucial for the performance and safety of your solar power system. It is recommended that installation be performed by a qualified professional.
1. Basic Connection Diagram
The system is designed to integrate shore power or a gas generator, solar panels, a solar charge controller, an inverter charger, and a battery bank to power both AC and DC loads.

Image: A diagram illustrating the basic connection of the solar power system within an RV setup. It shows the flow from external power sources (shore power/generator) and solar panels through the inverter-charger and solar controller to the battery bank, which then powers AC and DC loads.
2. Solar Panel and Charge Controller Connection
Follow these steps for connecting your solar panels to the charge controller:
- Cover your solar panels to prevent exposure to sunlight during installation.
- Determine your wiring method: series or parallel. For parallel connection, use the provided MC4 Y-connectors.
- Connect the MC4 cables from the solar panels to the solar charge controller.
- Connect the battery cables to the appropriate positive and negative terminals on the solar charge controller. Use a screwdriver to secure the connections.
- Ensure solar controller settings match your battery's composition type before continuing.

Image: Screenshot of the Bluetooth application interface for monitoring the MPPT solar charge controller, showing real-time data, historical data, and parameter settings.
3. Inverter Charger Connection
Connect the inverter charger as follows:
- Connect the inverter switch panel to the inverter-charger.
- Set the dials and switches on the front of the inverter-charger based on your battery type and preferred AC/DC priority. Refer to the inverter-charger's specific manual for detailed settings.
- Optional: Connect shore power to the AC input on the back of the inverter-charger. After wiring, power on the inverter using the switch panel for a brief period to check connectivity.
- Turn the inverter off to continue with further connections.
- Connect negative and positive cables to the front inverter terminals as pictured, then connect these cables to the appropriate battery terminals.
- Connect AC appliances to the AC output using LNE wiring or directly plugging them into the AC outlets.
Note: All fuses, breakers, and battery interconnection cables displayed in diagrams are not included in this kit and must be sourced separately for a safe and complete installation.
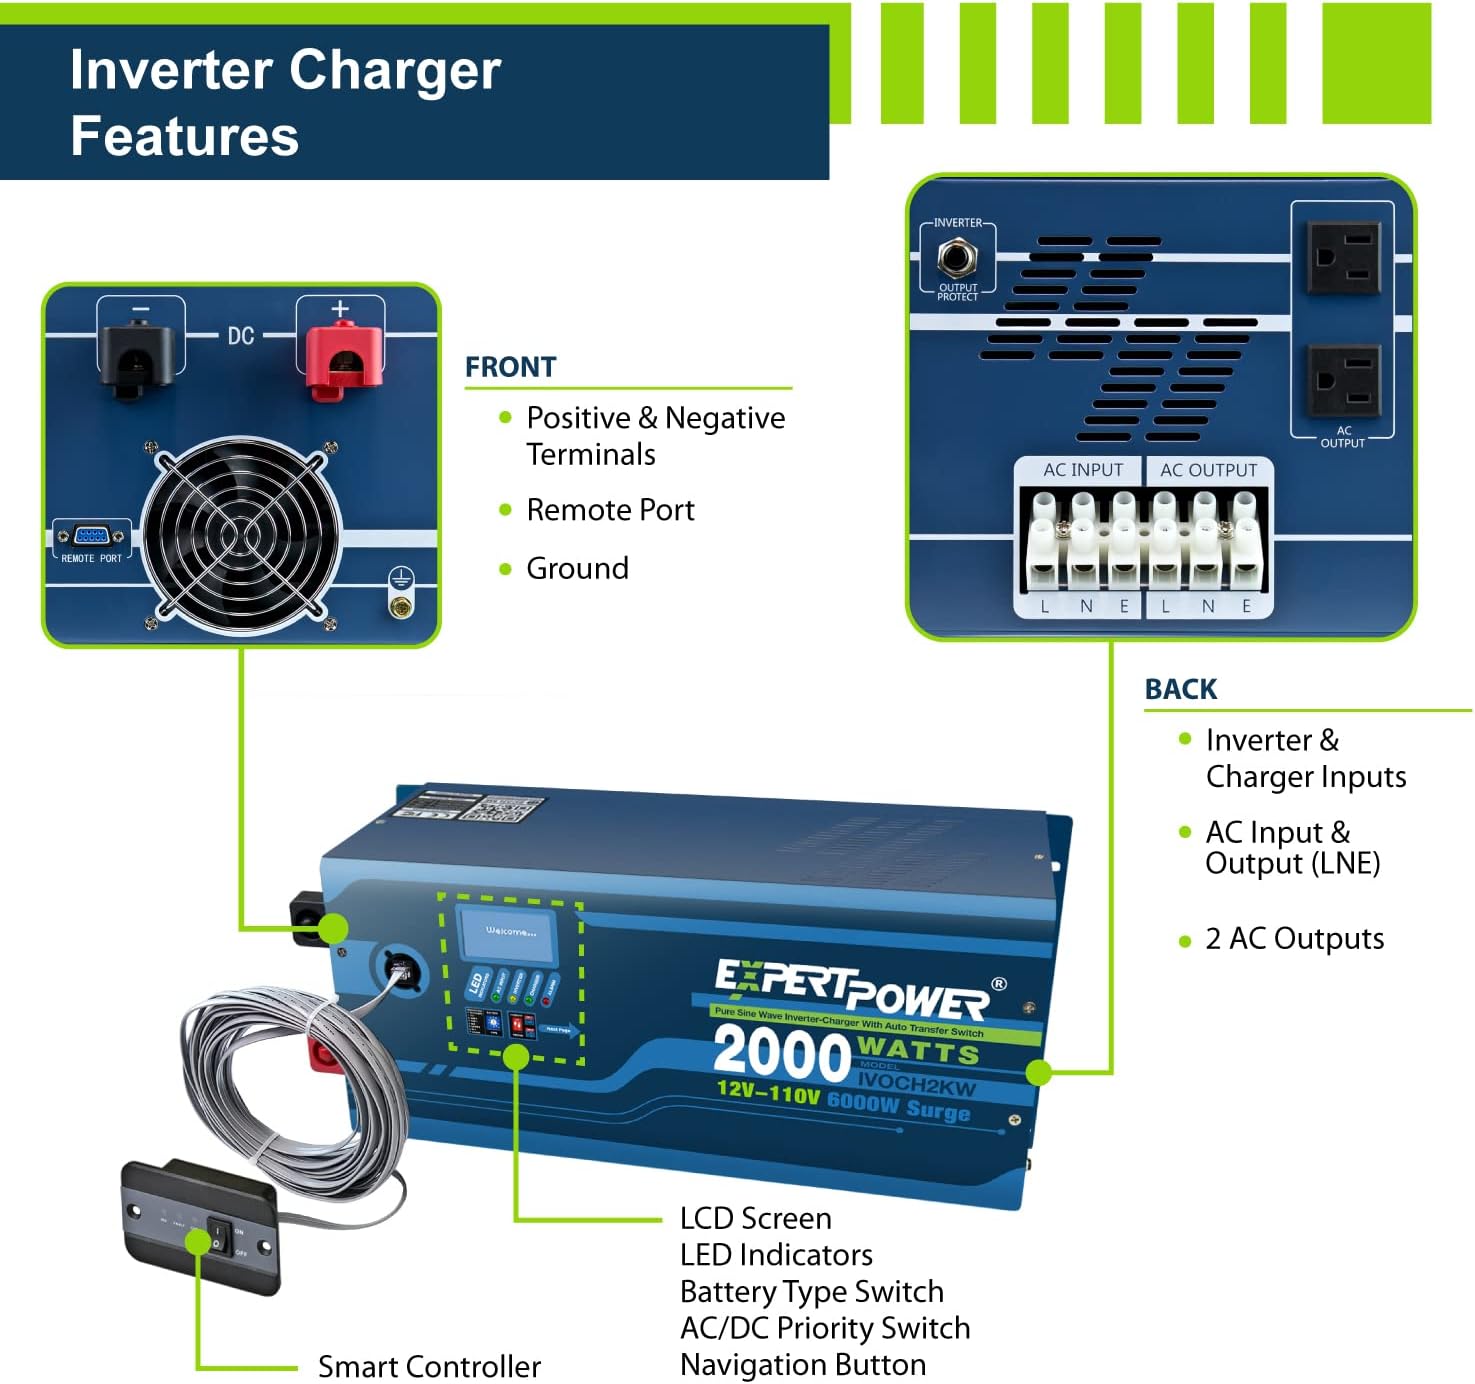
Image: Diagram highlighting the front and back features of the ExpertPower 2000W Pure Sine Wave Inverter Charger, including terminals, ports, LCD screen, and AC inputs/outputs.
4. Battery Expansion
The LiFePO4 battery supports expansion up to 4 batteries. They can be sequenced in either series at 48V 200Ah, or in parallel at 12V 800Ah.
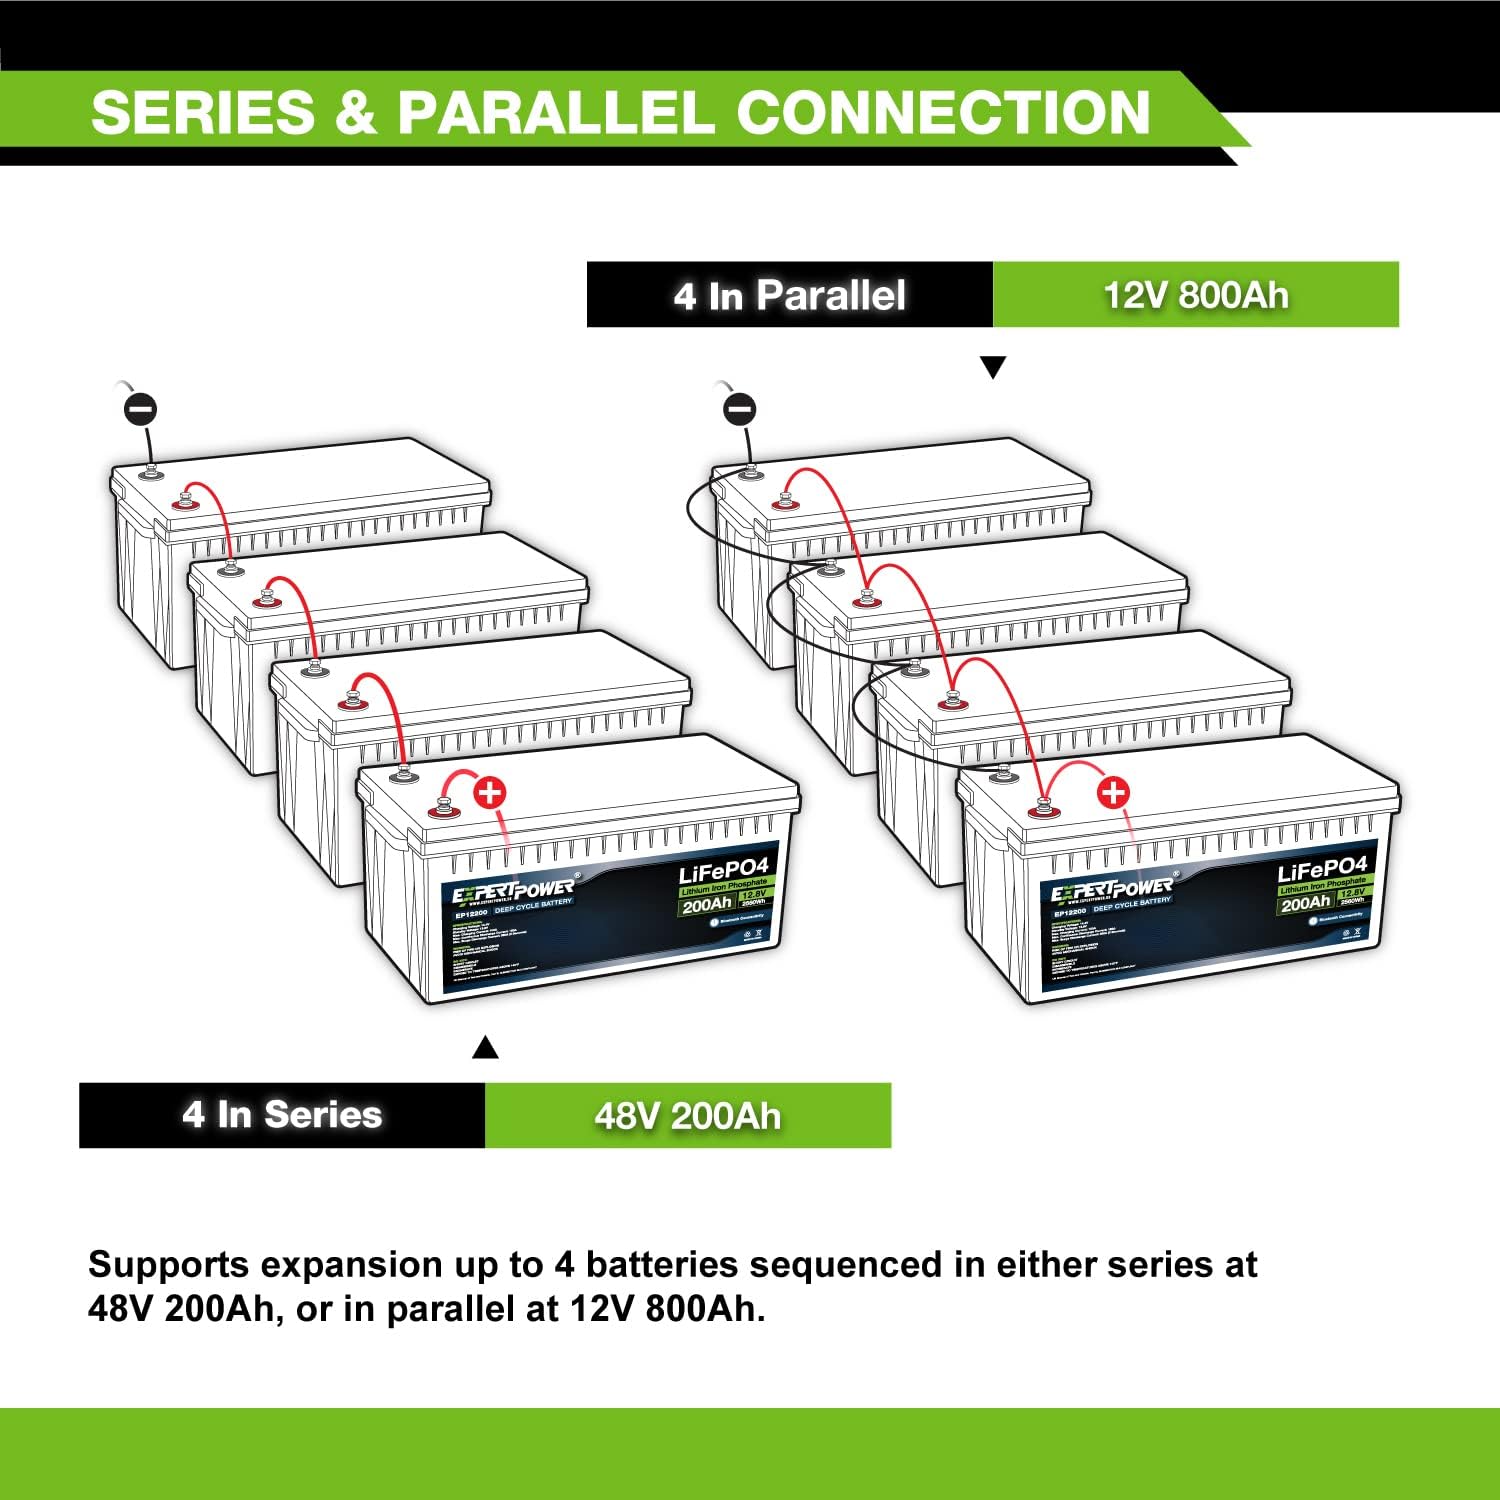
Image: Diagram showing how to connect four LiFePO4 batteries in parallel for 12V 800Ah or in series for 48V 200Ah.
Arahan Operasi
LiFePO4 Battery Operation
The ExpertPower LiFePO4 battery features a built-in Battery Management System (BMS) that protects against overcharge, deep discharge, overloading, overheating, short circuits, and excessive low self-discharge. A built-in low-temperature cut-off prevents charging below 23 °F (-5 °C).
Monitor the battery's State of Charge (SOC), temperature, protection warnings, and other parameters using the dedicated Bluetooth app on your smartphone.

Image: A visual representation of the ExpertPower LiFePO4 battery with its Bluetooth connectivity feature, showing how to monitor battery status via a smartphone app.
MPPT Solar Charge Controller Operation
The 30A MPPT controller uses advanced solar technology to maximize power generation from your solar array by over 20% compared to PWM controllers. It automatically detects 12V/24V systems. The controller also includes various protections:
- Perlindungan Litar pintas
- Perlindungan Lebihan
- Perlindungan Arus Terbalik
- Reverse Prevention Circuit
- Perlindungan Terlebih Arus

Image: Diagram detailing the features and protections of the ExpertPower 30A MPPT Solar Charge Controller, including compatibility with various battery types and built-in Bluetooth.
Pure Sine Wave Inverter Charger Operation
The ExpertPower 2KW Pure Sine Wave Inverter/35A Charger is compatible with all battery systems, including AGM, Wet, Gel, and LiFePO4, offering 8 selectable profiles. It features a built-in 30A transfer switch with UPS functionality, automatically switching between shore power and battery power within 5 milliseconds.
Penyelenggaraan
The LiFePO4 battery is designed for low maintenance, offering up to 1 year of maintenance-free storage due to its low self-discharge rate. Regularly inspect all cable connections for tightness and corrosion. Keep solar panels clean for optimal performance. Refer to individual component manuals for specific maintenance guidelines.
Menyelesaikan masalah
For any operational issues or unexpected behavior, first review the connection diagrams and ensure all components are correctly installed and configured. Check all cable connections for security and integrity. If problems persist, consult the individual manuals for each component (battery, controller, inverter) for specific troubleshooting steps. For further assistance, please contact ExpertPower customer support.
Spesifikasi
Key specifications for the ExpertPower 2.5KWH 12V Solar Power Kit components:
| Komponen | Spesifikasi |
|---|---|
| Jenama | ExpertPower |
| Nombor Model | C14LBXLFP12_200B3 |
| LiFePO4 Battery Capacity | 12V 200Ah (2.5KWH) |
| Kuasa Panel Suria | 4 x 100W (400W total) Monocrystalline |
| Panel Suria Voltage | 18.81V |
| Solar Panel Rated Current | 5.32A |
| Litar Terbuka Panel Suria Voltage | 22.2V |
| Solar Panel Short Circuit Current | 5.6A |
| MPPT Charge Controller Current | 30 Amps |
| Inverter Charger Power | Gelombang Sinus Tulen 2000W |
| Inverter Charger Current | 35A |
| Berat Barang | 44 Pounds (total kit weight may vary) |
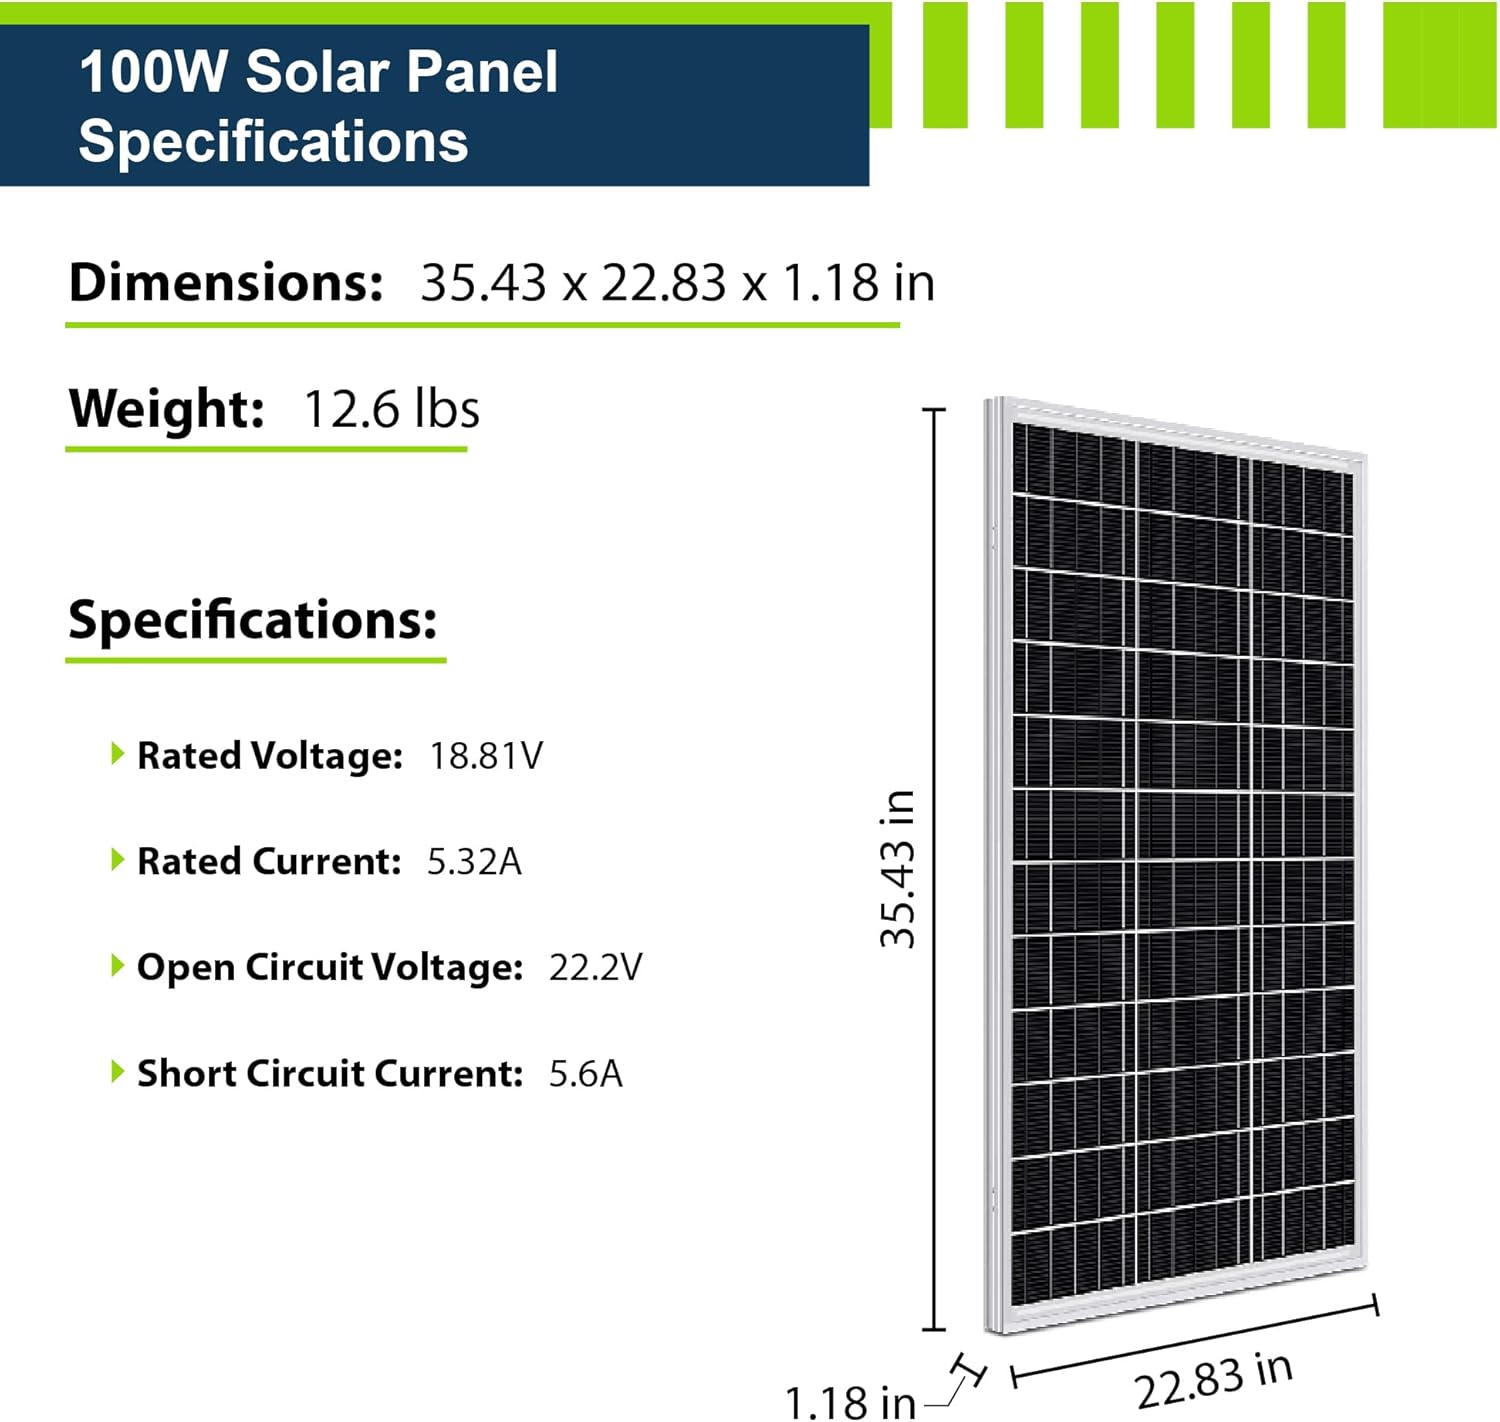
Image: Detailed specifications and dimensions for a single 100W Monocrystalline Solar Panel.
Video Produk Rasmi
Video: ExpertPower Solar Panel Kits - From Small to Giant. This video provides an overview of ExpertPower's solar panel kits, showcasing their versatility for various applications.
Video: ExpertPower Solar Kits. This video offers a general introduction to ExpertPower's range of solar kits.
Waranti dan Sokongan
For warranty information and customer support, please refer to the official ExpertPower website or contact their customer service directly. ExpertPower is committed to providing reliable products and assistance.
Anda boleh melawat ExpertPower Store on Amazon untuk maklumat lanjut dan pilihan hubungan.