1. Pengenalan
This manual provides essential instructions for the safe and efficient operation of your Projector Super 8MM AUTOLOAD Film Projector. Please read this manual thoroughly before use and retain it for future reference.
2. Maklumat Keselamatan
Sentiasa patuhi langkah keselamatan berikut:
- Ensure the projector is placed on a stable, level surface.
- Do not expose the projector to moisture or extreme temperatures.
- Unplug the projector from the power outlet before cleaning or performing maintenance.
- Do not attempt to open the projector casing or perform repairs yourself. Refer to qualified service personnel.
- Jauhkan daripada kanak-kanak dan haiwan peliharaan.
- Gunakan hanya l yang ditentukanamp jenis untuk penggantian.
3. Kandungan Pakej
Sahkan bahawa semua item ada:
- Projector Super 8MM AUTOLOAD Film Projector
- Kord Kuasa
- Take-up Reel
- Unjuran Lamp (pre-installed or included)
4. Produk Lebihview
Familiarize yourself with the main components of your projector.

Rajah 4.1: Depan view of the Projector Super 8MM AUTOLOAD Film Projector, showing the film path, lens, and a take-up reel placed in front.
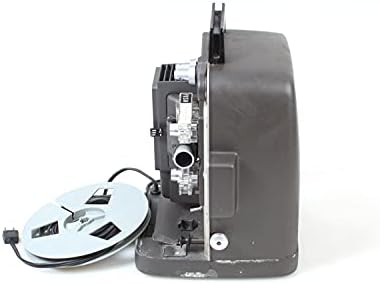
Rajah 4.2: sebelah view of the Projector Super 8MM AUTOLOAD Film Projector, highlighting the film loading mechanism and power cord connection.
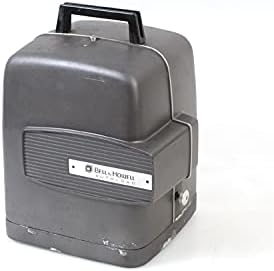
Rajah 4.3: The Projector Super 8MM AUTOLOAD Film Projector with its protective cover in place, ready for storage or transport.
5. Persediaan
5.1 Membongkar dan Meletakkan
- Carefully remove the projector from its packaging.
- Place the projector on a firm, level surface.
- Pastikan pengudaraan yang mencukupi di sekeliling projektor untuk mengelakkan terlalu panas.
- Position the projector at an appropriate distance from the projection screen to achieve the desired image size.
5.2 Sambungan Kuasa
- Sambungkan kord kuasa ke input kuasa projektor.
- Pasangkan hujung kord kuasa yang satu lagi ke dalam soket elektrik yang sesuai.
5.3 Film Loading (AUTOLOAD System)
- Ensure the projector is turned off.
- Place an empty take-up reel onto the take-up spindle.
- Thread the leader of your Super 8MM film into the film gate opening. The AUTOLOAD system will automatically pull the film through the projector mechanism.
- Once the film leader emerges from the other side, attach it to the take-up reel.
- Ensure the film is properly seated in all guides and sprockets.
6. Arahan Operasi
6.1 Powering On and Projection
- Turn the power switch to the "ON" position. The projection lamp should illuminate, and the motor should start.
- Adjust the focus knob (usually located near the lens) until the image on the screen is sharp and clear.
6.2 Kawalan Main Semula
- Hadapan/Undur: Use the directional switch to play the film forward or rewind it.
- Kawalan Kelajuan: If available, adjust the speed control knob to change the projection speed (e.g., 18 frames per second or 24 frames per second).
- Pelarasan Bingkai: Some projectors have a frame adjustment lever to align the film frame vertically on the screen.
6.3 Mematikan Kuasa
- Once projection is complete, turn the power switch to the "OFF" position.
- Allow the projector to cool down before handling or storing.
7. Penyelenggaraan
7.1 Membersihkan Projektor
- Kanta: Gently wipe the projector lens with a soft, lint-free cloth or lens cleaning paper. Use a lens cleaning solution sparingly if necessary.
- Film Path: Use a soft brush or compressed air to remove dust and film debris from the film gate, sprockets, and guides.
- Luaran: Wipe the exterior of the projector with a damp kain. Jangan gunakan pembersih atau pelarut yang melelas.
7.2 Lamp Penggantian
- Ensure the projector is unplugged and completely cool.
- Cari lamp access panel (refer to your specific model's diagram if available).
- Carefully open the panel and remove the old lamp. Avoid touching the new lamp bulb with bare hands, as oils can reduce its lifespan. Use a cloth or glove.
- Masukkan l baruamp, ensuring it is seated correctly.
- Tutup lamp access panel securely.
8. Penyelesaian masalah
| Masalah | Kemungkinan Punca | Penyelesaian |
|---|---|---|
| Tiada kuasa | Power cord not connected; outlet not working; fuse blown | Check power cord connection; test outlet; check projector fuse (if accessible and user-serviceable) |
| Tiada gambar di skrin | Lamp burned out; lens cap on; film not loaded correctly | Gantikan lamp; remove lens cap; re-load film |
| Imej kabur | Focus not adjusted; lens dirty | Adjust focus knob; clean lens |
| Kesesakan filem | Improper film loading; damaged film; dirty film path | Re-load film carefully; inspect film for damage; clean film path |
9. Spesifikasi
- Jenama: Projektor
- model: Super 8MM AUTOLOAD
- Jenis Filem: Super 8MM
- Teknologi Ketersambungan: Filem
- Resolusi Paparan: 960 x 540
- Ciri Khas: Mudah alih
- Penggunaan yang Disyorkan: Pawagam Rumah
- Dimensi Pakej: 16 x 12 x 12 inci
- ASIN: B093RD38ZF
- Tarikh Mula-mula Tersedia: 9 November 2021
10. Waranti dan Sokongan
This product is listed as "DISCONTINUED" and is likely a vintage item. Therefore, standard manufacturer warranty and direct support may not be available. For technical assistance or parts, please consult specialized vintage electronics repair services or online communities dedicated to Super 8MM projectors.
For further information, you may refer to the product's original listing or contact the seller if purchased recently.


