1. Arahan Keselamatan Penting
Read and understand all safety instructions before operating the generator. Failure to follow these instructions can result in serious injury or death.
- Bahaya Karbon Monoksida: Generators produce carbon monoxide, an odorless, colorless, poisonous gas. Operate the generator outdoors in a well-ventilated area, far from windows, doors, and vents. Never operate indoors or in partially enclosed spaces.
- Bahaya Kejutan Elektrik: Do not operate the generator in wet conditions. Ensure all electrical connections are dry and properly grounded. Use only approved extension cords that are rated for outdoor use and the generator's power output.
- Bahaya Kebakaran: Gasoline is highly flammable. Refuel in a well-ventilated area with the engine off and cool. Do not smoke or allow open flames near the generator or fuel. Store gasoline in an approved container in a safe location.
- Permukaan Panas: The generator engine and muffler become very hot during operation and remain hot for a period after shutdown. Avoid contact with hot surfaces to prevent burns.
- Kanak-kanak dan Haiwan Kesayangan: Keep children and pets away from the generator, especially during operation.
2. Komponen Selesaiview
Familiarize yourself with the main components of your Husky HKG3000 portable gasoline generator.
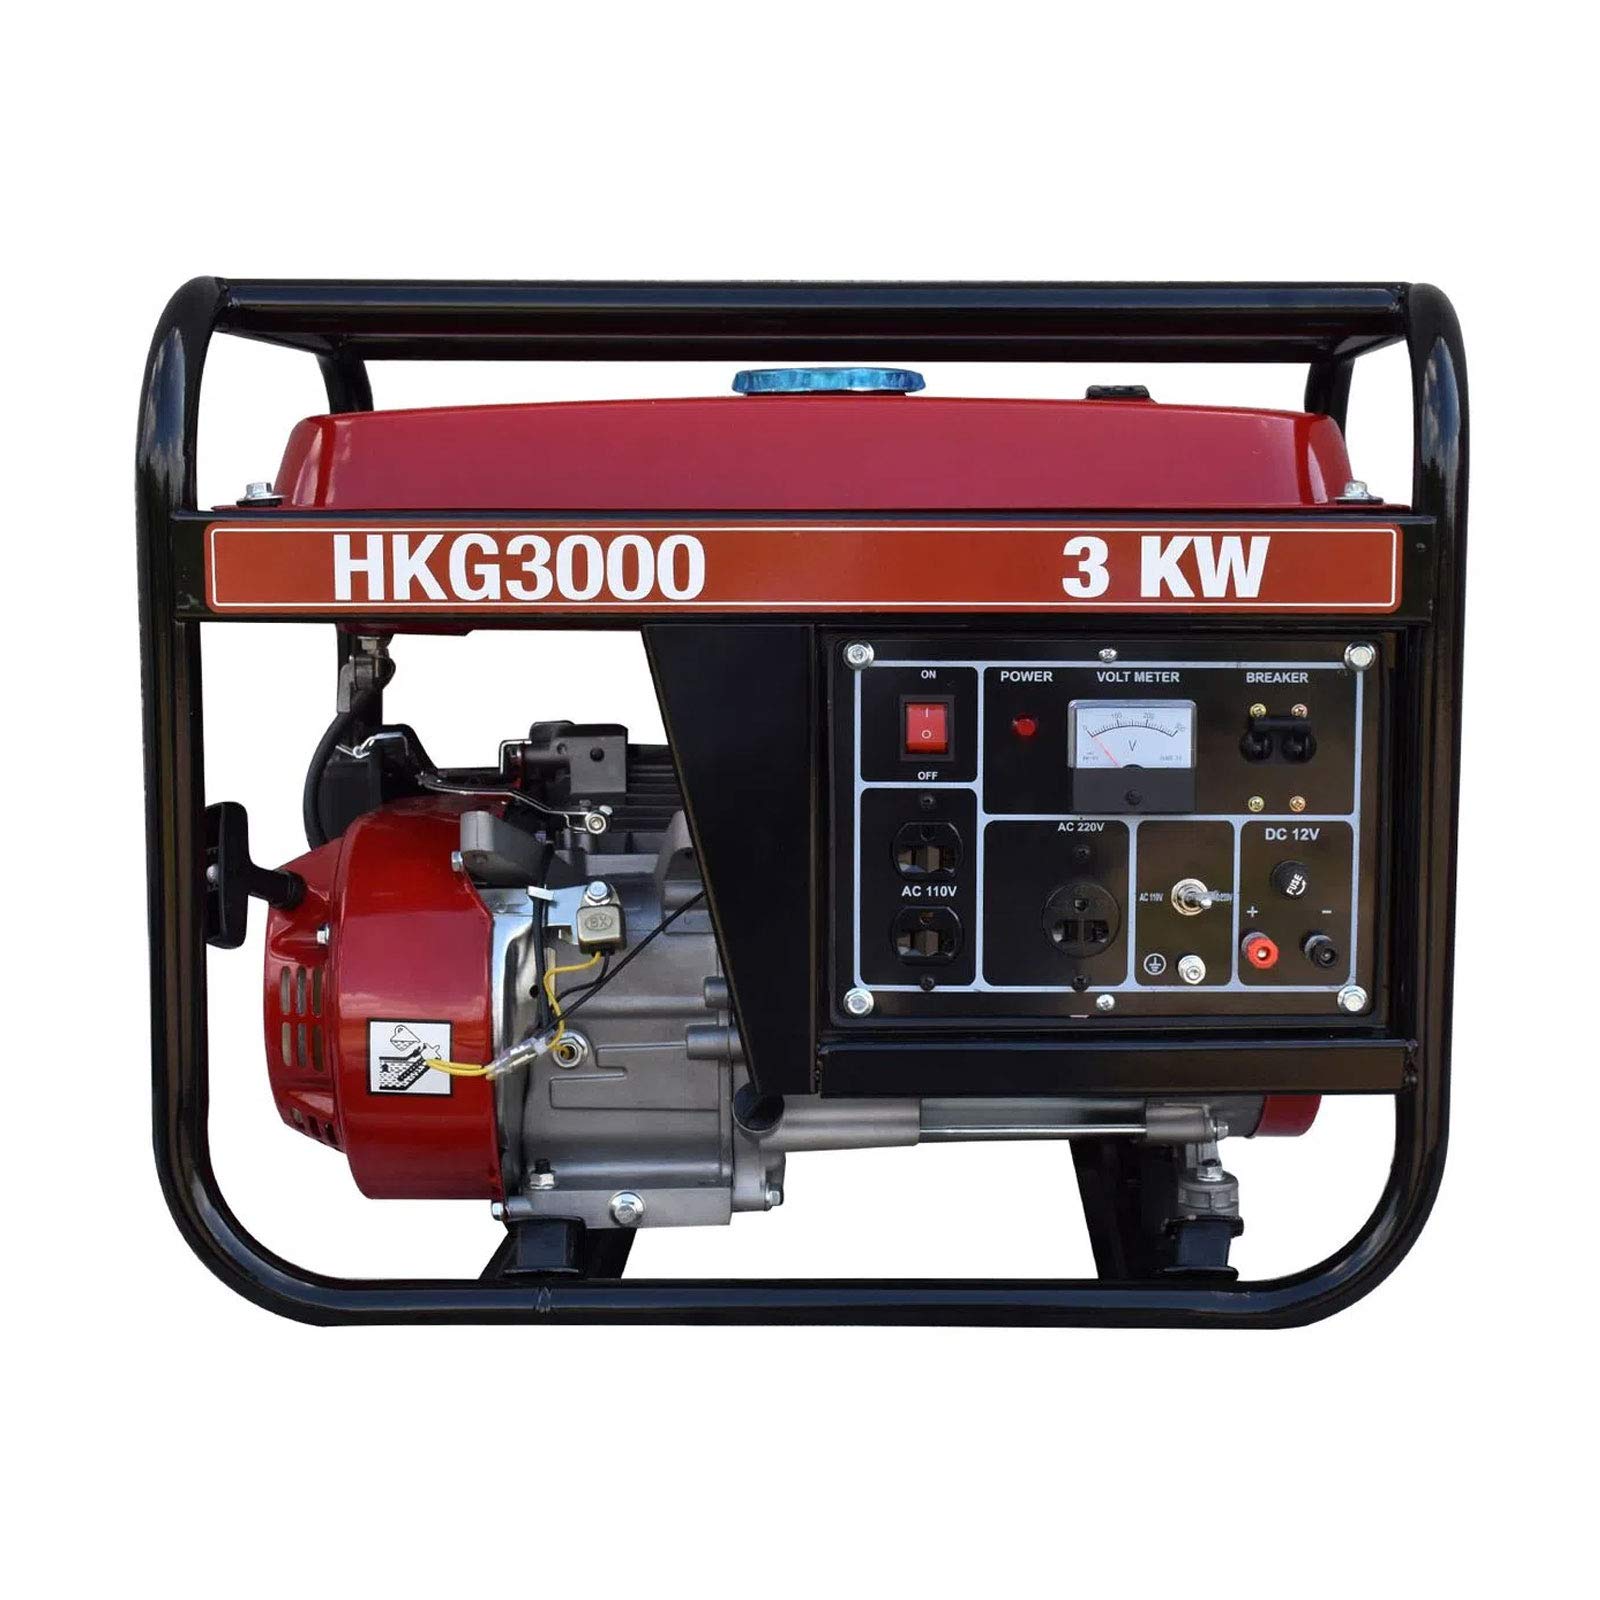
Rajah 2.1: Secara keseluruhan view of the Husky HKG3000 Portable Gasoline Generator, showcasing rangka teguh dan panel kawalannya.

Rajah 2.2: Depan view of the Husky HKG3000 Portable Gasoline Generator, highlighting the control panel with power outlets, voltmeter, and circuit breakers.

Rajah 2.3: Sisi view of the Husky HKG3000 Portable Gasoline Generator, showing the 4-stroke engine, air filter housing, and fuel valve.

Figure 2.4: Included accessories for the Husky HKG3000 Portable Gasoline Generator, featuring the user manual, power plugs, and a spark plug wrench.
Komponen Utama:
- Tangki Bahan Api: Stores gasoline.
- Penutup Bahan Api: Seals the fuel tank.
- Injap Bahan Api: Controls fuel flow to the engine.
- Tuas Tercekik: Digunakan untuk menghidupkan enjin sejuk.
- Pemula Recoil: Manual pull-cord for starting the engine.
- Suis Mesin: Turns the engine ignition ON/OFF.
- Penapis Udara: Melindungi enjin daripada habuk dan serpihan.
- Oil Fill Cap/Dipstick: For adding and checking engine oil.
- AC Outlets (110V/220V): For connecting electrical devices.
- DC 12V Outlet: Untuk mengecas bateri 12V.
- Voltmeter: Memaparkan output voltage.
- Pemutus Litar: Protect the generator and connected devices from overload.
- Peredam: Mengurangkan bunyi enjin dan menghalakan gas ekzos.
3. Persediaan
Sebelum penggunaan pertama, lakukan langkah persediaan berikut:
3.1 Membongkar
- Keluarkan penjana dengan berhati-hati dari bungkusannya.
- Inspect for any shipping damage. Contact your dealer if damage is found.
- Ensure all included accessories (power plugs, spark plug wrench, manual) are present.
3.2 Menambah Minyak Enjin
The generator is shipped without engine oil. Operating without oil will cause severe engine damage.
- Letakkan penjana pada permukaan yang rata.
- Unscrew the oil fill cap/dipstick.
- Slowly add the recommended engine oil (e.g., SAE 10W-30) to the crankcase until it reaches the upper mark on the dipstick. Do not overfill.
- Gantikan penutup isi minyak/dipstick dengan selamat.
3.3 Menambah Bahan Api
Use only fresh, unleaded gasoline with an octane rating of 87 or higher.
- Ensure the generator engine is off and cool.
- Buka penutup minyak.
- Carefully pour gasoline into the fuel tank, avoiding spills. Do not fill above the red indicator or the bottom of the filler neck.
- Securely close the fuel cap. Wipe up any spilled fuel immediately.
3.4 Membumikan Penjana
Pembumian yang betul adalah penting untuk mengelakkan kejutan elektrik.
- Connect a heavy-gauge copper wire from the generator's grounding terminal to an approved ground source, such as a ground rod driven into the earth.
- Consult a qualified electrician for local grounding requirements.
4. Arahan Operasi
4.1 Pemeriksaan Pra-Mula
- Periksa paras minyak enjin.
- Periksa tahap bahan api.
- Ensure all electrical loads are disconnected from the generator.
- Verify the generator is on a level surface and in a well-ventilated outdoor area.
4.2 Starting the Engine (Manual Start)
- Putar injap bahan api ke ON kedudukan.
- Gerakkan tuil pencekik ke DITUTUP (start) position if the engine is cold. If the engine is warm, set the choke to the TERBUKA kedudukan.
- Putar suis mesin ke ON kedudukan.
- Firmly grasp the recoil starter handle and pull it slowly until resistance is felt, then pull quickly and smoothly.
- Once the engine starts, slowly move the choke lever to the TERBUKA (run) position.
- Biarkan enjin panas selama beberapa minit sebelum menyambungkan beban elektrik.
4.3 Menyambungkan Beban Elektrik
- Pastikan penjana berjalan dengan lancar.
- Pasangkan peranti elektrik anda satu demi satu, bermula dengan kuasa tertinggitage peranti.
- Jangan melebihi kuasa yang dianggarkan oleh penjanatage (2.8 kW nominal, 3 kW maximum). Overloading will trip the circuit breakers.
4.4 Menghentikan Enjin
- Putuskan sambungan semua beban elektrik daripada penjana.
- Putar suis mesin ke DIMATIKAN kedudukan.
- Putar injap bahan api ke DIMATIKAN kedudukan.
5. Penyelenggaraan
Regular maintenance ensures optimal performance and extends the life of your generator. Always perform maintenance with the engine off and cool.
5.1 Penukaran Minyak Enjin
- Tukar minyak enjin selepas 20 jam pertama operasi, kemudian setiap 50-100 jam atau setiap tahun.
- Drain old oil while the engine is warm. Refill with recommended oil type and quantity.
5.2 Pembersihan Penapis Udara
- Inspect the air filter every 50 hours or more frequently in dusty conditions.
- Clean the foam element with warm, soapy water, rinse, and allow to dry completely. Lightly oil the foam element before reinstallation.
5.3 Pemeriksaan Palam Pencucuh
- Periksa palam pencucuh setiap 100 jam atau setiap tahun.
- Clean carbon deposits and adjust the gap if necessary. Replace if electrodes are worn or insulation is cracked.
5.4 Penyelenggaraan Sistem Bahan Api
- If storing the generator for more than 30 days, drain the fuel tank and carburetor, or use a fuel stabilizer.
- Regularly check fuel lines for cracks or leaks.
5.5 Penyimpanan
- Bersihkan bahagian luar penjana.
- Simpan di kawasan yang bersih, kering dan mempunyai pengudaraan yang baik, jauh daripada cahaya matahari langsung dan suhu yang melampau.
- Tutup penjana untuk melindunginya daripada habuk.
6. Penyelesaian masalah
Bahagian ini menyediakan penyelesaian kepada isu operasi yang lazim.
6.1 Enjin Tidak Akan Berhidup
- Tiada Bahan Api: Periksa paras bahan api dan tambahkan petrol baharu jika perlu.
- Fuel Valve OFF: Putar injap bahan api ke ON.
- Suis Enjin MATI: Turn engine switch to ON.
- Improper Choke Position: Adjust choke lever as per starting instructions (Section 4.2).
- Tahap Minyak Rendah: Check oil level and add oil if necessary. The generator may have a low-oil shutdown feature.
- Fouled Spark Plug: Periksa dan bersihkan atau gantikan palam pencucuh.
6.2 Tiada Output Kuasa
- Pemutus Litar Tersandung: Reset the AC or DC circuit breaker on the control panel. Reduce load if it trips again.
- Lebihan beban: Disconnect some electrical devices. Do not exceed the generator's rated capacity.
- Faulty Connection: Check all power cords and connections.
6.3 Enjin Berjalan Dengan Buruk
- Bahan Api Basi: Drain old fuel and refill with fresh gasoline.
- Penapis Udara Tersumbat: Bersihkan atau ganti penapis udara.
- Fouled Spark Plug: Periksa dan bersihkan atau gantikan palam pencucuh.
7. Spesifikasi
| Spesifikasi | Nilai |
|---|---|
| Jenama | Husky |
| Model | HKG3000 |
| Jenis Enjin | 4-Stroke |
| Kuasa Kuda Enjin | 7.5 hp |
| Jenis Bahan Api | petrol |
| Sistem Permulaan | Manual (Undur) |
| Output Kuasa Maksimum | 3 kW (3000 Watt) |
| Output Kuasa Dinilai | 2.8 kW (2800 Watt) |
| Kekerapan | 60 Hz |
| Voltage | 110V / 220V |
| Penggunaan yang Disyorkan | Komersil |
| Berat Barang | 70 Kilogram |
| Mudah alih | Mudah alih |
8. Waranti dan Sokongan
This Husky generator is covered by a manufacturer's warranty. Please refer to the warranty card included with your product for specific terms and conditions.
For technical assistance, parts, or warranty claims, please contact Husky customer support through their official webtapak atau maklumat hubungan yang diberikan dalam dokumentasi produk anda.
Always provide your model number (HKG3000) and serial number when contacting support to ensure efficient service.


