1. Pengenalan
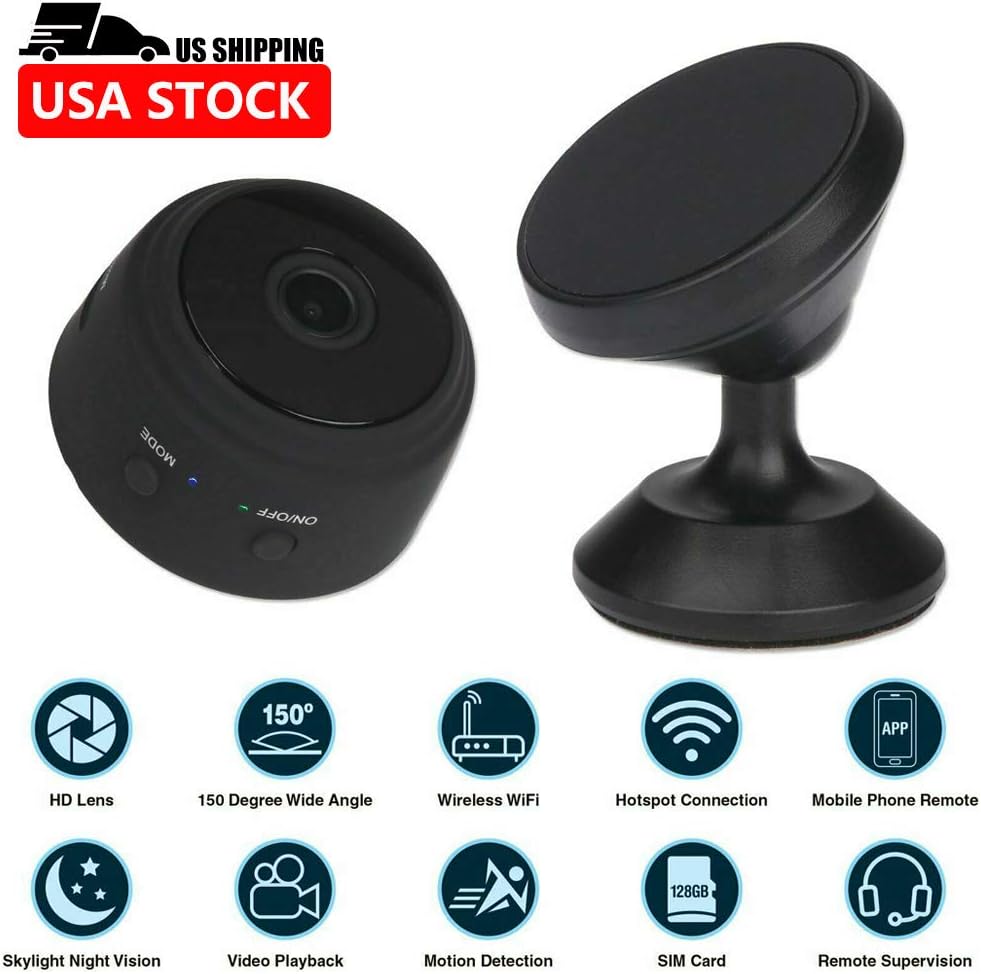
The A9 Mini Camera is a compact and versatile wireless IP camera designed for home and office security, surveillance, and general monitoring. Featuring 1080P HD video recording, 150-degree wide-angle viewing, night vision capabilities, and smart motion detection, this camera offers comprehensive monitoring solutions. Its ultra-miniature design and multiple installation options make it suitable for various indoor and outdoor applications. This manual provides detailed instructions for setup, operation, maintenance, and troubleshooting to ensure optimal performance of your device.
2. Kandungan Pakej
Sila sahkan bahawa semua item yang disenaraikan di bawah disertakan dalam pakej anda:
- 1 x A9 Mini Camera
- 1 x Camera Holder
- 1 x Kabel USB Standard
- 1 x Flexible Gooseneck USB Cable
- 1 x Manual Pengguna

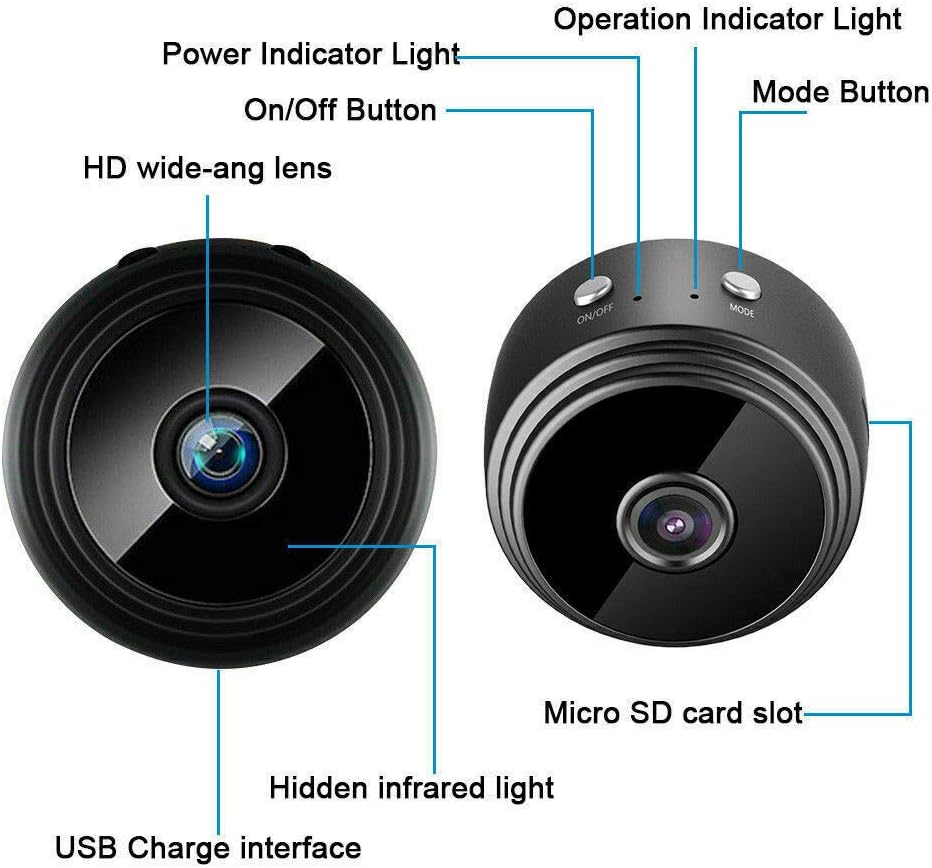
3. Produk Lebihview
Familiarize yourself with the components of your A9 Mini Camera:

- HD wide-angle lens: Captures 1080P video with a 150-degree viewsudut ing.
- Butang Hidup/Mati: Menghidupkan atau mematikan peranti.
- Lampu Petunjuk Kuasa: Menunjukkan status kuasa.
- Lampu Penunjuk Operasi: Shows current operating mode (e.g., recording, standby).
- Butang Mod: Switches between different operating modes.
- Slot kad SD mikro: For inserting a TF card (not included) for local storage.
- Hidden infrared light: Enables night vision capabilities.
- USB Charge interface: For charging the camera and connecting to power.
4. Persediaan
4.1 Kaedah Pemasangan
The A9 Mini Camera offers flexible installation options:
- With Holder: Place the camera on the included holder for stable placement on countertops, desks, or flat surfaces.
- Magnet terbina dalam: The camera features a powerful built-in magnet, allowing it to be easily attached to metal surfaces such as table legs, refrigerators, or metal shelves.
- Flexible Gooseneck USB Cable: Use the flexible gooseneck USB cable to power the camera and adjust its angle. This can be inserted directly into a PC USB port or a USB power adapter.

4.2 Initial Setup (App & Power)
- Muat turun Aplikasi: Download the compatible application to your smartphone or tablet. The camera supports Android and iOS mobile operating systems.
- Hidupkan kuasa: Connect the camera to a power source using the provided USB cable. The camera will power on automatically or can be turned on using the On/Off button.
- Sambungan Wi-Fi: Proceed to connect the camera to your Wi-Fi network as described in the next section.
4.3 Wi-Fi Connection Methods
There are two primary methods for connecting your camera to Wi-Fi:
- Wireless Wi-Fi Connection (via Router): Connect the camera to your home or office Wi-Fi router. This allows for remote control and viewing from anywhere with an internet connection.
- Camera's Built-in Wi-Fi Hotspot: The camera has a built-in Wi-Fi hotspot. You can directly connect your phone to this hotspot. This method allows for remote control within approximately 10 meters, even if your phone does not have an internet connection.
5. Arahan Operasi
5.1 Mod Rakaman
The A9 Mini Camera supports three recording modes:
- 24H Recording: The camera records continuously throughout the day (default mode).
- Pengesanan Pergerakan: Recording starts automatically when motion is detected within the camera's field of view.
- Pemasa: Set a specific schedule for the camera to record, allowing for customized recording periods.
5.2 Penglihatan Malam
The camera is equipped with hidden infrared lights, enabling clear video recording in low-light conditions or complete darkness. Night vision activates automatically when ambient light levels are insufficient.
5.3 Pengesanan Pergerakan
When motion detection is enabled, the camera will begin recording when it senses movement. This feature helps conserve storage space and battery life by only recording when an event occurs. Alerts can be configured through the mobile application.
5.4 Multi-Platform and Multi-User Support
The A9 Mini Camera supports viewing and control from multiple platforms, including Android, iOS, Windows, and Mac OS. Multiple users can also access the camera feed simultaneously from different devices (phone and computer).
5.5 Recording Without Wi-Fi
The camera can record video even without a Wi-Fi connection. Simply insert a Micro SD card (TF card, not included) into the camera's slot. The camera will automatically record HD video to the Micro SD card. This is useful for situations where Wi-Fi is unavailable or unreliable.
6. Penyelenggaraan
- Pembersihan: Gunakan kain lembut dan kering untuk membersihkan kanta dan badan kamera. Elakkan menggunakan pembersih cecair atau bahan kasar.
- Suhu dan Kelembapan: Store and operate the camera within the specified temperature and humidity ranges to prevent damage. Avoid extreme heat, cold, or high humidity.
- Storan: When not in use for extended periods, ensure the camera is fully charged and stored in a cool, dry place.
- Kemas kini Firmware: Semak pengeluar website or the mobile application periodically for any available firmware updates to ensure optimal performance and security.
7. Penyelesaian masalah
- Kamera tidak dihidupkan: Ensure the camera is properly connected to a power source or that its internal battery is charged.
- Tidak dapat menyambung ke Wi-Fi: Verify that your Wi-Fi network is active and within range. Ensure you have entered the correct Wi-Fi password. If using the camera's hotspot, ensure your phone is connected directly to it.
- Hayat bateri pendek: The camera's continuous recording time is approximately 1 hour. For extended use, keep the camera connected to a power source.
- Kualiti video yang lemah: Check if the lens is clean and free from obstructions. Ensure adequate lighting for optimal video clarity, especially if night vision is not active. Verify the resolution settings in the app.
- Micro SD card not recognized: Ensure the TF card is inserted correctly and is not damaged. Format the card if necessary (this will erase all data).
8. Spesifikasi
| Ciri | Spesifikasi |
|---|---|
| Resolusi | 1080P HD |
| Format Video | AVI, MP4 |
| Kadar Bingkai | 25 FPS |
| Viewsudut | 150 darjah |
| Jarak Pengesanan Pergerakan | 6 meter (lurus) |
| Pencahayaan Minimum | 1 LUX |
| Masa Rakaman Berterusan | lebih kurang 1 jam |
| Format Mampat | H.264 |
| Julat Rakaman | 5m² |
| Penggunaan Kuasa | 240MA/3.7V |
| Suhu Penyimpanan | -20 hingga 80 darjah Celsius |
| Suhu Operasi | -10 hingga 60 darjah Celsius |
| Kelembapan Operasi | 15% hingga 85% RH |
| Jenis Kad Memori | TF card (Micro SD, not included) |
| Compatible Playback Software | VLCPlayer / SMPlayer |
| Keserasian OS Komputer | Windows / Mac OS X |
| Keserasian OS Mudah Alih | Android/iOS |
| Web Keserasian Pelayar | IE7+, Chrome, Firefox, Safari, etc. |
| Saiz Barang | 4.4cm x 2.3cm |
| Berat Barang | 0.15 Kilogram (5.3 auns) |
| bahan | logam |
| Teknologi Ketersambungan | Berwayar, Tanpa Wayar (Wi-Fi) |
| Sumber Kuasa | Dikuasakan Bateri |
| Jenis Pemasangan | Wall Mount, Stand, Magnetic |
| Ciri Khas | Sensor Gerakan, Penglihatan Malam |
| Penggunaan Dalaman/Luar | Dalaman, Luaran |
| Penilaian Perlindungan Antarabangsa | IP67 |
| UPC | 772728676361 |
9. Waranti dan Sokongan
For information regarding the product warranty, please refer to the documentation provided at the time of purchase or visit the official website of the retailer or manufacturer. If you encounter any issues not covered in this manual or require further assistance, please contact the customer support channels provided by your point of purchase or the manufacturer's official support page.