1. Pengenalan
This manual provides comprehensive instructions for the installation, operation, and maintenance of the SINOTIMER TM919B 30A Programmable Electronic Timer Switch. This device is designed to automatically control the ON/OFF switching of various electrical appliances based on user-defined daily or weekly programs. Please read this manual carefully before installation and use to ensure proper function and safety.
2. Maklumat Keselamatan
WARNING: Risk of electric shock. Installation should only be performed by a qualified electrician or trained personnel.
- Sentiasa putuskan kuasa pada pemutus litar sebelum memasang atau menservis suis pemasa.
- Pastikan semua sambungan pendawaian selamat dan mematuhi kod elektrik tempatan.
- Jangan melebihi kadar beban maksimum 30A.
- Peranti ini bertujuan untuk kegunaan dalaman sahaja. Elakkan pendedahan kepada kelembapan atau suhu yang melampau.
- Jangan cuba membuka atau membaiki unit ini sendiri. Hubungi kakitangan servis yang berkelayakan.
3. Produk Lebihview
The SINOTIMER TM919B is a digital timer switch featuring a large LCD display, multiple programming options, and a manual override function. It is designed for DIN rail mounting.
3.1. Komponen dan Kawalan
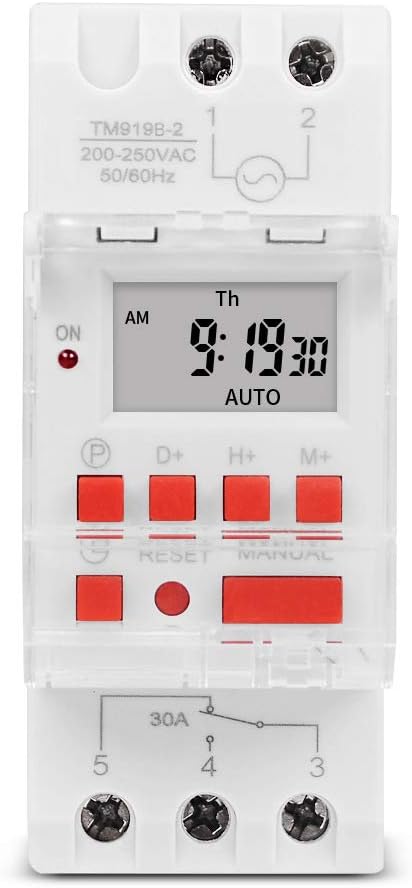
Rajah 1: Depan view of the TM919B timer switch, showing the LCD display, control buttons, and terminal connections.

Rajah 2: bersudut view of the TM919B with the transparent protective cover open, revealing the programming buttons (P, D+, H+, M+, RESET, MANUAL).
- Paparan LCD: Shows current time, day, and program status.
- P (Program) Button: Enters/exits program setting mode.
- D+ (Day) Button: Adjusts day of the week in setting modes.
- H+ (Hour) Button: Melaraskan jam dalam mod tetapan.
- M+ (Minute) Button: Melaraskan minit dalam mod tetapan.
- Butang TETAP SEMULA: Mengosongkan semua tetapan dan menetapkan semula pemasa kepada tetapan lalai kilang.
- Butang MANUAL: Bertukar antara mod HIDUP, AUTO dan MATI.
- Sambungan Terminal: For power input and load output.
4. Spesifikasi
| Ciri | Spesifikasi |
|---|---|
| Model | TM919B |
| Voltage | 220V (AC200-250V) |
| Kekerapan | 50/60Hz |
| Beban Maks | 30A (Beban Tahan) |
| Program | 16 ON/OFF programs per day/week |
| Selang Minimum | 1 minit |
| Sandaran Bateri | Built-in rechargeable battery (for memory retention) |
| Melekap | Rel DIN 35mm |
| Dimensi | Rujuk Rajah 3 |

Rajah 3: Detailed dimensions of the TM919B timer switch, showing height, width, and depth measurements.
5. Persediaan dan Pemasangan
Follow these steps for safe and correct installation of your timer switch.
5.1. Pemasangan
- Pastikan bekalan elektrik diputuskan pada pemutus litar utama.
- Mount the TM919B onto a standard 35mm DIN rail. The device features a clip mechanism on the back for secure attachment.
- Press the orange clip at the bottom of the unit to release it from the DIN rail if removal is necessary.

Rajah 4: sebelah view of the TM919B, highlighting the orange DIN rail mounting clip.

Rajah 5: belakang view of the TM919B, illustrating the DIN rail mounting mechanism.
5.2. Diagram Pendawaian
Refer to the diagram below for correct wiring connections. Ensure all connections are tight and insulated.

Rajah 6: sebelah view of the TM919B showing the wiring diagram printed on the casing. Terminals 1 and 2 are for power input (L and N). Terminals 3, 4, and 5 are for load output (Common, Normally Open, Normally Closed).
- Terminal 1 & 2: Power Input (L - Live, N - Neutral). Connect your 220V AC supply here.
- Terminal 3: Common (COM) for the output relay.
- Terminal 4: Normally Open (NO) output. The load will be powered when the timer is ON.
- Terminal 5: Normally Closed (NC) output. The load will be powered when the timer is OFF.
For typical applications where the load is switched ON by the timer, connect the load between Terminal 3 (COM) and Terminal 4 (NO).
6. Arahan Operasi
6.1. Initial Setup and Reset
- After connecting power, the display may be blank or show random characters. Press the TETAP SEMULA button with a pointed object (e.g., a pen tip) to clear all memory and reset the timer. The display will show "0:00" and "MO".
- Allow the internal battery to charge for at least 30 minutes before programming for optimal performance and memory retention during power outages.
6.2. Menetapkan Waktu dan Hari Semasa
- Tekan dan tahan butang D+ button to set the current day of the week (MO, TU, WE, TH, FR, SA, SU).
- Tekan dan tahan butang H+ button to set the current hour (0-23).
- Tekan dan tahan butang M+ button to set the current minute (0-59).
- Release the buttons when the correct time and day are displayed. The timer will automatically save the settings.
6.3. Pengaturcaraan Kitaran HIDUP/MATI
The TM919B supports up to 16 ON/OFF programs. Each program consists of an ON time and an OFF time.
- Tekan ke P button once. The display will show "1 ON". This is for the first ON program.
- guna D+ to select the day(s) for this program. Options include:
- MO TU WE TH FR SA SU (Every day)
- MO (Monday only)
- TU (Tuesday only)
- ...
- ISNIN TU RA TH JUM (Hari Kerja)
- SA SU (Weekends)
- MO TU WE (Mon-Wed)
- TH FR SA (Thu-Sat)
- MO WE FR (Mon, Wed, Fri)
- TU TH SA (Tue, Thu, Sat)
- MO TU WE TH FR SA (Mon-Sat)
- guna H+ dan M+ untuk menetapkan jam dan minit ON yang diingini.
- Tekan ke P button again. The display will show "1 OFF". This is for the first OFF program.
- guna D+, H+, dan M+ to set the desired OFF day, hour, and minute. Ensure the OFF time is after the ON time for the same program.
- Repeat steps 1-5 for additional ON/OFF programs (up to 16). If you don't need all 16 programs, simply press P to cycle through unused programs until you return to the current time display.
- To exit programming mode and save settings, press the clock button (usually labeled with a clock icon, or simply wait for 30 seconds without input).
6.4. Penggantian Manual
Tekan ke MANUAL butang untuk beralih melalui mod operasi:
- ON: Output pemasa sentiasa HIDUP, mengabaikan semua program.
- AUTO: Pemasa beroperasi mengikut kitaran ON/OFF yang diprogramkan. Ini adalah mod operasi standard.
- MATI: Output pemasa sentiasa MATI, mengabaikan semua program.
Pastikan pemasa ditetapkan kepada AUTO for programmed operation.
7. Penyelenggaraan
- The TM919B is designed for maintenance-free operation.
- Bersihkan bahagian luar dengan kain lembut dan kering. Jangan gunakan pembersih atau pelarut yang kasar.
- Ensure the internal battery is charged by keeping the unit powered for at least 24 hours initially, and periodically thereafter, to maintain time and program memory during power outages.
8. Penyelesaian masalah
| Masalah | Kemungkinan Punca | Penyelesaian |
|---|---|---|
| Paparan kosong. | Tiada bekalan kuasa; bateri dalaman kehabisan kuasa. | Check power connections. Allow unit to charge for 30 minutes. |
| Timer not switching load. | Incorrect wiring; timer in MANUAL ON/OFF mode; incorrect program settings. | Verify wiring (refer to Figure 6). Ensure timer is in AUTO mode. Check program times and days. |
| Program hilang selepas kuasa dimatikantage. | Internal battery not fully charged or faulty. | Ensure unit is powered for at least 24 hours to fully charge the battery. If problem persists, contact support. |
| Butang tidak bertindak balas. | Unit frozen; temporary glitch. | Tekan ke TETAP SEMULA butang. |
9. Waranti dan Sokongan
Produk SINOTIMER dihasilkan mengikut piawaian berkualiti tinggi. Untuk maklumat jaminan atau sokongan teknikal, sila rujuk dokumentasi yang disediakan bersama pembelian anda atau lawati laman web rasmi SINOTIMER. webtapak. Simpan resit pembelian anda sebagai bukti pembelian.
For further assistance, you may contact SINOTIMER customer service through their official channels.


