1. Maklumat Keselamatan
Please read and understand all safety information and operating instructions before using this multimeter. Failure to follow these instructions may result in electric shock, fire, or damage to the meter.
- Sentiasa pastikan petunjuk ujian disambungkan dengan betul dan suis fungsi ditetapkan pada julat yang betul sebelum membuat sebarang ukuran.
- Jangan cuba mengukur voltages or currents exceeding the maximum rated values for this meter.
- Sentiasa berhati-hati apabila bekerja dengan litar hidup. vol tinggitages boleh berbahaya.
- Never open the meter casing unless specifically instructed for battery or fuse replacement. Ensure test leads are disconnected before opening.
- Gantikan bateri apabila penunjuk bateri rendah muncul untuk memastikan bacaan yang tepat.
- Jangan gunakan meter jika ia kelihatan rosak atau jika penebat pada wayar ujian terjejas.
Rajah 1: belakang view of the Rebel MIE-RB-830 Multimeter, showing the battery compartment cover and a warning label. The label advises removing test leads before opening the case to avoid electrical shock and to install fuses with correct amp/volt ratings. It also indicates the power supply is a 9V battery, type NEDA 1604 9V 6F22.
2. Produk Lebihview
The Rebel MIE-RB-830 is a compact, battery-operated digital multimeter designed for measuring DC/AC voltage, DC current, resistance, diode, and transistor (hFE) values. It is suitable for general electrical testing and troubleshooting.
2.1. Komponen
- Digital Multimeter Unit
- Petunjuk Ujian (Merah dan Hitam)
- 9V Battery (may be included or sold separately)
- Manual Pengguna (dokumen ini)

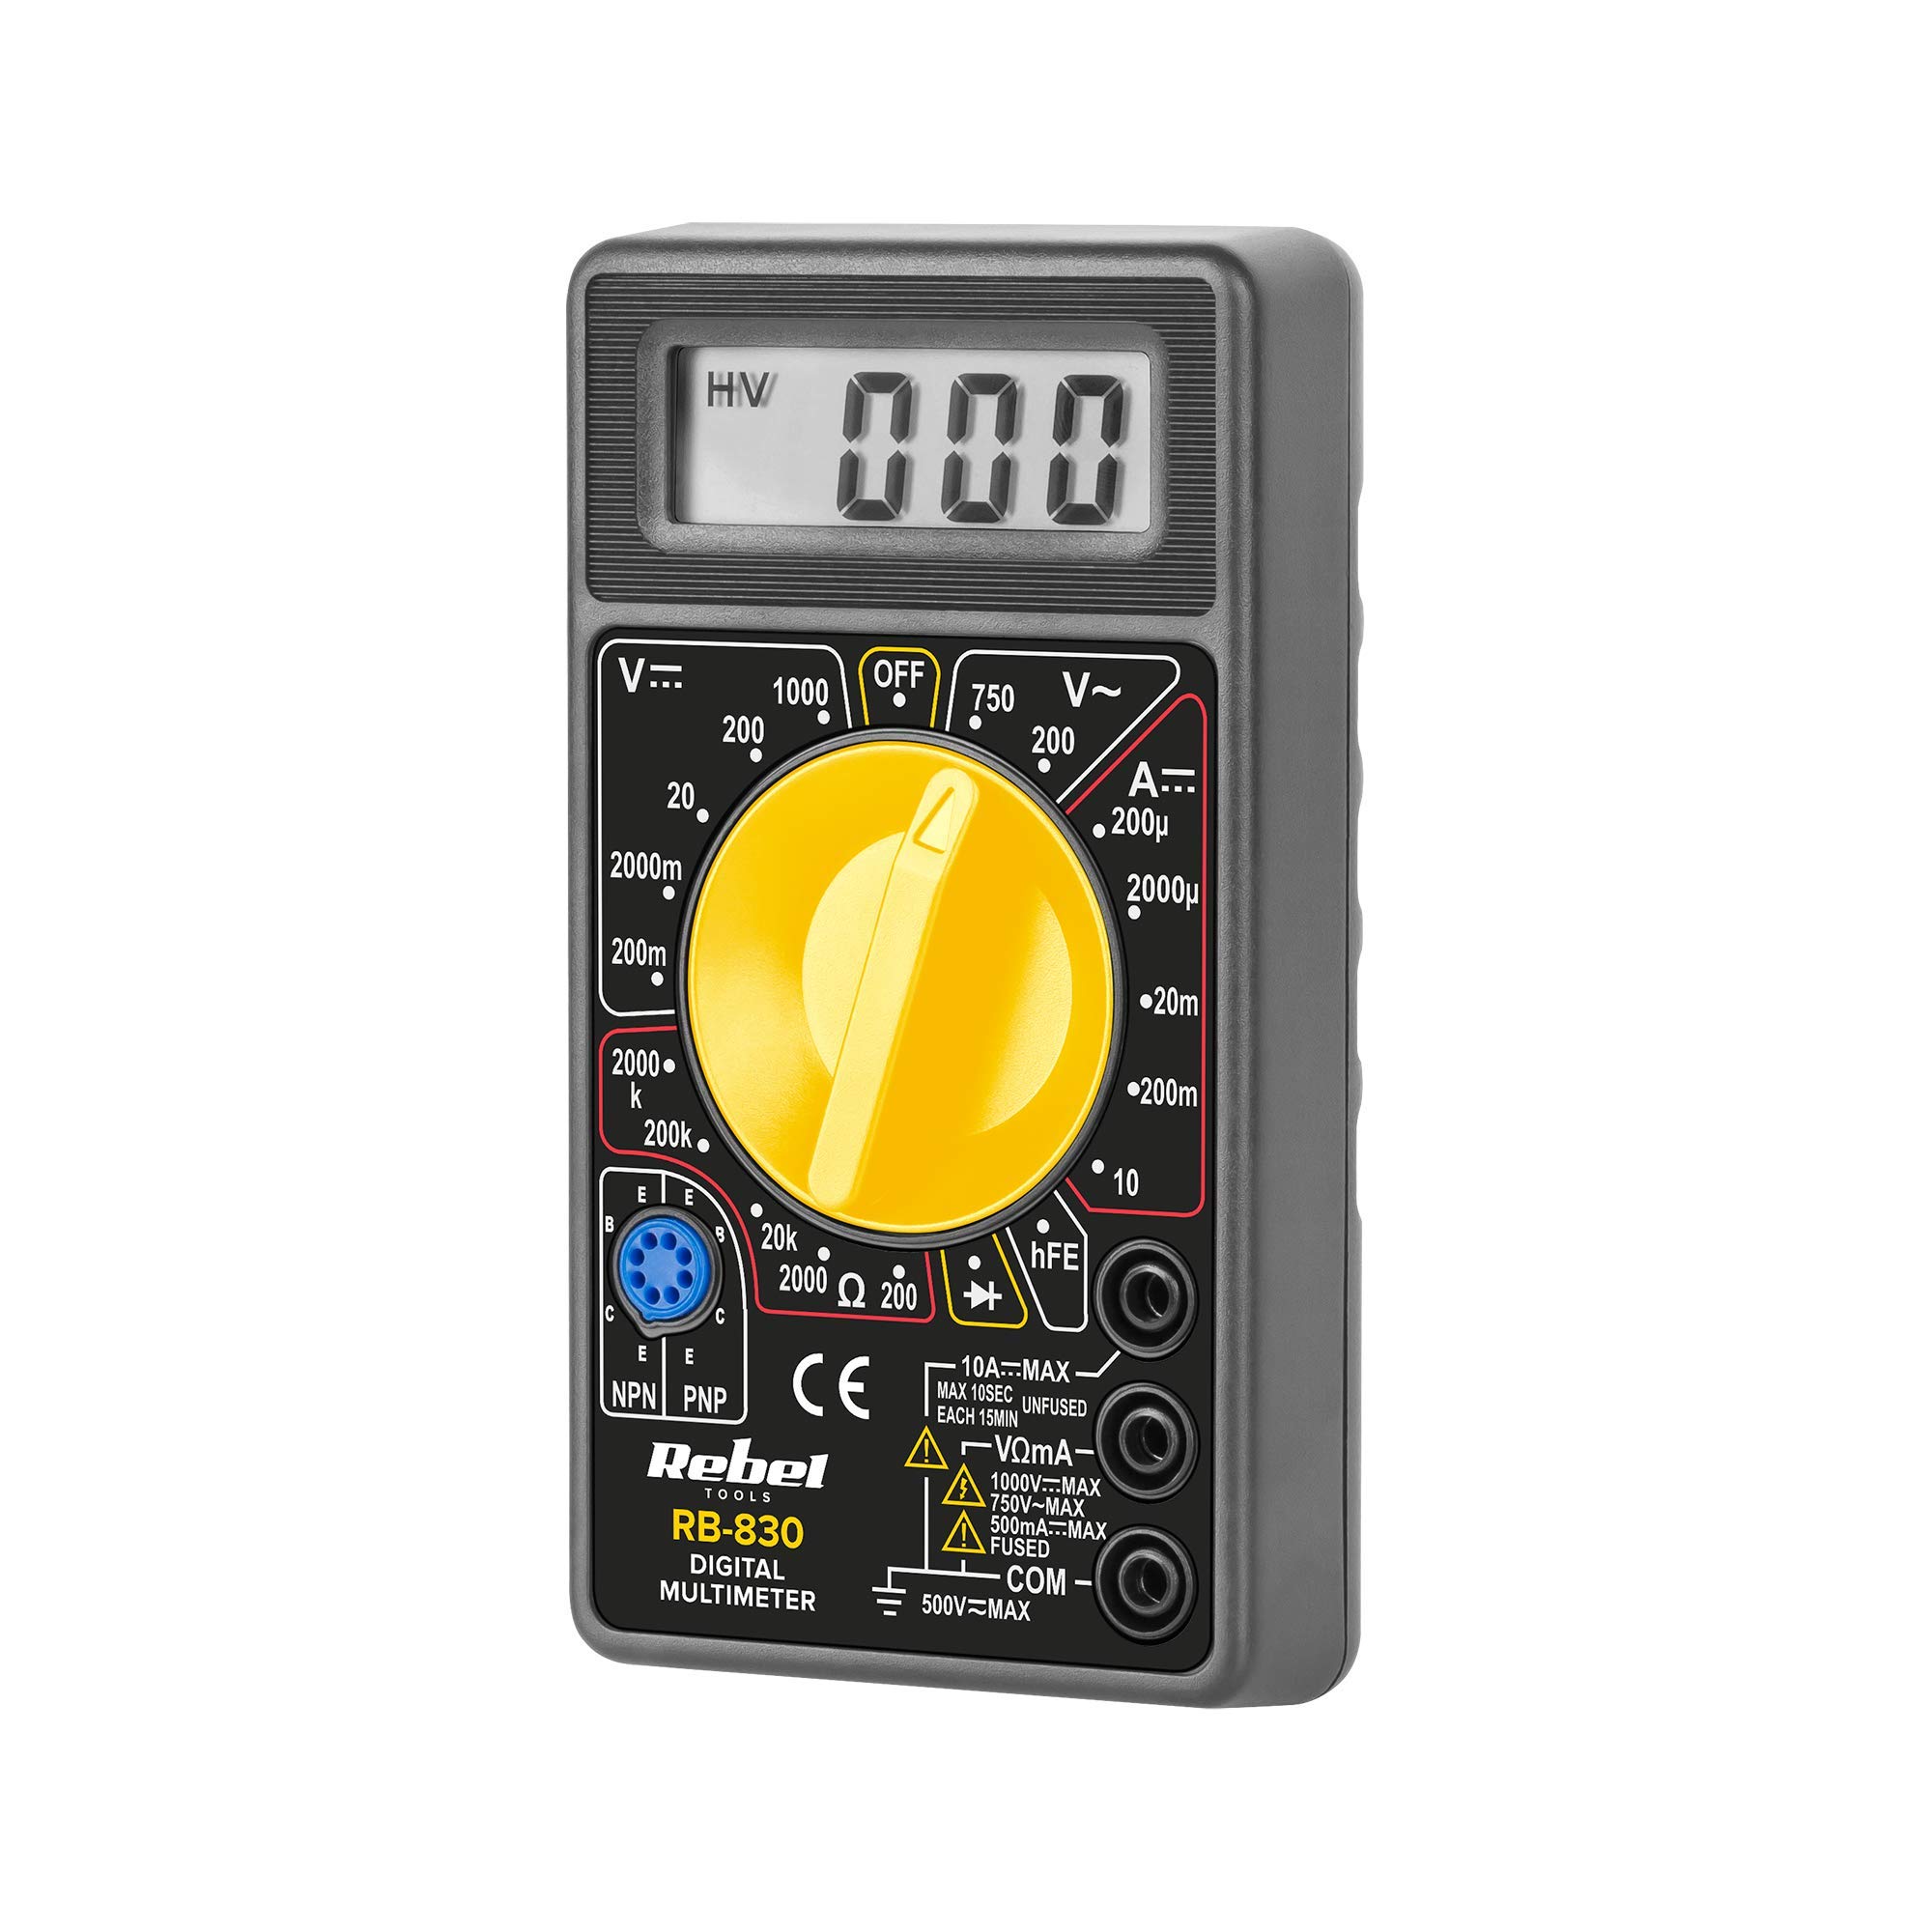
Rajah 2: The Rebel MIE-RB-830 Digital Multimeter shown with its accompanying red and black test leads. The multimeter features a large LCD display and a rotary function switch.

Rajah 3: jarak dekat view of the red and black test leads. These leads are essential for connecting the multimeter to the circuit under test.
3. Persediaan
3.1. Pemasangan Bateri
- Pastikan multimeter dimatikan dan semua kabel ujian diputuskan sambungannya.
- Locate the battery compartment cover on the back of the meter (refer to Figure 1).
- Tanggalkan skru penahan dan tanggalkan penutup dengan berhati-hati.
- Insert a new 9V battery (NEDA 1604 or 6F22 type), observing the correct polarity (+ and -).
- Gantikan penutup petak bateri dan kencangkannya dengan skru.
3.2. Menghubungkan Petunjuk Ujian
- Sambungkan merah test lead to the "VΩmA" input jack.
- Sambungkan hitam test lead to the "COM" (common) input jack.
- For current measurements exceeding 200mA (up to 10A), connect the red test lead to the "10A" input jack.
4. Arahan Operasi
4.1. Pemilihan Fungsi
Turn the rotary switch to the desired measurement function and range. Always start with a higher range if the approximate value is unknown to prevent overloading the meter.
4.2. Mengukur DC Voltage (V–)
- Tetapkan suis putar kepada Vol DC yang dikehendakitage (V–) range (e.g., 20V, 200V).
- Sambungkan petunjuk ujian merah ke sisi positif (+) litar dan petunjuk ujian hitam ke sisi negatif (-).
- Baca voltagnilai e pada paparan LCD.
4.3. Mengukur Vol ACtage (V∼)
- Tetapkan suis putar kepada Vol AC yang dikehendakitage (V∼) range (e.g., 200V, 750V).
- Sambungkan petunjuk ujian merentasi vol ACtage sumber.
- Baca voltagnilai e pada paparan LCD.
4.4. Measuring DC Current (A–)
Awas: To measure current, the meter must be connected in series with the circuit. Never connect the meter in parallel with a voltage source when in current mode, as this can damage the meter and the circuit.
- Set the rotary switch to the desired DC Current (A–) range (e.g., 20mA, 200mA, 10A).
- For currents up to 200mA, ensure the red lead is in the "VΩmA" jack. For currents up to 10A, move the red lead to the "10A" jack.
- Buka litar di mana arus akan diukur dan sambungkan meter secara bersiri.
- Baca nilai semasa pada paparan LCD.
4.5. Mengukur Rintangan (Ω)
Awas: Pastikan litar atau komponen yang diuji dinyahtenagakan sebelum mengukur rintangan.
- Set the rotary switch to the desired Resistance (Ω) range (e.g., 200Ω, 2kΩ, 200kΩ).
- Sambungkan wayar ujian merentasi komponen atau litar yang hendak diukur.
- Baca nilai rintangan pada paparan LCD.
4.6. Diode Test (→|–)
- Set the rotary switch to the Diode Test (→|–) position.
- Sambungkan wayar ujian merah ke anod diod dan wayar ujian hitam ke katod.
- Paparan akan menunjukkan vol ke hadapantage drop (biasanya 0.5V hingga 0.8V untuk diod silikon).
- Balikkan petunjuk. Paparan harus menunjukkan "OL" (Gelung Terbuka) untuk diod yang baik.
4.7. Transistor (hFE) Test
- Tetapkan suis putar ke kedudukan hFE.
- Kenal pasti sama ada transistor tersebut adalah NPN atau PNP.
- Insert the transistor's emitter, base, and collector leads into the corresponding sockets on the hFE test socket.
- Read the hFE (DC current gain) value on the display.
5. Penyelenggaraan
5.1. Penggantian Bateri
When the low battery indicator appears on the display, replace the 9V battery as described in Section 3.1. Using a low battery can lead to inaccurate readings.
5.2. Penggantian fius
If the current measurement function stops working, the fuse may need replacement. This operation should only be performed by qualified personnel.
- Pastikan multimeter dimatikan dan semua kabel ujian diputuskan sambungannya.
- Open the back casing of the meter (this may involve more screws than just the battery compartment).
- Locate the blown fuse and replace it with a fuse of the exact same type and rating (e.g., F200mA/250V for mA range, F10A/250V for 10A range). Refer to the internal markings or specifications for precise fuse ratings.
- Carefully reassemble the meter, ensuring all screws are tightened.
5.3. Pembersihan
Lap meter dengan iklanamp kain dan detergen ringan. Jangan gunakan bahan kasar atau pelarut. Pastikan meter kering.
6. Penyelesaian masalah
| Masalah | Kemungkinan Punca | Penyelesaian |
|---|---|---|
| Tiada paparan atau paparan samar | Bateri rendah atau mati | Ganti bateri 9V. |
| Bacaan yang salah | Low battery; Incorrect range selection; Poor test lead connection | Replace battery; Select appropriate range; Ensure leads are firmly connected. |
| Pengukuran arus tidak berfungsi | Blown fuse; Incorrect lead connection for current | Replace fuse (see Section 5.2); Ensure red lead is in "VΩmA" or "10A" jack as appropriate. |
| "OL" (Lebihan) dipaparkan | Measured value exceeds selected range; Open circuit (for resistance/continuity) | Select a higher range; Check circuit for breaks. |
7. Spesifikasi
| Fungsi Pengukuran | Julat | Ketepatan |
|---|---|---|
| DC Voltage (V–) | 200mV, 2V, 20V, 200V, 1000V | ±(0.5% + 2 digit) |
| Vol. ACtage (V∼) | 200V, 750V | ±(1.2% + 10 digit) |
| DC Current (A–) | 200µA, 2mA, 20mA, 200mA, 10A | ±(1.0% + 2 digit) |
| Rintangan (Ω) | 200Ω, 2kΩ, 20kΩ, 200kΩ, 2MΩ | ±(0.8% + 2 digit) |
| Ujian Diod | ya | Maju voltage penurunan |
| Ujian Transistor (hFE). | ya | hFE value |
| Bekalan Kuasa | Bateri 9V (NEDA 1604 atau 6F22) | |
| Paparan | 3½ Digit LCD, Max. 1999 | |
| Dimensi | Lebih kurang 13.5 x 10 x 4 cm | |
| Berat badan | Approx. 107 grams (without battery) | |
| Suhu Operasi | 0°C hingga 40°C (32°F hingga 104°F) | |
| Suhu Penyimpanan | -10°C hingga 50°C (14°F hingga 122°F) | |
| Piawaian Keselamatan | CE, RoHS |
8. Waranti dan Sokongan
This Rebel MIE-RB-830 Digital Multimeter is covered by a standard manufacturer's warranty against defects in materials and workmanship. Please refer to the warranty card included with your purchase or contact your retailer for specific warranty terms and conditions.
For technical support or service inquiries, please contact the point of purchase or visit the official Rebel webtapak untuk maklumat hubungan.


