1. Pengenalan
This manual provides detailed instructions for the installation, operation, and maintenance of your Vetroo V360 Liquid CPU Cooler. Designed for high-performance cooling, this All-in-One (AIO) liquid cooler features a 360mm radiator, three 120mm Addressable RGB (ARGB) PWM fans, and a robust pump to ensure optimal thermal management for your CPU. Please read this manual thoroughly before installation to ensure proper setup and functionality.
2. Apa yang ada di dalam Kotak
Buka pek semua komponen dengan berhati-hati dan sahkan bahawa anda telah menerima item berikut:
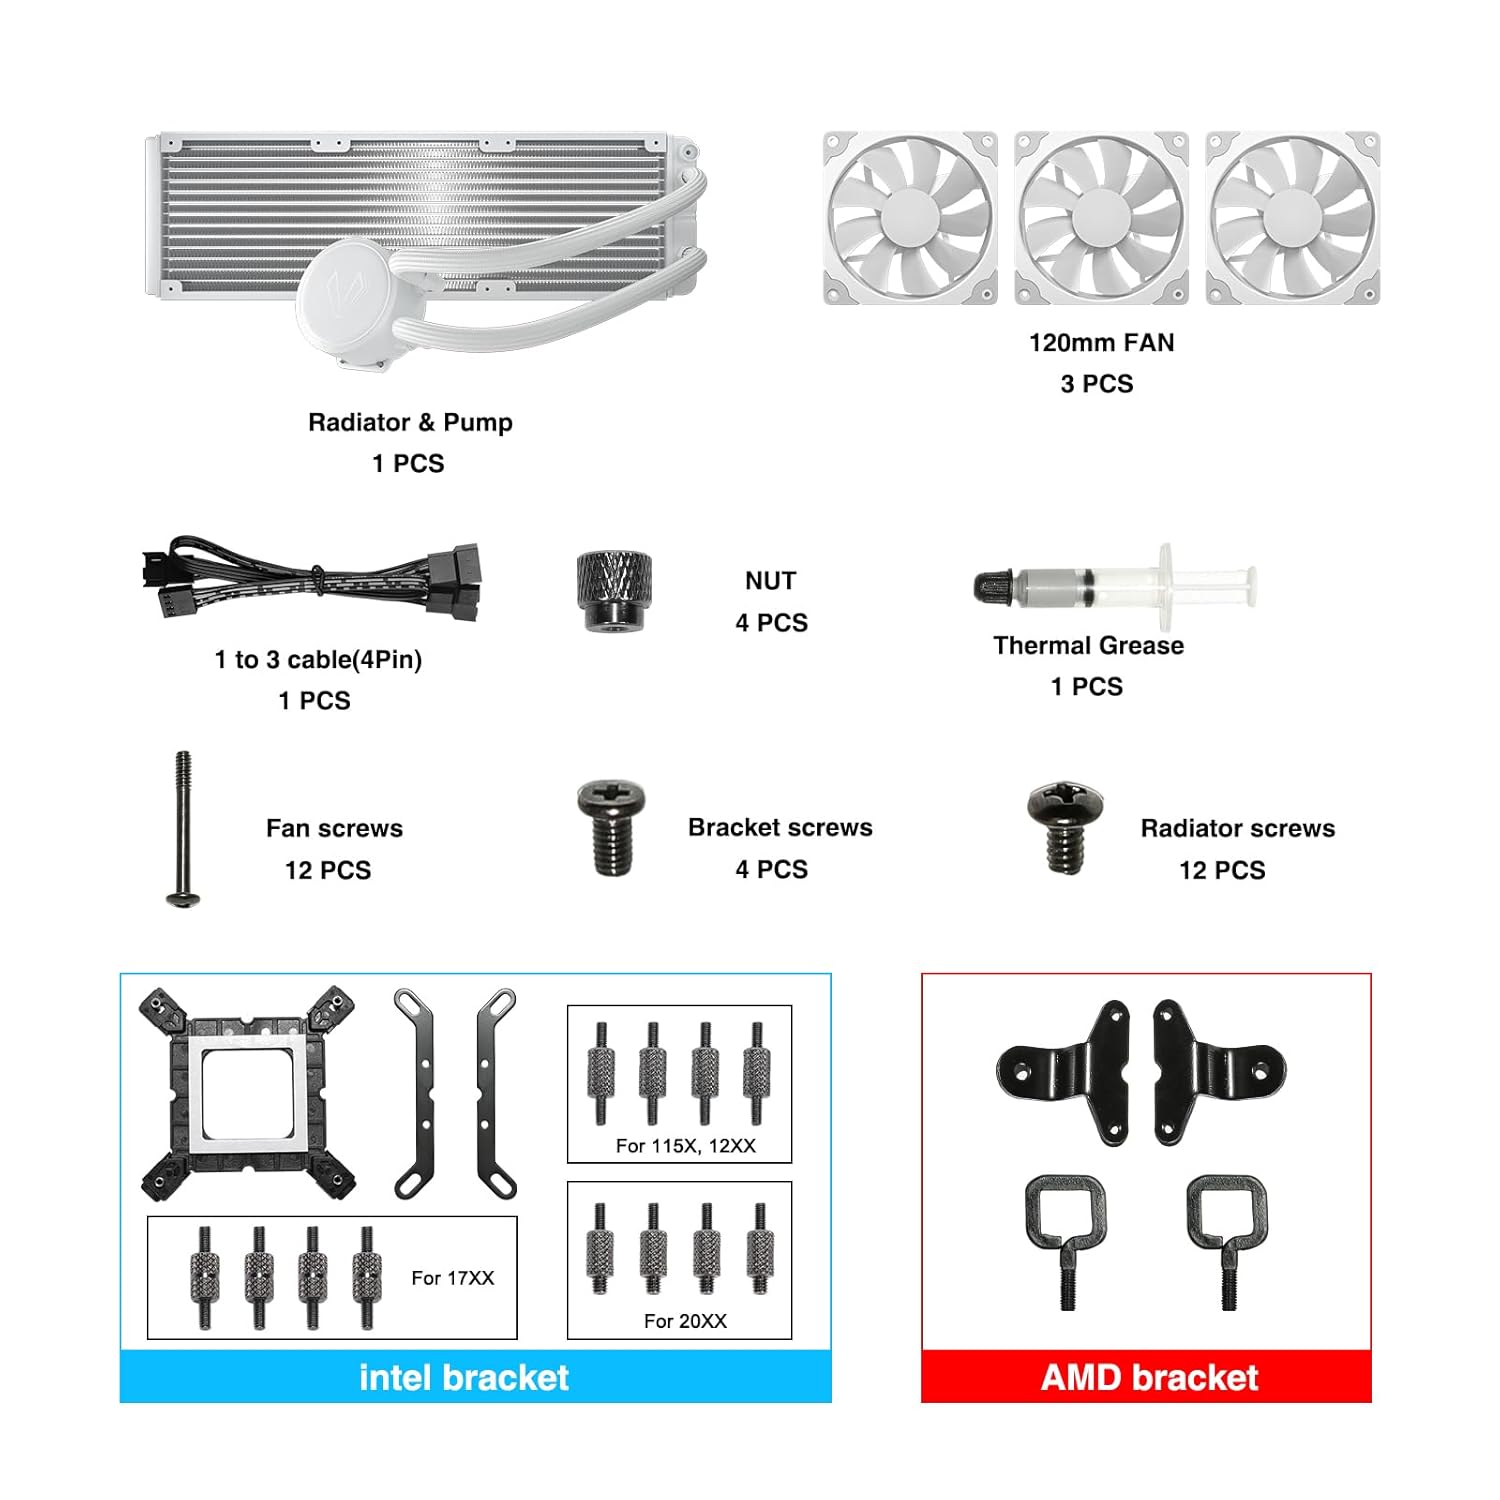
Image: All components included in the Vetroo V360 Liquid CPU Cooler package.
- Radiator & Pump (1 unit)
- 120mm Fans (3 units)
- 1 to 3 Cable (4-Pin) (1 unit)
- Nuts (4 units)
- Thermal Grease (1 tube)
- Fan Screws (12 units)
- Bracket Screws (4 units)
- Radiator Screws (12 units)
- Intel Mounting Brackets (for LGA 1851/1700/1200/115X)
- AMD Mounting Brackets (for AM5/AM4)
3. Panduan Pemasangan
Follow these steps carefully for proper installation. Ensure your system is powered off and unplugged before beginning.
3.1. Intel Socket Installation (LGA 1851/1700/1200/115X)
- Prepare the Intel Back Plate: Adjust the position of the Intel back plate according to your motherboard's CPU bracket type (115X/1700/1851). Install the back plate onto the rear of the motherboard, ensuring the holes align with the CPU socket. Secure it by installing the position screws from the front side of the motherboard.
- Attach Intel Mounting Bracket to Pump: Install the Intel mounting bracket onto the pump unit. Use the provided screws to securely fix the bracket to the pump.
- Sapukan Pes Terma: Apply a small amount of thermal paste onto the center of your CPU. Use the provided spoon or a spatula to spread the thermal paste evenly across the CPU's Integrated Heat Spreader (IHS).
- Pasang Pam: Carefully place the pump unit, with the Intel mounting bracket attached, onto the CPU. Align the screws on the pump bracket with the holes on the Intel back plate. Tighten the screws in a diagonal pattern until the pump is securely fastened.

Image: Intel back plate with adjustable positions for LGA 115X, 1700, and 1851 sockets.

Image: The Intel mounting bracket being attached to the pump unit with screws.

Image: Thermal paste being applied and spread evenly on the CPU.

Image: The pump unit being secured to the motherboard over the CPU.
3.2. AMD Socket Installation (AM5/AM4)
For AMD installations, please note that the package does bukan include an AMD backplate. You must use the original backplate that came with your motherboard. If you do not have the original backplate, please acquire one before proceeding.
- Attach AMD Mounting Bracket to Pump: Install the AMD mounting bracket onto the pump unit. Use the provided screws to securely fix the bracket to the pump.
- Sapukan Pes Terma: Apply a small amount of thermal paste onto the center of your CPU. Use the provided spoon or a spatula to spread the thermal paste evenly across the CPU's Integrated Heat Spreader (IHS).
- Pasang Pam: Carefully place the pump unit, with the AMD mounting bracket attached, onto the CPU. Align the hooks on the AMD bracket with the retention clips on your motherboard's original AMD backplate. Secure the pump by tightening the thumb screws in a diagonal pattern until the pump is firmly seated.
3.3. Pemasangan Radiator dan Kipas
- Mount Fans to Radiator: Attach the three 120mm fans to the radiator using the longer fan screws. Ensure the fan airflow direction is as desired (typically pushing air through the radiator).
- Pasang Radiator dalam Bekas: Secure the radiator assembly to an available mounting location in your PC case (e.g., top, front, or rear) using the radiator screws.
- Connect Fan and Pump Cables: Connect the 4-pin PWM fan cables to the included 1-to-3 cable, then connect this cable to a CPU_FAN or AIO_PUMP header on your motherboard. Connect the 3-pin ARGB cables from the fans and pump to the included controller hub. Connect the controller hub to a 5V 3-pin ARGB header on your motherboard for Addressable RGB synchronization.
3.4. Panduan Video Pemasangan
For a visual walkthrough of the installation process for both Intel and AMD systems, please refer to the official video below:
Video: Official installation guide for Vetroo V240 & V360 Water Coolers, demonstrating steps for both Intel and AMD platforms.
4. Arahan Operasi
4.1. Addressable RGB (ARGB) Sync
The ARGB lighting on the pump and fans can be synchronized with your motherboard's lighting software via the 5V 3-pin interface. This allows for a wide range of customizable lighting effects and colors, providing even and rich illumination for your system.

Image: The included controller hub for ARGB synchronization and PWM control.
4.2. PWM Smart Control
The three 120mm fans feature PWM (Pulse Width Modulation) smart control, allowing their speed to be automatically adjusted based on your CPU temperature. This provides optimal airflow while minimizing noise levels. The fan speed ranges from 800 to 1800 RPM, with a maximum airflow of 52 CFM and a noise level of 30.8 dB(A).
Nota Penting:
- The PWM mode for the fans must be configured and enabled in your motherboard's BIOS settings for proper automatic speed adjustment.

Image: Internal components of the fan highlighting features for low noise operation.
5. Penyelenggaraan
Penyelenggaraan berkala membantu memastikan jangka hayat dan prestasi optimum penyejuk CPU cecair anda.
- Penyingkiran habuk: Bersihkan sirip radiator dan bilah kipas secara berkala untuk mengelakkan pengumpulan habuk, yang boleh menghalang aliran udara dan mengurangkan kecekapan penyejukan. Gunakan udara termampat atau berus lembut.
- Pengurusan Kabel: Pastikan semua kabel dialihkan dengan kemas dan selamat untuk mengelakkan gangguan pada bilah kipas atau komponen lain.
- Periksa Tiub: Occasionally check the tubing for any signs of kinks, leaks, or damage. While rare, addressing these issues promptly can prevent system damage.
6. Penyelesaian masalah
If you encounter issues with your Vetroo V360 Liquid CPU Cooler, refer to the following common problems and solutions:
- Fans Not Spinning or Spinning Too Slowly:
- Check if the fan cables are securely connected to the controller hub and the motherboard's CPU_FAN/AIO_PUMP header.
- Ensure PWM mode is enabled and configured correctly in your motherboard's BIOS settings.
- Verify that the power supply to the controller hub (SATA power) is properly connected.
- No RGB Lighting or Incorrect Colors:
- Confirm that the 3-pin ARGB cables from the fans and pump are correctly connected to the controller hub and the motherboard's 5V 3-pin ARGB header.
- Ensure your motherboard's ARGB software is installed and configured to control the lighting.
- Check for any loose connections on the controller hub.
- Suhu CPU Tinggi:
- Verify that the pump is running. You may hear a faint hum or feel vibrations from the pump unit.
- Ensure the pump is securely mounted to the CPU and making good contact. Re-check the thermal paste application.
- Confirm that the fans are spinning and that airflow through the radiator is not obstructed by dust or cables.
- Check your system's overall airflow. Ensure adequate intake and exhaust fans in your PC case.
- Missing AMD Backplate:
- As stated in the installation section, the Vetroo V360 does not include an AMD backplate. You must use the original backplate provided with your AMD motherboard. If you do not have it, you will need to source one compatible with your motherboard's AM4/AM5 socket.
7. Spesifikasi
| Ciri | Spesifikasi |
|---|---|
| Dimensi Produk | 15.6"P x 2.1"L x 4.7"T (Radiator) |
| Nombor Model Item | V360-White |
| Pengeluar | Vetroo |
| Jenama | Vetroo |
| Jenis Penyambung Kuasa | 3-Pin/ 4-Pin |
| Voltage | 12 Volt |
| Wattage | 12 watt |
| Kaedah Penyejukan | air |
| Peranti Serasi | Intel LGA 1851/1700/1200/2066, AMD AM5/AM4, Gaming Console |
| Tahap Kebisingan | 30.8 dB(A) |
| bahan | Kuprum (Plat Sejuk) |
| Kelajuan Putaran Maksimum | 1800 RPM (Peminat) |
8. Waranti dan Sokongan
Vetroo products typically come with a standard manufacturer's warranty. Please refer to the warranty information provided with your purchase or contact Vetroo customer support for specific details regarding your product's warranty period and terms.
For additional support, frequently asked questions, or to download the official user manual in PDF format, please visit the following link:


