pengenalan
This manual provides detailed instructions for the safe and effective operation, maintenance, and troubleshooting of your POPOMAN MTM320B Green Cross Line Laser Level. Please read this manual thoroughly before using the device and retain it for future reference.

Figure 1: POPOMAN MTM320B Laser Level and Accessories. The image displays the green laser level unit, a USB-C charging cable, a rechargeable battery pack, a magnetic L-bracket, a rotary base, and a protective carry bag.
Arahan Keselamatan
Always adhere to the following safety guidelines to prevent injury and damage to the device:
- Keselamatan Laser: This product emits a Class II laser beam. Do not stare directly into the laser beam. Avoid direct eye exposure.
- Persekitaran Operasi: Use the device in a stable and well-lit environment. Avoid extreme temperatures and high humidity.
- Keselamatan Bateri: Use only the specified battery and charging cable. Do not disassemble, short-circuit, or expose the battery to high temperatures. Ensure the protective film is removed from the battery before first use.
- Penyelenggaraan: Jangan cuba membaiki peranti ini sendiri. Rujuk semua servis kepada kakitangan yang berkelayakan.
- Penilaian IP54: The device is rated IP54 for dust and splash resistance. While it can withstand light splashes, do not immerse it in water.

Figure 2: IP54 Protection. The image shows the laser level being splashed with water and covered in dust, illustrating its water and dust resistance.
Produk Selesaiview
The POPOMAN MTM320B is a versatile green cross line laser level designed for various leveling and alignment tasks. It features a self-leveling pendulum system and can project both cross lines and two plumb dots.
Ciri-ciri Utama:
- Green Laser Technology: Provides a brighter and more visible laser line compared to red lasers, especially indoors.
- 2-Point and Cross Line Projection: Projects one horizontal line, one vertical line, and two plumb dots (up and down).
- Mod Meratakan Sendiri: Automatically levels within a 4° inclination. If the tilt exceeds 4°, the laser will blink to indicate an out-of-level condition.
- Mod Manual: Allows locking the pendulum to project lines at any desired angle for non-level applications.
- Mod Nadi: Enables use with a laser detector (not included) for extended working distances up to 60 meters or in bright light conditions.
- Bateri boleh dicas semula USB: Equipped with a 4500mAh Lithium-Ion battery, providing up to 20 hours of continuous operation on a single charge.
- Pilihan Pemasangan Serbaguna: Includes a magnetic L-bracket and a rotary base for flexible positioning. Features 1/4"-20 and 5/8"-11 threaded mounts.
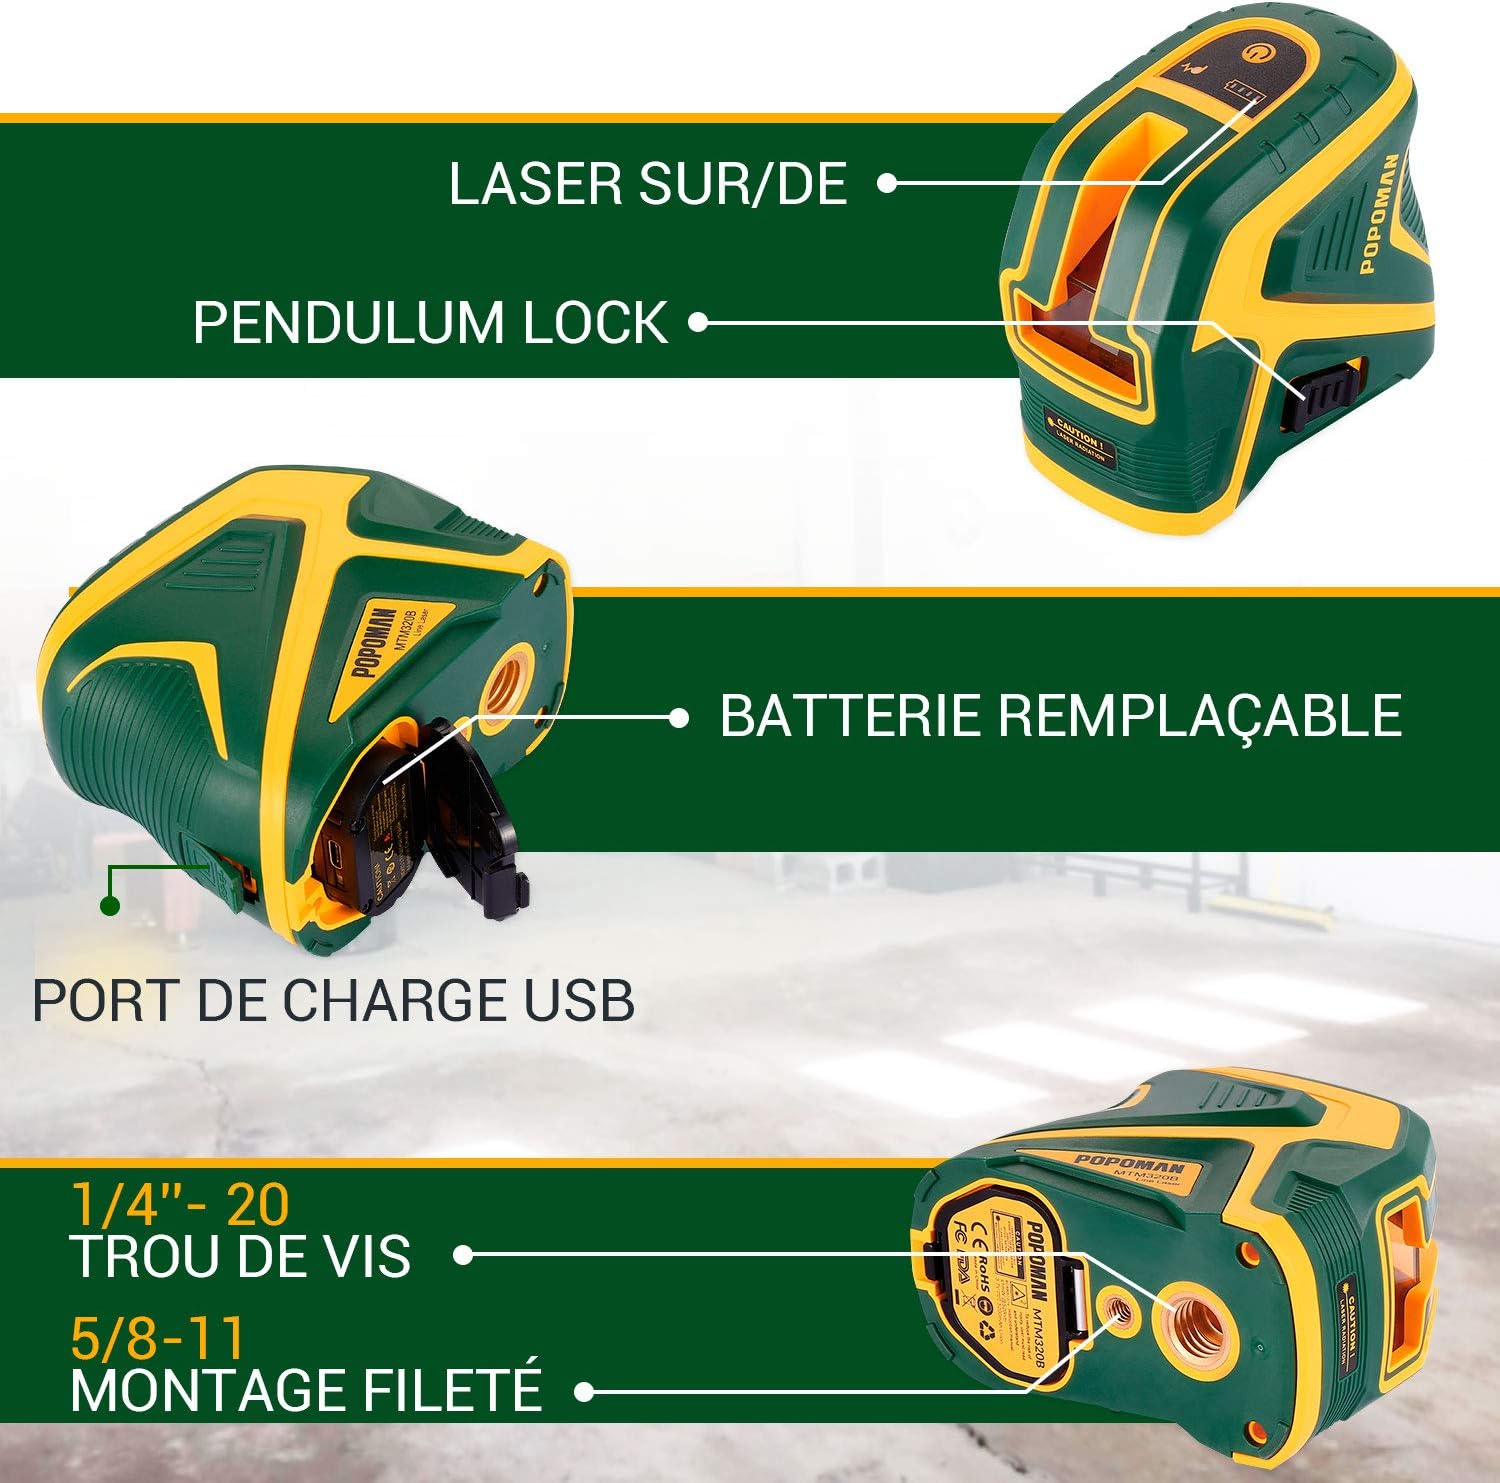
Figure 3: Product Features. This image highlights the laser's pendulum lock for secure transport and manual mode, the replaceable battery compartment, and the USB charging port.

Figure 4: Multifunctional Support. The image illustrates the magnetic L-bracket and the 360-degree rotary base, demonstrating various mounting possibilities for the laser level.
Persediaan
1. Mengecas Bateri:
Before first use, ensure the battery is fully charged. The 4500mAh Lithium-Ion battery provides extended operation time.
- Locate the USB-C charging port on the device or the battery pack.
- Connect the provided USB-C cable to the device/battery and a suitable USB power source (e.g., wall adapter, power bank, computer USB port, car charger).
- Lampu penunjuk pengecasan akan menunjukkan status pengecasan. Pengecasan penuh biasanya mengambil masa beberapa jam.
- Penting: Remove the protective film from the battery inside the battery compartment before initial use.

Figure 5: Charging Options. This image demonstrates various methods to charge the laser level's battery, including power bank, AC adapter, laptop, and car charger, highlighting its versatility.
2. Memasang Peranti:
The MTM320B offers flexible mounting options:
- On the Rotary Base: Place the laser level directly onto the included rotary base for 360-degree rotation and fine adjustment.
- With Magnetic L-Bracket: Attach the laser level to the magnetic L-bracket using the threaded mount. The bracket can then be affixed to metal surfaces or hung from screws.
- Pada Tripod: The device features 1/4"-20 and 5/8"-11 threaded mounts on its base, allowing it to be mounted on standard tripods (not included).
Arahan Operasi
1. Menghidupkan/Mematikan:
To power on the device, slide the pendulum lock switch to the unlocked position. To power off, slide the switch back to the locked position. The pendulum lock also serves as a transport lock, protecting the internal mechanism.
2. Mod Penarafan Kendiri:
When the pendulum lock is in the unlocked position, the device automatically enters self-leveling mode. It will self-level within a 4° inclination. If the surface is too steep, the laser lines will blink rapidly to indicate that it is out of range. Adjust the position of the laser level until the lines stop blinking and become steady.

Figure 6: Self-Leveling and Manual Modes. The top image shows the laser in self-leveling mode, projecting a level line. The bottom image illustrates manual mode, where the laser can project lines at an angle.
3. Mod Manual:
To use the device in manual mode (for projecting lines at an angle), keep the pendulum lock switch in the locked position. Press the power button to activate the laser lines. The lines will not self-level and can be projected at any angle. This is useful for tasks like installing handrails or decorative patterns.
4. Switching Laser Lines/Dots:
Press the mode button (often indicated by a laser icon or 'M') to cycle through different laser projection modes:
- Garisan mendatar sahaja
- Garis menegak sahaja
- Cross lines (horizontal and vertical)
- Plumb dots only
- Cross lines + Plumb dots
5. Mod Nadi:
Activate pulse mode by pressing the dedicated pulse mode button (often indicated by a pulse icon). In pulse mode, the laser beam is modulated, allowing it to be detected by a compatible laser receiver (not included) over longer distances (up to 60m) or in brighter outdoor conditions. The indicator light for pulse mode will illuminate when active.

Figure 7: Pulse Mode Button. This image provides a close-up of the laser level's control panel, highlighting the button used to activate the pulse mode for use with a laser detector.
Penyelenggaraan
- Pembersihan: Gunakan yang lembut, damp cloth to clean the device. Do not use abrasive cleaners or solvents. Keep the laser output windows clean for optimal performance.
- Storan: When not in use, store the laser level in its protective carry bag in a cool, dry place. Ensure the pendulum lock is engaged before storage or transport.
- Penjagaan Bateri: For long-term storage, charge the battery to approximately 50% every three months to prolong its lifespan.
- Pemeriksaan Penentukuran: Periodically check the accuracy of the laser level. Refer to the troubleshooting section for basic calibration checks.
Menyelesaikan masalah
| Masalah | Kemungkinan Punca | Penyelesaian |
|---|---|---|
| Garisan laser berkelip-kelip dengan pantas. | Device is out of self-leveling range (>4° inclination). | Place the device on a flatter surface or adjust its position until the lines become steady. |
| Laser tidak menyala. | Battery is depleted or not properly inserted. Pendulum lock is engaged. | Charge the battery. Ensure the battery is correctly inserted. Slide the pendulum lock switch to the unlocked position. |
| Garisan laser malap atau tidak kelihatan. | Operating in bright light conditions. Laser output window is dirty. | Use pulse mode with a laser detector for outdoor/bright conditions. Clean the laser output window with a soft cloth. |
| Inaccurate leveling. | Device is not properly calibrated or has been subjected to severe impact. | Perform a basic calibration check (see below). If issues persist, contact customer support. |
Basic Calibration Check:
To check the accuracy of the horizontal line:
- Place the laser level on a flat surface approximately 5 meters from a wall.
- Turn on the horizontal line in self-leveling mode and mark the center of the line on the wall (Point A).
- Rotate the laser level 180 degrees without moving its base and mark the center of the line again on the wall (Point B).
- The difference between Point A and Point B should be within ±3mm at 10 meters. For 5 meters, the tolerance is ±1.5mm. If the deviation is greater, the device may require professional calibration.
Spesifikasi
| Parameter | Nilai |
|---|---|
| Nombor Model | MTM320B |
| Kelas Laser | Kelas II |
| Panjang Gelombang Laser | Laser Hijau |
| Ketepatan Meratakan | ± 3 mm at 10 m |
| Julat Meningkat Diri | ± 4° |
| Jarak Kerja (Talian) | 25 m |
| Working Distance (Point) | 60 m |
| Working Distance (Pulse Mode) | 60 m (with detector) |
| Sumber Kuasa | Bateri Litium-Ion 4500mAh |
| Masa Operasi | Sehingga 20 jam (berterusan) |
| Penarafan IP | IP54 (Tahan Habuk dan Percikan) |
| Dimensi Produk | 11.2 x 6.8 x 9.7 cm |
| Berat Produk | 340 g |
| bahan | Laser |
Waranti dan Sokongan
POPOMAN products are designed and manufactured to high-quality standards. For warranty information, technical support, or service inquiries, please refer to the contact information provided on the product packaging or visit the official POPOMAN website. Please have your model number (MTM320B) and purchase details ready when contacting support.
Pengeluar: POPOMAN
model: MTM320B
Pertama Tersedia: 29 April 2021