1. Produk Lebihview
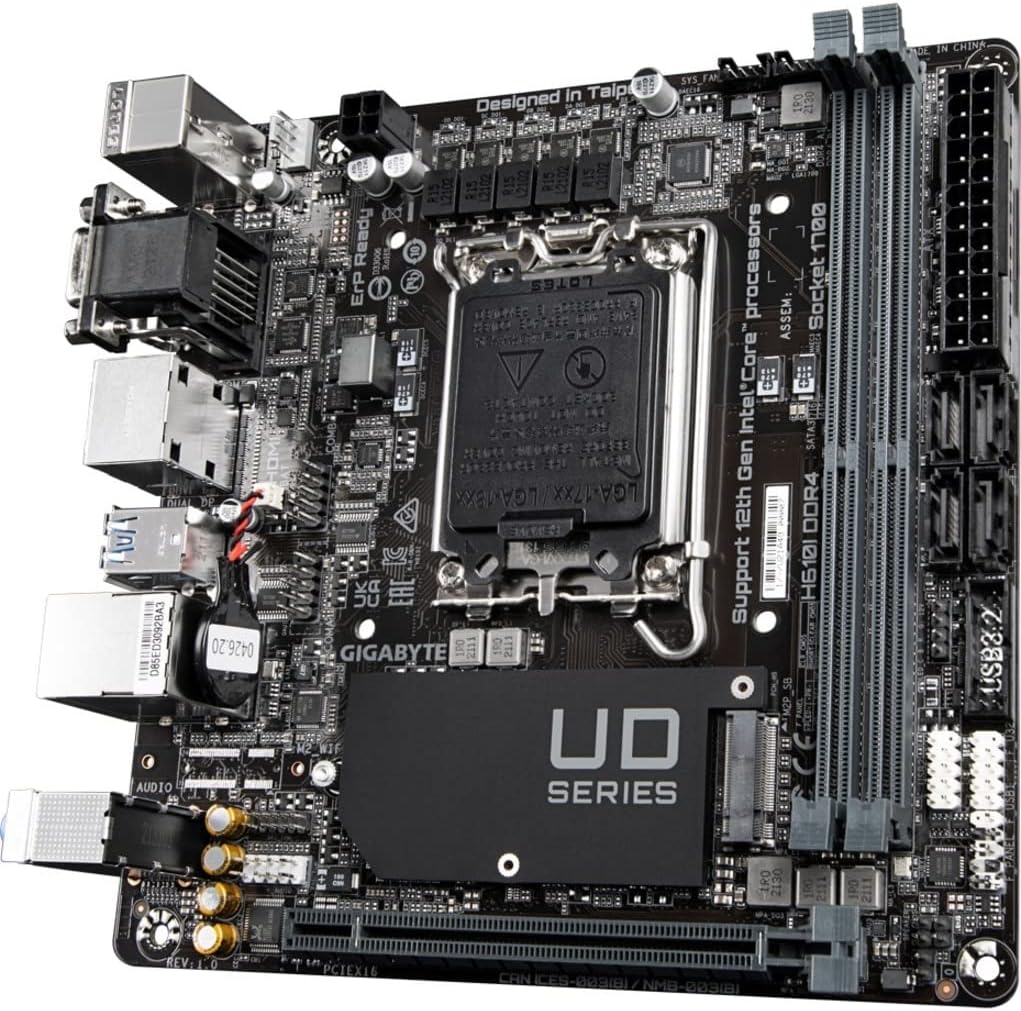
The GIGABYTE H610I DDR4 is a Mini-ITX motherboard designed to support 12th Generation Intel Core Series Processors. It offers a robust platform for building compact yet powerful systems, suitable for various applications from gaming to everyday computing. This motherboard integrates essential features for reliable performance and connectivity.
Ciri-ciri Utama:
- Soket Intel LGA 1700: Supports 12th Gen Intel Core Series Processors.
- Serasi dengan DDR4: Features Dual Channel Non-ECC Unbuffered DDR4 memory support with 2 DIMM slots.
- Commanding Power Design: Equipped with a 4+1+1 Hybrid Digital VRM Design for stable power delivery.
- Kesambungan Lanjutan: Includes PCIe 4.0 support, a Single NVMe PCIe 3.0 x4 M.2 slot, and USB 3.2 Gen1 ports.
- Rangkaian Pantas: Integrated Intel GbE LAN Chip for reliable wired network connections.
- Audio Dinamik: Features High Quality Audio Capacitors and Audio Noise Guard for enhanced sound experience.


2. Persediaan dan Pemasangan
Follow these steps for proper installation of your GIGABYTE H610I DDR4 motherboard and its components.
2.1 Memasang CPU
- Cari soket CPU LGA 1700 pada papan induk.
- Buka tuil soket CPU dan tanggalkan penutup pelindung.
- Carefully align your 12th Gen Intel Core processor with the socket, ensuring the notches on the CPU match the keys on the socket.
- Gently place the CPU into the socket without applying force.
- Close the CPU socket lever to secure the processor.

2.2 Memasang Memori DDR4
- Locate the two DDR4 DIMM slots on the motherboard.
- Buka klip di kedua-dua hujung slot DIMM.
- Selaraskan takuk pada modul memori DDR4 dengan kunci dalam slot DIMM.
- Masukkan modul memori dengan kuat ke dalam slot sehingga klip terpasang pada tempatnya.
2.3 Installing NVMe M.2 SSD
- Locate the single NVMe PCIe 3.0 x4 M.2 slot.
- Remove the M.2 screw and standoff from the motherboard.
- Masukkan SSD M.2 ke dalam slot pada sudut.
- Gently push down the M.2 SSD and secure it with the screw and standoff.
2.4 Sambungan Kuasa
- Sambungkan penyambung kuasa utama ATX 24-pin daripada bekalan kuasa anda ke pengepala yang sepadan pada papan induk.
- Connect the 8-pin CPU power connector (or 4-pin if applicable) to the CPU power header.

2.5 Panel Hadapan dan Sambungan Persisian
Connect your case's front panel headers (power button, reset button, USB, audio) to the corresponding pins on the motherboard. Refer to your case manual for specific pin layouts. Connect peripherals such as USB devices, display cables, and network cables to the rear I/O ports.
3. Arahan Operasi
3.1 Initial Boot-up and BIOS/UEFI Setup
- Selepas memasang semua komponen, sambungkan monitor, papan kekunci dan tetikus anda.
- Hidupkan sistem anda. Semasa proses but, tekan DEL kekunci berulang kali untuk memasuki utiliti persediaan BIOS/UEFI.
- In the BIOS/UEFI, you can configure boot order, system time, and other advanced settings. Save changes and exit to continue booting into your operating system installer.
3.2 Pemasangan Pemandu
After installing your operating system, install the necessary drivers for the motherboard components. These typically include chipset drivers, LAN drivers, audio drivers, and any other peripheral drivers. Drivers can usually be found on the GIGABYTE official webtapak untuk model papan induk khusus anda.
4. Penyelenggaraan
4.1 Pembersihan
Regularly clean your computer's interior to prevent dust buildup, which can lead to overheating and reduced performance. Use compressed air to remove dust from fans, heatsinks, and other components. Ensure the system is powered off and unplugged before cleaning.
4.2 Kemas Kini BIOS/UEFI
Periksa GIGABYTE secara berkala website for BIOS/UEFI updates. Updates can improve system stability, add support for new hardware, or fix bugs. Follow the instructions provided by GIGABYTE carefully when performing a BIOS/UEFI update to avoid system damage.
5. Penyelesaian masalah
Bahagian ini membincangkan isu-isu biasa yang mungkin anda hadapi dengan papan induk anda.
5.1 Tiada Output Paparan
- Check Monitor Connection: Ensure your monitor is correctly connected to the graphics card or motherboard's integrated graphics port and is powered on.
- Verify RAM Installation: Reseat the DDR4 memory modules firmly in their slots. Incorrectly seated RAM is a common cause of no display.
- Kuasa CPU: Confirm the 8-pin (or 4-pin) CPU power connector is securely plugged into the motherboard.
- Kad Grafik: If using a dedicated graphics card, ensure it is properly seated in the PCIe slot and has all necessary power cables connected.
- Pin CPU Bengkok: Carefully inspect the CPU socket for any bent pins. If found, contact GIGABYTE support.
5.2 System Unresponsive / Does Not Boot
- Bekalan Kuasa: Ensure the power supply is connected to the motherboard (24-pin ATX and CPU power) and is switched on.
- Kosongkan CMOS: Try clearing the CMOS (Complementary Metal-Oxide-Semiconductor) settings. This can usually be done by removing the CMOS battery for a few minutes or using a dedicated jumper on the motherboard.
- Minimal Boot Configuration: Disconnect all non-essential peripherals and components (e.g., extra storage drives, expansion cards) and attempt to boot with only the CPU, one RAM stick, and the graphics card (if no integrated graphics).
5.3 RAM Slot Malfunction
- If one of the two DDR4 RAM slots is not functioning, try testing each RAM stick individually in each slot to isolate the faulty component (RAM stick or motherboard slot).
- Ensure the RAM is compatible with the motherboard's specifications (DDR4, Non-ECC Unbuffered).
6. Spesifikasi Teknikal
| Ciri | Spesifikasi |
|---|---|
| Jenama | GIGABYTE |
| Nama Model | H610I DDR4 |
| Soket CPU | LGA 1700 |
| Pemproses yang Serasi | 12th Gen Intel Core Series Processors |
| Jenis Chipset | Intel H610 |
| Teknologi Memori RAM | DDR4 (Dwi Saluran Bukan ECC Tanpa Penampan) |
| Slot memori | 2 DIMM |
| Kelajuan Jam Memori | Sehingga 3200 MHz |
| Slot PCIe | PCIe 4.0 |
| Slot M.2 | 1 x NVMe PCIe 3.0 x4 M.2 |
| Port USB | USB 3.2 Gen1, USB 2.0 |
| LAN | Intel GbE LAN Chip |
| Audio | Kapasitor Audio Berkualiti Tinggi dan Pelindung Bunyi Audio |
| Faktor Bentuk | Mini-ITX |
| Dimensi Produk | 8.74 x 7.09 x 2.56 inci |
| Berat Barang | 1.3 paun |
7. Video Produk
7.1 Video Demonstrasi Produk
This video provides a brief demonstration of the GIGABYTE H610I DDR4 Mini-ITX Motherboard, showcasing its physical features and design. (Duration: 0:35)
7.2 Produk Selesaiview Video
Seorang pegawai tamatview video detailing the features and benefits of the GIGABYTE H610I DDR4 Mini-ITX Motherboard. (Duration: 0:52)
8. Waranti dan Sokongan
8.1 Maklumat Waranti
GIGABYTE products are covered by a limited warranty. The specific terms and duration of the warranty may vary by region and product type. Please refer to the warranty card included with your product or visit the official GIGABYTE weblaman web untuk maklumat jaminan terperinci.
8.2 Sokongan Teknikal
Untuk bantuan teknikal, muat turun pemacu atau maklumat produk lanjut, sila lawati sokongan rasmi GIGABYTE. weblaman web. Anda boleh menemui Soalan Lazim, panduan penyelesaian masalah dan maklumat hubungan untuk khidmat pelanggan.
Rasmi GIGABYTE Webtapak: www.gigabait.com


