1. Pengenalan dan Maklumat Keselamatan
Thank you for choosing the ANENG V8 Digital Multimeter. This device is designed for safe and accurate measurement of AC/DC voltage, AC/DC current, resistance, capacitance, frequency, temperature, diode, continuity, and battery testing. Please read this manual thoroughly before use to ensure proper operation and to prevent potential hazards.
1.1 Langkah Keselamatan
- Sentiasa pastikan multimeter berada dalam keadaan baik sebelum digunakan. Periksa wayar ujian untuk kerosakan.
- Jangan gunakan voltage or current that exceeds the maximum rated values for the multimeter.
- Berhati-hati apabila bekerja dengan voltagadalah melebihi 36V DC atau 25V AC RMS, kerana ini boleh menimbulkan bahaya kejutan.
- Sentiasa putuskan sambungan kuasa ke litar dan nyahcas semua voltan tinggitage kapasitor sebelum mengukur rintangan, kesinambungan, diod atau kemuatan.
- Pastikan suis putar berada di kedudukan yang betul untuk ukuran yang dikehendaki sebelum menyambungkan wayar ujian ke litar.
- Jangan kendalikan multimeter dalam gas letupan, wap atau persekitaran berdebu.
- Gantikan bateri dengan segera apabila penunjuk bateri lemah muncul untuk memastikan bacaan yang tepat.
2. Produk Lebihview
2.1 Kandungan Pakej
The ANENG V8 Digital Multimeter package typically includes the following items:
- ANENG V8 Digital Multimeter
- Petunjuk Ujian (Merah dan Hitam)
- Siasatan Suhu
- Membawa Sarung
- Manual Pengguna

Image: ANENG V8 Digital Multimeter with its standard accessories, including test leads, a temperature probe, and a protective carrying case.
2.2 Kawalan dan Paparan
The multimeter features an 8000-count LCD backlight display for clear readings in various lighting conditions. Key controls include a rotary switch for function selection and buttons for range, data hold, and other features.

Imej: Terperinci view of the multimeter's front panel, highlighting the LCD screen, the central rotary selector, and various control buttons.
3. Persediaan
3.1 Pemasangan Bateri
The ANENG V8 Digital Multimeter is powered by batteries. To install or replace batteries:
- Pastikan multimeter dimatikan dan putuskan sambungan semua kabel ujian.
- Cari penutup petak bateri di bahagian belakang peranti.
- Gunakan pemutar skru untuk melonggarkan skru yang menahan penutup bateri.
- Tanggalkan penutup.
- Insert new batteries, observing the correct polarity (+ and -) as indicated inside the compartment. The device typically uses AA batteries.
- Gantikan penutup bateri dan kencangkannya dengan skru.
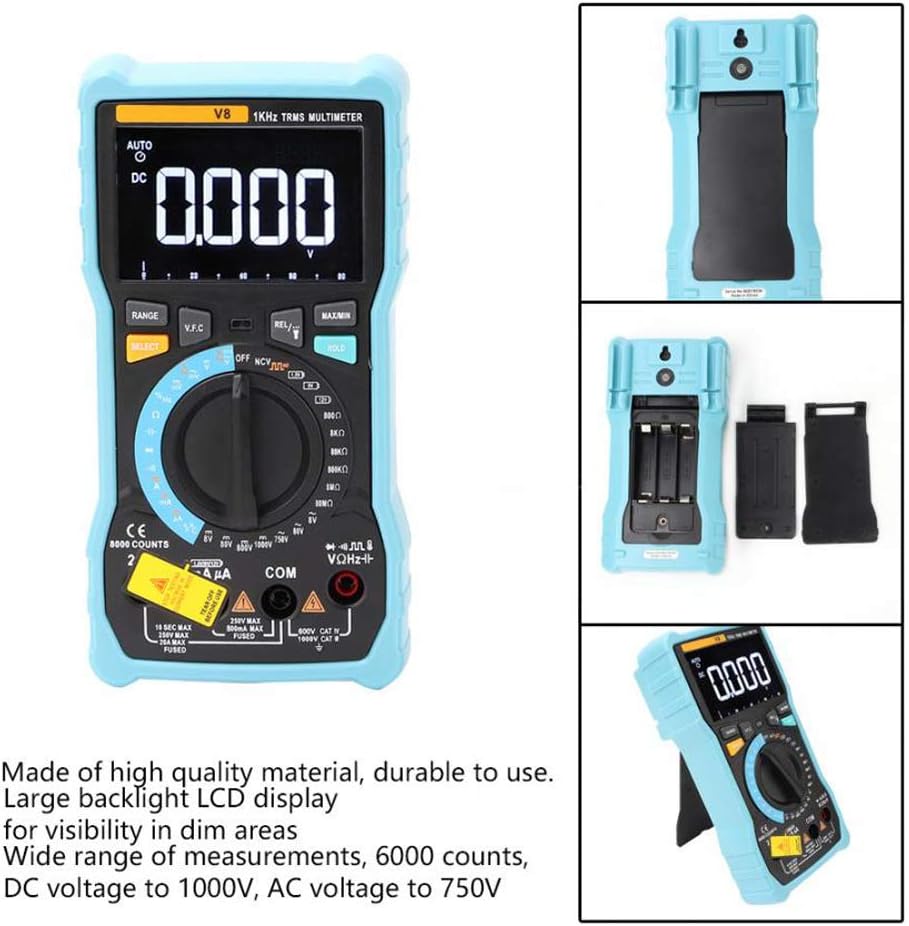
Imej: Bahagian belakang view of the multimeter with the battery compartment open, illustrating the correct placement for three AA batteries.
4. Arahan Operasi
Before any measurement, ensure the test leads are correctly inserted into the input jacks and the rotary switch is set to the appropriate function.
4.1 Measuring DC/AC Voltage
- Set the rotary switch to the 'V–' (DC Voltage) or 'V~' (AC Voltage) kedudukan.
- Connect the red test lead to the 'VΩmA' jack and the black test lead to the 'COM' jack.
- Sambungkan petunjuk ujian secara selari dengan litar atau komponen yang ingin anda ukur.
- Baca voltagnilai e pada paparan.
4.2 Measuring DC/AC Current
- Set the rotary switch to the 'A–' (DC Current) or 'A~' (AC Current) position. For milliampere (mA) atau mikroampere (µA) measurements, select the corresponding range.
- For current up to 800mA, connect the red test lead to the 'VΩmA' jack. For current up to 20A, connect the red test lead to the '20A' jack. Connect the black test lead to the 'COM' jack.
- Disconnect power to the circuit. Open the circuit where you want to measure current. Connect the multimeter in series with the circuit.
- Apply power to the circuit and read the current value on the display.
4.3 Mengukur Rintangan
- Set the rotary switch to the 'Ω' (Resistance) position.
- Connect the red test lead to the 'VΩmA' jack and the black test lead to the 'COM' jack.
- Ensure the circuit is de-energized and all capacitors are discharged. Connect the test leads across the component to be measured.
- Baca nilai rintangan pada paparan.
4.4 NCV (Not-Contact Voltage) Pengesanan
- Tetapkan suis putar ke kedudukan 'NCV'.
- Move the top end of the multimeter near the conductor or outlet.
- The multimeter will emit an audible beep and the NCV indicator light will flash if AC voltage is detected, indicating the presence of live voltage tanpa sentuhan fizikal.
4.5 Pengukuran Suhu
- Set the rotary switch to the '°C/°F' (Temperature) position.
- Connect the temperature probe to the 'VΩmA' and 'COM' jacks, observing polarity if applicable.
- Letakkan hujung probe suhu pada atau berhampiran objek yang suhunya ingin diukur.
- Baca nilai suhu pada paparan.
4.6 Fungsi Lain
- Kapasitansi: Set the rotary switch to the 'F' position. Connect leads across the discharged capacitor.
- Frequency/Duty Cycle: Set the rotary switch to the 'Hz/%' position. Connect leads to the signal source.
- Ujian Diod: Set the rotary switch to the 'Diode' position. Connect leads across the diode.
- Ujian Kesinambungan: Set the rotary switch to the 'Continuity' position. Connect leads across the circuit. An audible beep indicates continuity.
- Ujian Bateri: Set the rotary switch to the 'Battery' position. Connect leads to the battery terminals (1.5V, 9V, or 12V).
- Pegangan Data: Tekan butang 'HOLD' untuk membekukan bacaan semasa pada paparan. Tekan sekali lagi untuk melepaskan.
- Lampu latar/lampu suluh: Press the backlight button to turn on/off the display backlight or flashlight.
- Auto Matikan: Multimeter akan dimatikan secara automatik selepas tempoh tidak aktif untuk menjimatkan hayat bateri.
5. Penyelenggaraan
5.1 Pembersihan
Lap kes dengan iklanamp kain dan detergen lembut. Jangan gunakan bahan pelelas atau pelarut. Pastikan terminal input bebas daripada kotoran dan lembapan.
5.2 Penggantian Fius
Jika fungsi pengukuran semasa gagal, fius mungkin memerlukan penggantian. Rujuk spesifikasi untuk jenis fius dan kadaran yang betul. Penggantian fius hanya boleh dilakukan oleh kakitangan yang berkelayakan.
5.3 Penyimpanan
When not in use for extended periods, remove the batteries to prevent leakage and store the multimeter in a dry, cool place.
6. Penyelesaian masalah
- Tiada Paparan: Periksa pemasangan bateri dan cas. Gantikan bateri jika perlu.
- Bacaan yang salah: Ensure the rotary switch is set to the correct function and range. Check test lead connections. Verify battery charge.
- Pengukuran Semasa Tidak Berfungsi: Check the fuse. Replace if blown (refer to fuse replacement section).
- NCV Tidak Mengesan: Ensure the NCV function is selected and the multimeter is close enough to the AC voltage sumber.
7. Spesifikasi
| Parameter | Nilai |
|---|---|
| Paparan | 8000 Counts LCD with Backlight |
| DC Voltage (V) | 8.000V / 80.00V / 800.0V / 1000V |
| DC Voltage (mV) | 800mV |
| Vol. ACtage (V) | 8.000V / 80.00V / 750V |
| Vol. ACtage (mV) | 800mV |
| Arus DC (A) | 8.000A / 20.00A |
| Arus DC (mA) | 8.000mA / 80.00mA / 800.0mA |
| Arus DC (µA) | 800µA / 8000µA |
| AC Semasa (A) | 8.000A / 20.00A |
| AC Semasa (mA) | 8.000mA / 80.00mA / 800.0mA |
| Arus AC (µA) | 800µA / 8000µA |
| Rintangan | 800.0Ω / 8.000kΩ / 80.00kΩ / 800.0kΩ / 8.000MΩ / 80.00MΩ |
| Kapasitansi | 9.999nF / 99.99nF / 999.9nF / 9.999µF / 99.99µF / 999.9µF / 9.999mF / 99.99mF |
| Kekerapan | 9.999Hz / 99.99Hz / 999.9Hz / 9.999kHz / 99.99kHz / 999.9kHz / 9.999MHz |
| Kitaran Tugas | 1% ~ 99% |
| Julat Suhu | -20°C ~ 1000°C (-4°F ~ 1832°F) |
| Ujian Bateri | 1.5V / 9V / 12V |
| Bermula | Auto / Manual |
| Kadar Kemas Kini | 3 kali / saat |
| RMS sebenar | ya |
| Pegangan Data | ya |
| Lampu latar/lampu suluh | ya |
| Makluman Bateri Rendah | ya |
| Auto Matikan | ya |
| bahan | ABS / PVC |
| Sumber Kuasa | Dikuasakan Bateri |
8. Waranti dan Sokongan
This product is covered by a standard manufacturer's warranty against defects in materials and workmanship. Please refer to the warranty card included with your purchase for specific terms and conditions. For technical support or service inquiries, please contact your retailer or the manufacturer's customer service department.
9. Video Produk Rasmi
Tiada video produk rasmi daripada penjual tersedia untuk dibenamkan pada masa ini.