1. Pengenalan
Terima kasih kerana membeliasing the Ematic LED Projector. This manual provides essential information for setting up, operating, and maintaining your projector to ensure optimal performance and longevity. Please read this manual thoroughly before using the product and retain it for future reference.
2. Maklumat Keselamatan
To prevent fire or electric shock, do not expose this appliance to rain or moisture. To avoid electric shock, do not open the cabinet. Refer servicing to qualified personnel only.
- Jangan lihat terus ke dalam kanta projektor apabila lamp sedang aktif.
- Pastikan pengudaraan yang betul di sekitar projektor. Jangan halang bukaan pengudaraan.
- Gunakan hanya penyesuai kuasa yang dibekalkan dengan projektor.
- Jauhkan projektor daripada air atau sebarang cecair.
- Do not place the projector on an unstable surface.
- Cabut palam projektor daripada soket kuasa semasa ribut petir atau apabila tidak digunakan untuk jangka masa yang lama.
3. Kandungan Pakej
- Ematic LED Projector
- Alat Kawalan Jauh
- Penyesuai Kuasa
- Manual Pengguna
- AV Cable (if included)
4. Produk Lebihview
4.1 Depan View
Rajah 4.1: Depan view of the Ematic LED Projector, highlighting the projection lens.
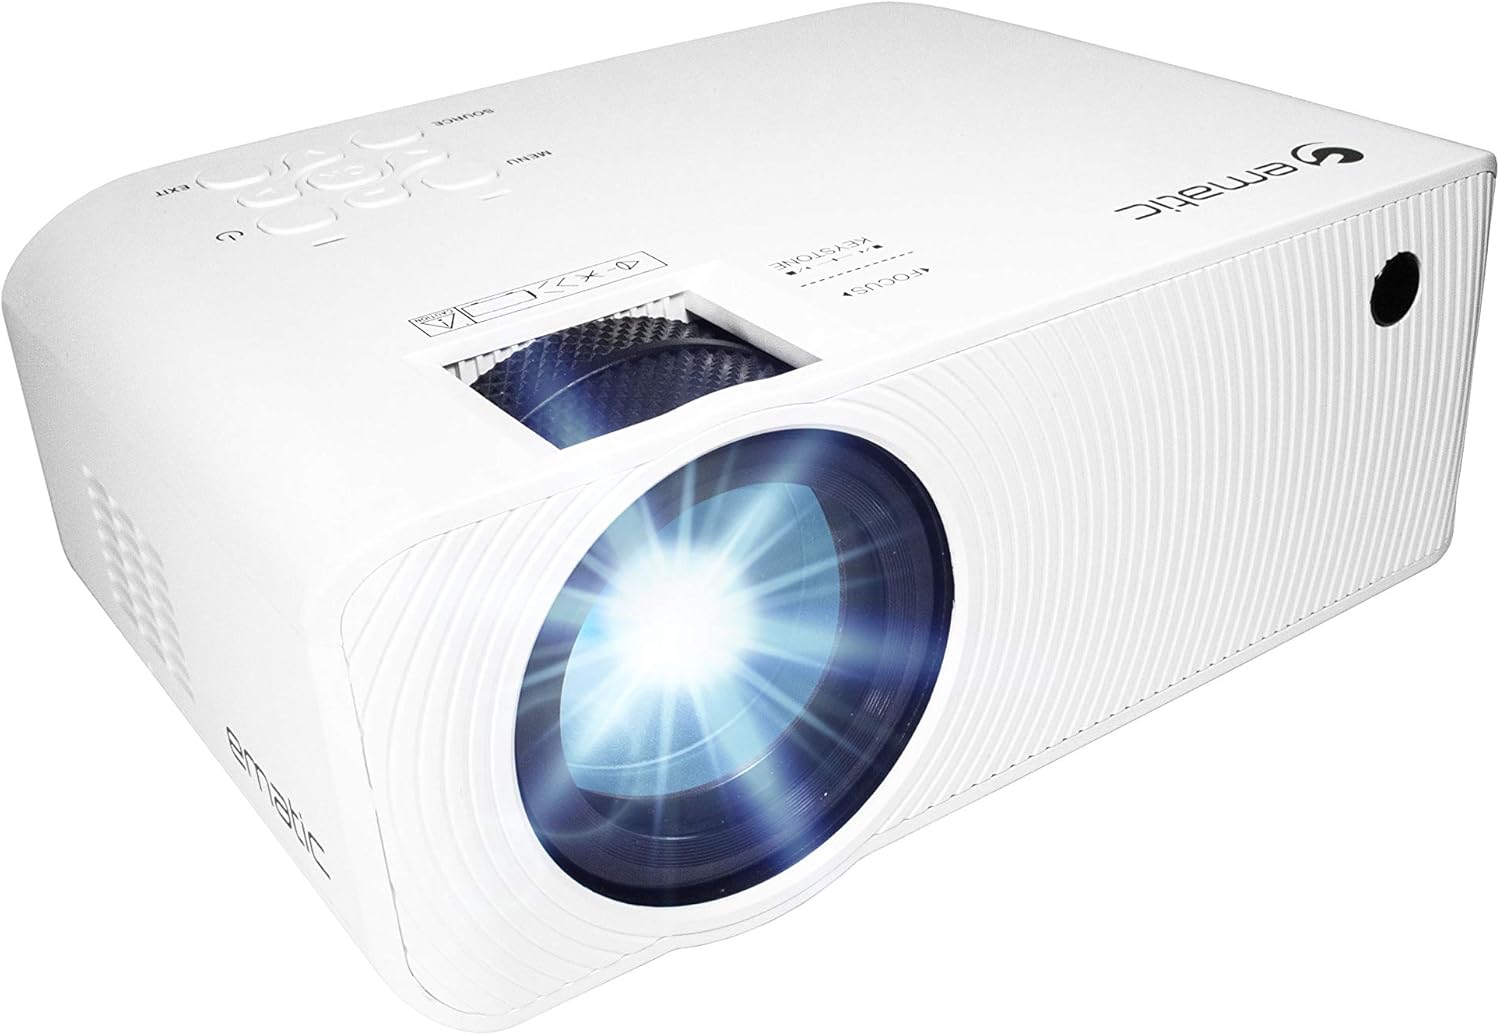
4.2 Atas View dan Kawalan

Rajah 4.2: Atas view of the projector showing the control panel (Menu, Source, Exit, Navigation buttons) and the Focus and Keystone correction dials. A remote control is also visible.
- Cincin Fokus: Melaraskan kejelasan imej.
- Pembetulan Keystone: Membetulkan herotan imej trapezoid.
- Panel Kawalan: Buttons for Menu, Source selection, Exit, and navigation.
4.3 Belakang dan Sisi Views dengan Pelabuhan

Figure 4.3: Rear panel of the projector displaying the connectivity options: AUX audio output, AV input, MicroSD card slot, two HDMI inputs, USB port, and DC power input.

Rajah 4.4: Sisi view of the projector, highlighting the VGA input port and the infrared (IR) receiver for the remote control.
- AUX: 3.5mm audio output for external speakers or headphones.
- DARI: Composite video and stereo audio input.
- MicroSD: Slot for MicroSD memory cards.
- HDMI 1 / HDMI 2: High-Definition Multimedia Interface inputs for digital audio/video.
- USB: USB port for media playback from USB drives.
- DC DALAM: Input kuasa untuk projektor.
- VGA: Video Graphics Array input for computer connection.
5. Persediaan
- penempatan: Place the projector on a stable, flat surface. Ensure there is adequate space around the projector for ventilation. For optimal viewing, position the projector perpendicular to the projection screen or wall.
- Sambungan Kuasa: Connect the supplied power adapter to the DC IN port on the projector and then plug the adapter into a power outlet.
- Kuasa Awal Hidup: Tekan butang kuasa pada projektor atau alat kawalan jauh untuk menghidupkan unit. Lampu penunjuk kuasa akan menyala.
- Pelarasan Fokus: Once the projector is on, rotate the Focus Ring (refer to Figure 4.2) until the projected image is clear and sharp.
- Pembetulan Keystone: If the image appears trapezoidal (wider at the top or bottom), adjust the Keystone Correction dial (refer to Figure 4.2) until the image is rectangular.
6. Arahan Operasi
- Menghidupkan/Mematikan: Press the power button on the projector or remote control. Press again to turn off.
- Pemilihan Sumber Input: Press the "Source" button on the projector or remote control to cycle through available input sources (HDMI 1, HDMI 2, AV, VGA, USB, MicroSD). Select the desired input.
- Navigasi Menu: Press the "Menu" button to access the projector's settings. Use the navigation buttons on the projector or remote to browse options and the "OK" button to confirm selections.
- Media Playback (USB/MicroSD): Insert a USB drive or MicroSD card into the respective port. Select "USB" or "MicroSD" as the input source. The projector will display a file browser. Navigate to your desired media file (video, photo, music, text) and press "OK" to play.
- Output Audio: The projector has built-in speakers (refer to Figure 6.1). For external audio, connect headphones or external speakers to the AUX port (3.5mm audio jack).

Figure 6.1: Projector highlighting its built-in speaker functionality.
7. Ketersambungan
The Ematic LED Projector offers multiple connection options to various devices, ensuring versatility for your entertainment and presentation needs.

Figure 7.1: Multimedia device compatibility chart for the projector.

Gambar 7.2: Cthamples of projector connections to a laptop and smartphone, highlighting supported input types.
- HDMI: Connect Blu-ray players, game consoles (PS4, Xbox), streaming devices (Amazon Fire TV Stick, Chromecast), laptops, and other HDMI-enabled devices.
- USB: Mainkan media files (videos, photos, music) directly from USB flash drives.
- MicroSD: Mainkan media files directly from MicroSD memory cards.
- DARI: Connect older devices like DVD players or VCRs using the included AV cable.
- VGA: Connect desktop computers or older laptops.
- Audio Out (AUX): Connect external speakers or headphones for enhanced audio experience.
8. Penyelenggaraan
- Pembersihan Kanta: Gunakan kain lembut dan bebas lin yang direka khusus untuk kanta optik untuk mengelap kanta projektor dengan perlahan. Jangan gunakan pembersih yang melelas atau kekerasan yang berlebihan.
- Penyingkiran habuk: Regularly clean the ventilation grilles with a soft brush or compressed air to prevent dust buildup, which can affect performance and lifespan.
- Pembersihan Luaran: Wipe the projector's exterior with a soft, damp kain. Elakkan menggunakan bahan kimia yang keras.
- Storan: When not in use for extended periods, store the projector in a cool, dry place, ideally in its original packaging or a protective case, to prevent dust accumulation and damage.
9. Penyelesaian masalah
| Masalah | Kemungkinan Punca | Penyelesaian |
|---|---|---|
| Tiada imej ditayangkan | No power; Incorrect input source; Cable not connected properly. | Check power connection; Select correct input source; Reconnect cables securely. |
| Imej kabur | Fokus tidak dilaraskan; Projektor terlalu jauh/dekat dengan skrin. | Adjust the Focus Ring; Adjust projection distance. |
| Imej adalah trapezoid | Keystone not adjusted; Projector not level. | Adjust the Keystone Correction dial; Ensure projector is on a flat surface. |
| Tiada bunyi | Volume too low; Muted; External speakers not connected or off. | Increase volume; Unmute; Check external speaker connection and power. |
| Alat kawalan jauh tidak berfungsi | Batteries dead; Obstruction between remote and IR receiver. | Gantikan bateri; Tanggalkan halangan; Halakan alat kawalan jauh terus pada penerima IR projektor. |
10. Spesifikasi
| Ciri | Perincian |
|---|---|
| Jenama | Ematic |
| Model | EMP-720 (Generic) |
| Resolusi Paparan | 1280 x 720 (Asli) |
| Teknologi Ketersambungan | HDMI, USB, AV, VGA, MicroSD, AUX |
| Ciri Khas | Pembesar Suara Mudah Alih Terbina Dalam |
| Berat Barang | 3.5 paun |
| Dimensi Produk | 13.85 x 5 x 8.8 inci |
| Lamp kehidupan | Up to 20,000 hours (Normal Mode) |
11. Waranti dan Sokongan
For warranty information and technical support, please refer to the warranty card included with your product or visit the official Ematic webtapak. Simpan bukti pembelian anda untuk tuntutan waranti.
Ematic Customer Support: www.ematic.us/support (Cthample Link)


